This camera manual library is for reference
and historical purposes, all rights reserved.
This page is copyright© by
This page may not be sold or distributed without
the expressed permission of the producer
On-line camera manual library
If you find this manual useful,
how about a donation of
$3 to:
M. Butkus, 29 Lake Ave.,
High Bridge, NJ 08829-1701
and send your e-mail
address
so I can thank you.
Most other places would charge
you $7.50 for
a electronic copy
or $18.00 for a hard to read Xerox copy.
If you use Pay Pal, use the link below.
Use the above address for a check, M.O. or cash.
Problems
opening PDF files or printing problems
- click here
CLICK HERE FOR A PDF OF
CHINON Auto S-240
made from HTML file
We thank you for selecting Chinon flash unit.
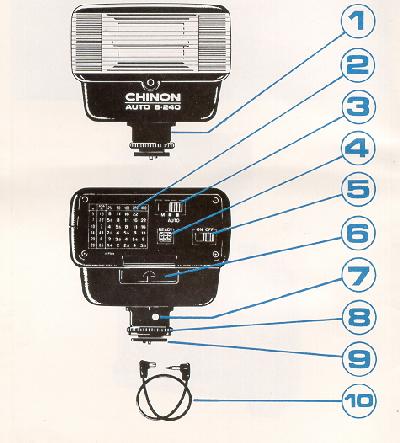
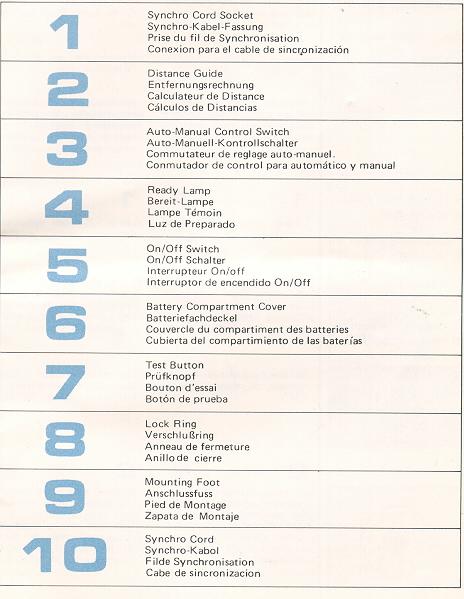
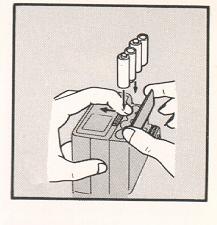
Remove Battery Compartment Cover and insert AA size
batteries according to the diagram inside.
Close the battery compartment cover.
Caution: Incorrect insertion of the batteries will prevent proper operation of the flashlight, and may cause damage!
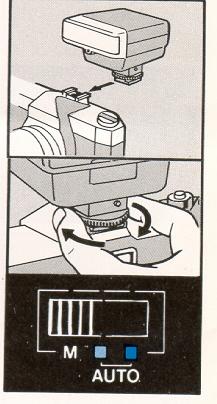
Loosen the Lock Ring.
Insert the Mounting Foot of your flash into the camera's accessory Shoe Clip. Then tighten the flash with the Lock Ring.
Set the Auto-Manual Control Switch to manual marked "M".
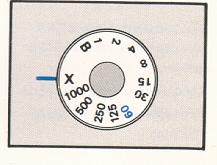
Set the shutter speed of your camera to the proper
setting for electronic flash use, or to 1/60seconds. Many camera have an
X for flash sync.
(Read your camera owner's manual for details on
the flash synchronization.)
If your camera has a hot shoe contact, your flash is now fully synchronized with the camera through the center contacts in the camera's shoe. In this case the Synchro Cord is not necessary.
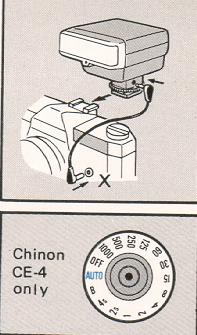
If you have Chinon CE4 camera, you no longer have to alter the shutter speed from the auto position since the flash is integrated electronically with the camera body. (Do not use any other brand from another manufacture as the extra contacts are not standard)
If the camera has not the hot shoe contact, use the Synchro Cord which comes with your flash unit.
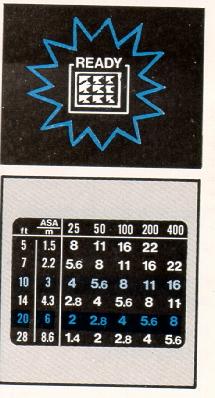
Switch the flash unit on and take a picture after
the Ready Lamp glows. The flash picture taking distance is indicated on
the Distance Guide,
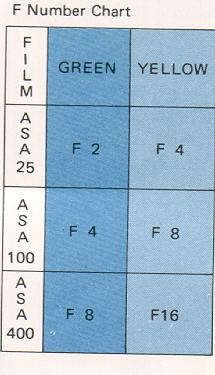
Formula for f-stop: Use this handy formula for figuring
out the f-stop.
Guide Number divided by Distance = Lens Aperture
(F-stop) Remember each flash unit has it's own guide number.
The higher the guide number, the more powerful the flash is and most likely
more expensive.
Example: When using a ASA 100 film and standing 18 feet from a subject.
Set the lens f-stop to f4, (24 divided by 6 = 4).
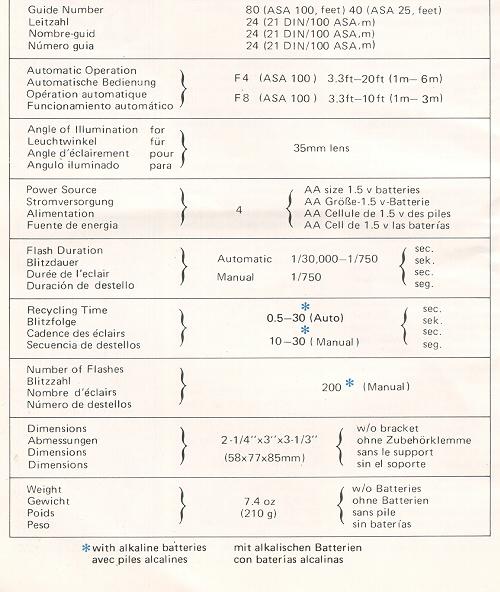
Guide number is shown in Specification on the last page of this instruction manual.
When used for automatic flash photography, your flash automatically controls light output and sets the correct exposures for the subject within the automatic range. Once you set the aperture (f stop) on your camera, there is no need to change it again while taking pictures within the available automatic range.
Your S-240 Flash is equipped with a thyristor circuit which automatically determines and shoots only the necessary light output for a short, conserving the rest battery power.
If the flash-to-subject distance is close, the "Ready Lamp" glows in a fraction of a second to be ready for the next shot so that you can take many flashes from a single battery charge.
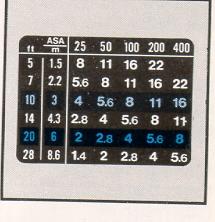
You can find the yellow-color and green-color numbers in meters and feet on the Distance Calculator Diagram, indicating the dual automatic range. Once you set the aperture on your camera, there is no need to change it again while taking pictures within the available automatic range.
1. Set your camera to the proper speed setting for
electronic flash. All Chinon cameras are 1/60 second.
(Refer to your camera owner's
manual.)
2. Set the Auto-Manual Control Switch on the back
of your flash to Yellow position for flash distance up
to 10 ft (3 m), or to Green position
for distance in excess 10 ft but less than 20 ft (6 m)
3. Consult the exposure table on the back of your
flash. The lens aperture of Yellow or Green colored
row are to be set according to
the distance and the ASA or DIN film speed corresponding to the
film in your camera. (Ex. When
using ASA 100 film set your camera's f-stop at f 8 for Yellow range
and at f 4 for Green range).
4. Slide the On-Off switch to "ON" and focus your
camera. Take the picture after the "Ready Lamp"
glows. (Note: If You have a flashmatic
camera, You cannot use the automatic operation but have to follow the manual
operation).
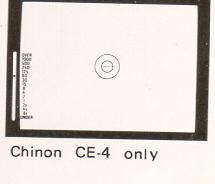
5. If you have Chinon CE4 camera, it has a special viewfinder ready-light system which is electronically coupled to the auto flash. When the flash has reached adequate power, the viewfinder 1/60 #C. shutter speed indicator (LED) will flash signaling the camera and the flash are ready to operate.
Hints for Maintenance and Better Flash Photography:
The use of flash eliminates "squinting and shadows" and helps bring out natural facial expressions on the subject. When taking pictures, avoid shooting into highly reflective surface like mirrors, glass or glittering water.
If you have to shoot a subject with such reflectors behind, use the automatic operation for flash or shoot from a different angle so that any reflections do not directly go into the camera lens.
When not in use, switch the unit off. Take the batteries out when the flash unit is being stored or when it will be carried during a long time.
Keep your flash unit away from dust and moisture to prolong its life. It is a good idea to bring out your flash unit from storage and "TEST FLASH" it once or twice a month.
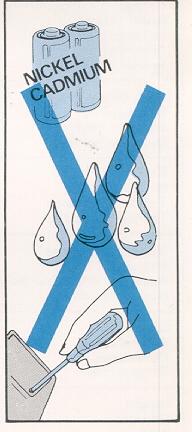
Do not use Nickel Cadmium batteries (Webmaster: I never had any problem after years with NC batteries, the new alkaline are better than the NC batteries anyway)
Do not try to open or repair your flash unit since the electric circuit inside carries a high voltage. If your flash needs repair or does not work correctly, take it to where You bought it from. Opening the unit voids the warranty. (Webmaster: after these years, there is little hope of repair at a reasonable expense)