have Through-the-Lens (TTL) flash.
This camera manual library is for
reference and historical purposes, all rights reserved.
This page is copyright© by
This page may not be sold or distributed without
the expressed permission of the producer
The CP-9AF is similar except this does not Auto Focus or
have Through-the-Lens (TTL) flash.
This camera manual library is for
reference and historical purposes, all rights reserved.
This page is copyright© by ![]() ,
M. Butkus, N.J.
,
M. Butkus, N.J.
This page may not be sold or distributed without
the expressed permission of the producer
Click on the links below for different languages
If you find this manual useful,
how about a donation of
$3 to:
M. Butkus, 29 Lake Ave.,
High Bridge, NJ 08829-1701
and send your e-mail
address
so I can thank you.
Most other places would charge
you $7.50 for
a electronic copy
or $18.00 for a hard to read Xerox copy.
If you use Pay Pal, use the link below.
Use the above address for a check, M.O. or cash.
Back to my main camera manuals page
CLICK
HERE FOR A PDF FILE OF
CHINON CP-7M English Pt. 1
CHINON CP-7M
Bedienungsanleitung
CHINON CP-7M Mode D'Emploi
CHINON CP-7M Manual de
Instrucciones
CHINON CP-7M English Pt. 2
CHINON CP-7M Bedienungsanleitung
CHINON CP-7M
Mode D'Emploi
CHINON CP-7M Manual de Instrucciones
Chinon CP-7m PDF version of this HTML manual
Chinon CP-7m
Bedienungsanleitung - HTML
Chinon CP-7m Mode D'Emploi - HTML
Chinon CP-7m Manual de Instrucciones - HTML
TABLE OF CONTENTS
|
Noncenclature Specifications Data panel Shoulder strap instructions Lens mounting Battery installation Battery testing Main switch Shutter release Film loading Setting the exposure mode Three-stage programmed AE Mode reset button Focusing Unloading exposed film Flash photography |
Self-timer operation Exposure Modes: I. Three-stage programmed AE mode II. Taking pictures in A mode III. Taking pictures in M mode Exposure adjustment Setting the film speed AE lock Multiple exposure "Bulb" operation (B mode) Interval timer Depth of field Infrared photography Memory storage Optional accessories Care of the camera |
NOMENCLATURE
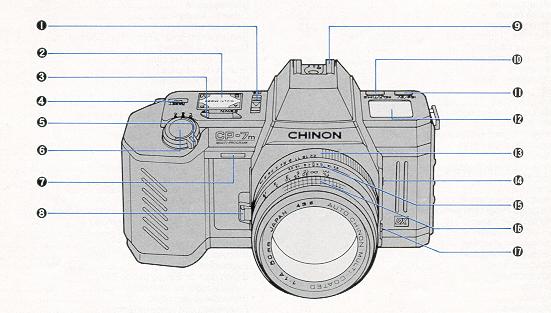 |
1) Multiple exposure (M.E.) switch 2) Exposure mode elector 3) UP/DOWN button 4) Mode reset button 5) Main switch 6) Shutter release button 7) Self-timer LED 8) Lens lock release lever |
|
9) Accessory shoe (hot shoe) 10) SELF/TIME button 11) ISO/EV button 12) Data panel 13) Aperture ring 14) Cable release socket 15) Depth of field scale 16) Focusing ring |
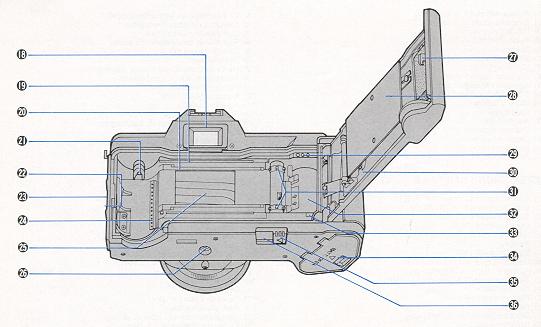
17) AE lock button 18) Viewfinder eyepiece 19) Film guide rail 20) Film rail 21) Rewind shaft |
 |
|
22) Back cover release lever 23) Back cover release button 24) DX film contacts 25) Focal plane shutter 26) Tripod socket 27) Film window 28) Film pressure plate 29) Data back contacts |
30) Camera back 31) Sprocket 32) Take-up spool 33) Leader index 34) Battery compartment cover 35) Rewind button 36) Rewind switch protection cover |
SPECIFICATIONS
Manual Setting: ISO 25~5000 for non DX coded film
Exposure Compensation: -4.0 EV to +4.0 EV with 1/2 EV increments (for DX coded film)
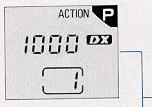
Action: The program designed for fast-moving objects. The lens aperture stays open up to the shutter speed of 1/500 sec. Between 1/500 and 1/2000 sec. the aperture varies in accordance with the programmed shutter speed.
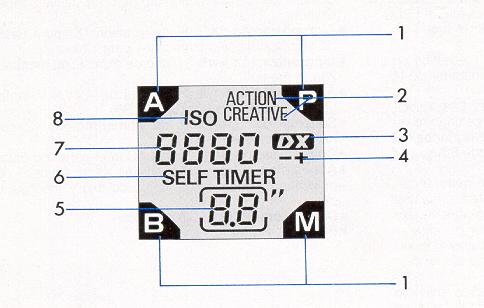
The CP-7m is equipped with a large LCD panel that displays important camera function information.
1 ) Exposure modes
2) Three stage program modes
3) DX film mark
4) Exposure compensation reminder
5) Film counter/self-timer countdown/"bulb" and "interval timer" elapsed time
6) Self-timer indication
7) Shutter speed/film speed indication
8) ISO mark
VIEWFINDER
Inside the viewfinder, essential information is displayed by multicolored digital LEDs.
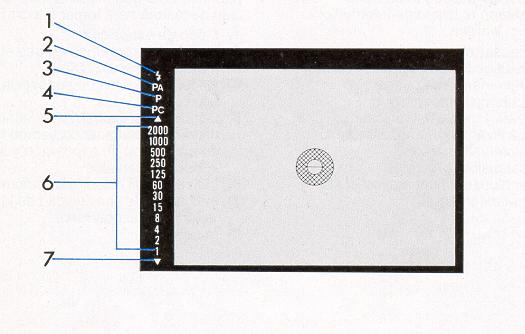 |
1.) Flash ready LED (red) |
SHOULDER STRAP INSTRUCTIONS
LENS MOUNTING

Your CP-7m is equipped with a universal bayonet mount which accepts all
interchangeable lenses
with "K", "KA" or "RK" bayonet mounts.
BATTERY INSTALLATION
The CP-7m uses four (4) AA size 1.5 V alkaline batteries or a 6 V lithium
battery (2CR-5 type).
Number of Film Cartridges:
When using a roll of 36 - exposure film, the following data was observed
during laboratory testing.
| Lithium battery (2CR-5) | Four 1.5 V AA - size alkaline batteries |
| 150 rolls | 80 rolls |
NOTE: Although "AA" type Ni-Cad rechargeable battery can be used, their performance will be very limited. Make sure that the Ni-Cad battery can be fitted easily into the CP-7m without undue force.
BATTERY TESTING
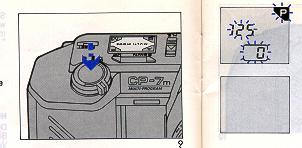
Set the main switch to the "S" or "C" position, and depress the shutter
release halfway (Fig. 9). Fresh batteries should be installed in any of the
following cases. When all displays on LCD data panel blink. When shutter
release button is depressed all the way down, the shutter will not release and
all displays on LCD panel and LED indication in the viewfinder will not light
up.
MAIN SWITCH (S/C Mode Selector)
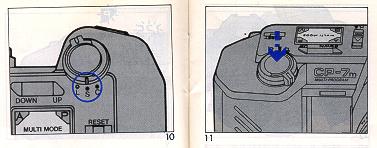
To prevent accidental exposures and to conserve battery power, the main switch
should be set to the "L" position. When the main switch is set to the "L"
position, all the electric circuitry is shut off and the shutter release is
locked. The LCD display panel will be switched off. To operate the camera, set
the main switch to the "S" or "C" position (Fig. 10). S -
Single-frame mode: film is advanced one single frame after each exposure.
C - Continuous mode: film is advanced continuously at up to two and
half frames per second as long as the shutter release button is kept fully
depressed.
SHUTTER RELEASE
The CP-7m features a two-stage electromagnetic shutter release (Fig. 11).
1. When the shutter release button is depressed halfway, the electronic
circuitry (including the LCD data panel and viewfinder LEDs) starts
functioning. The meter and information display remain on for 12 seconds after
you lift your finger from the button
2. When the button is fully depressed, it will trigger the shutter
FILM LOADING
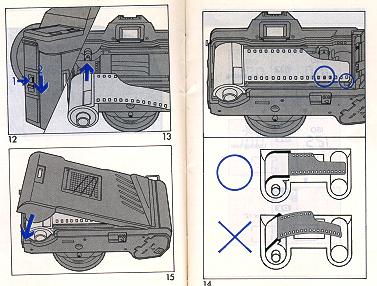
1. Set main switch to the "S" or "C" position.
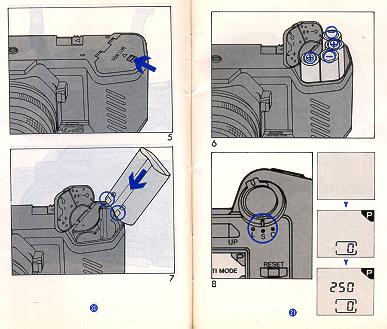
2. Open the back cover by pressing the back cover release button and sliding the back cover release lever downward (Fig. 12).
3. Insert a film cartridge into the film chamber with the protruding end of the cartridge positioned toward the bottom of the camera (Fig. 13).
4. Extend the trimmed end of the film up to the yellow leader index. Make sure that the lower perforations of the film engage the teeth on sprocket (Fig. 14).
5. Close the camera back firmly until it locks with a click (Fig. 15).
6. The camera will automatically advance the film to the first frame, and
"1 " will appear in the frame counter in the LCD panel.
If the frame counter still shows "O", open the back cover and re-load the film
properly.
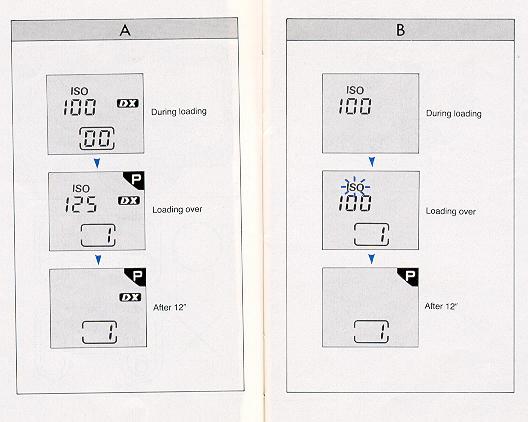
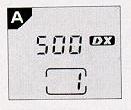
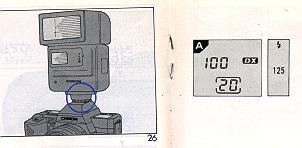
With DX film, ISO number will appear during loading. When loading is
completed, the DX mark and the metered data (shutter speed) are displayed and
the film speed is automatically set. The metered data (shutter speed) remains
displayed for 12 seconds. picture (A)
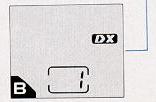
With non-DX film, after loading is completed, the data panel will display the
ISO mark blinking for 12 seconds, indicating to set the correct film speed.—
(B)
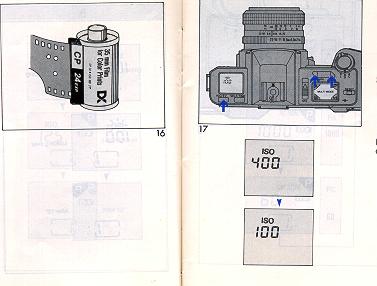
SETTING THE FILM SPEED
SETTING THE EXPOSURE MODE

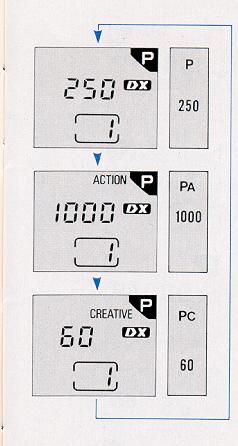
The CP-7m features a three stage programmed AE mode (P -
Program, P. A - ACTION, P.C - CREATIVE),
aperture priority (A) mode, a metered manual (M)
mode and bulb (B) mode. To set the exposure mode, simply
press down the desired mode at the corner of the exposure mode selector. One
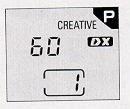
press on P mode will result in normal "P", another press in "P
- ACTION" and a third press in "P - CREATIVE" (Fig. 18). See
EXPOSURE MODES for further details.
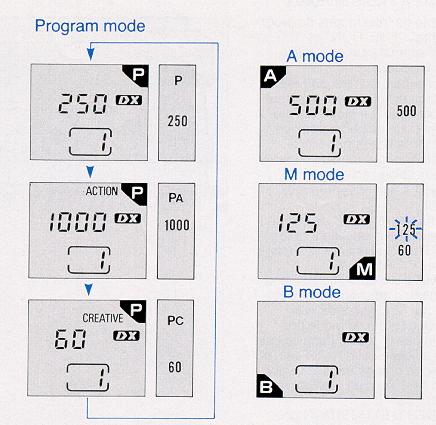
THREE-STAGE PROGRAMMED AE
The CP-7m is equipped with three program modes of normal "P",
"P - ACTION" and "P - CREATIVE". Normal "P"
mode can be used in most cases.
The CP-7m automatically selects the most suitable combination of shutter speed and aperture for the optimum exposure. The programmed AE mode is ideal for general picture taking by shooting very quickly and easily, eliminating troublesome exposure setting according to light conditions.
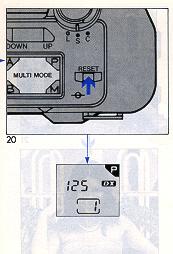
MODE RESET BUTTON
 |
 |
 |
 |
 |
When you want to quickly set the camera to the normal Program mode from P - ACTION, P - CREATIVE, A, M or B. simply press and release the mode reset button.
1. The mode reset button pressed and released, exposure mode is set to the normal Program and "P" is displayed in data panel and "P" LED lights up in the viewfinder (Fig. 20). Any exposure adjustment and self-timer are canceled.
2. When the mode reset button is pressed and released, the metered shutter speed in the normal "P" mode is displayed in the data panel for 12 seconds. When the mode reset button is pressed and released after the self-timer is activated the metered shutter speed is displayed in the data panel for one second: the self-timer is cancelled without exposing a frame.
FOCUSING
At the center of the viewfinder is a split image with microprism collar which
is then surrounded by a ground glass. When the camera is In focus, the image
on three focusing aids becomes sharpest. While observing the subject through
the viewfinder, turn the lens focus ring until the upper and lower split
images match up to form a uniform image (Fig. 21). This split image focusing
is particularly helpful when the subject is dominated by vertical lines. The
microprism is also very helpful; when out of focus; the image on the
microprism will be composed of a collection of asterisks (Fig. 22). These
sparkling asterisks will disappear when the focus is properly set. You can
double check the focus seeing by the image on the ground glass. You can also
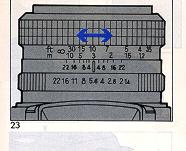
focus indirectly. Actually measure or estimate the distance to the subject and
set the lens focus ring to the appropriate seeing (Fig. 23).
UNLOADING EXPOSED FILM
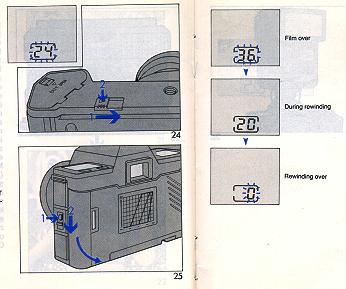
When the film in the camera is fully exposed, the number in the film counter
remains blinking for 12 seconds. All other LCD displays will disappear at this
time.
FLASH PHOTOGRAPHY
The CP-7m is designed with a unique flash system, making flash photography
simple. The CP-7m offers a wide range of uses, such as X sync at 1/100 sec.
with A and M modes, and also slower sync flash photography possibility.
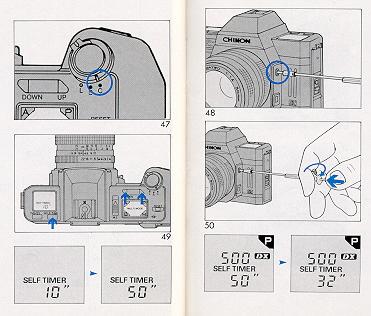
SELF-TIMER OPERATION
The CP-7m is equipped with an electronic self timer with a red LED and a unique "up to 90 minute" setting. Film is automatically advanced one frame after the exposure is completed.
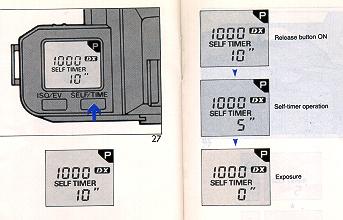 |
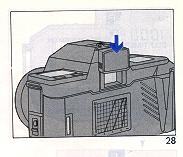
1. Press the SELF/TIME button to activate self-timer for a 10 seconds delay (Fig. 27). 2. Focus the subject and depress the shutter release
bottom The self-timer LED |
To cancel operation: Press the ISO/EV button. After the
self-timer operation has
started, you can cancel it by pressing the SELF/TIME button, however,
self-timer
mode still remains in effect. You can also cancel it by pressing the mode
reset button, but the exposure mode is set to the normal "P" mode after
cancellation.
NOTE:
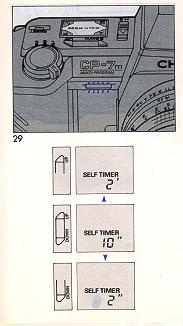
2. The self-timer LED starts blinking with 10 seconds remaining prior to exposure and stays lit at 2 seconds prior to the exposure (Fig. 29).
3. If you wish to see the frame counter during self-timer operation, press the UP/DOWN button in either end.
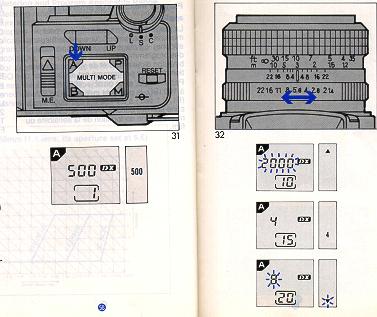
EXPOSURE MODES:
I. Three-stage Programmed AE Mode
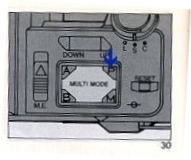
The CP-7m is designed with a three-stage program, which gives you greater
photographic versatility: select any program based on your photographic
needs (Fig. 30, Table A).
Programmed AE Signal and Aperture Setting
Unlike other program cameras, the CP-7m functions perfectly with "K" (even "KA" or "RK") mount lenses even in program mode. Generally, you should set the aperture at its minimum seeing. Although you can take a perfectly exposed picture at any aperture setting, the applicable programmed range is limited. The program AE signal LED is useful to check the lens aperture seeing for program modes. The programmed AE viewfinder LED for P. PA or PC in use will "flicker" when the lens aperture is within four stops of the full maximum aperture. Set the aperture within the range so that the programmed AE signal LED will not "flicker". On the other hand, if you would not stop down any further than a particular f/stop, simply set the aperture ring to the desired aperture.
Metering and Program Applicable Range
Metering range is a range which the exposure meter (a silicon blue cell) can obtain a properly exposed image. The program applicable range is a range where the program combination of aperture and shutter is applicable. For example, using a 50 mm F1.4 lens at ISO 100, the metering range is EV+1 (F1.4, 1 sec.) to EV+20 (F22, 1/2000 sec.), darkened area in TABLE A. The metering range varies according to film speed.
II. Taking pictures in the A mode
After you have set the exposure mode selector to "A" and
selected the desired aperture, the camera will automatically select the
required stepless shutter speed from 8 sec. to a fast 1/2000 sec. The "A"
mode is convenient for taking pictures at specific aperture settings based
on your individual needs.
F-Stop Number Guide
The following f-stop settings are general guidelines for your use.
With ISO 100 film
| Lighting Conditions | F-Stop Number Range |
| Outdoors, sunshine Outdoors, cloudy Indoors |
f/8-22 f/2.8-5.6 f/1.4-2.8 |
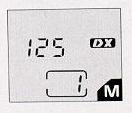
III. Taking Pictures In the "M" Mode
You can manually control the CP-7m by selecting shutter
speeds and/or apertures individually.

EXPOSURE ADJUSTMENT (P, A MODE)
The camera exposure setting may be affected if there is a
big gap between brightness of a main subject and background. This will
result in under or over exposed pictures. In these cases, you should use the
exposure adjustment system. You can also use the system when you wish to
create a deliberate effect of over or under exposure. You can change the
exposure factor up to four full stops either plus or minus in 1/2 EV
(Exposure Value) increments
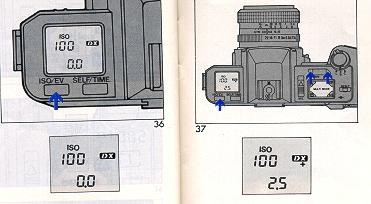
When using DX-coded film
1. Press the ISO/EV button to display ISO number and exposure adjustment (Fig. 36).
2. While pressing the ISO/EV button, press the UP/DOWN button to set your film speed to the desired exposure adjustment position (Fig. 37).
3. Be sure to return the exposure adjustment to "0" after use.
NOTE: "+" and "-" symbols indicate over- and under-exposure respectively.
Press the mode reset button to reset the exposure adjustment to "0".
You can confirm the adjusted value by pressing the ISO/EV bottom
When using non-DX film
The adjusted value will not be displayed. While pressing ISO/EV button, press the UP/DOWN button to change the film sped for the proper exposure adjustment.
Exposure adjustment at ISO 100
| Film speed | Adjusted value |
| ISO 25 ISO 50 ISO 100 ISO 200 ISO 400 |
+2 [EV] + 1 0 -1 -2 |
AE LOCK
Under normal circumstances, the CP-7m will produce
perfectly exposed photographs, due to the integrated automatic exposure
circuitry. However, some lighting conditions might occur that could misguide
the system, such as subjects with a very high contrast or strongly backlit
scenes. In such cases, the AE lock (exposure memory) system should be used.
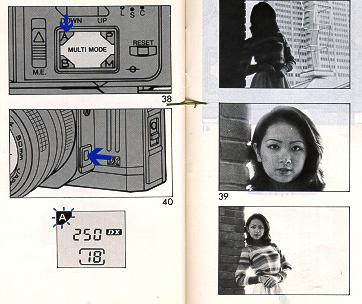
1. Set the exposure mode selector in the "A" position (Fig.
38).
2. Look through the viewfinder and center your subject in the split image/microprism center spot (Fig. 39). If necessary, approach the subject and use the tele-photo seeing when using zoom lenses.
3. While pressing the shutter release button halfway, press the AE lock button (Fig. 40). "A" will blink on the data panel. The exposure (shutter speed) will be memorized as long as the AE lock button is pressed.
4. Focus and compose the subject in the viewfinder as you desire then press the shutter release button all the way to take the photograph.
MULTIPLE EXPOSURE
The CP-7m is equipped with an unlimited multiple exposure
provision.
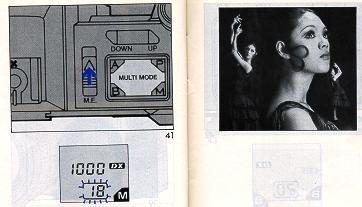
1. Slide the multiple exposure switch in the direction of the arrow (Fig. 41). The film counter frame on the data panel will blink for 12 seconds after the panel is activated by partial depression of the shutter release.
2. Release the shutter to take the picture. The film will not advance and only the shutter will be charged; the film counter will not advance. You can make unlimited multiple exposures on any single frame.
3. Set the multiple exposure switch to the original OFF position after use.
NOTE:
After taking a picture, and if the multiple exposure switch is moved to the
OFF position with the film counter frame blinking, film will be advanced to
next frame. After 12 seconds, the panel indicator will stop blinking. After
that time, if the multiple exposure switch is returned to the OFF position,
partial depression of the shutter release button or pressing any one of the
exposure mode selector, the ISO/EV button or the SELF/TIME button will
result in advancing the film one full frame.
BULB OPERATION (B MODE)
When shooting night scenes or long time exposure for more
than 8 seconds duration, use "B" mode. The reflex mirror
will shift to the open (up) position while the shutter release button is
pressed. Use of a cable release and a tripod is recommended for stability to
prevent vibration during exposures.
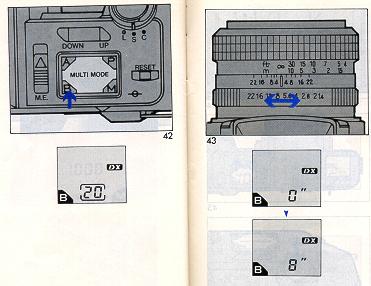
1. Set the exposure mode selector in the "B" position (Fig. 42).
2. Rotate aperture ring to set the desired f/stop (Fig. 43).
3. Press the shutter release button all the way to start the bulb operation. Elapsed exposure time is shown in the frame counter position in seconds up to 60 seconds, and in minute increments from 1 to up to 90 minutes.
NOTE:
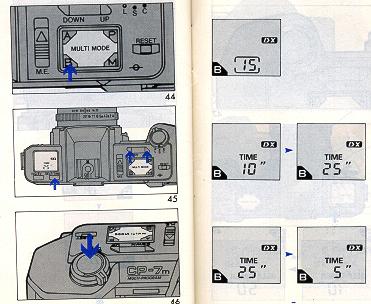
INTERVAL TIMER
The CP-7m features a unique interval timer that can be
set for intervals of up to an incredible 90 minutes.
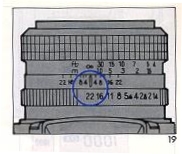
DEPTH OF FIELD
"Depth of field" designates the nearest and furthest
limits of the area that will be sharply defined in the picture in front of
and beyond the subject. Depth of field is controlled by f/ stop ring on the
lens. The larger the lens opening (f/stop), the shallower is the depth of
field. The smaller the lens opening, the greater the depth of field will
become (Fig. 51 ).
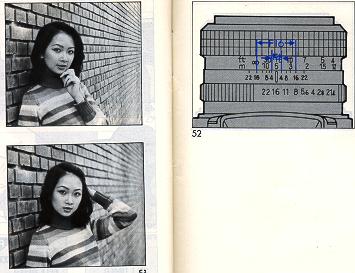
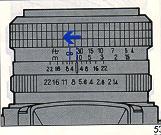
Depth of Field Scale:
The depth of field scale indicates (after focusing) the
approximate area that will be sharp in the picture. Locate on the depth of
field scale the corresponding pair of f/stop figures. The distance between
these two f/ stop figures on the focusing ring will be the area of greatest
sharpness in your picture (Fig. 52).
INFRARED PHOTOGRAPHY
If you intend to take infrared photographs using infrared film and R2 or 02
filter, an extra focusing adjustment must be made. After focusing note the
distance seeing aligned with the focus index, and move that figure over to
the red infrared mark engraved on the lens (Fig. 53). Focus adjustment is
not required when using infrared color films.
NOTE:
Read the instructions packed with the infrared film for further information.
MEMORY STORAGE
The metering display remains on for 12 seconds after the shutter release button has been depressed (halfway), or the exposure mode selector, ISO/EV button or SELF/TIME button is pressed once. After 12 seconds have passed, the metering display will disappear. The CP-7m is equipped with a condenser for memory backup which can store the information of frame number, film speed, exposure mode, exposure adjusted value and shutter speed set at M for up to five hours after the batteries are removed when all displays on LCD data panel comes to flicker (batteries almost exhausted).
OPTIONAL ACCESSORIES
· Standard Lenses
50 mm t/1.4 multicoated
50 mm f/1.7 multicoated
50 mm f/1.9
· Wide angle Lenses
17 mm t/3.5 multicoated
28 mm f/2.8 multicoated
· Telephoto Lenses
135 mm f/2.8 multicoated
300 mm f/5.6 multicoated
500 mm f/8 reflex type
· Zoom Lenses
28-70 mm f/2.8-4.2 multicoated
MACRO
35-80 mm f/3.5-4.8 multicoated
MACRO
35-105 mm f/3.5-4.5 multicoated
MACRO
35-200 mm f/4-5.6 multicoated
70-210 mm f/4-5.6 multicoated
MACRO
75-200 mm f/4-4.8 multicoated
MACRO
75-300 mm f/5.6 multicoated
MACRO
· Auto Focus Lens
35-70 mm f/3.5-4.5 multicoated
· Accessories
CHINON AUTO "S" series available Filters (ND2X, ND4X, 1A, PL, Y2 49 mm)
Hard rubber eyepiece.
Eyepiece adapter (-3, +1, +3)
Angle finder
Auto extension ring
Bellows Mini copy stand
Cable release (13 inch)
Deluxe carrying case
Wideband Strap with CHINON logo
Eyepiece cover
CARE OF THE CAMERA
Your CP-7m is a precision instrument. Used with care, it will provide years of service. Protect your camera from dirt, rain, dampness and excessive heat. Avoid touching the lens. To clean the lens wipe it gently with a soft lint less cloth or lens tissue. Do not use eyeglass tissues as they might damage the lens coating.