Chinon CX
AKA - RevueFlex 3000 SL
This camera manual library is for reference
and historical purposes, all rights reserved.
This page is copyright© by  , M. Butkus, NJ.
This page may not be sold or distributed without
the expressed permission of the producer
I have no connection with any camera company.
On-line camera manual library
If you find this manual useful,
how about a donation of
$3 to:
M. Butkus, 29 Lake Ave.,
High Bridge, NJ 08829-1701
and send your e-mail
address
so I can thank you.
Most other places would charge
you $7.50 for
a electronic copy
or $18.00 for a hard to read Xerox copy.
This will help me to continue to host this site,
buy new manuals, and pay their shipping costs.
It'll make you feel better, won't it ?
If you use Pay Pal, use the link below.
Use the above address for a check, M.O. or cash.
<<< IF YOU WOULD LIKE THIS OR ANY PDF FILE
PRINTED, BOUND AND MAILED TO YOU,
SEE THIS OUTSIDE COMPANY'S OFFER >>>
Back to main camera manual page
Chinon CX PDF direct from manual
Chinon CX PDF from HTML file below
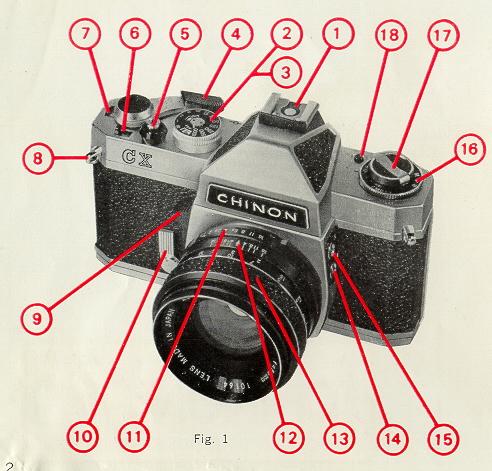
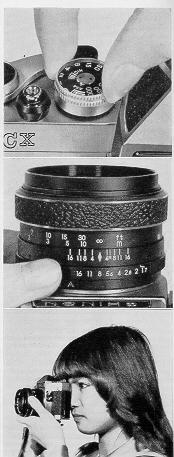
1. Accessory shoe (with direct flash contact)
2. Shutter speed dial
3. Film speed dial (ASA/DIN)
4. Film advance lever
5. Shutter release
6. Multiple exposure lever
7. Exposure counter window
8. Shoulder strap eyelet
9. Exposure-meter switch
10. Self-timer
|
11. F stop ring
12. Depth of field scale
13. Distance ring
14. M synchro-flash socket
15. X synchro-flash socket
16. Film type indicator
17. Film rewind knob/Film chamber cover opening
18. Battery test button
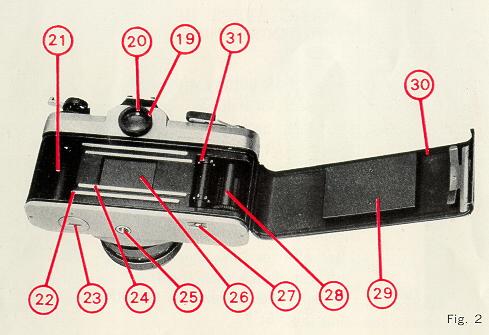
19. Viewfinder eyepiece
20. Battery test light |
21. Film chamber
22. Film guide rail
23. CdS battery compartment cover
24. Film rail
25. Tripod socket
26. Shutter |
27. Rewind button
28. Take-up spool
29. Film pressure plate
30. Film chamber cover
31. Sprocket teeth |
IMPORTANT! BASIC STEPS IN PHOTOGRAPHING
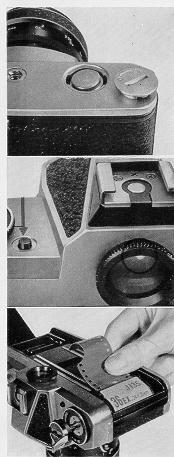
(1) Insert CdS battery with plus (+) side up
(2) To test battery condition, Fig. 6 depress the battery test button and observe test light
(3) Load 35 mm film in 20 or 36 exposure cassette
Mercury
batteries are no longer available.
Look for Wein Air batteries as
a replacement. |
 |
|
|
|
|
(4) Set ASA (or DIN) speed dial in accordance with the film speed specified on the film box
(5) Set either the shutter speed or lens opening according to your photographic need
(6) Focus the lens
(7) Release the shutter (Fig. 8) |
 |
LOADING THE CAMERA
Use 35 mm film in 20 or 36 exposure cassette. It is recommended to load and unload camera in subdued light, e.g. shadow of your own
body and not in direct sunlight.
|
(1) Pull up film rewind knob until camera-back pops open. Swing open camera-back |
 |
(2) While rewind knob is still fully pulled up insert film cassette into chamber with protruding end toward bottom of camera. Press in film
rewind knob. If it does not go in all the way, turn it until it does.
|
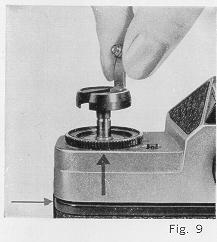
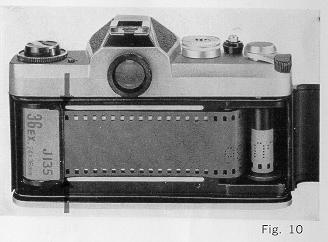
(3) Insert end of film into slot in take-up spool and engage perforation of film with tooth in spool slot. Place thumb lightly over film on
bottom sprocket wheel and operate film advance lever until upper sprocket wheel engages film perforations. When advance lever
stops, free it by depressing shutter release on top of camera. Make sure that film lies flat between guide rails
(Fig. 10). Close camera
back firmly. |
 |
|
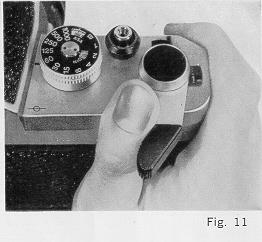
(4) Operate film advance lever, depressing shutter release until figure " 1 " is lined up in the exposure counter window. In this position the
camera is ready for the first exposure to be made (Fig. 11). |
 |
To be certain that the film transports correctly, take up any film slack in the cassette by turning the rewind crank clockwise till resistance is felt.
When advancing the film the rewind knob should turn anticlockwise. This is evidence that the film is loaded correctly. If it does not, start
loading again.
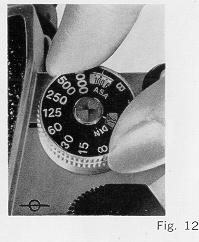
SETTING FILM SPEED (ASA/DIN)
The ASA (or DIN) speed of the film is specified on the film box or in the instruction sheet packed with the film.
Pull up and rotate the outer rim of the shutter dial until desired ASA (DIN) number of the film appears in the window on the top of the film
shutter speed dial (Fig. 12). |
 |
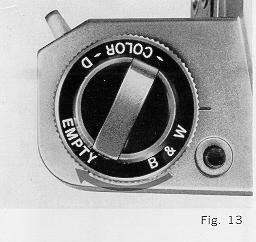
Also rotate film type indicator dial so that the film type inserted shows to its pointer
(Fig. 13). This will remind you of the type of film you are using.
Some ASA (DIN) numbers are represented by a dot only. The chart below specifies the ASA (DIN) numbers. |
 |
CORRECT EXPOSURE
Correct exposure can be made by setting F stops on the lens and correct combination of shutter speed. As the CHINON CX camera has a
built-in through-the-lens CdS exposure meter, you can take correctly exposed photographs.
(1) See the subject through viewfinder. Press down the exposure meter switch (Fig. 14). |
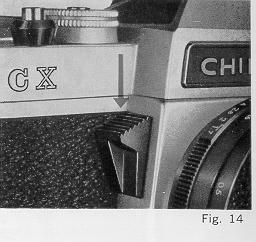 |
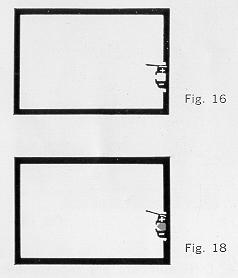
Depending upon the subject, rotate either shutter speed dial or F stop ring until the
exposure indicator needle in the viewfinder comes to the complete horizontal position
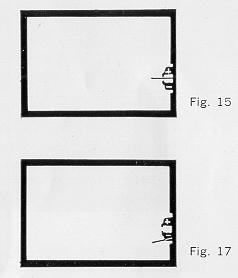
(Fig. 15). If the needle is above the horizontal position, it
is overexposed (Fig. 16). Change the shutter speed to a faster speed or use a smaller lens opening so that the correct exposure combination
can be obtained. If the needle is below the horizontal, it is under exposed so that a slower shutter
speed or bigger lens opening must be set (Fig. 17). |
 |
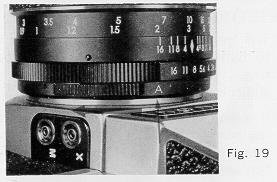
| 2) When an ASA setting is used in conjunction with speeds and/or apertures which are beyond the range of the TTL meter a red signal will
appear in the exposure zone of the viewfinder (Fig.
18). When the red signal appears it indicates that a flash unit should be used to
supplement existing light.
|
 |
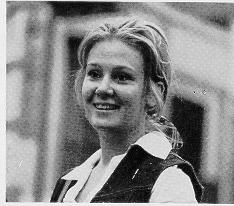
FOCUSING
Release the exposure meter switch and AUTO/MANUAL control on the lens to position
(Fig. 19).
Turn the distance ring first in one direct then in the opposite direction until microprism
in the center of the image in the viewfinder is sharp (Fig. 20). Picture is now focused. The distance scale may also be used for
focusing. Estimate or measure the camera to-to-subject distance in feet or in meters,
then turn focusing ring. So the figure representing that distance is opposite the index line.
|
 |
RELEASING THE SHUTTER
Hold the camera as steady as possible and press the shutter release slowly and smoothly. When using slower speeds ranging from 1/30 to 1
second and " B" (bulb) in poorly lit areas, use a tripod or other firm support to prevent blurring the picture.
SETTING THE SHUTTER
The length of time for the film to be exposed to light can be adjusted by shutter speed setting. "60" (1/60 second) is recommended for subjects not in motion.
It is recommended to use shutter speeds ranging from 1/125 to 1/1000 for subjects in motion. 1/1000 second speed will best ' freeze" fast action.
The " B " setting can be used for long exposures at night, using street lights or electric signs, or under poor light conditions when flash unit is not used.
UNLOADING THE CAMERA
When the red figure " 20 " or " 36 " (corresponding to 20- and 36-exposure film) appears in the exposure counter window lined up to the index
mark, the end of the film has been reached.
Take the following steps for rewinding film into cassette.
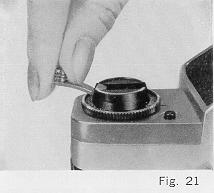
(1) Unfold crank on rewind knob (Fig. 21).
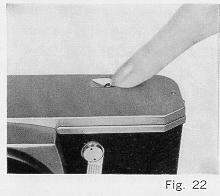
(2) Press in all the way rewind release button on camera bottom (Fig.
22).
|
 |
(3) Turn rewind crank lever clockwise. Tension is felt as the film is rewound from the take. up spool into the cassette. Stop rewinding when
tension is released. Open camera back (by pulling out rewind knob all the way) and remove the film.
Have film processed without delay.
DEPTH OF FIELD
A zone of the picture in front of and behind your subject will also be sharp. The depth of this zone depends on the aperture selected. If you
wish to know how much of an area will be sharp in the final picture, it can be
predetermined in two ways:
(A) Depth of Field Pre-viewer
Slide the AUTO/MANUAL aperture opening switch to "M" (Manual) position. Set the lens to the selected aperture opening of the F stop ring.
This will enable you to preview the area of sharpness in the picture before taking.
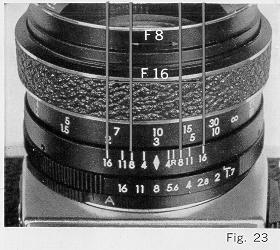
(B) Depth of Field Scale (Fig. 23)
After setting the lens opening and having focused on your subject, the area of sharpness in front of and behind your subject can be
determined on the Depth of Field Scale. Locate on the Depth of Field Scale the same two F numbers corresponding to stop you have set on
the F stop ring. The distance between these two F numbers on the focusing scale will be the area of sharpness in your picture.
|
 |
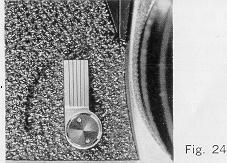
SELF TIMER
The self-timer permits the photographer to get into the picture. Place camera on tripod or other firm support (tripod socket is on bottom of
camera). Get camera ready for exposure as usual. Push down self-timer lever (Fig. 24).
|
 |
Depress shutter release to start self-timer. Exposure will be made approximately 8 seconds after the release has been pressed.
FLASH PICTURES
Most types of flash bulbs and also electronic flash can be used for flash pictures.
When using flash bulb No. 5, 5B, 25, 25B, M5, M5B, M2, M2B, AG1, 6, 6B, 8, connect the flash cord to flash socket " M ". When using
electronic flash or SM flash bulbs, connect the flash cord to flash socket "X" (Fig. 25).
|
|
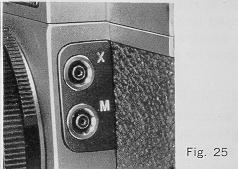 |
The use of Nos. 5, 5B, M5 and M5B flash bulbs as well as electronic flash. Nos. 6, 6B, 8 flash bulb is recommended for shutter speeds from
1/30 to 1/125 sec.
The use of Nos. M2, M2B, AG1, AG1B. SM flash bulbs is recommended for shutter speeds from
1/30 to 1/60 sec. Cordless flash units are slipped into the accessory shoe on the top of the camera. The accessory shoe may also be utilized
for a flash unit having a synchro cord.
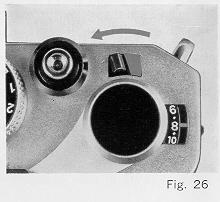
MULTIPLE EXPOSURE
To superimpose two or more exposures on one negative, support the camera on a rigid tripod to ensure correct framing. Make the first
exposure in the normal way, then, without moving film transport lever, slide the multiple exposure lever
(Fig. 26) as far as it will go to the left.
A red signal appears in its cutout window indicating that the film transport lever can be wound, but will only set the shutter and not transport
the film. On releasing, a second exposure is made on the same film frame. This procedure can be repeated to obtain any numb her of
exposures on one negative. If the multiple exposure lever has been set but is in fact not required, you can manually push it back to cancel its
effect. |
 |
CHANGING THE LENS
A 55 mm lens is the proper focal length for general purpose picture taking. Any Chinon
telephoto and wide angle lens or Pentax, Prinzflex or Sigma lens mount can be used. To remove the lens, push up the exposure switch on the
camera body, holding it in one hand and grip the lens with the other, turning counter clockwise until it is removed.
To replace the lens, turn clockwise until secured in position finger-tight.
IMPORTANT NOTE
When installing or removing the 55 mm F/1.2 Chinon lens the exposure switch must be in " OFF " position (Fully up) or the focus ring must
be turned to a distance setting of less than 0.9 M (3 feet) to avoid damage to the rear lens
element.
The following interchangeable lenses and accessories for CHINON Single Lens Reflex are available.
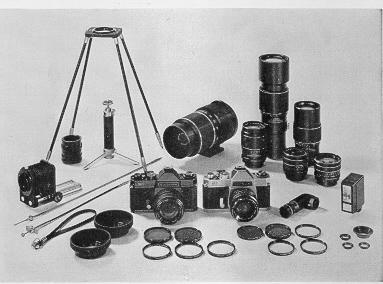
Interchangeable Lenses Accessories
|
28mm F 2.8 AUTO
100m m F 2.8 AUTO
135mm F 2.8 AUTO
200mm F3.5 AUTO
300mm F4.5 AUTO
500mm F8 (Mirror) |
Auto-Extension rings
Mini- Copy stand
Table tripod
Angle finder
Rubber eyepiece
Filter (52mm).1A, UV, Y2, ND4, PL
Filter (55m m) IA, UV, Y2, N D4, PL |
|
Cable release (20 inch)
Cable release (13 inch)
Eyepiece adaptor --2.5 Dioptor
Eyepiece adaptor +1.0 Dioptor
|
Rubber lens hood (52mm)
Rubber lens hood (55mm)
Wrist strap Lens mount cap
Eyepiece adaptor +3.0 Dioptor
Body cap |