If you find this manual useful,
how about a donation of
$3 to:
M. Butkus, 29 Lake Ave.,
High Bridge, NJ 08829-1701
and send your e-mail
address
so I can thank you.
Most other places would charge
you $7.50 for
a electronic copy
or $18.00 for a hard to read Xerox copy.
This will help me to continue to host this site,
buy new manuals, and pay their shipping costs.
It'll make you feel better, won't it ?
If you use Pay Pal, use the link below.
Use the above address for a check, M.O. or cash.
Click here for
Chinon Genesis III
PDF version - better printing
 ,
,
,
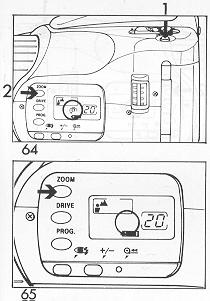
NOMENCLATURE
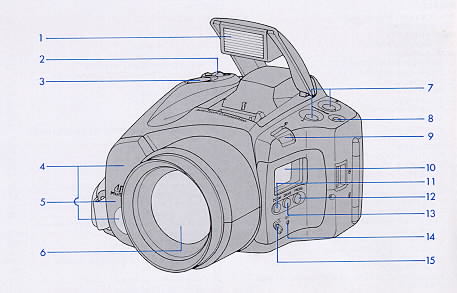 |
1. Retractable flash
2. Main switch
3. Shutter release button
4. Auto focus window
5. Self-timer indication LED
6. Lens
7. Manual power zoom button (tele/wide)
|
|
8. Spot AF button
9. Flash mode button
10. LCD panel
11. Zoom select button
12. Program select button
13. Drive button
14. Manual rewind button
|
15. EV compensation button
16. Film window
17. Film pressure plate
18. Take-up mark
19. Film tip mark
20. Viewfinder eyepiece
21. Quick return mirror
|
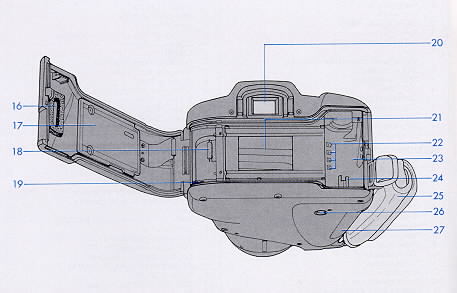 |
22. Automatic film speed setting contacts
23. Film chamber
24. Film rewind shaft
25. Hand strap
26. Tripod socket
27. Battery compartment cover
|
SPECIFICATIONS
MAIN FEATURES: -35 mm TTL finder zoom camera
- 38-110 mm zoom lens
- Auto programmed zoom
- Hybrid auto focusing system
- Fully motorized film transport
- Built-in sensor flash
- TTL metering multi mode program AE
- Built-in LCD panel
FILM TYPE: 35 mm film cartridge
PICTURE SIZE: 24x36 mm
LENS: Aperture ratio: F/4.4-5.6
Focal length: f/38 mm-110 mm
Lens construction: 12 elements in 11 groups
Macro: Yes: 0.85 m (33.5") at tele position (1:5.5)
Zooming: 3 modes: auto programmed zoom, manual power zoom, tele zoom
FINDER: Type: TTL finder
Finder screen: Fine matte screen
Magnification: 0.73x (50 mm inf.)
Coverage: Vertical: 85%, Horizontal: 85%
Diopter: - 1.0
VF indication: AF indicator: multi AF OK signal, near warning spot AF
OK signal, near warning
Exposure indicator: Slow speed warning, bulb mode signal
Flash indicator: Flash sync. signal, recharging signal
Finder mirror: Motorized quick return mirror
FOCUSING SYSTEM: Type: Combination AF: TTL phase differential
detection/Multi AF
Focus lock/cancellation: Yes
Focus range: 0.85 m (35.5") -- inf.
SHUTTER: Type: Electromagnetic vertical running focal
plane shutter
Type of shutter release: Electromagnetic release
Shutter speed range: 1-1/1 000 sec.
Shutter bulb: Yes
Release operation: Focus priority
EXPOSURE METER:
Type: TTL metering system
Exposure control: S modes: normal, action, creative, slow sync., flash
program
Photo cell: Two divided SPD (1 )
Exposure range: W: EV 4.2-EV 18.8 (ISO 100), T: EV S-EV 20 (ISO 100)
Film speed sensing: DX film sensing: ISO 25-3200
ISO 25: ISO 25 to 40, ISO 50: ISO 50 to 80, ISO 100: ISO 100 to 160,
1SO 200: ISO 200 to 320, ISO 400: ISO 400 to 640, ISO 1000: ISO 800 to 1250, ISO
1600: ISO 1600 to 2500, ISO 3200: ISO 3200 to 5000,
Non DX film to ISO 25 setting
Exposure compensation: Yes: +/- 2 EV (0.5 EV step)
Shutter speed limit: Flash program: max. 1/38-1/100 sec.
Others: max. 1 sec.
Bulb exposure: Yes
FILM TRANSPORT: Film loading: Auto loading
First frame setting: Automatic setting by closing film door
Film winding: Motorized winding
Shooting mode: 2 modes: single, continuous (approx. 1.5 frame/sec.)
Film rewinding: Motorized rewinding
Rewinding actuation: Automatic
Rewinding stop: Automatic
Rewind button: Built-in
Frame counter: by LCD panel
FLASH: Type: Retractable sensor flash
Flashmatic: Yes
Auto recharging: Yes
Flash guide no.: 14 (ISO 100 meter)
Effective range: (ISO 100): W: 0.85 m-5.1 m (33.5"-16.7'), T: 0.85
m-4.0 m (33.5"-13.1')
Off flash mode: Yes
Fill flash mode: Yes
Recycle time: Approx. 4 sec.
OTHER FEATURES:
Power source: Lithium battery pack (2CR5): customer replaceable
Battery check: Yes: on LCD panel/release lock out
Film door window: Built-in
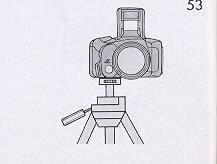
Tripod screw: Built-in: U-1/4~
Self-timer: Built-in: approx. 10 sec. cancelable
Multiple: Yes, unlimited.
LCD indication: Built-in: Frame counter including film transport
signal, Photographing mode indication: continuous mode, multiple exposure,
self-timer
Exposure mode indication: normal program, action program, creative
program
Zoom mode indication: programmed, manual power, tele zoom
Exposure compensation indication
Battery indication
Auto power shut off: Yes: approx. 60 sec.
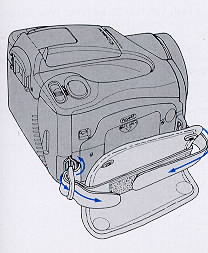
Strap: Hand/neck strap
Filter: Attachable: 58mm
Lens hood: Attachable: 58mm
Converter lens: Attachable: Tele converter (1.4x)
Size: 126.5(W)x84.5(H)x126.5(D) mm (511~x3.4"x5.1N)
Weight: 710 9 25.1 oz. (without battery)
Mode buttons: exposure mode, photography mode, programmed zoom mode
Function button: main switch, rewind button, exposure compensation
button, zoom button, flash switch, central spot button
Specifications subject to change without novice
SIMPLIFIED INSTRUCTIONS
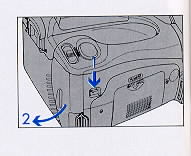
A. Battery Installation
1 ) Insert a pointed object such as a ball-point pen into the battery cover
release hole on the side of the camera and slide it in the direction indicated
by the arrow to open the battery compartment. (Fig. 1 )
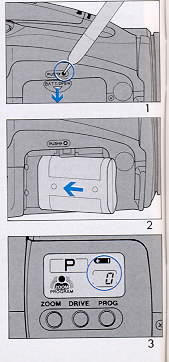
2) Place the battery correctly in the battery compartment in accordance with
the marks inside and close the cover.
Use a 6 V lithium battery of the "2CR-5" type. (Fig. 2)
B. Battery Check
Slide the Main Power Switch to the "ON" position. If the film counter and
battery check mark are lighted on the LCD panel at this time, power is being
supplied to the camera circuitry. The marks will stay lighted for 60 seconds
until an automatic power shut-off system goes into effect. (Fig. 3)
Note:
When any of the following occurs, it means that the battery condition is too
low for continued use and the battery should be replaced with a new one.
--The battery check mark is blinking.
--The battery check mark is blinking and the shutter is locked.
-- Nothing appears on the LCD panel.
Battery life: Approximately 24, 24-exposure rolls, using 50% flash. (CHINON Laboratory testing)
When a new battery is correctly installed and the LCD indication is still not displayed correctly remove the battery and reinstall it again.
A memory back up system memorizes the frame counter as well as the film speed for a short time even without a battery. However, it is recommended to replace
the battery as quickly as possible.
C. Setting the Film Speed

|
Using films with DX coding is recommended. In this case, the proper film speed will be set by the camera automatically Film can be used with ratings from
ISO 25 to 3200. (Fig. 4)
Note:
For reversal (slide) film, please use ISO 25, 50, 100, 200, 400, 1000 or 1600.
For films without DX coding, the camera is set automatically at ISO 25. Only
use non DX film with an ISO 25 rating. However, if non-Dx films with ratings of
ISO 50 or 100 are used, the camera can be adjusted for them by using the
built-in exposure compensation system (See page 50 in the Applied Use section
for exposure compensation instructions).
Please keep the camera's DX contact points and the DX information panels on the film cartridges clean. (Fig. 5)
|
D. Loading a Film: Automatic Film Loading
The film should be carefully loaded into the camera, without being subjected to direct sunlight.
1 ) Turn the Main Power Switch to the "OFF" position.
2) Open the back cover by pushing the back cover release button in the direction of the arrow. (Fig. 6)
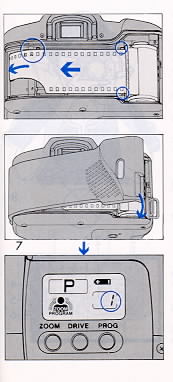
|
3) Insert the film cartridge and pull out the film so that the trimmed end
lines up with the film tip mark. The length of film pulled out shouldn't be
either too short or too long against the position of the film tip mark. If it
was pulled out too much, adjust it by rewinding the film back into the film
cartridge so that the trimmed end lines up with the film tip mark. Make sure
that the film lies flat between the film guides.
4) Close the back cover. (Fig. 7) The film will be advanced
automatically to the first frame. Turn the Main Power Switch to the "ON"
position and make sure the counter on the LCD panel shows "1".
Note:
If the frame counter on the LCD panel is blinking "0" after the back cover
has been closed, it means that the film has not been loaded correctly. Open up
the back cover and insert the film correctly again.
|
With non-DX films or ISO 25 DX films, if the "0" remains lighted on the LCD
panel after the back cover has been closed, it also means that the film has not
been loaded correctly Open up the back cover and insert the film correctly
again.
Always set the Main Power Switch to "OFF" while loading the film.
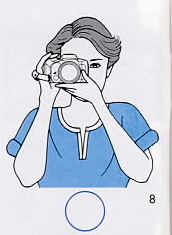
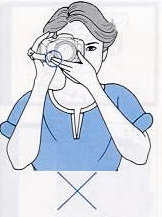
E. Holding the Camera
|
|
|
Hold the camera in such a way that your elbow is securely touching your body
to ensure camera steadiness and to avoid the possibility of camera shake.
(Fig. 8)
Hold the camera so that your fingers, the carrying strap etc. will not cover
any part of the flash unit, lens, or the AF measuring windows. |
Gently press the shutter release button. When the telephoto lens is in use,
be particularly careful to avoid any camera movement.
When the camera is not in use, always return the Main Power Switch to the
"OFF" position.
F. Viewfinder Information
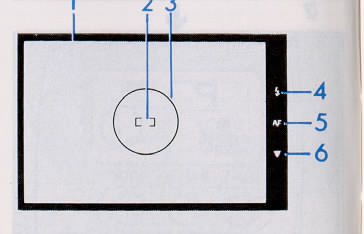
|
1 ) Viewfinder frame
2) Autofocus frame
The TTL AF mode and the central spot of the Multi AF focus areas.
3) Evaluative metering central measuring area.
4) Flash Ready Signal
When the flash is fully charged, this light will glow steadily. While the
flash is recharging, the same light will blink until the flash recharging
is completed. |
5) AF OK signal
When blinking, this indicator warns that the camera-to-subject distance is
too close for proper focus. The camera shutter cannot be released in either the
single or continuous shooting modes if this condition occurs.
6) Slow Shutter Speed Warning
When blinking, this indicator warns that the automatically selected shutter
speed is too slow for non flash photography or slow flash sync photography. When
it glows steadily, the bulb exposure mode will be utilized upon releasing
the shutter. The flash will fire, even in the bulb mode, if the flash is in the
open position. In both instances, a tripod is suggested.
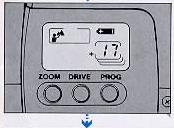
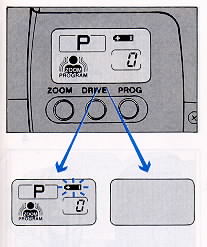
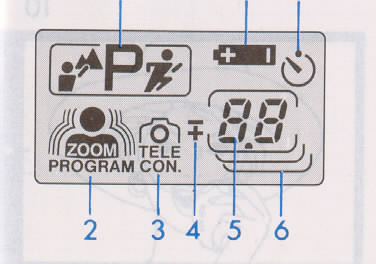
G. LCD Panel Display

|
1) Image Program Mode/Program AE indication
2) Auto Composing Mode
3) Tele Converter Mode
4) Exposure Compensation Indication
5) Frame Counter
6) Continuous Shooting Mode
7) Self-timer Mode
8) Battery Check Mark
|
H. Auto focus Photography
The camera incorporates an auto focusing system combining both a TTL Passive
AF and an Infrared Active Multi AF systems: the Dual Mode Auto focusing System.
Depending upon the subject situation, the optimum AF system will be
automatically selected for pin-point auto focusing accuracy.
|
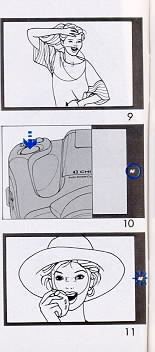
1 ) Position the camera so that the subject is set within the auto focus
frame of the viewfinder. (Fig. 9)
2) Press the release button gently. The focus distance will be measured and
set automatically. Once the focus has been completed, the "AF OK" mark in the
viewfinder will light up and the subject in the viewfinder will be visible in
sharp detail. This is a visual confirmation that the subject will be correctly
focused in the picture. (Fig. 10)
3) When the camera-to-subject distance is too close, the AF OK mark in
the viewfinder frame will blink and the shutter release will be locked. In
this case, position the camera further away from the subject and focus
again. (Fig. 11 )
|
|
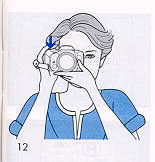
4) Once the AF OK mark is lighted and focus is visibly
confirmed by the viewfinder, press the shutter release button all the way
down to take the photograph.
(Fig. 12)
|
Note:
Since the TTL viewfinder enables a visible focusing confirmation, when your
main subject is not sharply in focus in the viewfinder, press the shutter
release button halfway again for refocusing.
Never push or turn the lens as the camera's micro computer always detects and
memorizes the exact position of lens focusing each time the focusing is
completed. If the lens is accidentally pushed or turned, turn off the camera by
sliding the Main Power Switch to "OFF" to initialize the camera's memory before
shooting again.
If the camera-to-subject distance is closer than 85 cm (33.5 inches), the AF
OK mark will blink and the shutter release will be locked. The camera should
then be positioned further away from the subject so that the picture can be
taken.
I. Multi Image Program Shooting (for basic snap shooting)
The camera utilizes a Multi Image Program shooting mode. By selecting either
the Standard Image Program Mode, Sport/Portrait Image Program Mode or the
Landscape Image Program Mode, depending upon the subject situation, an optimum
composing angle will be automatically selected along with an optimum programmed
exposure setting.
The Following is the procedure for the Standard Image Program Mode which is
designed for general picture taking situations and provides the best results for
snap shooting.
|
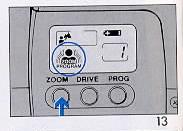
1) Press the Zoom Mode Button (Fig. 13) so that the LCD panel
shows the Auto Composing Mode ~ indication.
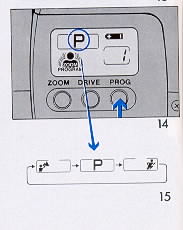
2) Press the Program AE select button. (Fig. 14)
Each time that this button is pressed the Program AE indication mark on the LCD
panel will change ( ~ ~ p ~ ~ ). Press the Program AE select button until the
LCD panel indicates P . (Fig. 15)
3) Look through the viewfinder and point the camera at the main
subject and gently press the shutter release button halfway. The camera
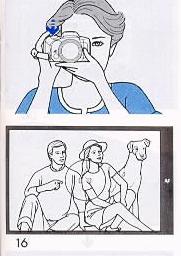
will then automatically compose the picture by zooming the lens as well as
precisely setting the focus. (Fig. 16)
|
4) Once the composing and focusing is completed, press the shutter
release button all the way down to take the picture.
|
Note:
For more details on Multi Image Program shooting, see the applied use
section (Page 30).
Never push or turn the lens as the camera's micro computer always detects and
memorizes the exact position of the lens each time the focusing is completed. If
the lens is accidentally pushed or turned, turn off the camera by sliding the
Main Power Switch to "OFF" to initialize the camera's memory before shooting
again.
The LCD indication will automatically disappear after 60 seconds upon
completion of picture taking. Pressing either the shutter release button (half
way), Zoom Select but ton, Drive button, Program AE select button, Manual Zoom
button or Flash button will automatically reset the zoom lens to the Wide Angle
Position
(38 mm) and the LCD indication will be activated again. |
J. Shooting with Manual Power Zooming
When you wish to control the picture composition yourself, set the camera for
the Manual Power Zooming mode.
|
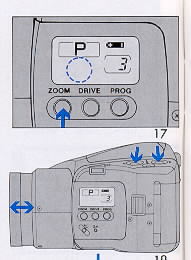
1) Press the Zoom Mode button so that the Auto Zoom mark "*" on the
LCD panel disappears. (Fig. 17)
2) Lens zooming can now be controlled by pressing the Manual Zoom
buttons (Tele or Wide) on top of the camera. (Fig. 18)
|

3) Look through the viewfinder and compose the picture by pressing the
Manual Zoom buttons. Once the desired picture composition is completed, press
the shutter release button all the way down to take a picture. (Fig. 19)
Note:
While in the Power Zoom Mode, any of the three Auto Exposure Mode Program
can be selected by pressing the Program AE select button, regardless of the lens
focal length Setting.
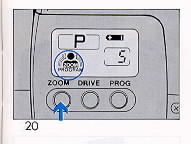
When you wish to change from the Manual Zoom mode to the Multi Image Program
Composing Mode, press the Zoom button so that the Auto Composing Mode symbol
",.~.," appears on the LCD panel. (Fig. 20)
Turning the Main Power Switch to the "OFF" position and then back "ON" will
also change the Manual Power Zoom mode to the Auto Composing Mode mode.
The LCD indication will automatically disappear after 60 seconds upon
completion of picture taking. Pressing either the shutter release button (half
way), Zoom Select but ton, Drive button, Program AE Select button, Manual Zoom
button or Flash button will automatically reset the zoom lens to the Wide Angle
Position
(38 mm) and the LCD
K. Flash Photography
The camera utilizes an Automatic Sensor Flash system which is designed to
measure ambient light intensity and then activate and fire the built-in flash
when needed. The sensor flash of the camera works automatically only when the
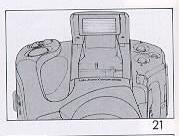
flash is in the open position. (Fig. 21 )
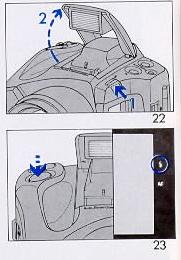
1 ) Slide across the flash button to pop up to the flash into its operating
position. (Fig. 22)
2) Gently press the shutter release button half way. If the flash is
necessary, the "  "
mark in the viewfinder lights up or blinks to signal that the automatic sensor
flash mode is in operation. (Fig. 23)
"
mark in the viewfinder lights up or blinks to signal that the automatic sensor
flash mode is in operation. (Fig. 23)
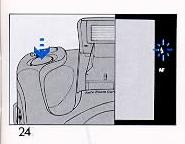
3) If the " " mark
lights up continually, it means the flash is fully charged and ready to fire.
Press the shutter release button all the way down to take a flash picture.
(Fig. 24)
4) If the " " mark
blinks, it means the flash is being charged. Flash charging takes approximately
4 seconds. Immediately upon completion of the flash charging, the "
" mark will light up continually and the camera will be ready for flash
photography.
Note:
When the flash is in the closed position and the "
" mark in the viewfinder blinks, the flash is needed. Slide across the flash
button to pop the flash up and then take the picture.
The flash can be charged even if the shutter release button is fully
depressed. In this case, immediately upon completion of the flash charging, the
shutter will be released. Therefore, to avoid accidental exposures, it is
recommended that the shutter release button not be fully depressed during flash
charging.
Flash effective range.
|
ISO 100 |
ISO 400 |
| Tele |
0.85-4.0 m |
0.85-8.0 m |
| 33.5"-12.3' |
33.5"-26.2' |
| Wide |
0.85 - 5.1 m |
0.85-10.0 m |
| 33.5"-15.7' |
33.5"-32.8' |
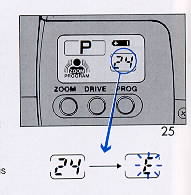
L. Automatic Film Rewinding
1 ) When the entire film cassette has been used, the film will automatically
start to rewind within two to three seconds
2) While the film is rewinding, the counter will count backwards. When the
film is entirely rewound, the rewind motor will stop automatically
3) Check the frame counter on the LCD panel to make certain that the film
counter shows "E" before opening the back cover. (Fig. 25)
If a film must be removed before it has been completely used, press the
manual rewind button "em" located on the side panel. Use a ball-point pen or a
similar object which is not too sharp. Use only a light touch to initiate the
partial film rewinding. Too much pressure could cause internal damage to your
camera. Rewinding will begin automatically. (Fig. 26 )
Note:
After the film is rewound, if the frame counter still does not return to "E"
but a number is blinking, press the manual rewind button again.
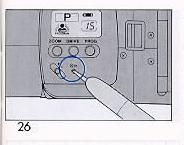
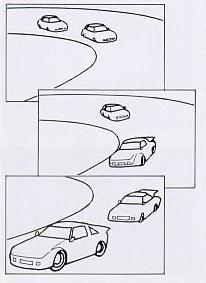
A. Multi Image Program Composition Shooting
According to your photographic purpose and the desired image effect, select
either the Standard Program Mode, Sport/Portrait Program mode or Landscape
Program mode. The camera will automatically compose the picture and select an
optimum exposure setting.
(1) Standard Composing Mode This mode is ideal for general picture taking. When
this mode is chosen, the lens focal length will be automatically controlled so
that the main subject or subjects will always be within the picture area. Since
the standard program AE will always accompany this composing mode, it will
maintain a fast enough shutter speed to avoid camera shake while an adequate
depth of field will also be implemented to assure razor sharp pictures.
Set the camera for the desired Multi Image Program Mode by pressing the Zoom
Mode button until the " "
mark appears on the LCD panel. Press the Program AE Select Button until the "P"
mark appears on the LCD panel. Partially depress the shutter release and the
camera will automatically control the lens zooming and exposure for general
shooting occasions (snap shot photography). (Fig. 27)
"
mark appears on the LCD panel. Press the Program AE Select Button until the "P"
mark appears on the LCD panel. Partially depress the shutter release and the
camera will automatically control the lens zooming and exposure for general
shooting occasions (snap shot photography). (Fig. 27)
 |
 |
(2) Landscape/Group Program Mode This mode is ideal for scenery since the
picture will be composed with wider focal length selections with an automatic
exposure setting that provides greater depth of field. It is also ideal for
pictures of people in groups since the camera will adjust the image size to
include everyone in the gathering. |
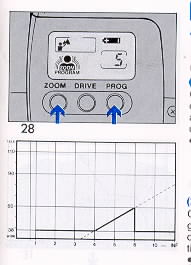
Set the camera for the desired Multi Image Program Mode by pressing the Zoom
Mode button so that the "my" mark appears on the LCD panel. Press the Program AE
Select Button until the " ~ " mark appears on LCD panel. Partially depress the
shutter release and the camera will automatically control the lens zooming and
exposure for landscape or group photographs.
(Fig. 28)
|
(3) Sport/Portrait Program Mode + Auto Close up This
mode is designed for portrait or sports/action pictures. In this mode, the
camera will select an optimum lens focal length and exposure setting
emphasizing a greater telephoto magnification along with a wider aperture
and faster shutter speeds to better frame a portrait image but also to
increase the potential to freeze the motion and reduce camera shake. |
Set the camera for the desired Multi Image Program Mode by pressing the Zoom
Mode button until the " "
mark appears on the LCD panel. Press the Program AE Select Button until the "  " mark appears on the LCD panel. Partially depress the shutter release, and the
camera will automatically control the lens zooming and exposure for portrait or
sports photography
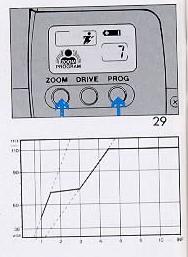
(Fig. 29)
" mark appears on the LCD panel. Partially depress the shutter release, and the
camera will automatically control the lens zooming and exposure for portrait or
sports photography
(Fig. 29)
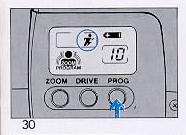
(3-1 ) Automatic Close-up Photography
In the Sport/Portrait Image Program Mode, when the subject is within 0.85 to
1 meter (33.5~--39.4") from the camera, the Auto Close-up mode will be
activated.
1) Set the camera for the Sport/Portrait Image Program mode.
(Fig. 30)
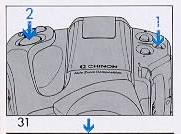
2) Press and hold the TTL SPOT AF button. Look into the viewfinder and
point the camera at the subject. Gently press the shutter release button halfway
to actuate the focus. If the camera-to-subject distance is within the 0.85-1
meter (33.5"~39.4") range, the camera will automatically set the focal length
for extreme telephoto (110 mm) to emphasize the close-up effect.
(Fig. 31)
Note:
If the subject is not in the close-up distance range (0.85-1 meter,
33.5"--39.4"), the lens focal length will not be set at the extreme telephoto
(110 mm) position.
B. Memory Function
When the Main Power Switch is turned "OFF", the camera will automatically
initialize itself and set the Standard Image Program Mode with the normal
program exposure setting when the power switch is turned to "ON" again. If you
always wish to use the camera with the Manual Power Zoom mode or an exposure
program other than the normal program AK, the desired mode can be memorized by
the following process.
(1) Manual Power Zooming with a Specific Program AE Setting
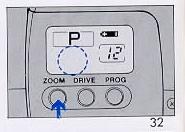
1 ) Set the camera for the Manual Power Zoom mode by pressing the Zoom Mode
button so that the ""
mark disappears from the LCD panel. (Fig. 32)
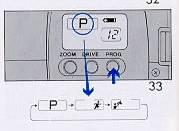
2) Select the preferred program AE by pressing the Program AE Select Button
until the appropriate symbol appears on the LCD panel. (Fig. 33)
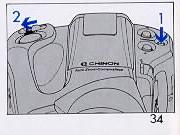
3) Press and hold the SPOT AF button and turn the Main Power Switch to "OFF".
The Manual Power Zooming Mode and the selected program AE mode have now been
assigned as your standard shooting mode. (Fig. 34)
Once the memory process is completed, even when the camera is used in a shooting
mode other than one placed in memory, the memorized mode will always be recalled
by turning the Main Power Switch to "OFF" and then back to "ON".
(2) Portrait/Sport or Landscape Composing Modes
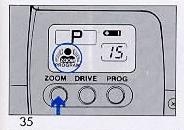
1) Set the camera for the Image Composing Mode by pressing the Zoom
Mode Button so that the "3~ " mark will appear on the LCD, panel.
(Fig. 35)
2) Select the preferred Program AE by pressing the Program AE Select
Button until the appropriate symbol for the desired program exposure mode ("  " for the Landscape Program AE or "
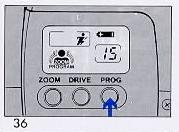
" for the Portrait/Sport Program AK) appears on the LCD Panel. (Fig. 36)
'
" for the Landscape Program AE or "
" for the Portrait/Sport Program AK) appears on the LCD Panel. (Fig. 36)
'
3) Press and hold the SPOT AF button and turn the Main Power Switch to
"OFF". The new Exposure Program is now in the camera memory.
(Fig. 37)
Note:
The Continuous Shooting Mode 16 can also be
set into memory. Set the camera for the Continuous Shooting Mode by pressing the
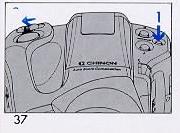
DRIVE button. Press and hold the SPOT AF Button and slide the Main Power Switch
to "OFF". The Continuous Shooting Mode is in the camera's memory.
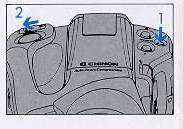
When you wish to modify the memorized mode, select the mode that you wish to
change by pressing either the Zoom Mode, DRIVE or Program AE Select Buttons and
then slide the Main Power Switch to "OFF" while pressing the Spot AF button. The
newly selected mode will now replace the previous memory.
(Fig. 38)
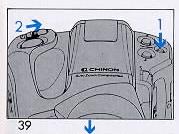
Clearing the Memory
When you wish to clear the memory to return to the normal shooting mode, turn
the Main Power Switch "ON" while the SPOT AF button is pressed. Now, the camera
will return to the normal shooting mode as follows (Fig. 39):
Standard Shooting Mode:
-
Zoom Mode--Auto Composing
Standard Image
-
Program AE--Standard Program P Program Mode
-
AF Mode: Single Single Shooting Mode
-
Film Transport Mode: Single
C. Auto Focus Modes
(1) Dual Mode Auto focusing
The camera incorporates a Dual Mode Auto focusing System which combines both
TTL passive AF and Infrared Active AF Systems into one system. This system
eliminates the inherent disadvantages of each AF system to permit virtually any
subject to be properly focused under the widest possible variety of lighting
conditions. Depending upon the subject situation and the lens focal length in
use, the camera will automatically select an optimum AF system from either the
Multi AF or TTL Passive AF systems.
<Multi AF>
The Multi AF system utilizes triple infrared beams which provide a wider
focusing area instead of a single, central beam of a conventional infrared AF
system. Therefore the Multi AF system eliminates the need for a focus lock even
if the subject would be positioned off-center. In the Multi AF mode, the actual
focusing area will be wider than the AF frame in the viewfinder.
(Fig. 40)
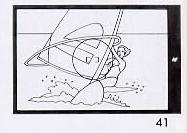
<TTL Passive AF System>
The TTL Passive AF System is ideal for telephoto pictures that require
increased focusing accuracy. In the TTL Passive AF System, the focusing area is
precisely what the AF frame in the viewfinder covers. (Fig. 41 )
Note:
Although the camera automatically selects the optimum AF system for each
subject situation and shooting condition, if the viewfinder image on the main
subject does not appear to be sharp upon completion of focusing, focus again by
pointing the AF frame precisely on the main subject.
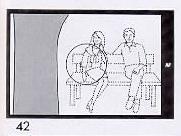
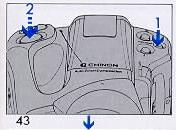
(2) Spot AF Mode
In the Spot AF Mode, the focusing area will be precisely what the AF frame in
the viewfinder covers.
1 ) Point the AF frame in the viewfinder directly on the main subject.
(Fig. 42)
2) Press and hold the Spot AF button and gently press the shutter release
button halfway. (Fig. 43)
3) "The AF OK" LED in the viewfinder will light up in red and the focusing
will be locked on the main subject. Once the focusing is locked on the main
subject, the focusing will be locked as long as the shutter release button is
halfway pressed, even if your finger is lifted from the Spot AF button.
4) Gently press the shutter release button fully to take a picture.
(Fig. 44)
Note:
When the "AF OK" LED blinks, it means the camera-to-subject distance is too
close. The camera should then be positioned further away from the main
subject to allow focusing to be completed.
Center-weighted Spot AE metering will only be effected if the picture is
taken while the Spot AF Button is pressed.
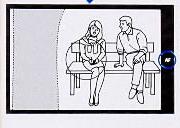
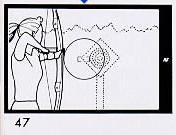
(3) Focus Lock (Prefocus) and Cancellation
When the main subject is located "off-center" in the viewfinder, or when it
is difficult to focus on the subject, the focus lock is invaluable.
(Fig. 45)
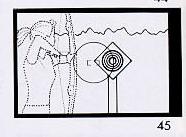
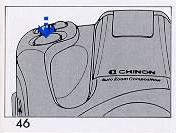
1 ) Look into the viewfinder and point the auto focus frame on the center of
the subject that is to be in focus. Gently press the shutter release button and
confirm that the "AF OK" LED in the viewfinder lights up. (Fig. 46)
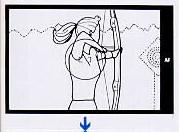
2) Without losing tension on the shutter release button, recompose the
picture in the viewfinder and then take the photograph by pressing the shutter
release button all the way down. (Fig. 47)
Note:
The focus lock feature can be canceled by removing your finger from the
shutter release button. Thus, you can repeat this technique any number of times
without having to take a picture.
The focus lock functions with both the Dual Mode AF and Spot AF modes.
D. Flash Photography
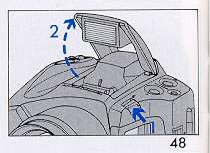
(1) Automatic Sensor Flash Mode
1 ) Press the flash button so that the flash will be properly positioned for
automatic flash photography. A built-in sensor will fire the flash only when
necessary.
(Fig. 48)
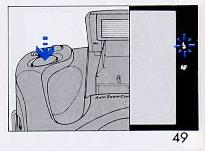
2) Gently press the shutter release button halfway to confirm that the flash
ready light " " in the
viewfinder lights up. If the flash ready light does not light up, that means the
flash is not necessary for a properly exposed picture. The flash will not be
fired when the picture is taken. If the flash ready light blinks, it indicates
that the flash is charging. During the flash charging period of
approximately 4 seconds, the shutter cannot be released. Wait until the flash
ready light glows constantly and then take a flash picture by gently pressing
the shutter release button all the way down. (Fig. 49)
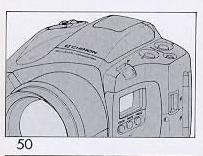
(2) Off-flash Mode
Although the camera will fire the flash automatically in accordance with the
brightness of the surrounding lighting conditions (when the flash is in its
operating position), there are times when it might be preferable to take a
picture without the flash to capture a special mood. Off-flash photography is
achieved with the following procedures.
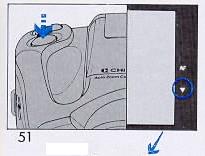
1 ) Gently press the flash down until it is returned to its storage position
in the top of the camera. When the Main Power Switch is slid to "ON", the
Off-flash mode will be activated. (Fig. 50)
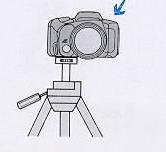
2) Gently press the shutter release button halfway If the Slow Shutter Speed
Warning LED " ~ " blinks in the viewfinder, it warns that the shutter speed is
possibly too slow for handheld picture taking. Hold the camera as securely as
possible or use a tripod in order to avoid camera shake and subsequently blurred
pictures. If the Slow Shutter Speed Warning LED "
" glows constantly while pressing the shutter release button halfway, it means
that a bulb exposure will be taken. In this case, a tripod must be used.
(Fig. 51 )
(3) Fill-in Flash Mode/Slow Flash Synchronization
Under some available light conditions (deep shade or back-lit situations) a
picture may result where the subject is too dark. The use of the flash for
daylight flash will enhance the picture tremendously under these conditions.
When this mode is used, depending upon subject brightness, the shutter speed may
vary from 1/100 see to 1 second or even slower in the Bulb mode. This slow flash
synchronization enables beautiful night scenes to be depicted while having the
foreground subject flawlessly exposed by the fill-in flash.
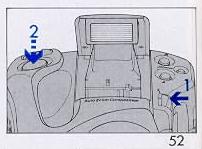
1 ) The Fill-in flash Mode can be used by pressing the Flash button. While
holding the Flash button down, compose the picture and gently press the shutter
release button halfway. (Fig. 52)
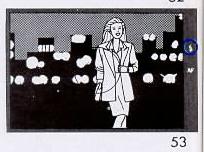
2) When the Flash Ready LED ( 5, ) in the viewfinder glows constantly, a
Fill-in flash photograph can be taken by pressing the shutter release button all
the way down. If the Flash Ready LED ( 5, ) blinks, it means the flash is
charging. Wait until the Flash Ready LED glows constantly (approximately 4
seconds). The shutter can then be tripped to take a Fill-in flash photograph.
(Fig. 53)
Note:
The use of a tripod is recommended for taking a Fill-in flash photograph in
low light conditions to avoid possible camera shake since the shutter speed may
go down to 1 second or even slower in the Bulb mode.
If the Slow Shutter Speed Warning LED (a) in the viewfinder glows constantly,
it means that the Bulb mode is in effect and a tripod must be used to avoid
camera shake.
E. Automatic Fill-in Flash/Back Light Control Systems The camera has both an
automatic Fill-in flash and an automatic Back Light Control system. When the
main subject has less light falling upon it than the surrounding area, the
subject may be underexposed or silhouetted. In such a case, the camera will
automatically adjust the exposure by activating the automatic Back Light Control
or the automatic Fill-in flash so that the main subject will be more favorably
exposed.
1) Press the Flash Button so that the flash will pop up to its
operating position. (Fig. 54)
2) Press the Shutter Release Button fully to take a picture. Depending
on the lighting situation on the subject, the camera will automatically
compensate for the exposure by using the automatic Back Light Control or firing
the flash (Automatic Fill-in flash) when necessary.
Note:
If the flash is closed (OFF-Flash Mode) while photographing a back lighted
condition, only the automatic Back Light Control will be in effect to adjust the
exposure.
If the flash is in its operating position, the flash ready light ( 6, ) in
the viewfinder will illuminate if the camera desires to use the flash to
compensate for the back lit situation.
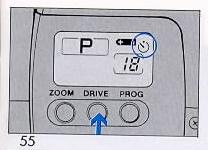
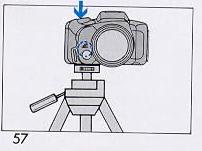
F. Self-timer
The Self-timer feature allows the photographer to be in the picture.
1 ) Place the camera on a tripod or other firm support.
2) Press the Drive Mode button so that the self-timer symbol mark " 6) "
appears on the LCD panel. (Fig. 55)
3) Look into the viewfinder and position the AF frame on the center of the
subject. (Fig. 56)
4) Press the shutter release button completely to start the self-timer
operation. The self timer indication LED on the front of the camera will light
up and the picture will be taken in approximately 10 seconds. The self-timer
indication LED will initially glow and then will blink for two seconds just
before the picture is taken.
(Fig. 57)
The Self-timer shooting mode will be canceled if the self-timer has not been
used within 60 seconds.
To cancel the Self-timer during its "count down", press the Drive Mode button
once. To cancel the Self-timer Mode before the "count down" has started, press
the Drive Mode button twice to return to the Normal Shooting Mode.
|
When taking a picture of yourself, it is recommended to compose the picture
manually by using the power zoom. Otherwise, the Auto Composing Mode system will
adjust the picture composition without you in the picture taking area and the
optimum composing angle may not be selected.
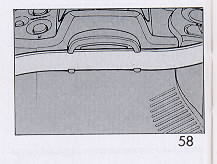
For self-timer photography or when the picture will be taken with your eye
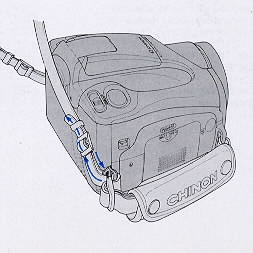
away from the viewfinder eyepiece, slip the neck strap into the slots alongside
the viewfinder eyepiece to prevent extraneous light from entering into the
camera through the eyepiece and effecting the exposure. (Fig. 58)
|
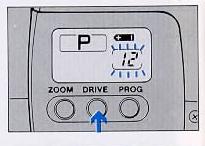
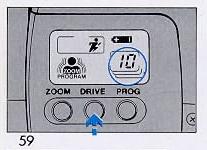
G. Continuous Shooting Mode
|
The camera has a sequential shooting capability which allows you to shoot
continuously as long as the Shutter Release Button is kept fully depressed.
1 ) Press the Drive Mode Button twice so that the Continuous Shooting Mode
indication " 10, " will appear on the LCD panel. (Fig. 59)
|
2) Press the shutter release button fully to start taking pictures.
Continuous shooting will take place as long as the Shutter Release Button is
completely depressed.
|
Note:
In this mode the camera will focus prior to each shutter release so that
even if the subject is moving, proper focusing will always be obtained.
In the Auto Composing Mode, the shutter will be released upon the completion
of the automatic picture composition process prior to each shutter release.
In the Sensor Flash Mode, the shutter will be released upon the completion of
the flash recycling, if necessary.
|
H. Unlimited Multiple Exposure Mode
The camera incorporates a multiple exposure system for unlimited images on
one frame.
The film will not advance automatically after taking a picture when this mode
is selected.
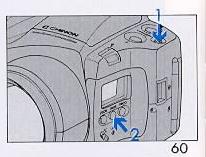
1 ) While pressing the Spot AF Button, press the Drive Mode Button so that
the counter frame on the LCD panel will begin blinking. The Multiple Exposure
Mode is then activated. (Fig. 60)
2) Press the Shutter Release Button fully to take each picture. During this
mode, the film will not advance and the frame counter will remain unchanged.
Note:
To cancel the Multiple Exposure Mode, press the Drive Mode Button or turn
the Main Power Switch to the "OFF" position.
Prior to developing and printing the film, the photo finisher should be
advised that multiple exposures have been taken. Otherwise, the negative (s) may
not be printed or printed improperly.
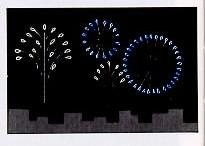
The Multiple Exposure technique is suitable for capturing fireworks displays
or night scenes, or when using the flash in a dark area. In daylight, it may
result in overexposed negatives.
I. EV Compensation
The EV Compensation allows the photographer to expose pictures either darker
or lighter in tone as opposed to the fully automatic exposures that the camera
would take without any manual direction from the photographer. In addition, it
also effectively corrects exposure settings when shooting against back lighted
or spotlighted conditions (With DX films).
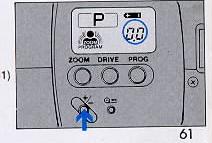
1) Push the EV Compensation Button (+/-) so that (0.0) appears on the LCD
panel. (Fig. 61)
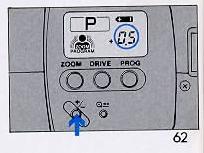
2) Select a preferred EV Compensation index by pushing the EV Compensation
Button.
Each time you press this button, the value of the EV Compensation will change
as follows: 0.0~ +0.5 ~ +1.0 ~ +1.5 ~ +2.0 ~ --2.0 ~ --1.5 ~--1.0 ~--0.5~0.0
each change will be indicated on the LCD panel as the buttons pressed.
(Fig. 62)
3) Once the preferred EV Compensation value is reached, press any button
other than the EV Compensation Button or leave the camera alone for
approximately 5 seconds. The LCD indication will revert to the normal display
indications. An absolute value (+ or -) will appear on the panel to signify that
the EV Compensation is in use. (Fig. 63)
Note:
Once the EV Compensation is set, it will not be canceled even if the shutter
is released or the Main Power Switch is fumed "OFF. For cancellation, press the
EV Compensation Button until the LCD panel indicates "0.0". The EV Compensation
will then be canceled.
During film rewinding and/or film loading, the EV Compensation setting will
be automatically canceled and the camera will revert back to the "0.0" setting.
The EV Compensation will not be effected during routine battery changes due
to the memory back up system.
The EV Compensation must be reset, if needed, after each new roll of a film
is loaded.
J. Bulb Photography
In either the Off-flash mode or the Fill-in flash modes in low lighting
conditions beyond the normal AE range, the camera will automatically switch
itself to the Bulb mode. This setting is extremely advantageous for night
photography
1) Select either the Off-flash Mode by returning the flash into its
retracted position or the Fill-in flash Mode by holding the flash button
depressed.
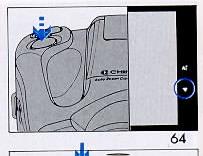
2) Press the Shutter Release Button halfway and confirm that the " ~ "
mark in the viewfinder lights up. (Fig. 64)
3) Press the Shutter Release Button completely but very gently to take
the Photograph. The shutter will stay open as long as the Shutter Release
Button is fully depressed. (Fig. 65)
Note:
-
A tripod must be used for Bulb photography.
-
In either Off-flash or Fill-in flash Modes, the camera switches itself to the
Bulb mode only at a brightness level of EV 4.2 or less for wide angle lens
settings and EV 5.0 or less for telephoto lens settings with ISO 100 films.
-
When using ISO 1000, 1600 or 3200 films, the Bulb mode cannot be activated.
K. Optional Accessories
a. Optional Tele Converter (1.4x) with Tele Converter Mode
|

|
CHINON offers an optional Tele Converter for the camera which will extend the
telephoto focal length to 154 mm. For picture taking with the optional
teleconverter, it is recommended to set the camera for the "Tele Converter mode"
for fool-proof picture taking. Neglecting to do this may result in pictures with
a "PORTHOLE" effect since the zoom could extend to wide angle, causing comer and
edge vignetting.
1 ) Turn the Main Power Switch to "OFF". Hold the filter ring around the
camera's lens and attach the Tele converter on to the filter ring by threading
it on. (Fig. 66)
|
|
|
2) Turn the Main Power Switch to "ON". Press and hold the
Spot AF Button down and the press the Zoom Mode button. The Tele Converter
Mode mark " ~ " appears on the LCD panel to signify that the Tele Converter
Mode is now set for picture taking. (Fig. 67)
3) Compose the picture by pressing the Power Zoom Buttons (Tele or Wide) and
then take the picture.
4) To cancel the Tele Converter Mode, press the Zoom Mode Button and confirm
that the Tele Converter Mode mark " ~ " disappears from the LCD panel. (Fig.
68)
|
Note:
In the Tele Converter Mode, lens zooming can only be made within the focal
length range that is effective for the Tele Converter.
The camera will not focus property if a picture is taken in the Tele
Converter Mode without attaching the Tele Converter. When taking a picture
without the Tele Converter in place, always cancel the Tele Converter Mode.
Once the Tele Converter Mode is selected, it cannot be canceled even if the
Main Power Switch is fumed "OFF. Cancellation can only be made by pressing the
Zoom
Mode Button.
- Always turn the Main Power Switch to the "OFF" position for attachment or
removal of the Tele Converter.
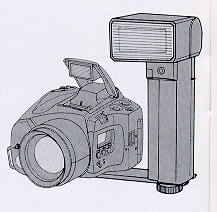
b. External Flash Unit
The external flash unit (Auto GS-320) can be used to extend the effective
flash range of the camera when using ISO 100 or 400 negative films. Using the
Auto GS-320 flash is recommended when the subject is beyond the effective flash
range of the camera's built-in sensor flash. The Auto GS-320 flash unit will
also permit bounce flash photography.
1) Attach the Auto GS-320 to the camera and turn the slave switch to
the flash "ON" position.
2) Press the Flash Switch on the camera to position the camera's flash
for sensor flash photography.
3) For ISO 100 negative film, select the A1 automatic position (A2 for
ISO 400 films).
4) Set the camera for the Manual Power Zooming Mode and compose the
picture by using the Power Zoom Buttons
(Tele or Wide).
5) Once the picture composition is completed. set the zoom head of the flash
unit according to the following table.
6) You are ready to take a flash picture with the Auto GS-320. For more
details, please refer to the instructions supplied with the Auto GS-320 flash
unit.
Note:
Unless the camera's built-in sensor flash is in its operating position, the
Auto GS-320 will not operate since the flash can only be fired by the built-in
slave unit of the Auto GS-320 and the flash light of the sensor flash of the
camera.
c. Using the Optional Slave Unit SE-620
With the optional slave unit (SE-620), a hot shoe type automatic flash unit
having an F-number setting can be used as an external flash unit with the
camera. The effective flash range can be calculated with the following formula.
Effective range = Guide number. F/F=4.4 and 5.6 for 38 mm and 110 mm zoom
lens settings, respectively.
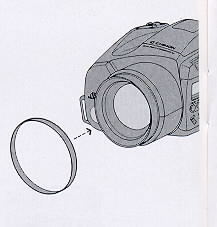
d. Filter and Hood
1 ) Filters of 58 mm diameter can be attached to the camera's filter ring.
When you wish to use a Polarizing filter with the camera, always select a
circular type PL filter. Using special effect filters such as a close-up lens
may result in out of focus pictures or picture vignetting. With these special
effects filters, always focus with the Spot AF button and take pictures after
the focusing is visibly confirmed through the view finder.
2) A 58 mm lens hood may be mounted on the camera but it may obstruct the
Multi AF infrared beams thereby effecting the focus. When using a lens hood,
always use the Spot AF button for focusing.
(AUTO DATE)
(1) YEAR/MONTH/DAY, DAY/HOUR/MINUTES SETTINGS
(A) Year/month/day setting
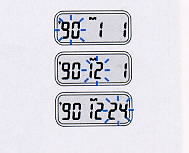
Example: 24 December, 1990
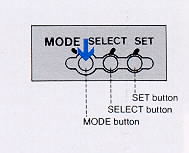
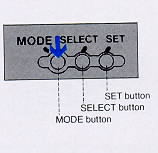
1. With a ball point pen or similar object (fingernail), press the
MODE button for year/ month/day setting.
2. With a ball point pen or similar object (fingernail), press the
SELECT button to locate the "year" position. Blinking number will appear.
3. With a ball point pen or similar object (fingernail), press the SET
button to set "90". Press the SELECT button to locate the "month" position above
whose number "M" (month) indication always appears and whose number appears
blinking. Then, press the SET button until "12" appears.
4. Press the SELECT button to locate the "day" position. The blinking
"day" indicating number will appear. Then, press the SET button until "24"
appears.
NOTE:
'Every time you press the SET button, the number shown on the display window
proceeds consecutively. When you press and hold the SET button for more than a
second, the numbers will change continuously.
(B) Hour/minute setting
Example: 19:58 (PM 7:58)
1. With a ball point pen or similar object (fingernail), press the MODE
button for day/ hour/minute setting.
2. With a ball point pen or similar object (fingernail), press the SELECT
button until a blinking "!" appears. Press the SET button to start "00" second.
3. Press the SELECT button to locate the blinking "minute" position. Press
the SET button to set "58".
4. Press the SELECT button to locate the blinking "hour" position. Press the
SET button to set "19".
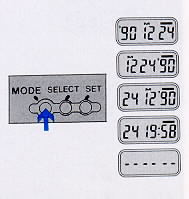
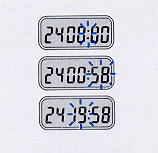
(2) DATA IMPRINTING
When the above procedure (1) is completed, select, by depression of the MODE
button, the year/month/day, month/day/year, day/month/year mode, day/hour/minute
mode or non imprinting mode that is desired.
NOTE:
-
'The data will not be sharply defined if subject on the bottom right hand corner
of the horizontal picture is white or yellow.
-
'Imprint display "-" in the upper right corner of the LCD will appear blinking
upon completion of the imprinting.
-
'Make sure that the "-" appears lit on the LCD before releasing shutter
(imprinting).
-
'Data recorded with the ISO 25 color negative film may not be brightly imprinted
due to the narrow latitude of this particular film.
-
Auto Date back is powered by the camera's battery. The following steps should be
taken as soon as possible to avoid any loss of date.
1. When replacing the battery, do so as quickly as possible. If
the Auto Date back is left without a battery for two to three hours, the time
and date readings may be incorrect even after a replacement battery has been
installed.
2. If an incorrect LCD indication appears after the installation of a
new battery, reinstall the battery in the battery compartment or "reset" it by
releasing the shutter.
3. Always check for the correct time and date indications after
replacing the battery.
IMPORTANT
1. To clean the unit, use a dry cloth without any cleaning agent
2. Do not depress the buttons with any too-sharp object such as a knife.
3. Rough handling may result in damage to the unit.
4. Keep the lithium battery out of the reach of children.
LCD Information
1. Use the unit at temperatures between -10°C and +50°C for normal
operation of the liquid crystal.
2. Do not expose the unit to the direct rays of the sun for a long
time since the LCD may turn black at temperatures above 60°C (140°F).
3. Performance of the LCD declines as the temperature becomes low.
Care of the Camera
This camera is a precision photographic instrument. When used with care it
will provide years of trouble-free service. Protect your camera from dirt, rain,
dampness and excessive heat. Avoid touching the lens. To clean the lens, wipe it
gently with a soft lintless cloth or tissue. Do not use eyeglass tissues as they
might damage the lens coating. Do not open and touch the inside of the camera as
possible high voltage in the flash circuitry can be dangerous. When the camera
will not be in use for a long period of time, turn off the Main Power Switch and
store in a well ventilated, cool, dry place. Due to the sensitive
characteristics of the micro computer built into the camera, the camera may not
operate properly even when a fresh battery is installed. It is not a
malfunction. If this should occur, turn the Main Power Switch "ON" and
"OFF" or reinstall the battery again.
Because we continually strive to improve our products, we may change
specifications without prior notice