and historical purposes, all rights reserved.
This page is copyright© by
This page may not be sold or distributed without
the expressed permission of the producer.
I have no connection with any camera company.
This camera manual library is for reference
and historical
purposes, all rights reserved.
This page is copyright©
by
![]() ,
M. Butkus, N.J.
,
M. Butkus, N.J.
This page may not be sold or distributed without
the expressed
permission of the producer.
I have no connection with any camera company.
If you find this manual useful,
how about a donation of
$3 to:
M. Butkus, 29 Lake Ave.,
High Bridge, NJ 08829-1701
and send your e-mail
address
so I can thank you.
Most other places would charge
you $7.50 for
a electronic copy
or $18.00 for a hard to read Xerox copy.
If you use Pay Pal, use the link below.
Use the above address for a check, M.O. or cash.
Back to main Camera Manual Site
Click here for Chinon LED Promaster
PDF
version of this manual
- better printing
INDEX
Nomenclature
Specifications
BASIC PROCEDURE
Installing Batteries
Loading the Camera
Using the Memo holder/Advancing the film
Film Speed Setting/Shutter Speed Setting
Aperture Setting
Focusing
Determining Correct Exposure
Unloading the Camera
Changing the Lens
ADVANCED TECHNIQUE
Depth of Field
Self-Timer
Electronic Flash
Infra-Red Film
MACRO PHOTOGRAPHY
Macro Photography
POWER WINDER
Power Winder
Chinon Lenses
Accessories for the Camera
NOMENCLATURE
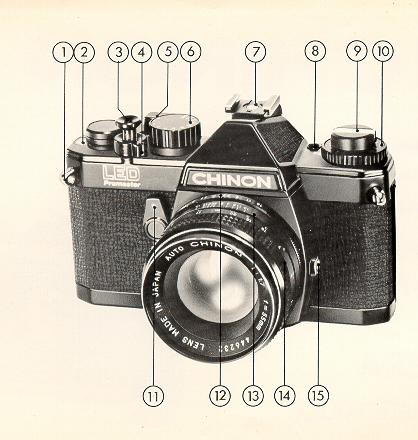
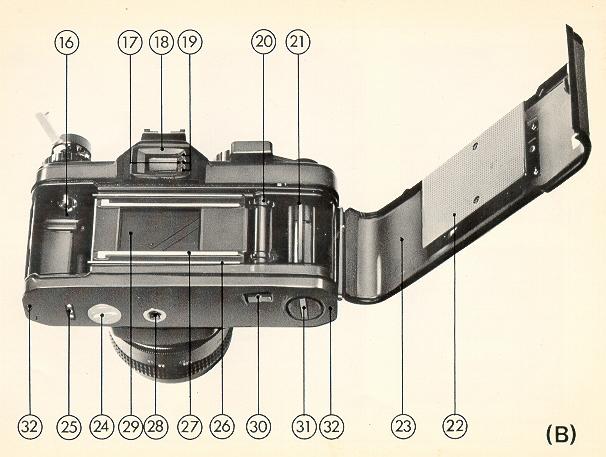
(Please refer to figures A & B in Illustrated Guide.)
 |
|
1. Shoulder strap eyelet 2 Frame counter 3 Shutter release / exposure meter switch 4 Shutter release lock lever 5 Film advance lever 6. Shutter speed dial 7. Accessory shoe (hot shoe) 8. Battery test button 9. Film rewind knob / back cover opener 10. Film speed dial (ASA/DIN) 11. Self timer |
12. Aperture ring 13. Depth of field scale 14. Focusing ring 15. X synchro-flash socket |
 |
|
|
16. Film chamber 17. Battery check lamp 18. Viewfinder eyepiece 19. Exposure indicator LED's 20. Sprocket teeth 21. Take-up Spool 22. Film pressure plate 23. Film chamber cover |
24. Battery compartment cover 25. Power Winder electrical contacts 26. Film guide rail 27. Film rail 28. Tripod socket 29. Shutter 30. Rewind button 31. Power Winder coupling cover 32. Power Winder guide pin receptacle |
SPECIFICATIONS
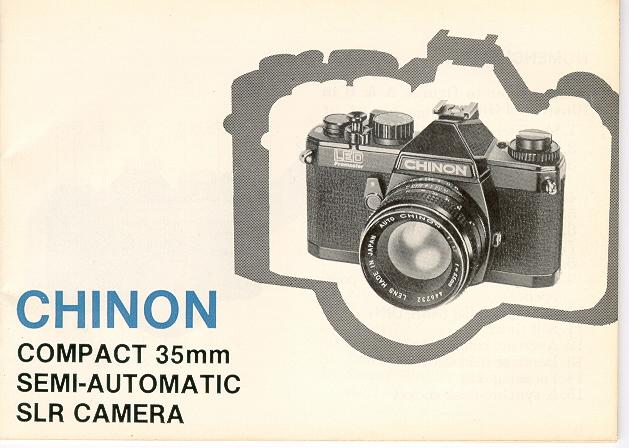
* Type: 35 mm SLR (single lens reflex) compact camera with Seiko focal plane shutter and L.E.D. type light measuring system
* Picture Size: 24 x 36 mm
* Film: 35 mm cartridge film
* Lens Mount: Pentax/Praktica M-42 Mount (thread mount)
* Viewfinder Visibility: 95% of negative size
* Mirror: Quick return, shockless system
* Shutter: New Seiko MFC-M (metal focal plane shutter, vertical path)
* Shutter Speeds: I sec. ~ 1/1000 sec., "B", "X" (X = 1/100 sec.)
* Exposure Meter: TTL, centre weighted measuring system employing
two silicon blue
cells, 3 step exposure indicator with 3
LEDs, Exposure range of EV 1 ~ 18 at ASA 100 F/1 A
* ASA Range: 25-1600 (DIN 15-33)
* Film Wind: Single stroke in an arc of 135° with 20° stand off
* Film Counter: Automatically indicates number of exposures
and resets to zero
when the camera is opened.
* Self Timer: 7 - 12 seconds
* Film Rewind: Folding crank type
* Accessory Shoe: Built-in hot shoe
* Synchronization: "X~ terminal (X = 1/100 sec.)
* Power Source: Two silver oxide G-13 type batteries (Eveready S-76 or equivalent)
* Battery Test: Indication by green signal lamp (LED) in viewfinder frame - push button
* Accessory: Chinon Power Winder, Chinon Interchangeable lenses, various accessories
* Dimensions: (Body only) 140.50 mm (w) x 88 mm (h) x 50 mm (d) (5.53" x 3.46" x 1.96~)
* Weight: (Body only) 610 g (21.51 oz.)
Outline Procedure of Shooting

Installing the Batteries:
2. Place the two 1.5V silver oxide G-13 type batteries (Eveready S76 or equivalent) with the minus ( - ) side facing upwards (Fig. 2).
3. Replace the battery chamber cover by turning fully clockwise (Fig. 3).
TESTING THE BATTERIES:
Test the Batteries When: — A new battery is installed
— The camera is being used continuously for many hours.
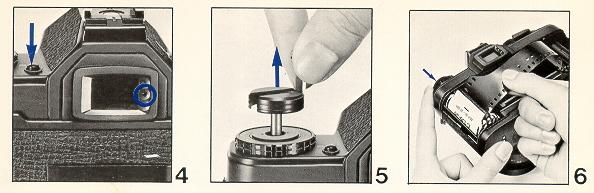
LOADING THE CAMERA:
Use 20 or 36 exposure 35mm film
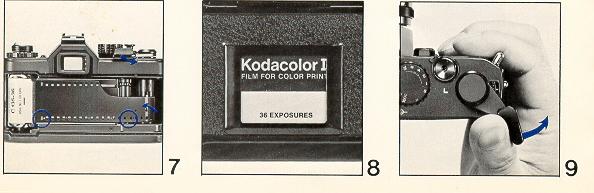
2. Keep the film rewind knob pulled all the way out, insert the film cartridge into the film chamber with the protruding end into the chamber at the bottom of the camera (Fig. 6). Push in the film retinal knob. It may be found necessary to turn the knob slightly so that the rewind catch engages the film cartridge spool. Insert the trimmed end of the film into the slot of the take-up spool. Holding the film lightly down on the film sprocket, operate the film advance lever. Having checked that the upper and lower film perforations have engaged the transport sprockets, close the camera back firmly until a click.
NOTE: DO NOT LOAD OR UNLOAD THE CAMERA IN BRIGHT SUNLIGHT.
MEMO HOLDER/ADVANCING THE FILM:
USING THE MEMO HOLDER:
Your new compact SIR camera has a built-in memo holder feature.
To utilize the memo holder feature, simply cut off the top of the film box and insert it into the memo holder located on the back cover of your camera so that you can quickly and easily identify the type of film and ASA speed used in the camera. Your calling card can also be inserted in the memo holder (Fig. 8).
ADVANCING THE FILM:
Make sure the film has been loaded properly. Operate the film advance lever through a full stroke (Fig. 9).
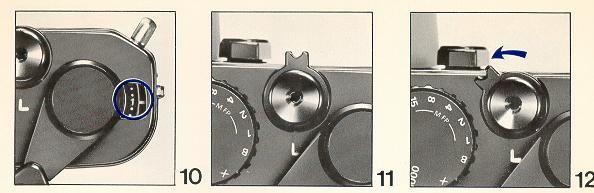
Now turn the rewind knob clockwise until resistance is felt. DO NOT FORCE IT. Keep observing the film rewind knob, it should turn counter clockwise every time the film is advanced. Operate the film advance lever and shutter release until Figure 1 is opposite the pointer in the frame counter window. Your camera is now ready for the first exposure (Fig. 10).
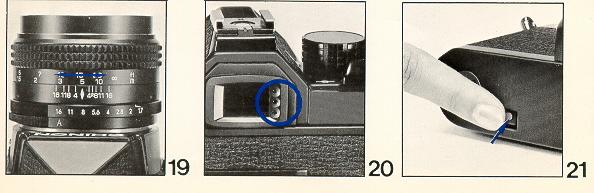
NOTE: WHEN THE SHUTTER RELEASE LOCK IS ENGAGED (Fig. 11) THE SHUTTER CANNOT BE RELEASED, TURN THE LEVER TO THE LEFT TO UNLOCK. (19)
FILM SPEED/SHUTTER SPEED:
THE FILM SPEED SETTING:
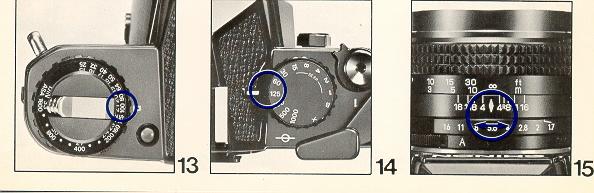
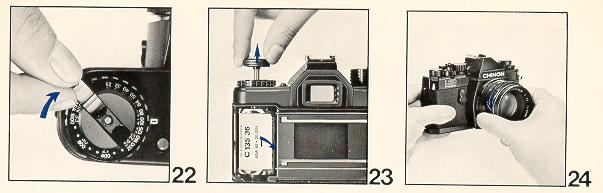
The ASA / DIN speed of the film is specified on the box or in the instruction sheet packed with the film. Set the ASA / DIN speed opposite the white index mark on the camera top cover by turning the ASA / DIN speed dial (Fig. l 3 ). Each time you use a different type of film, the ASA / DIN speed dial must be reset accordingly.
SHUTTER SPEED SETTING:
Rotate the shutter speed dial to the left or right and select a suitable shutter
speed from the band of "B", "X", 1 to 1 / 1000. "X" speed is 1/100 (Fig. 14).
APERTURE SETTING/FOCUSING:
APERTURE SETTING:
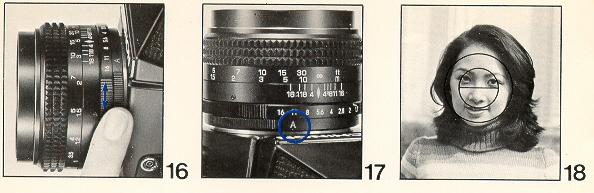
The aperture is set in the usual way by rotating the lens diaphragm ring until the desired F stop is set against the red diamond index mark on the lens barrel (Fig. 15 & 16 ). For further explanation see "Determining Correct Exposure".
FOCUSING:
Set the auto / manual switch on the lens to the auto position (Fig. 17 ). Observe the subject through the viewfinder. Turn the focusing ring on the lens until the upper and lower split images in the microprism are coincident in the center of the viewfinder (Fig 18 ).
The focus can also be adjusted by the microprism which surrounds the split image disk by turning the focusing ring on the lens back and forth until the image is perfectly sharp. This procedure ensures without a doubt that the image is at its sharpest setting.
Scale Focusing
You may also focus by utilizing the engraved distance scale on the lens. Estimate or measure the camera to subject distance in feet or meters and then set the focusing ring to appropriate setting (Fig. 19).
DETERMINING CORRECT EXPOSURE:
Your new compact SLR camera has a Through The Lens (TTL) exposure metering system. Also called an instant aperture closed measuring system. To determine the correct exposure, operate the film advance lever, observing the subject through the viewfinder in the center of the microprism area. Depress the shutter release button slightly until one or two of the exposure indicator lamps (LED's) located on the right side of the viewfinder frame illuminate (Fig. 20). Should the green lamp (LED) not illuminate, you must turn either the shutter speed dial or the lens aperture ring until the green lamp illuminates. By doing so, you will be assured of a correct exposure.
THE EXPOSURE INDICATOR:
Your new compact SLR camera has three exposure indicator lamps (LED's) located at the right side of the viewfinder. These three lamps control the condition of exposure of the camera. The conditions of exposures can be confirmed in the following three ways.
A. Over exposure
B. Correct exposure
C. Under exposure
When rotating the shutter speed dial or the lens aperture ring, you must operate them slowly since the exposure indicator lamps are very sensitive. Generally you should select a shutter speed first then operate the lens aperture ring until the proper exposure is obtained. A tripod should be used for shutter speeds longer than 1/30 sec.
NOTE: ONLY THE TOP RED EXPOSURE INDICATOR LAME WILL ILLUMINATE REGARD LESS OF THE LIGHTING CONDITION WHEN THE SHUTTER SPEED DIAL IS SET AT THE "X" OR "B" POSITION.
UNLOADING THE CAMERA:
When the red figure "20" or "36" (20 or 36 exposure) appears opposite the index mark in the frame counter window the end of the film has been reached.
Steps for Unloading the Camera:
2. Fold out the rewind crank on the rewind knob (Fig. 22).
3. Turn the rewind crank in a clockwise direction.
The rewind button on the camera bottom will snap back into position when the film advance lever is next operated. Have the film processed without delay.
CHANGING THE LENS:
Your new compact SLR is equipped with a thread mount which accepts all interchangeable lenses with Pentax/Praktica thread mounts. To remove the lens turn the lens counter clockwise until it is separated from the camera body (Fig. 24 & 25).
NOTE: DO NOT REMOVE OR REPLACE THE LENS WHILE THE CAMERA IS FUNCTIONING
DEPTH OF FIELD:
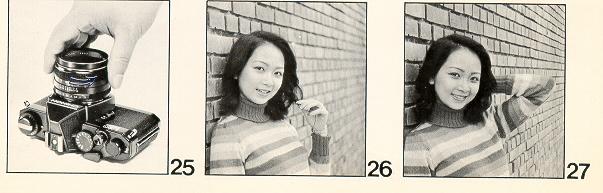
Depth of Field is the distance between the nearest and farthest objects in the scene that will be sharp in the finished picture. In practical terms this means that when you bring an object into sharp focus, objects behind and in front of this will be rendered more or less sharply as well. For more Depth of Field use a smaller aperture (for example, fill instead of 05.6). For less Depth of Field, use a larger aperture (for example' f/4.0 instead of f/8) (Fig. 26 & 27).
Visible Check in the Viewfinder;
Set the lens at the selected lens opening on the f stop ring. Depress the shutter release button half way and observe the subject through the
viewfinder. By doing so this will enable you to preview the area of sharpness in the picture before shooting. In addition Depth of Field viewing can be accomplished by setting the automatic / manual lever on the lens to the "M" position. By doing so you will preview the scene without activating the exposure system.
NOTE: MAKE SURE YOU RETURN THE AUTOMATIC / MANUAL LEVER TO THE "A" POSITION.
Depth of Field Scale
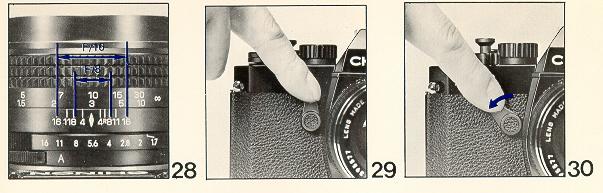
The depth of field scale indicates (after focusing) the approximate area that will be sharp in the picture. Locate on the depth of held scale the corresponding pair of f stop figures. The distance between these two f stop figures on the focusing ring will be the area of sharpness in your picture
SELF-TIMER:
This device, when set, trips the shutter release mechanism after a delay of 7-12 seconds. It is necessary if the photographer wishes to be in the picture and is useful for tripping the shutter at slow shutter speeds if a cable release is not available.
When using the self-timer the camera must of course be mounted on a tripod or a solid support of some kind.
To operate, move the self-timer lever counter clockwise as far as it will go.
Advance the film transport lever. Upon pressing the shutter release button, the
self-timer mechanism will start to operate (Fig. 29 - 30).
USING ELECTRONIC FLASH:
It is advisable to use flash when the exposure indicators detect that the light level is too low, such as indoors, at nigh time, or in daylight when the subject is too dark to provide adequate exposure.
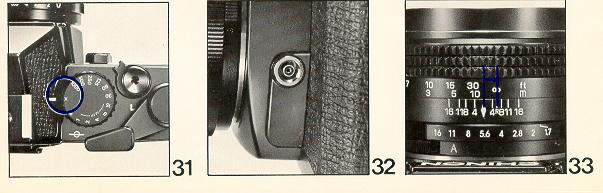
Electronic flash units as well as conventional flash units using flash bulbs may be utilized. Your new camera has a hot shoe. (Accessory shoe with built-in flash contact), together with a standard PC outlet for "X" synchronization (Fig. 31 & 32).
Electronic flash units having a foot with built-in contact may be used without a connecting cord. As the hot shoe has "X" type synchronization it can be used with electronic flash at "X" (1/100) or at slower shutter speeds. The lens aperture is determined by the calculation table indicated on the flash unit.
NOTE: WHEN THE "FP" OR "M" FLASH BULBS ARE USED THE PC CONNECTING CORD SHOULD
BE INSERTED INTO THE "X" TERMINAL AND THE SHUTTER SPEED SET AT 1/ 15 OR AT SLOWER
SHUTTER SPEEDS. IT IS ADVISABLE TO USE A TRIPOD FOR SLOW SHUTTER SPEED PHOTOGRAPHY.
(Webmaster: This is for the very old flash bulbs, not a common item anymore)
USING INFRA-RED FILM:
To use infra-red film an extra focusing adjustment must be made. After focusing
note the figure that is adjacent to the red diamond on the distance scale, then
move that figure over to the red "R" marked on the right side of the red diamond
(Fig. 33). This adjustment is only required for black and white infra-red film.
When using color infra-red film, focus in the normal manner.
<<< If
you are interested in IR photos, try digital >>>>
Macro Photography
The world of close-up photography has always been a complicated extension of normal photography. Now for the first time with your Chinon compact SLR, equipped with Chinon's unique 55mm f/1.7 macro lens, you can explore this fantastic world of photography without the costly addition of special equipment. Whether you are photographing an industrial application such as an ultra close-up of a printed circuit, or even an esoteric whim such as photographing a beautiful close-up of a dew drop on a flower petal, you can, without the addition of any accessories, open up new vistas in photographic applications. The only limit is your imagination.
The science of macro photography revolves around a close-up reproduction ratio which is not normally obtainable with standard focal length lenses. Since more and more photographers are exploring this highly creative world of macro-photography, Chinon has developed through extensive optical research, this unique ultra fast 55mm f/1.7 macro lens. It is available as a standard lens on both new SLR models.
Selection of the subject
Macro photography can cover the entire gamut but your subject should be relatively shallow in depth since depth of field becomes more critical in most macro situations. Particular emphasis should be placed on steadying the camera. Therefore, a tripod is almost an absolute necessity in all macro applications because the subject matter is being highly magnified.
Under many macro situations, where lighting is not an important factor it is highly recommended that you use a low speed film such as Panatomic X*, Kodachrome 25* and Kodacolor II*. In most instances your macro photograph will be more impressive when it is enlarged to a minimum of an 8" x 10" print. Accordingly you should keep the grain of the film "super fine" by using the recommended films. However, when lighting conditions necessitate a high speed film such as Tri-X * or Kodacolor 400 * it should not be regarded as a critical deterrent. Your Chinon 55mm f/1.7 macro lens is of the highest resolving power and the results will be acceptable with any type of film. Couple the fantastic features of your new camera with the Chinon Power Winder and the 55mm f/1.7 Chinon macro lens and creative capabilities are virtually endless. In addition to the 55mm f/1.7 macro lens your new SLR accepts an entire "system" of top quality lenses:
MACRO LENSES:
50mm f/1.7MC Macro
55mm f/1.7 Macro
40-105mm f/3.5 MC Macro
85-210mm f/4.5 MC Macro
Chinon Power Winder:
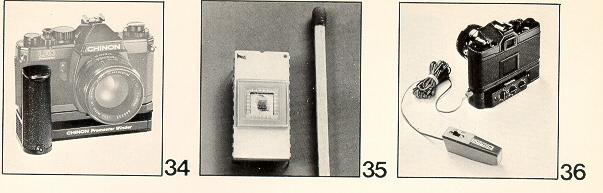
Your Chinon compact single lens reflex camera can also be used with the new Chinon Power Winder when motorized photography is desired. This sophisticated accessory enhances the versatility of your new camera and opens up new horizons for creative photography (Fig. 34).
The Power Winder, designed with the latest electronic technology, employs a special computer "memory" chip which monitors key functions essential to motorized photography (Fig. 3 5 ).
Single Frame Mode:
As in normal photography however the Power Winder can be coupled with an accessory remote control device (Fig. 36).
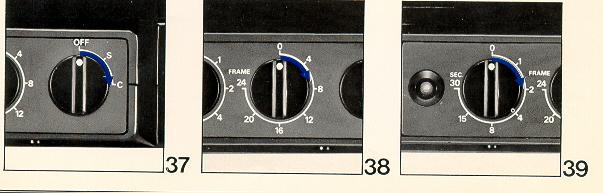
Continuous Mode:
Outstanding "hi-speed" (2 fps.) effects such as a subject moving or changing expressions can be caught on film. Couple this feature with the unique pre-set counter and electronic interval timer features and you can do almost anything photographically with your new Chinon camera (Fig. 37).
Pre-Set Counter:
The special "memory" chip monitors a preselected amount of exposures up to 24 frames - at a push of a button (Fig. 38).
Interval Timer:
Time lapse photography at your fingertips. By means of the "unique" memory chip it is now possible to make exposures up to 30 seconds apart.
It is possible to photograph just the same as in normal photography even when
your Power Winder is attached to your new Chinon Camera (Fig. 39).
2. The C/S dial of the Power Winder should be turned to the off position
so that
frames are not accidentally exposed when the
winder is installed to the camera body.
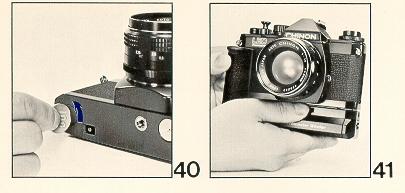
3. Insert the guide pin of the winder into the pin receptacle located on
the bottom
of the camera and rotate the winder attachment
screw clockwise until the
winder is securely fastened
to the camera body (Fig. 41).
Care of the Camera:
Your Chinon compact single lens reflex camera is a precision instrument built with the latest technologies. When used with care it will provide years of trouble free service.
Protect your camera from dirt, rain, dampness, and extreme heat. Avoid touching the lens. To clean the lens wipe it gently with a soft lintless cloth or tissue. Do not use eyeglass tissue as this might damage the lens coating.
IMPORTANT NOTE: Be sure always the shutter release lock lever is set at the "L" (locked) position when your camera is not used. This avoids a waste of battery and an accidental miss shot.
CHINON INTERCHANGEABLE LENSES
STANDARD LENSES:
50mm f/2.8
f/1.7 MC Macro
55mm f/ 1.7, f/ 1.7 MC, f/1.7 Macro f/ 1.4, f/1.4
MC
WIDE ANGLE LENSES: 24mm f/2.5 MC, 28mm f/2.8, f/2.8 MC, 35mm f/2.8, f/2.8 MC
TELEPHOTO LENSES:
135mm f/2.8, f/2.8 MC
200mm f/3.5, f/3.5 MC
300mm f/5.6 MC
500mm f/8.0 (mirror)
ZOOM LENSES:
75 - 205mm f/3.5
85 - 210mm f/4.5 MC
85 - 21Omm f/4.5 MC Macro
90- 190mm f/5.6
*With a single control ring for zooming and focusing.
CHINON ACCESSORIES
Power Winder
Remote Control Unit
Auto-Extension Rings
Bellows
Table Tripod
Mini- Copy stand
Spare Ring for Mini-Copy stand
Cable Release (13 inch)
Angle Finder
Eyepiece Adapter ( - 3, +1, +3)
Rubber Eyepiece
Filter (52mm/55mm)
IA, UV, Y2, ND4, PL
Rubber Lens Hood (52mm/55mm)
Neck Strap
Wrist Strap
Standard Lens Cap
(52mm/55mm/62mm)
Lens Cap with 2 clips (52mm/55mm) Lens Mount Cap Body Cap
Because we continually strive to improve our products, we may change specifications
without prior notice.