and historical purposes, all rights reserved.
This page is copyright© by
This page may not be sold or distributed without
the expressed permission of the producer.
I have no connection with any camera company.
If you find this manual useful,
how about a donation of
$3 to:
M. Butkus, 29 Lake Ave.,
High Bridge, NJ 08829-1701
and send your e-mail
address
so I can thank you.
Most other places would charge
you $7.50 for
a electronic copy
or $18.00 for a hard to read Xerox copy.
buy new manuals, and pay their shipping costs.
It'll make you feel better, won't it ?
If you use Pay Pal, use the link below.
Use the above address for a check, M.O. or cash.
Back to my on-line camera manuals page
CLICK HERE FOR Chinon PW-535 / PW-545
PDF FILE MADE FROM THIS PAGE
Chinon Power Winder instructions. Other models are basically the same. This model will fit the CE-5, CG-5, CE-4s, CE-4 series.
The PW-600 series will work on a CP-5, CP-6 or CP-X camera.
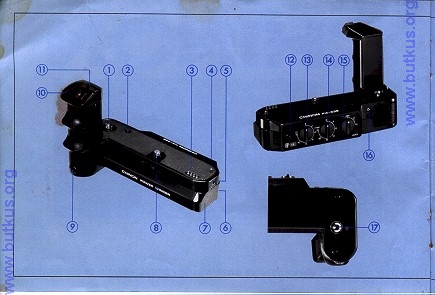
NOMENCLATURE
| 1. Film Winder Coupler
2. Rewinding Pin 3. Electrical Pin Connectors 4. Guide Pin 5. Remote Control Socket 6. Battery Container Detachable Button 7. Battery Container 8. Attachment Screw |
9. Action Lamp
|
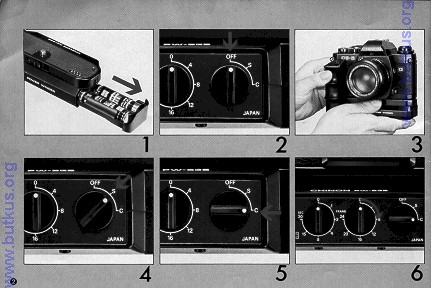
1. Takes 4 AA batteries
2. Dial should be off when installing and removing winder
3. Mount winder on camera. Turn screw on winder base to tighten to
camera. Finger tight is find. I find it good to clean the contacts
on the winder and bottom of the camera with a pencil eraser.
4. Winder dial is set to "single" fires once when shutter is press
and held.
5. Winder dial is set to "continous" fires and continues to fire when
shutter is pressed (Pre-set counter is at zero)
6. Other "pre-set" buttons, these fire at certain set times and total
number of frames to expose.
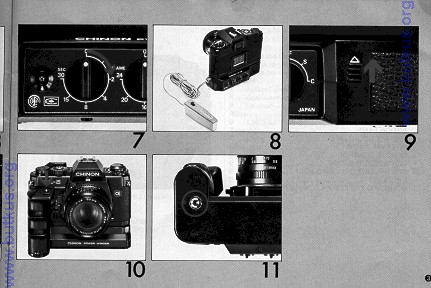
7. "Pre-set dial showing time between shots, action lamp, to left, will
light to show camera winder operation during firing only.
8. Optional wired remote control. This might be able to be made
by a plug that is just shorted by a switch. This would allow you
to make the wire as long as needed.
9. Shows rewind button. Press up to allow you to rewind film
without taking off power winder.
10. Shows locking button on certain winders. Usually used with
the "timed" feature. Allows you to press the winder button, push
this button forward and lock the shutter down. The "timed" feature
will then fire off the shots according to the timer setting.
11. Tripod mount. Placed here where there are some solid parts
on the winder body.
Below is the text from the Chinon PW-535 / PW-545 winder. Others very similar.
Chinon Power Winder: SPECIFICATIONS
Camera
CHINON CE-5, CG-5, CE-4s, CE-4
Winding Speed
Approx. 0.5 sec.
Shutter Speed Range .
AllSpeeds
C/S DIAL
Power Source - OFF; Single Frame - S;
continuous - C
* Pre-Set Counter
0, 4, 8, 12, 16, 20 & 24 frame
* Interval Timer
0, 1,2,4,8, 15&30sec.
Power Source
6V- 4 AA (Penlite) Alkaline Batteries
(By one touch detachable battery container)
Indication Lamp
Red indicator Lamp for "S" and "C"
Battery Life (Number of films)
Minimum 20 cartridges (36 Exposure) at Room Temperature
Shutter Release
Activated with Camera Shutter
Release Button or Winder Shutter
Release Button
Remote Control: 2.5 mm Mini-Jack, Remote-Control
Accessory Switch is available
Attach to the Camera
Screw-in to the tripod socket in the camera
with guide pin channel
Others
Action Lamp (Red LED)
Computerized Auto-Stop device when the film
is finished
Size
136.0 (L) x 88.5 (H) x 76.0 (W) mm
Weight
230 g.
* PW-535 version only
Chinon Power Winder Instructions
INSTALLING THE BATTERIES
1. Remove the Battery Container from the side of the Power Winder by depressing the battery container detachable button downward toward the arrow indication and sliding the container until it is separated from the winder (ring. 1).
2. Load the Battery Container with four (4) AA size (Penlite) 1.5 volt Alkaline Batteries. The correct positioning of the positive (+) and negative (-) ends of each battery is shown in the container. When a fresh set of batteries are installed, a minimum of 20 rolls of 36 exposure films can be used at room temperature. Replace with a fresh set of batteries when the motor in the power winder stops running.
If the motor stops during the film transport, it indicates that the batteries have insufficient power to drive the motor. Immediately, replace the batteries with a fresh set.
Install the batteries correctly to avoid malfunction of the Power Winder and to avoid the possibility of the batteries leaking.
NOTE: Always remove the batteries when the power winder is not in use for a long period of time. When replacing batteries all four (4) batteries must be replaced.
ATTACHING TO THE CAMERA
1. The C/S Dial should be turned to the off position (Fig. 2).
2. Insert the guide pin into the pin receptacle located on the bottom of the camera. Align the attachment screw to the tripod socket of the camera and rotate the attachment screw clockwise until the Power Winder is securely fastened to the camera body (Fig. 3).
NOTE: To attach a CHINON Power Winder to CE-5 and CG-5 camera body, the body grip has to be removed from the camera body.
ADVANCING THE FILM
Normal Use
1. Set the C/S Dial to the "S" (single frame exposure) position (Fig.
4).
2. Each time the shutter release button is depressed single frame shooting will result. The film will automatically be advanced one frame and the shutter will be wound ready for the next exposure.
Remarks: The shutter can be released by depressing the shutter release button on the camera body or the shutter release button on the winder grip.
Continuous Use
1. Set the C/S Dial to the "C" (continuous) position (Fig. 5).
2 Continuous shooting will result as long as the shutter release button is depressed.
3. The actual frame per second rate will depend on such factors as the interval timer and the pre-set counter. See "Interval Timer" and "Pre-set Counter" for further explanation.
ACTION LAMP
The Chinon Power Winder employs an electronic LED (red) which illuminates when the shutter is tripped and during the instant the film is automatically advanced. This action light confirms that the Power Winder and camera are functioning properly.
PRE-SET COUNTER (PW-535 only)
Because of the special computerized memory chip built in to the Chinon Power Winder it is now possible to preselect a predetermined amount of frames that can be shot continuously.
1. Set the C/S Dial to the "C" position.
2. Set the pre-set counter to the number of desired frames for continuous shooting (Fig. 6).
3. Depress the shutter release button on the camera.
NOTE: When the pre-set counter is used, check the remaining film in
the camera. If the desired amount of frames are greater than the amount
of frames remaining in the film, the counter will automatically stop at
the end of the roll.
- While taking pictures in the continuous shooting mode, the film advance will stop automatically regardless of the pre-set counter if your finger is removed from the shutter release button
- As soon as the shutter release button is depressed again the counter starts from the beginning. For example, should you set the pre-set counter to 8 depress the shutter release button and remove your finger after the 5th frame has been exposed. Then depress the shutter release button again. The counter will automatically start from the beginning and another 8 frames will be exposed.
- When the desired amount of frames are exposed, the Power Winder will stop automatically after advancing the film one additional frame.
- In the case where the Power Winder stops, check both the Frame Counter on the camera and the preset counter on the Power Winder. If the pre-set counter or the film in the camera has not reached the end, replace the batteries with a fresh set.
(PW-535 only)
As mentioned previously, because of the latest electronic technologies incorporated in the Chinon Power Winder and because of its special computerized memory chip it is now possible to shoot "time-lapse" photography by menas of the special built-in interval timer.
1. Set the C/S Dial to the "C" position.
2. Set the interval timer dial to the desired interval position (Fig. 7).
3. Keep the shutter release button depressed on the camera or locked into the continuous shooting position.
4. A desired number of frames can be exposed automatically when used with the pre-set counter and the interval timer.
NOTE: The Interval Timer controls the duration between each exposure automatically. Neither the pre-set counter nor the interval timer can be used in the "S" position.
REMOTE CONTROL
Remote control photography can be accomplished with your new Power
Winder by means of the special remote control accessory switch available
from your CHINON dealer (Fig. 8).
1. Set the C/S Dial to the off position.
2. Set the remote control switch to the off position and plug it into the remote control socket of your Power Winder.
3. Set the C/S Dial to either the "C" or "S" position.
C/S Dial set at the "C" position
(PW-535)
The operating manner is the same as previously described.
NOTE: When the C/S Dial is set at the S position do not use the Pre-Set Counter or the Interval Timer as these two features only function when the C/S Dial is set at the C position.
(PW-545)
Continuous shooting will result as long as the remote control switch
is set in the on position.
C/S Dial set at the "S" position
For single frame exposure, the Remote Control switch is set to the
on position. A frame will be exposed each time the remote control switch
is turned on.
NOTE: If you use Chinon Wireless Controller which is available as an optional accessory, you can control this Power Winder remotely at a distance of approx. 40 meters (13.1 2 Ft.).
REWINDING THE FILM
1. Your Chinon Power Winder has a built-in automatic stop device which is activated at the end of the roll of film. When the automatic stop device is activated the film should be completely exposed. It is recommended to check the frame counter to confirm that the roll of film is completely exposed.
2. Push up the rewind lever as indicated by the arrow mark on the Power Winder and rewind the film by turning the rewind crank in a clockwise direction on the camera (Fig. 9).
3. Process the film without delay.
CONTINUOUS SHOOTING LOCK
When used for continuous shooting with the Pre-set counter and Interval Timer, the shutter release button can be pressed down and locked for continuous shooting (Fig. 10).
CAUTIONS
1. The batteries will weaken if the Power Winder is not used for a long period of time or at low temperatures. It is recommended to replace the batteries or use the unit at normal room temperatures.
When new film is loaded in the camera, advance the film manually for one frame or re-set the C/S Dial.
If the Power Winder is not in use, the C/S Dial should be returned to the off position. If the Power Winder is not in use for a long period of time, remove the batteries from the unit.
4. The dials on the power winder should be set with clicked position.
MOUNTING THE POWER WINDER TO A TRIPOD
The Chinon Power Winder is provided with a tripod socket so that it
may be secured to a tripod (Fig. 11).