· When loading a film, never forget to remove the protective sheet inside the camera.
- - Back to Section One To Section Three To Section Four- -
Loading the film
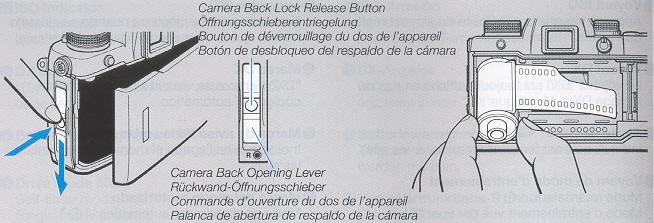
1. While pressing the lock release button, slide down the camera back opening lever and open the camera back.
· When loading a film, never forget to remove the protective sheet
inside the camera.
· Take care not to touch or contaminate the DX contacts and data back contacts.
· Always load and unload films in subdued light.
2. Insert the film slant-wise into the film 2
chamber with its protruding end downwards.
Note on the shutter curtain: The shutter curtain is a
precision part. Never touch it with your finger or strike Ike it with film
leader. When the film leader lies on the shutter curtain, in particular, never
trip the shutter.
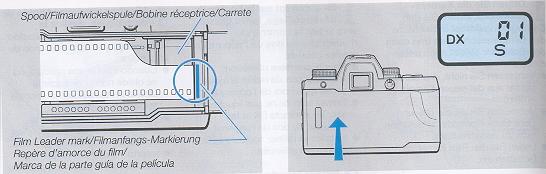
3. Pull out the film leader as far as
the orange "l" mark and place it on the spool. Make sure that the film
is in contact with the shutter and does not curl outwards (see illustrations
below).
· When too much of the film has been pulled out, rewind excess film
back into the cassette.
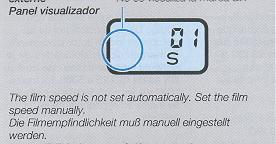
4. Make sure the camera back is
properly closed. When the camera back is closed, the film is
automatically advanced into position for the first shot and the exposure counter
will show "01."
· When the exposure counter in the display blinks and does not move
from "00" the film is not advancing properly. Open the camera back and reload
the film properly again
Setting the Film Speed
 |
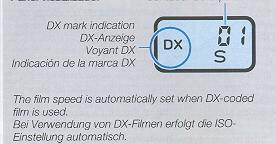
The film speed can be set in two ways: automatic setting with DX-codes and manual setting. The film speed is automatically set when the main switch is on and "DX" is displayed on the display panel. When using DX-coding film no adjustment is required. Be sure to set the film speed manually when "DX" is not shown on the display.
|
· When set to "DX" (automatic speed setting mode)
 |
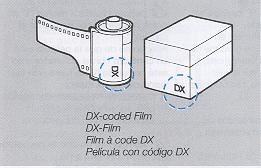
When DX-coded film is used, the film
speed is automatically set. The film speed range for DX coded film is ISO 25
to 5000. The "DX" mark and the film speed is indicated on the film package.
· The film speed is automatically set to ISO 100 when film other than DX-coded film is loaded. |
· Manual Setting of the Film Speed
 |
Set the film speed manually when using
non-Ding film, or when you want to use a film speed other than that of the
film.
· You can set the film speed in 1/3 step increments in a range of ISO 6 to 6400. · A manual film speed setting overrides a DX coded film speed setting. |
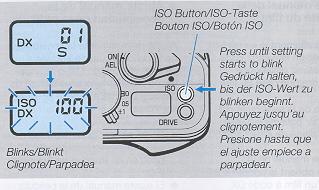 |
1. Turn the main switch on and hold down the ISO button (about 2 sec.) until the film speed setting starts blinking.
Take your finger off the button when the blinking starts. |
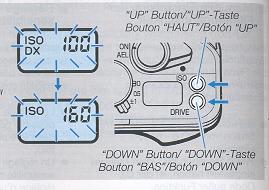 |
2. Press the "UP" button (ISO button) or 2 "DOWN" button (Drive Mode button) so that "DX" or the desired
film speed setting appears on the display panel.
|
DX - 6 - 8 - 10 - - 5000 - 6400 - (The The film speed changes continuously when the buttons are held down.)
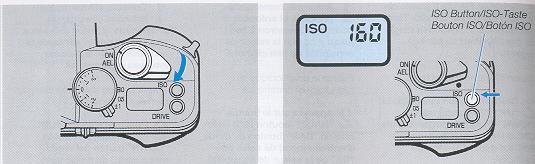
3. Now turn main switch off to complete film speed setting.
· The film speed setting can also be completed by depressing the shutter release
halfway or by leaving the camera idle for 16 seconds.
· When the film speed setting is made, the exposure counter reading
replaces the film speed value.
· The set film speed is stored until it is reset.
< Checking the Film Speed > Turn the main switch on and press
the ISO button to display the film speed setting on the display panel for about
16 seconds. "DX" and the film speed is displayed in DX mode.
 |
Use this lever to change exposure modes. Press in the exposure mode lock release button and turn the exposure mode selector lever to set the exposure mode index to desired position. |
Drive Mode Button
 |
The drive mode button allows you to select one of the following four modes:
"S" single-frame shooting,
"C" continuous shooting mode, " ![]() " self-timer shooting and "
" self-timer shooting and " ![]() " multiple exposure modes.
" multiple exposure modes.
1. Turn the main switch on and hold down the drive mode
button until the drive mode setting starts to blink (about 2 seconds).
Take your finger off the button when the blinking starts.
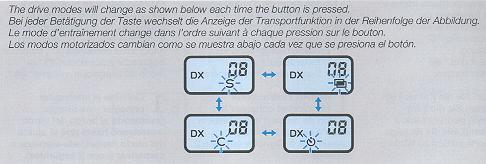 |
2. Press the drive mode button (DOWN button) or the ISO
button (UP button) to set the desired drive mode.
3. Press the shutter release halfway to light 3 the drive
mode indication. This action completes the drive mode setting.
· The drive mode can also be set by operating the main switch, changing exposure
mode or waiting 8 seconds until the blinking is replaced by steady lighting.
· In self timer mode ![]() " or multiple exposure mode "
" or multiple exposure mode "
![]() ", the
respective indication blinks.
", the
respective indication blinks.
· When the main switch is set to OFF while " ![]() " or "
" or " ![]() " mode has been set, the mode is canceled. When the main switch is turned on
later, the camera starts in "S" drive mode.
" mode has been set, the mode is canceled. When the main switch is turned on
later, the camera starts in "S" drive mode.
"S" Single-frame shooting mode Each time the shutter
release is depressed, one frame is exposed and the film is advanced for the next
shot, then stops.
"C" Continuous shooting mode While the shutter release is
depressed, the camera continues to take pictures at a maximum speed of about 3
frames a second. (The shooting speed differs with the shutter speed, film speed,
whether or not dates are imprinted between frames, battery condition, etc.)
"![]() "
Self-timer shooting mode Use this mode for self-timer shooting. For details, see
page 170.
"
Self-timer shooting mode Use this mode for self-timer shooting. For details, see
page 170.
"![]() "
Multiple exposure shooting Use this mode for multiple exposure shooting. For details see page 164.
"
Multiple exposure shooting Use this mode for multiple exposure shooting. For details see page 164.
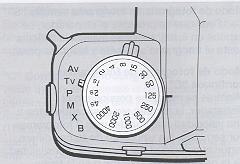 |
Use the shutter speed dial to adjust the
shutter speed. It can be used in the shutter-speed priority auto exposure
("TV") and manual exposure ("M") modes. Shutter speeds can be set in 1 step
increments from 4s (4 sec.) to 4000 (1/4000 sec.).
· The shutter speed must be fixed at a click position when shooting. |
 |
This camera provides three metering
methods: " |
 |
The FU-4 focusing screen (horizontal split-image spot/microprism type) comes with the camera as standard equipment. The subject is focused using the horizontal split-image spot in the center, on the microprism around it, and on the surrounding matte area. |
< Horizontal Split Image Spots > While looking through the viewfinder,
turn the distance ring until the upper and lower segments of the image coincide.
When the subject is not focused, the two segments will not coincide.
< Microprism Collar and Matte Screen>
Turn the distance ring until the image on the microprism collar or
matte screen appears sharp. If the subject is not in sharp focus, the image on
the microprism collar will appear grainy and that on the matte screen blurred.
· When using a slow lens or taking close-ups with a high magnification, focusing
may be difficult. In such cases, use the matte screen to focus.
· If you are nearsighted or farsighted and find focusing difficult, acquire an
optional FL diopter lens. Eight types are available from -5D to +3D that can be
attached to the viewfinder eyepiece (see page 234).
Holding the Camera
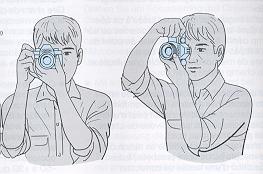 |
To take sharp pictures, the camera must
be held steady. Blurred pictures are most often caused by camera shake.
The camera can be held not only in the horizontal position, but also in the vertical position depending on the subject. In any case, find the camera holding techniques that suit you best. You can also use buildings and trees for support. |
Rewinding the Film
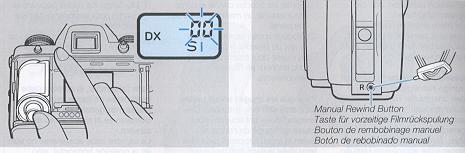
After the last frame is exposed, the camera will automatically rewind the
film. While the film is rewinding, the counter reading decreases continuously.
When rewinding completes, the motor will stop and "00" will blink on the
exposure counter. Check that the motor has stopped and that "00" blinks on the
exposure counter before opening the camera back and removing the film.
Use the manual rewind button to remove a film in mid-roll. Press the button
using the front end of the supplied strap stopper. (Do not use a needle or other
pointed object)
· Remove the film in subdued lighting.
· Be sure to unload the film after it has been rewound. After the film has been
rewound, the camera will not operate unless the camera back is once opened.
· Films that have been exposed should be developed as soon as possible.
· When more frames than the number normally provided by the film is shot, the
last frame the film is shot, the last frame may be cut in processing.
Shutter Speed and Aperture Indicators
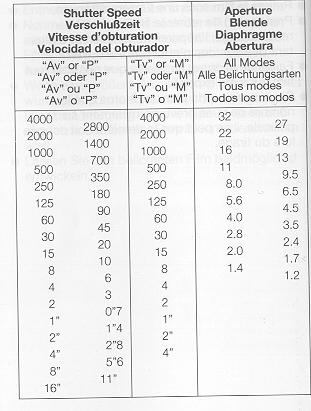 |
The shutter speed and the aperture are in the following manner.
· The shutter speed is indicated in the range of 4000 (1/4000 sec.) to 16 (16
sec.). When the exposure mode is "Av" or "P", the shutter speed coupled with the
aperture is shown in 1/2 steps. In "TV" or "M" modes, the set value is
displayed. When set to "X", the shutter speed of "125" is displayed. When set to
"B", the shutter speed is displayed as "blb."
· The aperture is indicated in 1/2 steps in the aperture range of the used
lens. However, when the aperture is operated in less than 1/2 steps, an
approximate value will be displayed. For example, an aperture of F3.3 is
indicated as "3.5".
|
- - Back to Section One
To Section Three To Section Four - -