Contax Aria
instruction manual
- Section Three -
- -
Back to Section One
To Section Two
To
Section Four- -
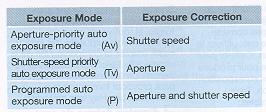
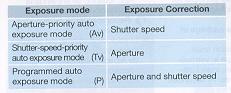
Taking Pictures ~ Selecting the Exposure Mode
You can choose the following exposure modes depending on your shooting object
and application.
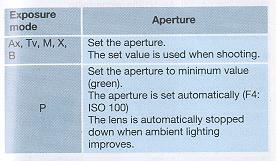
Av: Aperture-priority Auto Exposure When choosing your desired
aperture, the camera will automatically select the shutter speed suited for it
to provide correct exposure. This mode is useful for taking pictures by
utilizing the lens depth of field.
Tv: Shutter-speed-priority Auto Exposure (with MM type lenses only)
When choosing your desired shutter speed, the camera will automatically select
the aperture suited for it to provide correct exposure. This mode is useful for
taking fast moving objects.
P: Programmed Auto Exposure (with MM type lenses only)
In this mode, the camera will automatically select the optimum combination of
aperture and shutter speed on a preset program in accordance with the brightness
of the object. Because it is not necessary to set exposure, you can concentrate
on composing your picture and choosing the best shooting moment.
M: Manual Exposure In this mode, you can choose the
aperture and shutter speed as desired. Intentional over-or underexposure is also
easy.
X: Flash Photography This mode is for use with an
ordinary flash unit having only an X-contact but no dedicated flash linked
contact. A shutter speed of 1/125 is used. For details, see "Taking Pictures
Using X-contact Flash Units Other than TLA Flash Unit" on page 162.
B: Bulb Exposure This mode can be used for taking night
scenes or pictures of the sky at night which require long exposure.
· If an AE lens is mounted on the camera, you cannot take pictures in the "Tv"
or "P" mode. Even if it is been set to the "Tv" or "P" mode, it will
nevertheless operate in the "Av" mode.
· If no lens is mounted on the camera, the exposure mode will automatically
switch to the "Av" mode even if it has been set to the "Tv" or "P" mode.
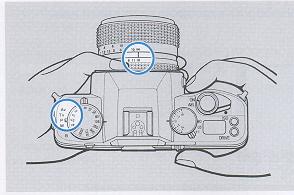
Aperture-priority Auto Exposure [Av]
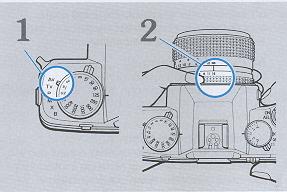 |
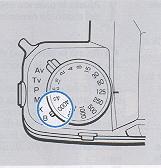
1. Set the exposure mode selector lever to 1 "Av."
2. Set the aperture and shoot.
When setting the aperture with the lens aperture ring, the camera will
automatically set a suitable shutter speed. The set aperture and the
automatically set shutter speed light in the viewfinder. It does not matter
where the shutter speed dial is set. |
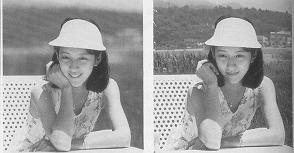 |
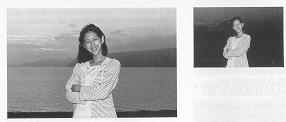
Example 1: When a large aperture
is used the depth of field is small.
Example 2: When a small aperture is used the depth of field is
large. |
Shutter-speed-priority Auto Exposure [Tv] (with
MM type lenses only)
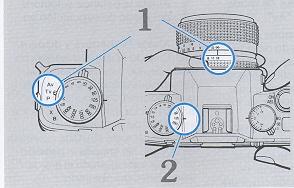 |
1. Set the lens aperture to the minimum 1 aperture (green) and set
the exposure mode selector lever to "Tv." The minimum aperture on the aperture ring of MM type lenses is
marked in green to show that you should set the lens to it in the programmed
auto exposure and shutter speed- priority auto exposure modes.
2. Set the shutter speed and shoot When the shutter
speed is set by turning the shutter speed dial, the camera will
automatically set the aperture suited for it. |
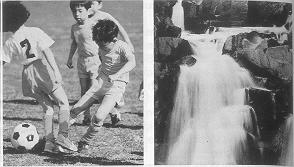 |
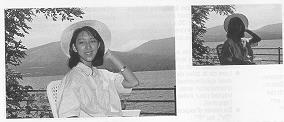
Example 1: Fast shutter speed
Example 2. Slow shutter speed
|
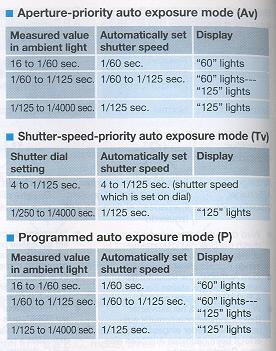
< Shutter Speed Shift and Warning in the
Shutter-Speed-Priority Auto Exposure Mode >
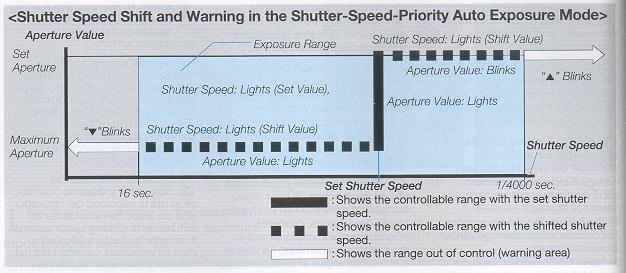
In the
"Tv" m mode , the shutter speed you have selected cannot provide correct
exposure because the aperture suited for it is beyond the lens aperture range,
the camera will then automatically shift the shutter speed to always provide
correct exposure. The shifted shutter speed is displayed. The controllable range
of shutter speeds on automatic setting is from 16 to 1/4000 seconds.
· When the correct shutter speed is faster than that you have set, the
aperture will blink. Make sure the lens is set at minimum aperture.
· When an MM type lens is set to an aperture that is not its
minimum aperture, the camera will automatically choose an appropriate aperture
between the maximum aperture and the aperture being set.
Programmed [P] (with MM type lenses only)
 |
1. Set the lens to its minimum aperture (in 1 green)
and set the exposure mode selector lever to "P."
2. Compose your picture and shoot.
The camera will automatically select the optimum combination of
aperture and shutter speed to suit your subject, and the selected aperture and
shutter speed will be displayed in the viewfinder. |
< Programmed Auto Control Diagram> (with F1.4
lens, using F16 and ISO 100)
The combination of aperture and shutter speed which can be set in the
programmed auto exposure mode are shown in the diagram.
· An aperture value between the set aperture and full opening is automatically
set if the MM lens is not set to its minimum aperture.
Precautions on Auto Exposure (Av, Tv, P)
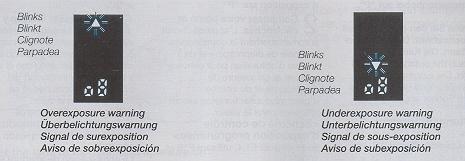
Over/Underexposure Warning in Auto Exposure> Overexposure Warning:
A blinking overexposure mark
 indicates overexposure. Because the subject is too bright, readjust the aperture
so that the
mark goes off. It is also possible to reduce the light intensity with an optional ND filter.
indicates overexposure. Because the subject is too bright, readjust the aperture
so that the
mark goes off. It is also possible to reduce the light intensity with an optional ND filter.
Underexposure Warning: A blinking underexposure mark  indicates underexposure. Because the subject is too dark, use additional light
to brighten up the subject or change the aperture so that the
mark
goes off. Also, a dedicated flash unit will let you take correctly exposed
pictures.
indicates underexposure. Because the subject is too dark, use additional light
to brighten up the subject or change the aperture so that the
mark
goes off. Also, a dedicated flash unit will let you take correctly exposed
pictures.
· Even when an over-or underexposure warning appears, you can still take the
picture by pressing the shutter release.
< Exposure Meter Indication in Evaluative Metering >
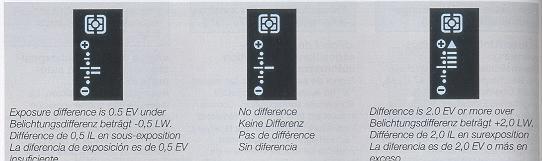
In the evaluative metering mode, the exposure meter lights and indicates the
difference between evaluative metering and center weighted average light
metering. When only the center bar is displayed, there is no difference between
evaluative metering and center-weighted average light metering. An additional
bar lights for each 0.5 EV exposure change. When the difference is 2.0 EV or
greater, the bar and Up
will light.
· When the "" or
lights, the camera warns against under- or overexposure. Then adjust the
exposure according to the instructions given on page 106.
· In center-weighted average light " "  " spot " "
 "
metering modes, the exposure meter is not displayed.
"
metering modes, the exposure meter is not displayed.
· For information on the different metering modes, see page 116.
< Cautions on the Use of Accessories>
When using a lens with a maximum aperture slower than F5.6 or an accessory with which the automatic diaphragm of the lens does not operate (auto
bellows PC, microscope adapter, extension tube 7.5 mm, reverse ring, etc.), note the following:
(1) Though the aperture displayed in the viewfinder is fixed at "1.4", the
camera light metering system will operate properly.
(2) You cannot take pictures in the shutter-speed priority (TV) or programmed
auto exposure (P) mode. Choose the aperture-priority exposure (Av) or manual
exposure (M) when using these accessories.
Manual Exposure [M]
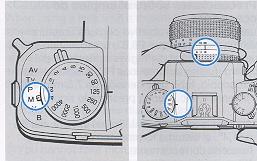 |
1.Set the exposure mode selector lever to "M".
|
 |
2. Set the
shutter speed and aperture and shoot. Set the shutter speed with the
shutter speed dial and aperture with the aperture ring. The selected shutter
speed and aperture value are displayed in the viewfinder. The exposure meter
shows the difference between suitable exposure in the manual exposure mode
and the correct exposure value in the set metering mode.
Set the shutter speed dial or the aperture ring to obtain correct
exposure.
|
Bulb Exposure [B]
|
|
1. Set the exposure mode selector lever to "B".
2. Set the aperture and shoot.
As long as the shutter release is depressed, the shutter will remain open to expose the film. |
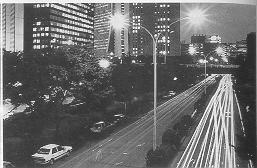 |
· Mount the camera on a tripod or a stable base to prevent camera shake and trip the shutter with Cable Switch L (optional accessory).
· While the film is exposed in the bulb exposure mode, the exposure counter in the display panel will indicate elapsed time during bulb exposure. It will
count from "0'00~ to "9'59" (9 minutes 59 seconds), then repeat the same cycle.
· During exposure all the indicators in the viewfinder disappear. |
Miscellaneous Shooting Techniques
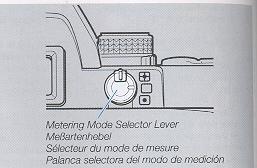 |
This camera provides three metering methods: evaluative, center-weighted average light and spot metering. You
can choose the desired method with the metering mode selector lever. Select the metering method that best suits the shooting conditions and your
shooting requirements for optimum effect. |
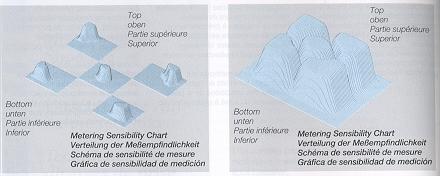
<Evaluative Metering> " "
mark As shown in the illustration, the evaluative metering method divides the
scene into 5 segments and obtains independent metering data from each segment to
determine optimum exposure depending on the condition of the subject. Thus
evaluative metering handles not only normal shooting conditions but can
automatically compensate for backlighted subjects leaving you free to compose
the picture. .
"
mark As shown in the illustration, the evaluative metering method divides the
scene into 5 segments and obtains independent metering data from each segment to
determine optimum exposure depending on the condition of the subject. Thus
evaluative metering handles not only normal shooting conditions but can
automatically compensate for backlighted subjects leaving you free to compose
the picture. .
Center-Weighted Average Light Metering> "
" In this method, the camera measures the light intensity with emphasis on the
subject in the center of the viewfinder and also takes the brightness in the
surrounding area into account to determine the exposure value. Because it
accommodates fluctuations of light, it is suited for ordinary and fast-moving
subjects.
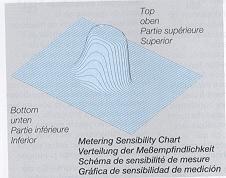
< Spot Metering > "
" In this method, the camera measures only the brightness of the subject in the
center of the viewfinder (microprism area) to determine the exposure value. Its
applicable area is within the outer circle of the center of the viewfinder. It
is suited for backlighted subjects, stage scenes in which the main subject is
spotlighted, or when there is an extreme difference between me subject and
background.
Due to the metering characteristics of this when using a lens with a maximum
exposure slower than F5.6 or the Mutar or close-up accessories (Auto Bellows PC,
microscope adapter, auto extension tube, reverse ring, etc.) with actual
exposure slower than F5.6 may cause metering error in spot metering. Under these
conditions, use the center-weighted average light metering method.
The area marked by colored lines in the table represents the range of shutter
speeds from 16 to 1/4000 seconds in which the camera can measure exposure in the
auto exposure modes.
The range marked by thick lines represents the metering range with an F1.4 lens
and ISO 100 film.
<Metering Range>
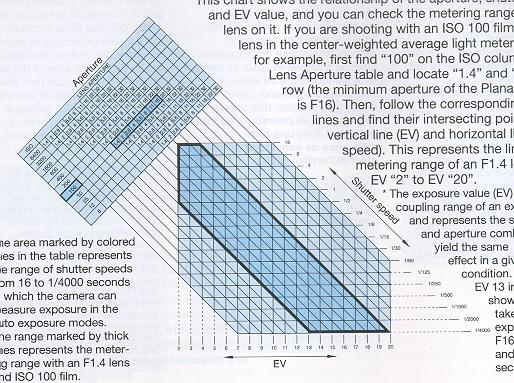
This chart shows the relationship of the aperture, shutter speed
and EV value, and you can check the metering range of your lens on it. If you
are shooting with an ISO 100 film and F1.4 lens in the center-weighted average
light metering mode, for example, first find "100" on the ISO column in the Lens
Aperture table and locate "1.4" and "16" in this row (the minimum aperture of
the Planar T. 50 mm is F16). Then, follow the corresponding oblique lines and
find their intersecting points with the vertical line (EV) and horizontal line
(shutter speed). This represents the limits of the metering range of an F1.4
lens which is EV "2" to EV "20".
* The exposure value (EV) shows the coupling range of an exposure meter and
represents the shutter speed and aperture combinations that yield the same
exposure effect in a given lightning condition. For example, EV 13 in the chart
shows that you can take the same exposure at both F16 1/30 sec. and F8, 1/126
sec.
If there is a great difference in brightness between the subject and its
background, the subject will not be correctly exposed. In this case, use
exposure compensation. Exposure compensation can also be used for intentional
over-and underexposure. There are three methods:
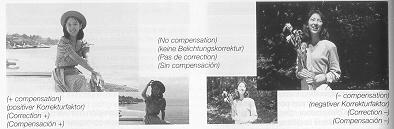
EXPOSURE COMPENSATION
 |
<1. Using the Exposure
Compensation Dial >
Normally, the exposure compensation dial is set to "O" in
the aperture-priority (Av), shutter-speed priority (Tv) or programmed auto
exposure (P) and manual exposure (M) modes. To compensate exposure, turn and
set the dial so that your desired compensating value comes opposite the
index mark. It can be set in 1/3-EV increments within a range of +2 EV to -2
EV. When the exposure compensation dial is set anywhere except "0", the "+"
or "-" mark will blink in the viewfinder, indicating that the exposure
compensation is in effect. |
 |
· In the manual exposure mode (M),
exposure cannot be corrected using exposure compensation. However, the
exposure meter shows the difference between the set value and "appropriate"
exposure. Thus to compensate exposure, use the shutter speed dial or
aperture ring to set the desired difference (exposure compensation) before
shooting.
|
· After taking pictures with exposure compensation, be sure to return the
dial to "0".
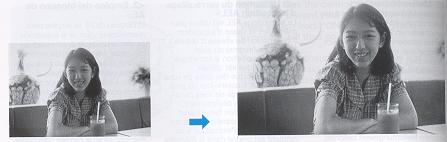
· Backlighted Subjects Exposure compensation of "+1/3" to "+2"
When shooting the subject against the light, under a bright sky, on an ocean
beach, in front of a window, and so on, where the greater part of your picture
is occupied by a bright background, the subject will be under-exposed and turn
out dark like a silhouette when it is taken on center weighted average light
metering. In such cases, use exposure compensation of +1/3 to +2 to give more
exposure.
· Spotlighted Subjects Exposure compensation of "-1/3" to "-2"
When shooting a spotlighted subject where a dark background predominates in the
scene, the subject will be overexposed and turn out light when it is taken using
center-weighted average light metering. In such cases, use an exposure
compensation of -1/3 to -2 to reduce the amount of light on it.
<2. Using the AE Lock >
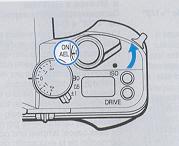 |
The AE lock is used for storing the
exposure value (combination of shutter speed and aperture) of the subject in
memory during auto exposure. It is used when you shoot the backlighted
subject or when you make continuous shooting of a moving subject at a fixed
exposure. When the main switch is set to "AEL", the exposure value at that
time will be stored in the camera memory so that you can trip the shutter
with the same exposure value, unaffected by changes in brightness on the
background.
|
1. First, face the central part of the view
finder toward your subject then switch the main switch from "ON" to "AEL." The
exposure will thus be locked.
To measure exposure in a narrow area and lock it, set the metering mode selector
lever for spot metering and use the AE lock.
· The metering mark in the viewfinder blinks during AE lock.
· Set the main switch to "AEL" when the display in the viewfinder
lights.
2 Recompose your subject and shoot.
· The exposure value will remain in memory while the AE lock is activated, but
the display will turn off after 16 seconds to save battery power.
· In the continuous-shooting modes (drive mode "C"), you can take
pictures in succession with the same exposure value, unaffected by changes in
brightness on the background, if you have locked the exposure.
· This camera stores in memory the exposure value in a combination
of shutter speed and aperture. For example, if the aperture is changed in the
"Av" mode after the AE lock is activated, the shutter speed will follow to
maintain the same exposure value.
· When changing the exposure compensation value in AE locked mode,
exposure is made as follows:
<3. Using the A.B.C. Mode (Automatic Exposure Compensation for 3 Consecutive
Frames)>
 |
This mode allows you to take pictures
automatically in three different steps of exposure: standard, overexposure
and underexposure. Even when taking pictures under fluctuating exposure
conditions, you can easily capture your subject without worrying about
exposure settings. All you have to do is to press the shutter release.
A.B.C. is an acronym of "Automatic Bracketing Control". |
In the A.B.C mode, the shutter speed or aperture is adjusted for automatic
exposure compensation.
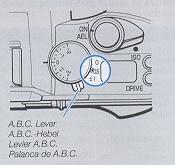 |
1. Move the A.B.C.
lever to set the compensation value. The camera will switch to the A.B.C.
mode. Two compensation values are available: +0.5 EV and +1 EV.
· When the exposure compensation dial is set to a position other
than "0", the A.B.C. mode is established on the basis of the compensation
value being set.
· Metering takes place during each exposure and the measured value
is compensated for. When shooting under conditions unaffected by changes in
ambient brightness, use the AE lock in the A.B.C. mode. |
· After taking pictures in the A.B.C. mode, be sure to return the A.B.C.
lever to "0."
· Flash pictures cannot be taken in the A.B.C. mode.
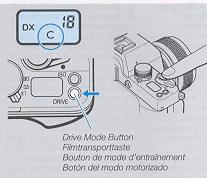 |
2. Set the drive
mode to "C" and hold down 2 the shutter release. Depending on the
compensation value that has been set, pictures will be taken in the order of
"standard", "over" and "under". The camera stops when three frames have been
exposed.
When the drive mode is set to "S", each frame is exposed in the A. B. C.
mode. When the drive mode is set to "
 ",
pictures are taken continuously in the A.B.C. mode after ten seconds. ",
pictures are taken continuously in the A.B.C. mode after ten seconds. |
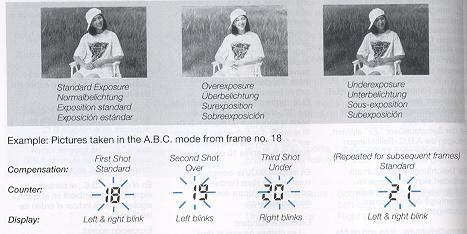
In the A.B.C. mode, the exposure counter will change in the
following order to show the order of shots.
Standard Exposure: Both left and right digits blink
Overexposure: Left digit blinks
Underexposure: Right digit blinks
IMAGE OF A.B.C. MODE IN ACTION
· When the
camera control range is exceeded by the compensation value, the limiting
compensation value will apply.
· To cancel the A.B.C mode after it has been activated' set the
A.B.C. lever to "O."
· When the main switch is turned off and then on again in the
A.B.C. mode, three frames will be exposed again in the A.B.C. mode as described
above.
Flash Photography
 |
When taking pictures indoors or at night where shutter speed of
slower than 1/30 sec. is required, use a flash. In combination with the
Contax TLA Flash System, this camera is designed to provide "TTL direct
light metering" in which the amount of flash light can be automatically
controlled on the camera side.
When using the TLA360 Flash Unit, be sure
to read the section, "CONTAX TLA360 Flash Unit" on page 202. When using
standard X-contact flash unit, set the exposure mode selector lever to
"X." |
Taking Pictures on TTL Direct Light Metering>
1
Mount the TLA flash unit on the camera 1 and turn it on.
2 Set the flash unit to ``TTL AUTO." As soon as the
flash is fully charged, the mark " " will appear in the viewfinder and the shutter speed will automatically be set
depending on the exposure mode.
" will appear in the viewfinder and the shutter speed will automatically be set
depending on the exposure mode.
· Manual (M), flash (X), and bulb (B) exposure:
· When "M" is used, the shutter speed cannot be automatically set
by the camera. Be sure to set it manually to 1/125 sec. or slower.
· The shutter speed you have set will be indicated in the
viewfinder.
· When "X" is used, the shutter speed is set to 1/125 sec. and
"125" in the viewfinder will light.
· When "B" is used, "blb" will light to indicate "Bulb Exposure."
3 Set the aperture and shoot.
 |
· In the "Tv" mode, the aperture is not set automatically. Be sure to set it
manually.
· After the flash has fired, the mark
will blink for two seconds if the subject was correctly exposed.
· When the mark "
" does not blink after shooting, change the aperture or the shooting distance
because your subject will be underexposed. |
· In the close-up shooting, even if the "
" mark blinks after shooting, overexposure may occur. Follow the instruction
manual of the flash unit to get the desired shooting range.
· Be sure to set the A.B.C. lever to "0."
· When the drive mode is set to continuous shooting mode "C,"
consult your flash unit's instructions regarding flash intervals and light
output during continuous shooting.
· The coupling range of film speeds is ISO 25 to 800 (without
exposure compensation).
<Slow-shutter Synchronization>
 |
Slow-shutter synchronization at 1/30
sec. or slower is effective for taking nighttime pictures and twilight
scenes with flash. This camera facilitates slow-shutter synchronization in
combination with a TLA flash unit. |
· When taking slow-shutter synchro flash pictures, use a tripod to prevent
camera shake because the shutter speed will be slow.
· In "Av", "Tv", or "P" exposure modes: Set the main switch to
"AEL." In this case, the shutter speed will be locked at the measured value in
ambient light. Make sure the flash is fully charged and shoot.
· In "M" exposure mode: Set the shutter speed at 1/30 sec. or
slower. Adjust the aperture ring to the measured value in ambient light so that
the exposure meter indicates "correct exposure" in the viewfinder. Make sure the
flash in fully charged and shoot.
<Daylight Flash >
 |
Subjects under direct sunlight or backlight will turn out dark without
exposure compensation or fill-in flash. When using the TLA flash in the TTL auto
mode in such cases, both the subject and background will be beautifully exposed.
· In "Av" or "Tv" exposure mode: If the up
mark blinks after the flash is fully charged, adjust the aperture ring to make
the aperture slower until the up
mark disappears. |
· In "P" exposure mode: In bright light, the exposure is automatically adjusted for daylight flash.
· In "M" or "X" exposure mode: In the "M" mode, set the
shutter speed dial to 1/125 sec or slower. Adjust the aperture so that the
exposure meter in the viewfinder indicates "correct exposure" and shoot.
<Using the Exposure Compensation Dial > In the TTL auto mode,
the amount of flash light couples with the camera's exposure compensation dial.
If you want to bring out the mood by adjusting the amount of flash, use the
exposure compensation dial.
< Second Curtain Synchronization >
 |
Second curtain synchronization is very
useful for shooting moving subjects when using slow shutter synchronization.
In ordinary flash photography, the flash is fired immediately after the
first curtain of the shutter has completed traveling (first curtain
synchronization). |
In combination with a Contax flash having a second curtain synchronization
capability, this camera can trigger the flash just before the second curtain
starts to travel (second curtain synchronization). Behind the subject
illuminated by flash light, the movement of the subject illuminated by ambient
light is captured like a flowing line so that its natural movement is depicted
clearly.
· The exposure is controlled in the same way as for ordinary flash photography
(first curtain synchronization).
<Taking Pictures Using X-contact Flash Units
Other than TLA Flash Unit>
 |
1 Mount the
flash unit on the camera. Set l the exposure mode selector lever to "X." The
shutter speed is set to 1/125 sec.
· It does not matter where the shutter speed dial is set. |
2 Set the aperture and shoot.
Set the aperture according to the instructions for the flash unit you use.
· When using a cord type flash that has no direct contact, connect the cord to
the sync terminal on the side of the camera.
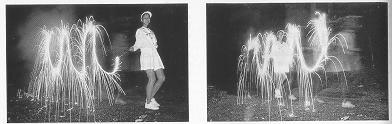
Multiple Exposure
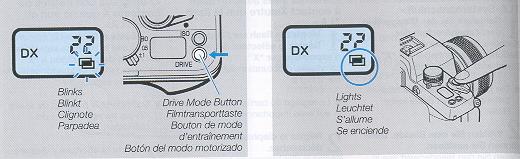
1 Set the drive mode button to select the 1 multiple
exposure mode "
 ". For
information on settings, see section, "Drive Mode Button" on page 70.
". For
information on settings, see section, "Drive Mode Button" on page 70.
The "
" mark on the display panel blinks.
2 Depress the shutter release.
The first exposure is made, shutter is wound but the film is not advanced.
The "
" mark on the display panel is now lit continuously.
3 Press the shutter release a second time.
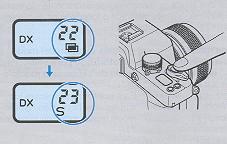 |
After the second exposure, the film is
advanced and the multiple exposure is completed.
· When the multiple exposure has been made, the camera is reset to "S"
drive mode. · Even if the main switch is turned off after the first
exposure, the camera is ready for the second exposure when the main switch
is turned on again. |
· The multiple exposure mode is canceled if the camera is set to some other
drive mode before exposure.
· Note that the multiple exposure mode cannot be canceled when the first
exposure has been made.
· The multiple exposure mode is canceled if the main switch is turned off
when the "
mark
on the display panel blinks. The next time the main switch is turned on, the
camera goes on in drive mode "S."
To make 3 or more multiple exposures:
 |
Press the drive mode button after step
2 page 164 to change the "
" mark on the display panel from steady light to blinking. This action will
allow you to make one more
exposure. You can repeat this action to as make as many exposures you wish. |
Using the Self-Timer
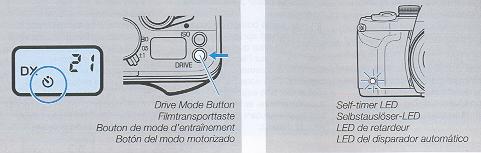 |
1 Set the drive
mode button to select the 1 self-timer mode "
.
For details, see section, "Drive Mode Button" on page 70.
|
2 Focus the lens on your subject and depress the shutter
release. The self-timer will start to operate and the shutter will be tripped
after ten seconds. When the self timer is operating, the self-timer LED on the
front of the camera blinks.
· Mount the camera on a tripod when you are using the self-timer.
· The self-timer cannot be used when the camera is set to bulb exposure.
· When the shutter release is depressed while the self-timer is running, the
counter will reset itself and be tripped after 10 seconds.
· To cancel the self-timer when it has started, turn the main switch off or
press the drive mode button.
· During automatic shooting using the self-timer, stray light may
enter the viewfinder eyepiece and affect exposure since you cannot keep your eye
at the viewfinder. To prevent this, attach the eyepiece cover over the eyepiece
(see page 22).
- - Back to Section One
To Section Two To
Section Four - -