- - Back to Section One To Section Two To Section Three - -
Other Functions
CLICK HERE TO SEE
CUSTOM FUNCTION 1 CUSTOM FUNCTIONS 2
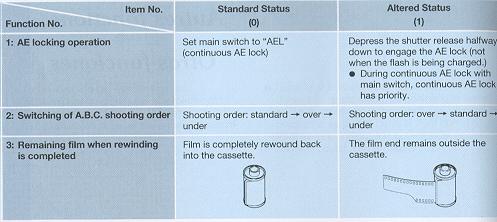
This camera is provided with five custom functions which are described in the
table below. The camera functions are set to standard mode when shipped (setting
"0"). (Operations described in this instruction manual assume that the camera is
used in standard mode ("0"). When changing the custom functions, see section,
"Setting the Custom Functions" on page 182.
· Camera operation changes when the custom functions are set. Read through the
section, "List of Custom Functions" to make sure that you use the functions
correctly.
Setting the Custom Functions
|
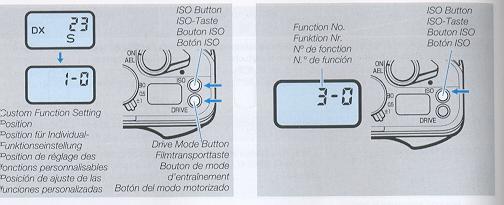
1 Turn the main switch on and hold down the ISO button and
the drive mode button simultaneously until the indication shown in the
illustration appears on the display panel (2 sec.).
Take your fingers off the buttons when the indication (custom function setting
position) shown in the illustration appears on the display panel.
2 Press the ISO button to select and display 2 the
function number to be set.
· Each time the ISO button is pressed, the function numbers are displayed in the
following order: 1--2--3--4--5--1 (repeating).
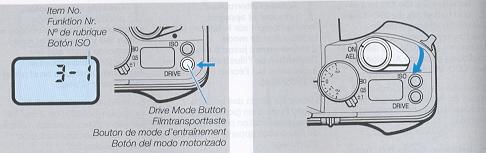
3 Press the drive mode button and select 3 the desired
item number.
· The item number changes each time the drive mode button is pressed. Select "O"
or "1."
4 Turn the main switch off to compete the setting.
· The setting can also be completed by depressing the shutter release halfway or
by leaving the camera idle for 16 seconds
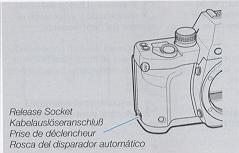 |
This socket is used for connecting cable switch L or Auto Bellows to transmit electric signals from these accessories to operate the shutter. · During shooting using cable switch L, stray light may enter the viewfinder eyepiece and affect exposure since you cannot keep your eye at the viewfinder. To prevent this, attach the eyepiece cover over the eyepiece (see page 22). |
· Do not connect cable releases sold on the market to the release socket as
this may damage the socket.
Detaching the Back
 |
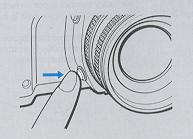
It is possible to detach the camera back and replace it with an optional Data Back D-9 (see page 212). The camera back can be removed by pushing down the camera back release pin. |
Aperture Stop-down Button
 |
The lens will always remain wide open to provide a clearer view through the viewfinder. However, it can be stopped down to your desired aperture by depressing this button (the image in the viewfinder will become darker accordingly) to check the depth of field or the blurred effect on the background. |
· You cannot get correct exposure when taking pictures or
checking exposure with the aperture stop-down button.
BASIC PHOTOGRAPHIC CONCEPTS
<Exposure> Lighting to film. When a picture is taken, the aperture
value and shutter speed adjusts the amount of light to the film.
<Shutter speed> The shutter in the camera controls the amount of light
that reaches the film by the length of time it stays open. The time the shutter
stays open is the shutter speed.
< Apertures Value> The aperture in the lens controls the amount of light
going through the lens by becoming smaller or larger. The size of the opening
produced by the size of the aperture is the aperture value.
< Film Speed (ISO Value)> Film speed is measured by values determined by
ISO (the International Standardization Organization). A small ISO value means
lower sensitivity but finer grain and higher image quality. A large ISO value
means high sensitivity. Such films can be used in locations with poor ambient
lighting or with fast shutter speeds, but it has coarser grain and therefore
poorer image quality.
< Depth of Field>
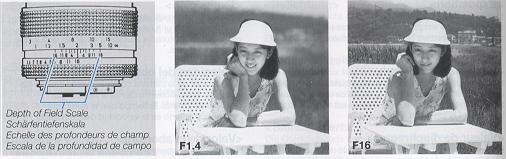 |
When a subject is in focus, not only the subject itself but also some area
in front and behind the subject will also be sharp. The range between the
nearest and farthest points that are sharp is the depth of field.
(1) The depth of field increases with small apertures and decreases with
large apertures.
(2) The depth of field is larger for a distant subject and smaller for a
near subject.
(3) The depth of field is larger behind than in front a
subject in focus. A lens with a long focal length (telephoto lenses) have
narrower depth of field than a lens with short focal length.
The depth of field scale on a lens tells us the depth of field that it provides.
For example, if we focus a 50mm F1.4 standard lens on a subject 2 meters away
and use an aperture of F16, the distance indicated by depth of field scale 16
shows that we obtain a depth of field from 1.4 m to 5 m.
Camera Care and Precautions
· To remove dust and dirt on the lens and viewfinder glass, blow off with an air
blower or wipe gently with a soft lens brush. If they are soiled with
fingerprints, wipe off lightly with lens tissue. That is enough. Never use a
bomb type blower. With its air pressure, dust and dirt may get farther into the
camera interior. Wipe off dust and dirt on the minor lightly with a lens brush
· To clean the camera exterior, wipe with the soft cloth. Never use benzene,
thinner or other solvents.
· After taking pictures in a dusty place such as at the seaside or on mountains,
clean the camera thoroughly. Salt air will cause corrosion and sand and dust
will adversely affect the internal precision parts of the camera.
· Do not leave the camera in hot places (on an ocean beach in summer, in a
parked car under direct sunlight, etc.) for a long time, because the camera,
film and battery may be adversely affected.
· The lens and viewfinder may be clouded if the camera is brought into a warm
room from outside where d is cold. This cloudiness will disappear soon, but it
is always advisable to avoid sudden temperature changes because water droplets
will cause internal corrosion.
· If you are going to use the camera for important events such as an overseas
trip or wedding ceremony, be sure to test it beforehand to make sure it
functions properly. It is also advisable to bring a spare battery with you.
· Because the camera is a precision device, do not expose it to excessive shock
such as by dropping, etc.
Note on the Shutter Curtain: The shutter curtain is made of a
very thin material. Never push it with a finger, or touch or wipe it. When
changing film, take care that the film edge does not touch the shutter curtain.
When using an air blower, do not blow air strongly on the curtain because it may
be damaged or deformed. Never use a pressurized blower.
Microcomputer Protection Circuit: This camera incorporates a
safety circuit to protect its microcomputer against strong external static
electricity. Though rarely, it may fail to function because this safety circuit
has come into action. In this case, set the main switch to OFF, remove the
batteries, reload them and use the camera again.
Optional Accessories
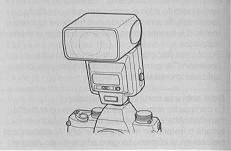 |
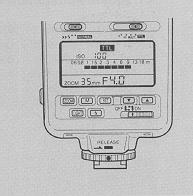
The TLA360 is a clip-on type TTL direct metering auto-flash
unit with power zoom and guide number 36 (with 35 mm lens, square cover and
ISO 100). Equipped with the automatic flash setting feature, the TLA360 can
offer the following four functions in combination with Contax Aria.
|
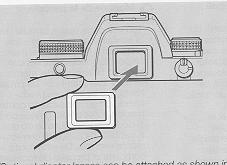
· These functions can be used when the flash unit is directly attached to the
accessory shoe on the camera top. The flash system is not automatically set when
it is used off the accessory shoe and through the TLA extension code or TLA
lighting system.
< 1. Auto Setting >
THE BASE OF THE FLASH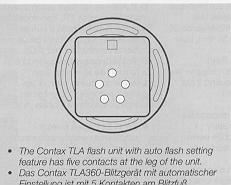 |
THE FLASH FUNCTIONS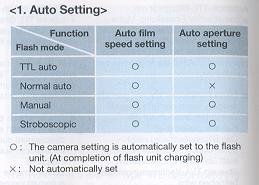 |
<2. Flash Unit Light Compensation>
 |
Light compensation can be used only in the "TTL auto flash"
mode and in no other mode.
· Compensation is activated in 1/3 steps in the range of -3EV to +1 EV. · The compensation amount of the flash unit is determined by the value of the camera's exposure compensation. For example, if the camera's compensation is "+1 " and the flash unit's compensation is "+1", the amount of light from the flash unit is set to +2 (EV). |
1 Press the "SEL" button of the flash unit.
· The compensation scale appears on the display panel of the flash unit and the
"+/-" mark starts to blink.
2 Press the "![]() "
and "
"
and "![]() "
buttons of the flash unit to set the desired value.
"
buttons of the flash unit to set the desired value.
Press the "SEL" button again. The "+/-" mark changes from
blinking to steady lighting and compensation is completed.
· The compensation scale of the flash unit's display panel indicates the value
set on the flash unit.
· When the compensation amount of flash unit is "0" (no
compensation), the compensation scale will disappear in 8 seconds.
<3. Auto OFF and Auto ON> When the power switch of the
flash unit is set to "Auto OFF", the flash unit is automatically powered off
approximately 80 seconds. Also, by depressing the camera's shutter release
halfway, "Auto ON" is activated to start charging of the flash unit. This power
saving feature is useful during prolonged flash photography.
<4. Shoe Stopper>
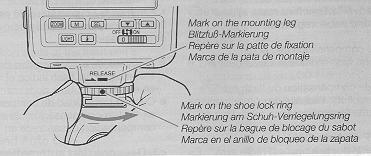 |
The "mounting leg" of the TLA360 has a shoe stopper (slip off protector) to prevent the flash unit from slipping off the camera unintentionally. Before mounting or removing the flash unit, never forget to line up the mark on the shoe lock ring index with the mark on the "mounting leg". |
The TLA360 has a great number of functions in addition to those
mentioned above. Refer to the TLA360 Instruction Manual so that you will be able
to avail yourself of all l the functions it provides.
Conatx Data Back D-9 (multi-function type)
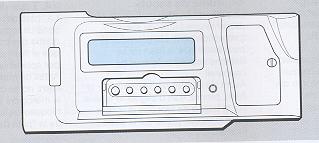 |
This multi-function data back can be used in place of the Contax Aria camera back. It has a "collective imprinting function that can imprint exposure data on shooting on the first two frames of the film and a "between-the-frames" imprinting function that can imprint dates and exposure data between the frames. Because both functions can be used together, it is possible to record exposure data by setting the "collective imprinting" function and record dates, time or counter data between the frames so that they can be extensively used for classification of photos, storage and arrangement of exposure data, etc. |
It also has an interval shooting function for controlling camera
operation.
· Note that the D-9 Data Back cannot imprint on the frames itself.
Collective Imprinting Function>
Exposure data on shooting of each frame are recorded by the camera and these
data are imprinted collectively on the first two frames when the film is
rewound.
* Imprinted data - RESULTS
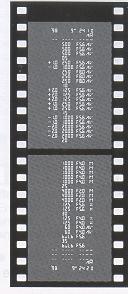 |
(1) Date of film loading (year, month, day and hour) (2) Camera used "AR" (3) Exposure data (exposure compensation value, shutter speed, F-number, exposure mode) (4)Frame No. (every five frames) (5) Date of film rewinding (year, month, day and hour) |
< Between-the-frames imprinting functions -
RESULTS
It is possible to choose one of the following
eight modes and imprint data between film frames.
(1) Date (year, month and day)
(2) Date (month, day and year)
(3) Date (day, month and year)
(4) Hour (day, hour and minute)
(5) Exposure data on shooting (exposure compensation value, shutter
speed, F-number, exposure mode or two characters)
(6) Counter data (4-digit add-up counter + exposure counter ) + two
characters
(7) Desired 6-digit fixed number + two characters
(8) No imprint
< Internal shooting > The interval shooting function makes
it possible to take automatically the set number of pictures at the set
interval, starting from the set time. It is convenient for observing changes
with time or unattended shooting.
Contax Power Pack Adaptor GP-1
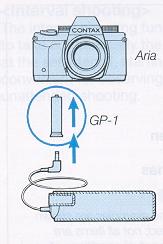 |
This adapter connects the Contax Power Pack P-8 (optional accessory) to Contax Aria. The P-8 is an external power supply which uses four 1.5 V M-size alkaline batteries or four 1.2 V M-size Ni-Cd batteries. In order to prevent the battery deterioration due to cold weather, the power pack is used to keep the camera power supply warm. |
 |
· Installing the Power Adapter 1 Install Power Pack Adapter GP-1 in the 1 camera. Remove the lithium battery in the camera and install GP-1 instead. · Store the battery compartment cover in a safe place. 2 Load batteries in the Power Pack P-8. (1) Insert four type M batteries in the supplied battery case according to
the symbols in it. Install the battery case in the Power Pack P-8. |
3 Insert the Power Pack P-8 plug into the
power socket of the adapter GP-1.
· It is advisable to protect the Power Pack under your coat or jacket when you
are taking pictures in cold weather.
· When changing the batteries, do not mix different batteries or used batteries
with new ones. Replace all the four batteries with new ones of the same type at
the same time.
· When you are not going to use the Power Pack for quite some time, take the
batteries out of the battery case to prevent battery leaks.
· To remove the connection cord, pull the plug and not the cord.
· P-8 Specifications Configuration: Power pack, battery case, jacket (with
strap), length of cord: 1.5 m Power supply: Four I .5 V M-size alkaline
batteries or four 1.2 V M-size Ni-Cd batteries (M-size manganese batteries are
not powerful enough and cannot be used)
· Battery capacity
(Number of rolls 24-exposure film that can be exposed with new batteries, in
accordance with Contax testing standards)
Battery type
Ordinary temperature
Four AA-size alkaline batteries:
approx. 25
Four 1.2 V AA-size Ni-Cd batteries:
approx 10*
* Use the Ni-Cd batteries fully loaded.
· Design and specification subject to change without prior
notice.
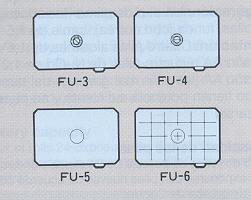 |
There are four interchangeable focusing screens for Contax Aria: FU-3, FU-4,
FU-5, and FU-6. The screens have a 5 mm diameter circle in the center marking
the spot metering area (FU-3 and FU-4 have a microprism as well).
· Never touch the focusing screens because they are machined to very high precision. |
FU-4 (horizontal split-image/microprism screen): This screen is provided as
standard on the Contax Aria. This screen enables you to focus using a center
split-image spot, microprism collar around it, and a surrounding matte area
making it suitable for a wide range of subjects.
FU-3 (45° split-image/microprism screen): Essentially the same as the FU-4, this
screen has a 45° split image center spot ideal for focusing images with
horizontal lines since you do not have to tilt the camera.
FU-5 (matte screen): This screen consists of a matte area all around and is
suited for a relatively narrow-aperture lens such as a long-focus lens. It is
also suited for close-up work and other situations when it is difficult to focus
with a microprism or split-image spot.
FU-6 (sectioned matte screen): It has ruled lines at 6mm intervals on a matte
screen and is especially suited for taking pictures using perspective control
with Auto Bellows or PC Distagon or when it is necessary to precisely determine
a composition during copying work, etc.
< Replacing Focusing Screens >
Each screen is supplied with a pair of tweezers that should be used when
screens are replaced.
The procedure described here for replacing focusing screens differ from that
given in the FU Focusing Screen instruction manual. Use the procedure given
below to replace focusing screens.
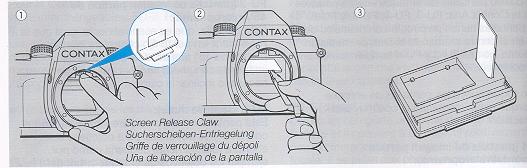
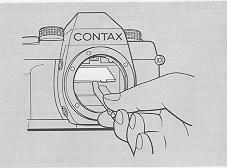
1 Removing the Screen
(1) Dismount the lens and gently push the screen release claw with your finger
tip. This causes the screen and its frame to come forward. Gently lower the
screen.
(2) Grip the protruding part of the screen with the supplied
tweezers to remove it.
(3) Place the removed screen in groove of the case to protect it
from dirt and damage.
2 Mounting the Screen
 |
(4) Hold the protruding part of the
screen with the tweezers and insert it in the lowered frame. Then gently
push tab of the frame (release claw) with the tweezers until it locks with a
click. Finally, tap it with a finger to make sure the screen has been
properly seated. This completes the mounting process.
· When replacing the focusing screen, always use the supplied tweezers to prevent the mirror and screen against scratches and fingerprints. · If the screen is soiled by dust, use a blower or soft lens brush to remove dust. |
· If the screen is improperly mounted, it may come loose during shooting or
it may become impossible to remove it. Should this happen, consult your nearest
service station for proper handling.
· Unused screens should be stored in the screen case according to the
instructions on the case.
 |
Those who are nearsighted or farsighted
and have difficulty viewing the viewfinder can obtain optional diopter
lenses that can be mounted in the viewfinder eyepiece. Eight diopter lenses
in the range from -5 (D) to +3 (D) are available.
|
SPECIFICATIONS:
Type: 35 mm focal-plane type AFsingle lens reflex camera.
Picture Size: 24 x 36 mm
Lens Mount: Contax/Yashica MM mount
Shutter: Vertical-travel focal-plane shutter.
Shutter Speeds:
16 sec. - I /4000 sec. at =Av" and "P";
4 sec. - 1/4000 sec. at "TV";
B. X (1 /125 sec.), 4 sec. - 1/4000 sec. on manual.
Sync Contacts: Direct X contact (synchronizing speeds 1/125 sec. or
slower) provided with direct contact and sync terminal
Self-timer: Electronic self-timer; trips the shutter after 10 sec. delay.
Shutter Release: Electronic release, provided with a special release
socket.
Exposure Control: (1) Aperture-priority auto exposure, (2)
Shutter-speed-priority auto exposure, (3) Programmed auto exposure, (4) Manual
exposure, (5) TTL auto-flash, (6) Manual flash.
Metering System: TTL evaluative metering/centerweighted average light
metering/spot metering switchover.
Metering Range: EV 2 - 20 (with an F1.4 lens and ISO 100 film)
Film Speed Range: ISO 25 - 5000 for automatic setting with DX code, lSO
6-6400 for manual setting
AE Lock: The quantity of light on the image surface is stored in memory.
Exposure Compensation: +2 EV to -2 EV (can be set in 1/3-step
increments).
A.B.C. Mode: +0.5 EV/ +/- 1 EV exposure compensating values with
A.B.C. lever.
Flash Light Control: TTL direct light control.
Flash Synchronization: In combination with dedicated flash, the
shutter speed is automatically set when the flash is fully charged.
Automatic Flash Setting: Possible in combination with dedicated flash
capable of automatic flash setting.
Second Curtain Synchronization: Possible in combination with dedicated
flash capable of second curtain synchronization.
Viewfinder: Pentaprism eye-level finder (long eye-point type)
· Field of view 95%
· Magnification 0.82X (with 50 mm normal lens at infinity,
-1 D diop.)
Diopter Adjustment: Eyepiece correction lenses can be attached (8
optional FL type diopter lenses)
Focusing Screen: Horizontal split-image/microprism type (FU-4)
(standard), interchangeable screens (FU type) are also available.
Viewfinder Display: Flash mark, shutter speed, aperture value, metering
mark, exposure warning mark, exposure meter, manual exposure mark, exposure
compensation mark, exposure counter/self-timer remaining time/A.B.C. mode/film
end
Display Panel: Exposure counter/A.B.C. mode/film speed/self-timer
remaining time/elapsed time on bulb exposure/custom function mark, battery
warning mark, self-timer mark, continuous shooting mark, single-frame shooting
mark multiple exposure mark
Film Loading: Auto loading, film automatically advances to "01" on
exposure counter.
Film Advance: Automatic winding with built-in motor.
Film Rewinding: Automatic rewinding with built-in motor, automatic stop
and mid-roll rewinding possible.
Drive Modes: Single frame, continuous, self-timer, multiple exposure
Winding Speed: Up to approx.3 fames/sec. on continuous shooting ("C"
mode) (with a new battery, at ordinary temperature, as tested according to
Contax testing standard).
Exposure Counter: Display panel and viewfinder, both automatically
resetting, additive type.
Accessory Shoe: Direct X-contact (provided with TLA flash contact).
Custom Functions:
(1) AE lock/unlock by depressing shutter release halfway
(2) Switching of A.B.C. shooting order
(3) Film end is not wound into the cassette
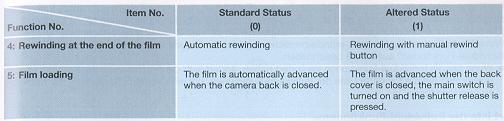
(4) Film not automatically rewound when film reaches end
(5) Film advance method
Camera Back: Can be opened with camera back opening lever, detachable,
with film check window
Power Source: Two 3 V lithium battery (CR2).
Battery Check: Automatic check, battery warning mark on display panel.
Battery Capacity: About 90 rolls of 24-exposure film (with a new battery,
at ordinary temperature, as tested according to Contax testing standard)
Other Details: Aperture stop-down button
Dimensions, Weight: 137 (W) x 92.5 (H) x 53.5 (D) mm (depth excludes
camera back and grip)}
460 g (excluding batteries)
* Specifications and design are subject to change without notice.
To make full use of the capabilities of this camera you are recommended to use
our interchangeable lenses and accessories with it. Contax shall not be liable
for any repair of damages arising from the use of third-party products made for
use with Contax cameras.
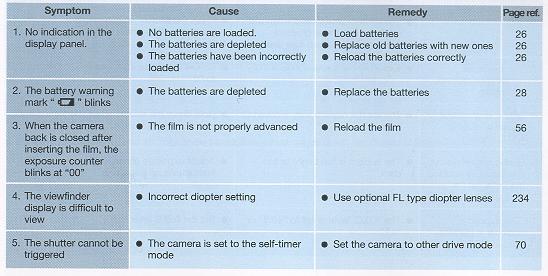
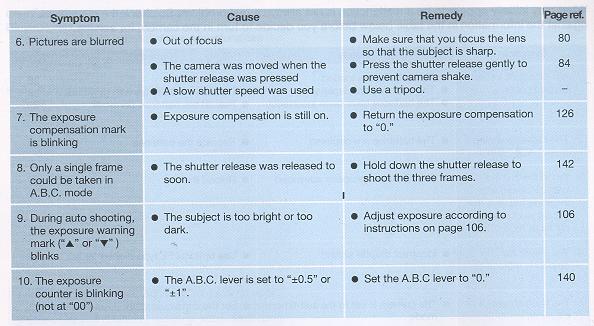
In Case of Difficulty