and historical purposes, all rights reserved.
This page is copyright© by
This page may not be sold or distributed without
the expressed permission of the producer.
I have no connection with any camera company.
This camera manual library is for reference
and historical purposes, all rights reserved.
This page is copyright© by ![]() , M. Butkus, NJ.
, M. Butkus, NJ.
This page may not be sold or distributed without
the expressed permission of the producer.
I have no connection with any camera company.
On-line camera manual library
If you find this manual useful,
how about a donation of
$3 to:
M. Butkus, 29 Lake Ave.,
High Bridge, NJ 08829-1701
and send your e-mail
address
so I can thank you.
Most other places would charge
you $7.50 for
a electronic copy
or $18.00 for a hard to read Xerox copy.
This will help me to continue to host this site,
buy new manuals, and pay their shipping costs.
It'll make you feel better, won't it ?
If you use Pay Pal, use the link below.
Use the above address for a check, M.O. or cash.
Click here for Camera Manual site
 |
Description of Parts (1) Attachment Screw (2) Electrical Contact Pins (3) Power take off (4) Power Switch (5) Locating Pin |
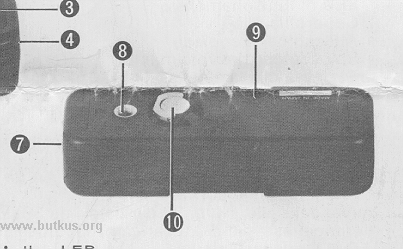 |
(6) Action LED (7) Battery Cover
(9) Rewind Button (10) Attachment Screw Lever |
Specifications
Camera: for use with CX-2 model camera.
Winding Time: Approximately 1 second.
Power Supply: Two 1.5V "AA" size penlight batteries. Either alkaline manganese or sealed carbon zinc.
Battery Duration: Over 30, 36-exposure cassettes of film with a fresh set of alkaline manganese batteries.
Over 20, 36-exposure cassettes of film with a fresh set of sealed carbon zinc batteries.
Action LED: Indicates when the motor is running.
Dimensions: 105mm x 24mm x 36mm
Weight: 959 (without batteries)
General Operation
1. Push and slide off the Battery Cover (7) in the direction of the arrow mark.
2. Install a pair of AA size 1.5V batteries according to the mark( -- + ) indicated respectively on the inside of the battery compartments.
3. Replace the Battery Cover (7) as before and turn off the Power Switch (4).
4. Couple the winder to the bottom of the camera body. Engage the winder to the Power take off
(3) make sure that the Locating Pin (5) is
aligned. Tighten the Attachment Screw (1) into the camera tripod socket.
5. Set the Power Switch (4) to "ON". The winder advances the film after each exposure automatically.
6. The Action LED (6) will light when the motor is running.
7. When you have finished exposing the last frame in your film cassette turn off the power switch. Then push the Rewind Button
(9) and
rewind the film as described in the instruction sheet of the CX-2 camera. You don't need to remove the winder from camera body when
removing film. Note: Set the Power Switch (4) at "OFF" position when the winder is not in use.