and historical purposes, all rights reserved.
This page is copyright© by
This page may not be sold or distributed without
the expressed permission of the producer
I have no connection with any camera company
On-line camera manual library
If you find this manual
useful,
how about a donation of $3 to:
M. Butkus, 29 Lake Ave.,
High Bridge, NJ 08829-1701
and send your e-mail address
so I can thank you.
Most other
places would charge
you $7.50 for a electronic copy
or $18.00 for a hard
to read Xerox copy.
This will help me to continue to host this site,
buy new manuals, and pay their shipping costs.
It'll make you feel better, won't it ?
Back to main camera manual page
CLICK HERE TO CONTINUE TO
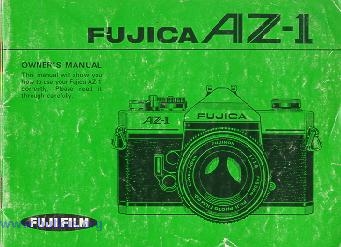
Fujica AZ-1 PDF FILE
MADE DIRECT FROM MANUAL
CLICK HERE TO CONTINUE TO English
Fujica AZ-1 PDF MANUAL
MADE FROM THIS PAGE
- Better printing
Fujica AZ-1 Bedienungsanleitung
Fujica AZ-1 mode d'emploi
Fujica AZ-1 manual de instrucciones
CONTENTS
Special features . . . . . . .
Specifications ...................................
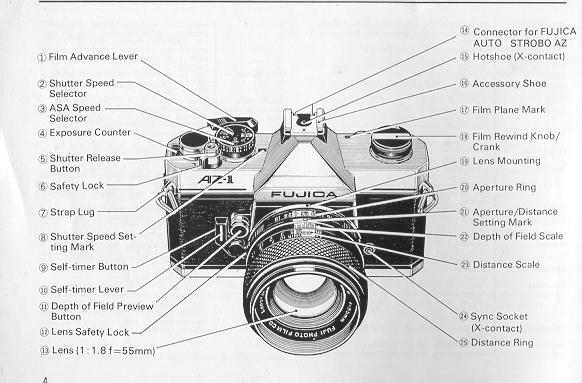
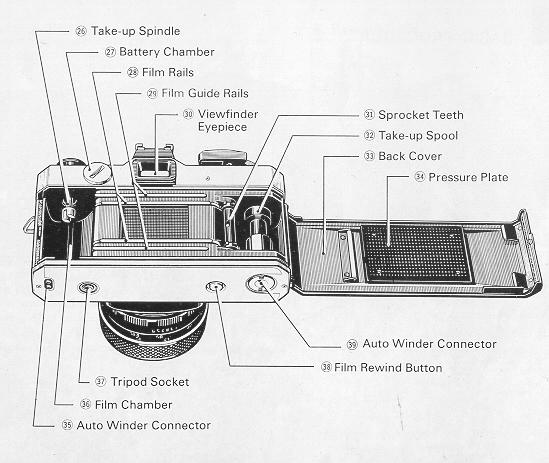
Names of parts ..........................
Basic procedures . . . . . . . . . .
· Loading the batteries
· Holding the camera steady· Loading the film . . . . . . ..
· Setting the film speed selector . . . . . .
· Automatic exposure control . . . . . . .
· Focusing . . . . . . . . . . .
· Using the self-timer . . . . . . .
· flash pictures . . . . . . . . .
· Rewinding the film . . . . . .
· How to change the lens . . . . . . .
Advanced techniques.. . . . . . . .
· Shutter speeds for moving subjects
· Controlling the zone of sharpness
· Infrared photography
· Taking close-ups and copying .
· Taking photomicrographs· Filters for your Fujica AZ- 1
· Changing the lens ·~ ...........
· Interchangeable lenses and accessories
Camera care a .....................
SPECIAL FEATURES
1. The camera's electronically controlled automatic exposure (AK) system
provides instant exposure determination by fast-reacting silicon photocells
which measure the exposing light through a fully open lens and an LSI circuit
which simultaneously converts the measurement into the correct shutter speed.
The shutter speed selected by the AE system is displayed in the viewfinder by
means of light-emitting diodes.
2. Pressing the shutter release button halfway down activates the AE lock
which ''remembers" and holds the correct shutter speed for as long as the
button is depressed so that you can just step back and immediately shoot
backlighted pictures without fussing over exposure compensation.
3. Three-way focusing by means of a split-image center spot and microprism and
groundglass collars lets you bring any subject into sharp focus quickly and
easily.
4. High quality Fujinon lens of proven sharpness and color reproduction lets
you take high quality, color-perfect pictures every time.
5. Accessory motorized winder (Fujica Auto Winder) automatically winds the
film to let you shoot at a rate of about 2 frames a second.
6. New type flash (Fujica Auto Strobo AZ) speeds up camera operation and
heralds in a new system. It automatically sets the camera', shutter speed to 1
/60-second.
Type: Through-the-lens single-lens reflex 35mm automatic exposure camera with focal plane shutter.
Film: Cartridge-packed 35mm roll film.
Picture Size: 24x36mm
Standard Lens: Fujinon 1:1.4 f=50mm: 6 components, 7
Options:
.Fujinon 1:1.8 f=55mm; 4 components, 6 elements;
·Fujinon.Z 1 3.5-4.5 f=43-75mm; 7 components, 7 elements.
Full aperture light metering, rectilinear helicoid mount; 49mm dia. screw-in filter; fully automatic diaphragm with multiple system f-stop scale and click stops.
Lens Mount Praktica screw
mount with lens lock; 45.5mm flange back Shower focal plane, 1/2-1/1,000-sec.
electronic (automatic) shutter speed control at 1/60, 1/250 and 1/1,000-sec.
mechanical (manual) shutter speed setting; self winding combination shutter
release button electronic circuit switch (pressing the shutter release button
activates the AE lock); provided with safety lock.
Flash Synchro- Hotshoe with X-contact (provides automatic exposure with
Fujica Auto Strobo AZ (optional): X-contact terminal; 1 /60-see flash
synchronization.
Self-timer: 8-sec. interval; activated by depressing start button.
Viewfinder: Pentaprism, eye-level, silver coated, 0.96x magnification; go% vertical 92% horizontal field of view (with 1 1.8 f=55mm lens); LED and scale shutter speed indication, quick-return mirror.
Focusing: (split-image, microprism, ground glass)
Exposure Control: TTL Center-weighted averaging-type metering system; silicon photodiode light receptor aperture-preferred automatic exposure control; provided with AE lock, and fractional exposure control for +1 and +2 and --1 and --2 stops; three 1.5V silver oxide batteries (Mallory MS-76 or Eveready S-76).,
Meter Range: EV2 to 18 with 1:1.4 f=50mm lens and ASA 100 film - operates with ASA film speeds 25 to 3,200.
· Film Advance: Single-stroke lever; 140' winding angle.
Automatic Film: Motorized film winder (Fujica Auto Winder, Advance optional) advances film and winds shutter each time shutter is released.
Exposure Count: Automatic reset additive type.
Film Rewind: Rewind button and crank
Dimensions: 133mm Wx87.5mm Hx50.5mm D (5-1/4 WX3-7/16H x 2D in.) (body alone)
Weight: 580g. (20-1 /2 oz.) (body alone but with batteries loaded.)
Accessories (included): Carrying strap, lens front cap, viewfinder eyepiece cap
Interchangeable lenses: 1: 2.8 f = 16mm, 1: 3.5 f = 19mm, 1: 2.8 Lenses f =24mm, 1:3.5 f =28mm,1: 1.9 f =35mm, 1:2.8 f_35mm, 1:3.5 f=35mm, 1:2 8 f=100mm, 1:2.5 f=135mm, 1:3.5 f=135mm, 1:4.5 f=200mm, 1:4.5 f=400mm, 1:5.6 f=600mm, 1 :3.5-4.5 f=43-75mm, 1:4.5 f=75-150mm, 1:4.5 f=54-270mm, 1:3.5 f=55mm (macro), 1:4 f=85mm (soft focus).
Optional Accessories: Hard case, Eyecup, eyesight adjustment accessories attachment lens, rightangle finder, close-up lens, extension tube (auto), microscope adapter, reverse adapter, extension bellows, Macrocinecopy, lens hood, Fujica Auto Winder, Fujica Auto Strobo AZ.
Notice:
Specifications are subject to change without notice.
LOADING THE BATTERIES
1. Battery type
Your Fujica AZ-1 is supplied with three 1.5V silver oxide batteries. To
replace them, ask for Mallory MS-76 or Eveready S-76 batteries. (webmaster -
typical batteries found in local stores)
2. Battery life
Under normal use the batteries should last about a year, but under heavy use,
they must be replaced sooner.
If you are not taking pictures for a long interval, remove the batteries from
the camera because old batteries can develop leaks and damage your camera.
3. Using batteries in freezing weather
Silver oxide batteries have excellent resistance to cold weather, but very low
temperatures (O C, 32 F or lower) will reduce their efficiency. For best
results, use new batteries for shooting in temperatures below O C (32 F) and
try carrying them in your inner coat pocket to keep them warm until they are
needed. Batteries which have slowed down in freezing weather can be used
again when they return to normal temperature.
· Guard against short circuiting, keep the batteries away from fire.
4. Precautions
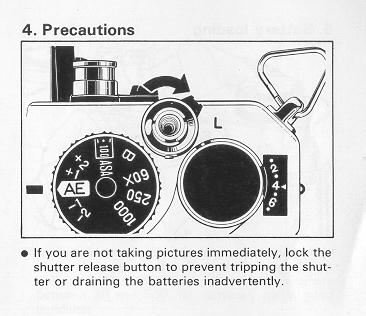 |
· If you are not taking pictures immediately, lock the shutter release button to prevent tripping the shutter or draining the batteries inadvertently. |
* LOADING THE BATTERIES
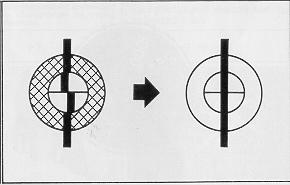
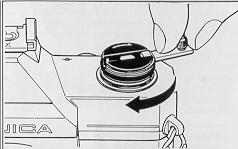
5. Battery loading

(1) 0pen the battery chamber cover (use a coin) by turning it to the left
(counter-clockwise).
(2)1nsert three batteries, positive ends first, in the battery chamber and
close the cover tightly by turning it to the right.
· Keep your fingers off the battery ends and wipe them clean with a dry piece
of cloth before loading.
* LOADING THE BATTERIES
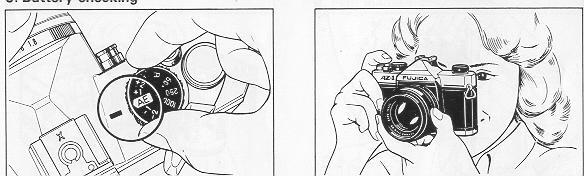
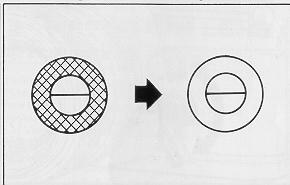
6. Battery checking
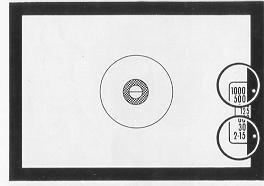
(1) Set the Shutter Speed Selector to ''AE."
(2) Look through the Viewfinder, turn the Aperture Ring, then press the
Shutter Release Button halfway down. If the LED light turns on anywhere
between 30 and 500, the batteries are in good condition.
· Be sure to release the AE Lock by taking your finger off the Shutter Release
Button each time you turn the Aperture Ring to change the aperture.
(3) If the LED light blinks, the batteries are worn out and have to be
replaced with a new set.
(4) If the batteries are completely exhausted or are loaded improperly, the
LED light will not turn on. You will have to change the batteries or load them
correctly.
* HOLDING THE CAMERA STEADY
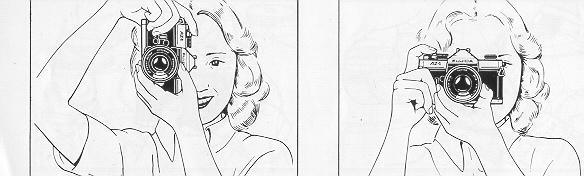
Before going into the mechanics of picture-taking, remember that holding the
camera steady is an important basic of good photography. Camera movement
results in blurred pictures.
* LOADING THE FILM
1. Film format
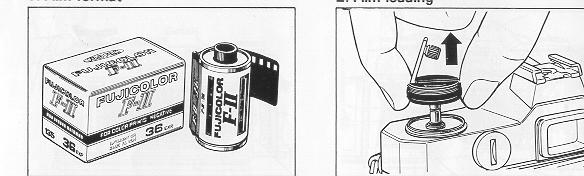
Use cartridge-packed 35mm roll film (135 type)
· Always load and unload film in subdued light.
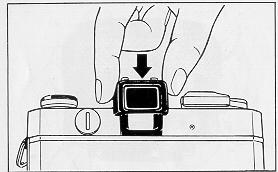
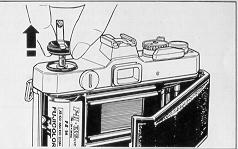
2. Film loading
(1) Open the back cover by pulling the film rewind knob all the way up. (The
cover will not snap open unless the knob is raised as far as it will go.)
(2) Drop the film cartridge into the film chamber with the spool head (the
protruding portion of the cartridge) pointing to the camera bottom, then push
the film rewind knob down to its regular position.
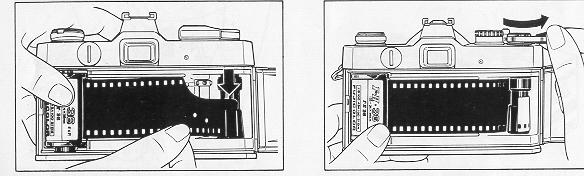
(3) Pull out the trimmed end of the film and insert it deeply into one of the
slots of the take-up spool and make sure it does not protrude from any of the
other slots.
(4) Give the film advance lever one full turn and make sure the sprocket teeth
catch the film perforations. (The take-up spool and the film advance lever
will turn in the opposite directions.)
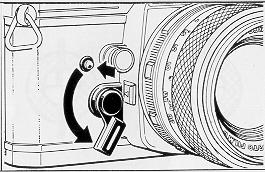
(5) Take up the slack in the film by erecting the film rewind crank and
turning it in the direction of the arrow. Next, check to make sure the film is
positioned between the guide rails, then close the back cover.

(6)Wind the film advance lever and press down the shutter release button.
Repeat until the third dot (first white dot) from "S'' comes directly opposite
the triangular setting mark in the exposure counter. The first frame is now in
position for exposure.
* If the film is properly loaded, the film rewind knob will turn while you are
winding the film with the film advance lever.
* The odd numbers of the exposure counter are represented by the white dots
between the even numbers.
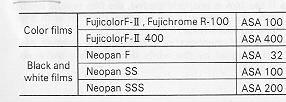
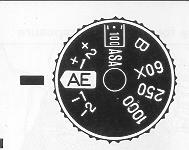
SETTING THE FILM SPEED SELECTOR
1. Film speed
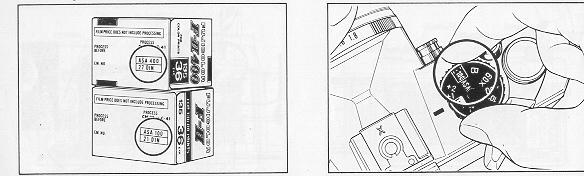 |
Some films respond to light faster than others, and the speed with which a
film responds to light is shown by its ASA number which is printed on the film
box (the faster the film, the higher the ASA number). Following are some
examples.
|
|
|
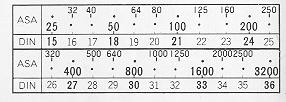
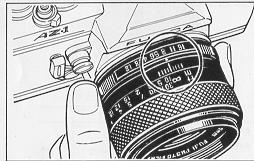
2. How to set the film speed selector
Pull up the knurled ring of the film speed selector and turn it to the left or
right to bring- the ASA number you want in the center of the film speed
indicator window.
· The lines between the ASA numbers etched on the film speed selector
represent the ASA numbers shown in the following chart.
AUTOMATIC EXPOSURE CONTROL (Aperture-preferred system)
 |
Exposure determination is always accurate and instantaneous because the silicon photocells in your Fujica AZ-1 ''see" and measure the brightness of your subject through a fully open lens. |
* Under normal conditions, all you need to do to get perfectly exposed
pictures is to set the shutter speed selector to ''AE", set the aperture ring
to the number you want, and press down the shutter release button.
2. Procedure for automatic exposure
 |
 |
|
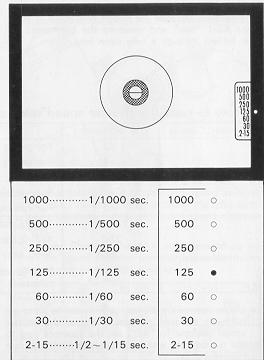
(1) Set the shutter speed selector to ''AE''. (2) Set the aperture ring to the number you want. (3) Look through the viewfinder and press the shutter release button halfway down to check the shutter speed set for you by the camera's electronic brain. (The selected shutter speed is the one opposite the red LED light.) The-numbers on the scale are as follows: |
* AUTOMATIC EXPOSURE CONTROL
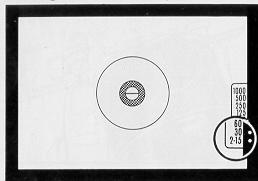
3. Over- and under-exposure warning
 |
If the subject is too bright for the aperture you selected (aperture
too large), the red LED light opposite the number 1000 will turn on and
blink. If the subject is too dim for the aperture you selected (aperture too small), the red LED light opposite the numbers 2-15 will turn on and blink. |
In the first case you will have to choose a smaller aperture and in the
second, a larger aperture.
Example: If the aperture you selected is f/5.6 and the red LED light
opposite the number 1000 turns on and blinks (overexposure warning), use an
aperture of f/8 or smaller. If the aperture you selected is f/5.6 and the red
LED light opposite the numbers 2-15 turns on and blinks (underexposure
warning), use an aperture of f/4 or larger.
Note: The smaller the number, the larger the aperture and vice versa.
* Normally, you won't be bothered with problems of this sort if you set the
aperture as follows:
Outdoors in clear weather a f/8 - f/16
Outdoors in cloudy weathers f/4 - f/8
Indoors f/1.4 - f/4
4. Using a slow shutter speed
 |
If the red LED light turns on opposite
"2-15'' or ''30", the shutter speed will be 1 /30-second or slower so you'll have to guard against camera shake. The best advice in this case is to use a tripod or switch to flash photography. |
5. How to use A the AE lock
 |
When the shutter release button is pressed halfway down, a red LED light in the viewfinder will turn on to tell you which shutter speed has been selected by the camera's electronic brain. And the LED light will remain in one position (in other words, the shutter speed setting will be ''remembered'' as long as the shutter release button is depressed regardless of chances in the brightness of the surrounding1ight. |
Warning:
If the shutter release button is depressed halfway down, that is, if the AE
system is locked, the shutter speed will not change even if you change the
aperture. Therefore, if you want to use a different aperture, you will have to
release the shutter release button to unlock the AE system before turning the
aperture ring.
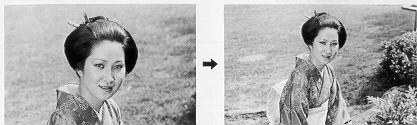 |
The AE lock is particularly useful for taking backlighted pictures which invariably calls for some exposure compensation. All you do to take a backlighted portrait is move up close to your subject, press the shutter release button halfway down and hold it there, then step back and press the shutter release button all the way down to take your picture. |
In other words, the AE lock can be used for automatic exposure
compensation.
* AUTOMATION EXPOSURE CONTROL
6. Automatic exposure range
Your Fujica AZ-1 is capable of automatic exposure with the aperture and
shutter speed combinations shown in the following table.
auto exposure range chart
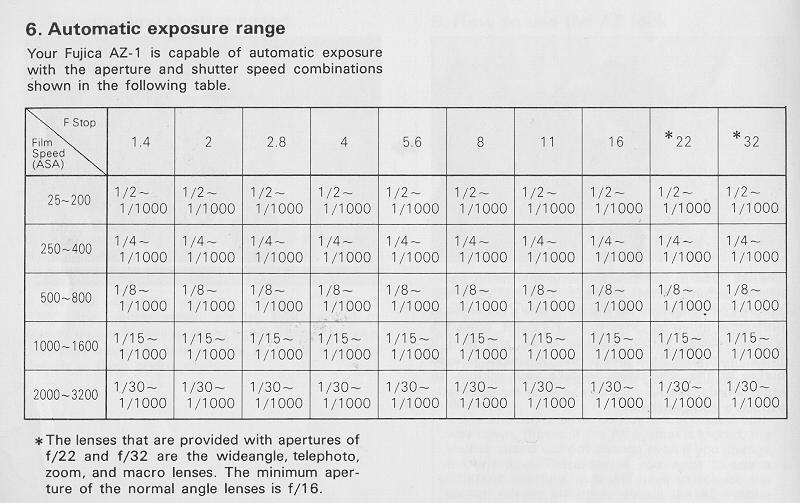
* The lenses that are provided with apertures of f/22 and f/32 are the
wideangle, telephoto, zoom, and macro lenses. The minimum aperture of the
normal angle lenses is f/16.
7. Automatic exposure on stopped-down metering
Your Fujica AZ-1 is capable of automatic exposure on full aperture metering
with Fujinon interchangeable lenses which are designed for full aperture
metering and on stopped-down metering with interchangeable lenses (including
lenses of other makes) designed for stopped-down metering. In case you are
shooting with a bellows extension, extension tubes, or through a microscope,
the light is measured with the lens stopped down. To take automatic exposure
pictures on stopped down metering, all you do is set the aperture, press in
the depth of field preview button and hold it there, then press down the
shutter release button.
When taking automatic exposure pictures on stopped-down metering, be sure to
attach the Eye Cup on the Viewfinder Eyepiece to prevent extraneous light
entering the meter.
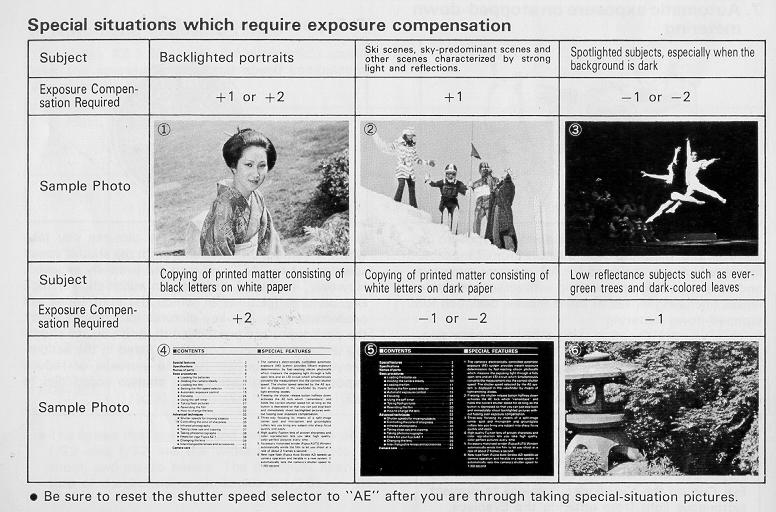
8. Exposure compensation
Under normal conditions, all the pictures you take with the camera on
automatic (with the shutter speed selector set to "AE'') will turn out
properly exposed. However, if you are shooting on automatic for high key
pictures (pictures in which the light tones are predominant) or low key
pictures (pictures in which the dark tones are predominant), or if you are
shooting under the special conditions listed in the accompanying table, you
will have to increase or reduce exposure by first setting the shutter speed
dial to +2, + 1, -1 or -2.
Special situations which require exposure compensation
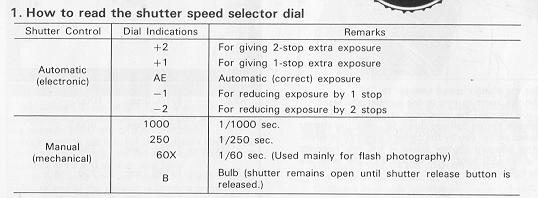
9. Manual exposure control
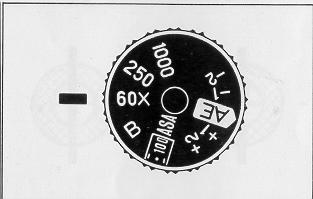 |
To switch the camera to manual (mechanical) exposure control, just set the shutter speed selector to "1000'', '250'', ''60x'', or ''B''. · If the batteries go dead (from wear or freezing temperature) you can shoot with both the aperture and shutter speed set manually. (The shutter speeds available for manual setting are shown on the dial of the shutter speed selector.) |
· When the camera is on manual, the LED light in the viewfinder will not turn
on when the shutter release button is pressed halfway down.
· The 1/60-second speed on the shutter speed selector is used mainly for
taking flash pictures. If the flash you are using is a Fujica Auto Strobo AZ,
you can shoot with the camera on automatic (set to "AE'').
· To take pictures requiring long exposures of 1second or more, set the
shutter speed selector to ''B". The shutter will remain open for as long as
the shutter release button is held depressed so that you can trip the shutter
when you want to.
FOCUSING
 |
In the center of the viewfinder of your Fujica AZ-1, you will see a split-image spot, a microprism collar around it which, in turn, is surrounded by a groundglass screen. Any one of them can be used for focusing the lens. · Eyesight adjustment If you are far- or nearsighted, one of the eyesight adjustment attachment lenses (+2, +0.5, - 2.5, and -4 dipolar) that are supplied on option will come in handy. With the right one attached to the viewfinder eyepiece, you can focus the lens without your glasses. |
 |
1. Focusing with the split-image spot
Look through the viewfinder, center the area of the subject on which you want to focus the lens in the split-image spot and turn the distance ring. Your subject is in sharp focus when the upper and lower segments of the split image fall in line. Use this method for taking pictures of tall buildings and towers. |
 |
2. Focusing with the micronprism collar
Look at the area of the subject on which you want to focus the lens through the microprism collar and turn the distance ring. Your subject is in sharp focus when it appears smooth and clear. This method is recommended for portrait work. 3. Focusing with the groundglass screen Look through the groundglass screen and turn the distance ring. Your
subject is in sharp focus when it appears sharp and clear. |
 |
4. Focusing by eye estimation Estimate the distance from camera to subject with your eye and set the distance ring to that distance (the white numbers on the distance scale are for meters and the green numbers are for feet;) However, if you are shooting with a large aperture or taking close-range pictures, it is always best to focus precisely through the lens. |
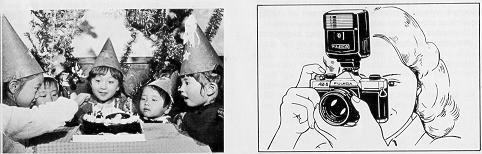
USING THE SELF-TIMER
 |
If you want to take a vacation picture of a group of people or a family souvenir picture with yourself in it, use the self-timer. (1) Mount your camera on a tripod, wind the film and focus the lens. (2)Set the aperture ring and check the shutter speed. (3) Fit on the eyepiece cap (included with your camera) to prevent extraneous light from entering the eyepiece. |
 |
(4) Push the self-timer lever all the way down. (5) Press in the self-timer button and take your place in front of the camera. You will hear a whirring sound of gears until the shutter is automatically tripped (in about 8 seconds) to expose your picture. · Do not depress the shutter release button after winding the self-timer lever because the shutter will go off immediately and the self-timer will remain inactivated. · Be sure to push the self-timer lever down as far as it will go, not just part of the way down. |
TAKING FLASH PICTURES
 |
1. Mounting the flash If you are taking indoor or nighttime pictures, or pictures which require a shutter speed of 1/30second or slower, the best advice is to use a flash. (1) If you are using a cordless flash, just clip it into the camera's hotshoe. |
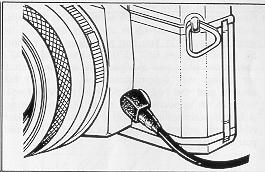 |
(2) If you are using a cord-type flash, plug the cord into the camera's sync socket. |
|
|
|
|
2. Setting the shutter speed Set the shutter speed selector to "60X'' (1/60-sec.) |
3. Setting the aperture (1)--1. If you are using the Fujica Auto Strobo AZ, use the following
apertures: (1) - 2. You can use any aperture (f-stop) to take automatic flash pictures but the shooting distance will differ with each (see graph). (1) - 3. To shoot on manual, refer to the instructions below to find the correct aperture |
(2)1f you are using any other automatic electronic flash, set the aperture
ring to the specified aperture and the flash will take care of the rest.
(Detailed instructions are packed with each flash unit.)
(3)1f you are using an ordinary electronic flash, to find the correct
aperture, just divide the guide number of your flash by the distance from
flash to subject.
Examples: (1) If your flash guide number is 20 (ASA 100, meters) and you are
shooting from a distance of 5 meters, the correct aperture is f/4 because 20 /
5 = 4.
This applies if you are shooting with Fujicolor F-II (ASA 100) film.
(2) If you are using Fujicolor F- ~ 400 (ASA 400) in your camera, the guide
number will double so the aperture will be f /8 because 40 / 5 = 8.
(3) Intermediate apertures not shown on the aperture ring can be taken care of
by setting the ring to the smaller number (larger aperture). For instance if
the guide number divided by the distance is 7 (or between 5.6 and 8}, set the
aperture ring to f/5.6.
(4) If you are using ordinary flash bulbs, set the shutter speed selector to
"AE'', look through the viewfinder to make sure the red LED light is on
opposite the numbers 2-15, then shoot.
FUJICA AUTO STROBO AZ Guide Table

REWINDING THE FILM
 |
· If you have reached the end of the film and are winding it with the film advance lever but the lever feels abnormally tight in the middle of the wind-up, do not force it because the film might break. Just return the lever to its regular position and rewind the film back into its cartridge. After you are through exposing a roll of film, rewind it back into the cartridge and take it to your photofinisher as soon as possible. |
 |
1. Press in the film rewind button Press in the film rewind button. (Normally, it will remain depressed after you lip your finger but depending on the position of the film advance lever, you may have to hold it down with your finger while the film is being rewound or you can just give the film advance lever one full winding while depressing the film rewind button then release your finger from the button and wind the film.) |
 |
2. Turn the film rewind Crank Erect the film rewind crank and turn it in the direction of the arrow until you feel a sudden release of tension. You have now rewound the film back into its cartridge. 3. Open the back cover Open the back cover by pulling the film rewind knob all the way up and unload the exposed cartridge. (The back cover will not snap open unless the film rewind knob is pulled outward as far as it will go.) |
· Be sure to open the back cover only after you have wound the film back
into its cartridge.
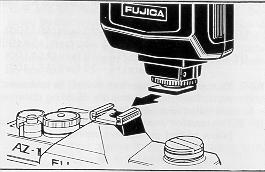
HOW TO CHANGE THE LENS
An advantage of the
single-lens reflex camera such as your Fujica AZ-1 is that you can use at
kinds of different lenses. A large assortment of high resolution,
color-corrected Fujinon interchangeable lenses are available to you for taking
landscapes, portraits, for copying and for shooting snapshots. Besides the
Fujinon lenses which are designed for full aperture light metering and are
equipped with a safety lock for precise lens positioning, you can use
practically any lens which has a Praktica thread mount.
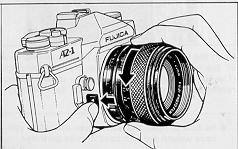 |
1. Fujinon lenses (full aperture metering with lens lock) (1 ) Dismounting |
(2) Mounting Screw the lens in by turning it to the right (clockwise) until
you hear the lens safety lock click quietly into place.
· Make sure the lens is securely mounted If it is not, your exposures will not
be precise because the camera will not be able to give you the correct shutter
speeds.
2. Stopped-down metering lenses (without lens lock)
(1) Mounting
Screw the lens in tightly by giving it 2 to 2 2 turns to the right
(clockwise).
· For taking pictures with this lens, refer to the paragraph on stopped-down
metering on page 21.
(2) Dismounting Just turn the lens to the left (counter-clockwise) until it
dismounts.
· The lens safety lock is not used in this case.
PART 2 - ADVANCED TECHNIQUES
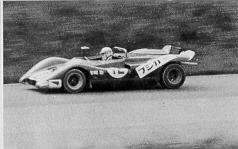
SHUTTER SPEEDS FOR MOVING SUBJECTS
|
|
|
(1) If you want to stop high-speed action at the revealing moment such as
the movements of a pole vaulter in mid-air or a racing car driving at full
speed, just adjust the aperture so that you will get a fast shutter speed of
1/500 or 1/1000 second.
(2) If you want to make the waves of the ocean or the waters of a river or
waterfall in your picture appear as though they are in motion, set the
aperture so that you will get a slow shutter speed of 1/15 or 1/30 second.
You can also use a slow shutter speed to make violent movements appear smooth
and flowing.
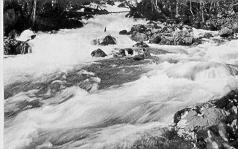
CONTROLLING THE ZONE OF SHARPNESS
|
|
|
1. Checking the depth of field
Look through the viewfinder and press in the depth of field preview button.
The lens will close down to the preset aperture to let you see how well the
background has been blurred out and how wide the zone of sharpness in your
picture will be. This is known as "checking the depth of field''
· Depth of field
When the lens is focused on a point, that point
will turn out sharpest in your picture, However, all objects located up to a
certain distance in front of and behind that point of sharpest focus will also
turn out sufficiently sharp and clear, and this zone of sharpness is known as
the depth of field of a lens.
You can control the depth of field to draw attention to the main subject of
your picture by blurring out its surroundings or you can make your picture
turn tout sharp all the way from foreground to farthest background because the
depth of field works as follows:
(1) The longer the lens focal length, the narrower the depth of field.
(2) The smaller the aperture, the wider the depth of field.
(3) The farther the point on which the lens is focused, the wider the depth of
field.
(4) The zone of sharpness in front of the point of sharpest focus is narrower
than the zone of sharpness behind it.
INFRARED PHOTOGRAPHY
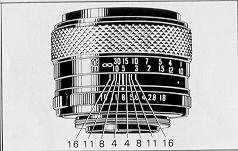
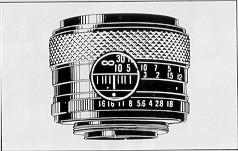
2. Using the depth of field scale of your camera
|
|
|
The interchangeable lenses of your Fujica AZ-1 have a depth of field scale
(colored lines) etched on the barrel and these colored lines work together
with the colored numbers on the aperture ring. If the aperture is set to a red
number, the distance on the distance scale which falls between the two.red
lines on the depth of field scale is the width of the depth of field. The same
applies to all of the other colored numbers and lines.
Example: If you are using an F1.8 55mm normal lens and have set the
aperture to f/8 (8 on the aperture ring) and the distance at 5 meters (15
feet), everything between 3.5 meters (11 feet) and 8.7 meters (28 feet) from
your camera will turn out sharp.
If you are shooting with infrared film in your camera, the lens will have to
be focused on a point slightly short of your subject. The procedure is as
follows:
(1) Focus the lens on your subject as you normally would.
(2) Check the distance on the distance ring and move that distance opposite
the infrared setting mark. Next, put a red filter on the lens and shoot. (The
infrared setting mark is the white dot on the left of the aperture setting
mark.)
Notice: Be sure to follow the directions packed with your infrared film
because exposure is not determined in accordance with the brightness of your
subject.
TAKING CLOSE-UPS AND COPYING
The following accessories are available for taking close-ups and copying
together with detailed instructions on how they are used.
For best results, always use a tripod for taking closeups and a copying stand
for copying.
· Close-up lens
With a normal lens on the camera, it will let you take sharp pictures between
28 and 50 centimeters from the camera.
· Extension Tube
With a normal lens on the camera, it permits magnifications ranging from about
0.34x to about 1.2x. Focusing can be done with the lens fully open because it
is equipped with an automatic diaphragm.
· Extension Bellows
This accessory lets you freely adjust the distance between lens and film
plane. An ideal aid for taking close-ups and larger-than-life pictures.
· Reverse Adapter
If you are shooting larger-than-life pictures with the aid of an Extension
Bellows, use this adapter to mount the reverse end of the lens on the bellows.
Your pictures will turn out sharper.
· Leica Thread Mount
This is used for mounting Leica mount lenses on the camera, but only for
taking close-ups. It will let you mount enlarging lenses (these are Leica
mount lenses) on the Extension Bellows for taking sharp close-ups and copies.
· Rightangle Finder
Designed to give you a comfortable view through the viewfinder from a low
angle or with the camera mounted on a copying stand. It will adjust to your
eyesight.
· Macrocinecopy
This is designed for copying pictures taken on 8mm and 1 6mm films. It can
also be used in place of an Extension Tube.
Notice: Excepting the Close-up Lens, light metering with these
accessories is done with the aperture stopped down (refer to the paragraph on
stopped down metering on page 21.)
TAKING PHOTOMICROGRAPHS
 |
All you need is a Microscope Adapter for mounting the camera body on the eyepiece of a microscope. Focusing is done with the microscope. |
FILTERS FOR YOU FUJICA AZ-1
Your Fujica AZ-1 will take 49mm-diameter, 0.75mm thread-pitch screw-in type
filters. Exposure compensation for filter is not necessary because the camera
measures the exposing light through the lens.
· Skylight filter
Yields clearer landscapes in color.
· Light balancing filter
For adjusting the color quality of the illumination to your color film.
· Neutral density (ND) filter
For reducing light intensity by a known degree. Used for exposing color
and black and white films.
· Ultraviolet (UV) filter
Absorbs ultraviolet rays. Used with both color and black and white films.
· Yellow and orange filters
For better contrast landscapes in black and white and improved sky effects.
· Red filter
For taking infrared pictures. Has special tonal qualities of its own.
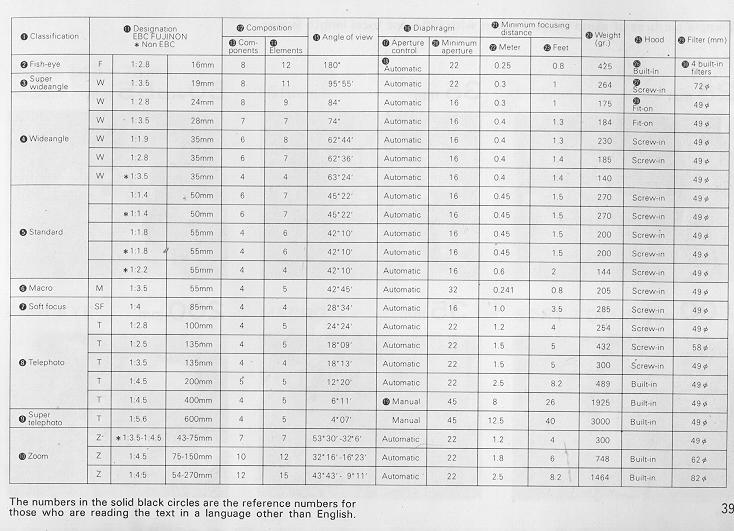
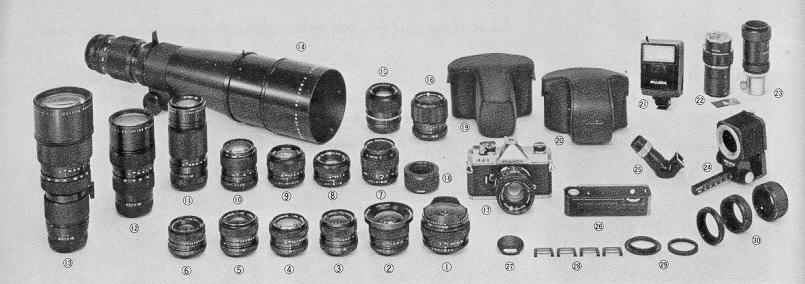
CHART OF LENSES FOR FUJICA CAMERAS
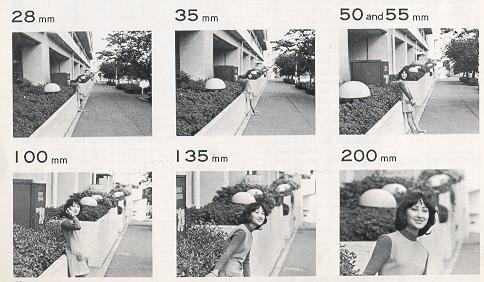
SAMPLE PICTURES OF 28MM TO 200MM LENSES
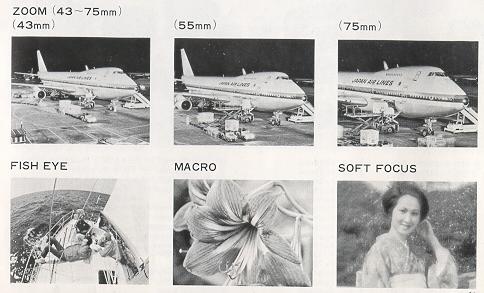
SAMPLE PICTURES OF ZOOM LENSES (43-75MM), FISHEYE, MACRO, SOFT FOCUS
SAMPLE OF THE LENSES AVAILABLE FOR FUJICA CAMERAS
|
(1) EBC FUJINON . Fish eye 1: 2.8 f = 1 6mm (2) EBB FUJINON NEW 1:3.5 f=19mm (3) EBC FUJINON · W 1 :2.8 f =24mm (4) EBC FUJINON.W 1:3.5 f=28mm (5) EBC FUJINON ·W 1:2.8 f=35mm (6) FUJINON .W 1:3.5 f=35mm (7) EBC FUJINON.MACRO 1:3.5 f=55mm (8) EBC FUJINON 1:1.4 f=50mm (9) FUJINON 1:2.2 f=55mm (10) EBC FUJINON.T 1:2.8 f=100mm (11) EBC FUJINON IT 1:4.5 f=200mm (12) EBC FUJINON · Z 1 :4.5 f =75 - 150mm (13) EBC FUJINON.Z 1:4.5 f=54 - 270mr (14) EBC FUJINON · T 1 :5.6 f =600mm |
(16) FUJINON.Z 1:3.5 - 4.5 f=43~75mm (17) FUJINON 1:1.8 f=55mm (18) Macro Adapter (19) Zoom Lens Case (20) Camera case (22) Macrocinecopy (23) Microscope adapter (24) Extension bellows (25) Rightangle finder (26) Fujica Auto Winder (26) Eye cup (26) Eyesight adjustment lens (29) Reverse adapter (30) Extension tubes |
CAMERA CARE
· After you are through shooting, be sure to trip the shutter by pressing
down the shutter release button.
· Periodically, dust off your camera and wipe it with clean, lintless cloth.
Use an air blower to remove dust and film debris from the interior.
· Guard the lens and viewfinder against fingermarks and dust. Use an air
blower to remove dust. Fingermarks are removed with Fuji Lens Cleaning Fluid
or Lens Cleaning Paper. Do not touch the mirror because it will damage easily.
· If you are shooting sea-side scenes, carry the camera in a vinyl bag and
take it out only when you need it. After you return home, wipe off salt and
sand with a piece of clean, lintless cloth.
· Take your camera to your service technician for checking about once every
two years. It will give you better and longer service.
· Guard against dropping your camera on the floor and do not leave it in
direct sunlight.
· Normally, your camera does not need lubricating. It should never be oiled or
taken apart except by a qualified service technician.
· If you are not using your camera for a long interval, take it out of its
case, remove the batteries, and store it away from moisture, heat, and dust.
The best way to store it is to keep it in a ridded container together with
some desiccant, such as silica gel.
· Keep a note of your camera and lens numbers so that you can trace them in
case they go astray.
· On hot days, do not leave your camera in your car or in moist places except
temporarily for a very short time.
· In freezing weather, keep it warm by putting it in its case and carrying it
inside your windbreaker and take it out only when it is needed.