FUJICA HALF
POSTED 7-18-'03
FUJICA HALF 1.9 CLICK HERE
This camera manual library is for reference
and historical purposes, all rights
reserved.
This page is copyright©
by  , M.
Butkus, NJ.
This page may not be sold or distributed without
, M.
Butkus, NJ.
This page may not be sold or distributed without
the expressed
permission of the producer
I have no connection with any camera company.
On-line camera manual library
Back to main on-line manual page
If you find this manual useful,
how about a donation of
$3 to:
M. Butkus, 29 Lake Ave.,
High Bridge, NJ 08829-1701
and send your e-mail
address
so I can thank you.
Most other places would charge
you $7.50 for
a electronic copy
or $18.00 for a hard to read Xerox copy.
This will help me to continue to host this site,
buy new manuals, and pay their shipping costs.
It'll make you feel better, won't it ?
If you use Pay Pal, use the link below.
Use the above address
for a check, M.O. or cash.
CLICK HERE FOR A FUJICA HALF
PDF VERSION MADE FROM THIS PAGE
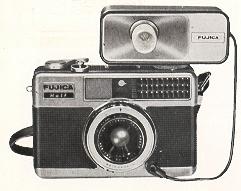
FUJICA HALF
The True Candid Camera
small...so light...so quick end easy to use
So delightfully quick and easy to use, it's truly a "candid
camera"... yet it gives you up to 72 sparkling color slides from the same kind
of 35 mm film that delivers only 36 color slides from other cameras!
How can the Fujica Half do it ? By dividing each frame of standard 35 mm film in
half and putting a picture on each half. And the Fujinon lens is so sharp that
the pictures it takes are crisp and full of lively color. When you project them,
(or, of course, enlarge them if you want to make prints), you'll see the same
quality you expect from a full size, fine quality 35 mm camera.
This booklet will tell you how to get the most from your new Fujica Half ... how
to use its convenient automatic features, how the computer electric eye sets
both lens openings and shutter speeds automatically... to give you correct
exposure every time you press the button. Read this manual carefully and you
will take better pictures than ever before.
Only 4 Basic Steps Needed
 |
|
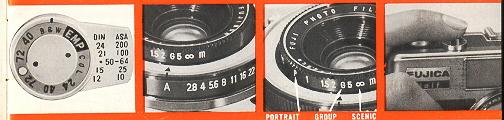
1. Set the Correct Film Speed
On the back of the camera, to the right of the
viewfinder, you'll find the Film Speed Setting. Align the ASA number of your
film with the arrow.
|
2. Set the Camera for Automatic Exposure
Rotate the inner black ring on the lens until the Red "A" is on top, in line
with the black line on the lens housing. This sets the camera for completely
automatic operation.
|
3. Focus the Lens
Dial the kind of picture you're taking into the smaller ring on the outside
of the lens: " P " for portraits, " G " for groups and co for distant shots and
scenics.
|
4. Then, just shoot
Swing the film advance lever all the way to wind the shutter, point the
camera at your subject and shoot. That's all there is to it. Try it a few times
until you get the feel of it. |
|
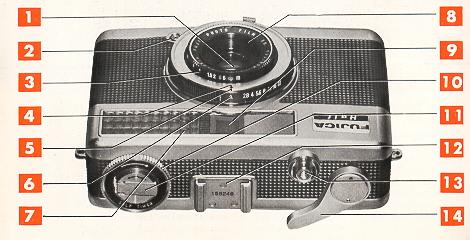
1 Fujinon 28 mm, f/2.8 lens
2. Flash connection outlet
3. Focusing Ring
4. Focusing ring arrow 5. Lens opening guide mark (Red)
6. Lens opening ring
7. Computer electric eye light-gathering window |
8. Threaded filter mount
9. Viewfinder window
10. Self-timer winding ring
11. Film rewind knob
12. Accessory shoe and serial number
13. Shutter release button
14. Film advance winding lever |
|
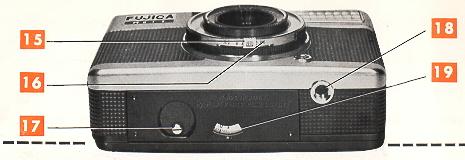
15. Shutter speed setting slide
(shown here set at automatic)
16. Shutter speed ring |
17. Rewind button
18.Tripod socket
19. Self-resetting automatic exposure counter |

| 20. Self-timer starting (S) and locking
(L) slide
21. Viewfinder Film reminder dial. Set it after loading your film to
remind you what film is in camera.
23. ASA film speed setting |
24. Wrist strap fixing
25. ASA film speed setting mark
|
|
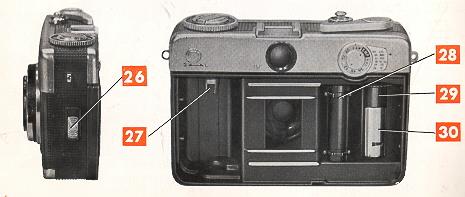
26 Camera back slide lock (Move up to open back)
27 Film cartridge spindle
28. Film sprocket wheel |
29 Film take-up spool
30 Take-up spool film catch
|
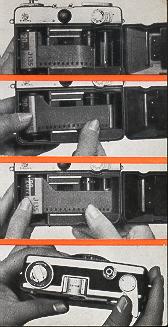
The Back and Inside of your FUJICA HALF
|
|
|
|
Before inserting film cartridge, push film spindle up |
After inserting film
cartridge, push film spindle down |
How to load film into the Fujica Half
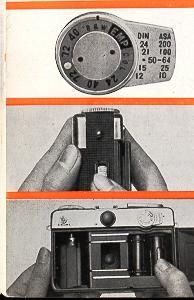 |
1. SET FILM SPEED
Align the ASA number of the film you're using with the Mark (No. 24) by
pushing the ASA Film Speed Setting Control (No. 23) up or down. |
|
2. OPEN BACK
Open the back of the camera by pushing up on the Slide Lock (No. 26). The
back will spring open slightly. Swing it open fully. |
|
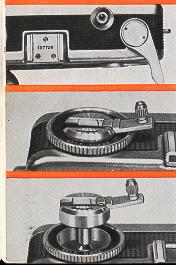
3. ROTATE FILM TAKE UP SPOOL
Rotate the Take-up Spool (No. 29) until the arrow cut-out is directly on top.
Move the spool by means of the knurled wheel at its top, or by moving the Film
Sprocket Wheel (No. 28). |
 |
4 INSERT FILM ROLL
Push the Film Cartridge Holder (No. 27) up. Drop in the film cartridge
with the sprocket holes of the protruding film leader down.
Then, push the Rewind Knob all the way down so that the film cartridge
spindle is inserted into the film cartridge. |
|
5. INSERT END OF FILM
Slip the end of the film under the Film Catch (No. 30) until the film
shows clearly all the way to the head of the arrow cut-out |
6. ADVANCE FILM
Hold the film cartridge in place with your thumb and swing the Film
Advance Lever (No. 14) all the way out. This will start the film on the
Take-up Spool. Be sure the film perforations engage the sprocket teeth on
the Sprocket Wheel. Then, close the back firmly until it clicks. |
|
7. PRESS SHUTTER RELEASE
The Exposure Counter (No. 19) will now read "S". Press the Shutter
Release Button (No. 13) and swing the Film Advance Lever again. Do this twice
more until the Exposure Counter reads " O ". |
How to unload
 |
1. When you reach the last frame, the Exposure Counter (No. 19) will
read "72" or "40" or "24", depending on the film load, and the Film Advance
Lever will stop part way out. DO NOT TRY TO FORCE IT ALL THE WAY. This is your
signal to |
|
2. Erect the handle on the Film Rewind Knob (No. 11) and push the
Rewind Button (No. 17) all the way in. Turn the handle in the direction of the
arrow until no more resistance is felt. |
|
3. Open the camera back as before. Pull the handle all the way up to
free the cartridge, and lift the cartridge out. Now, swing the Film Advance
Lever fully out and permit it to snap back. Cover the camera back.
|
What you see in the viewfinder..
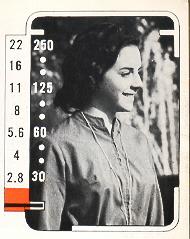 |
When you look through the Viewfinder (No. 21), you see your subject, brightly
and clearly, framed in a white outline that tells exactly what will be in the
picture. To the left, you see a scale of lens openings (f/stops) and shutter
speeds.
To set the camera for Automatic exposure, rotate the Lens Opening Ring (No.
6) until the red " A" clicks into position in line with the Guide Mark (No. 5).
Look through the viewfinder and press the Shutter Release Button (No. 13) until
some resistance is felt, about halfway down. You'll see a black bar swing up
from the bottom and point to a combination of lens opening and shutter speed.
This is the combination that the computer electric eye automatically
selected and set for you for the light value of the object or scene you
observe through the viewfinder. -All you need do now is focus and shoot. |
How this automatic setting can be very useful in manual settings
is explained on Pages 16 and 17.
If the black bar remains in any part of the red area at the bottom of the lens
opening scale when the Shutter Release Button is depressed, the light isn't
strong enough to take good pictures with the film you're using. That's your
signal to switch to flash. (See Page 18.)
Notice the two white lines on either side of the white outline, a little way
down from the top. These are "parallax correctors". When you are
photographing any subject closer than 3 feet (1 meter) from the camera, keep the
top of your subject below these two lines.
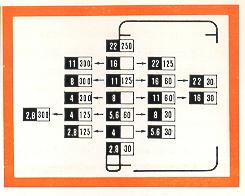
How the Computer Electric Eye helps you take perfect pictures .
automatically
The latest types of electric eye cameras
today usually set the lens opening automatically. The user then must select and
set a shutter speed. The Fujica Half goes a big step further. When set for
automatic operation, the Fujica selects and sets both the shutter speed
and the lens opening for you.
The colored arrow in the chart on this page shows you how the
computer electric eye starts off at the fastest shutter speed and smallest lens
opening.
Fastest shutter speed to catch any action and smallest lens opening
to give you the sharpest possible picture with the greatest depth of field. If
the light isn't bright enough to give you a perfect picture with this
combination... the entire circuit shifts to the next combination, and so on
until a perfect picture is possible.
This entire sequence takes place in the time it takes you to press the
button.
The column titled " Light Values" shows the broad range of lighting situations
your Fujica Half sets itself up for... very bright "17" to dim "8".
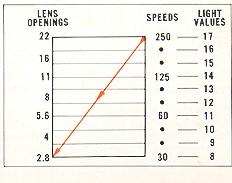
When you look through the viewfinder you will see two dots between each of the
shutter speeds. If, when pressing the shutter release button, the black bar
stops at one of these dots, this chart shows you the exact light value of the
scene being photographed.
For setting any combination manually see face 16.
How the FUJICA HALF Close-up Light Lock helps you solve difficult lighting
situations with ease
 |
If you're shooting a portrait against very dark trees, or with any similar
situation, you'll want to get correct exposure on important skin tones and
facial detail. Most automatic cameras would overexpose skin tones or underexpose
the background. With the Fujica Half, focus first, then go up to your subject
and aim the camera just a few inches away from the lighter part of your
subject's face. Press the Shutter Release Button until the black bar swings
up. Then, hold the button in that position, and back up to your shooting
position. Aim and press the button all the way down to take the picture. More
natural skin tones and shading will be the result in your finished color slide
or print. |
How to focus your
FUJICA HALF
Simplified . . . Automatically
. . .sharp
One of the best features of your Fujica Half is the simplicity of its focusing
system. By simply matching a symbol with the kind of picture you're shooting,
you can get sharpest focus for clearest pictures.
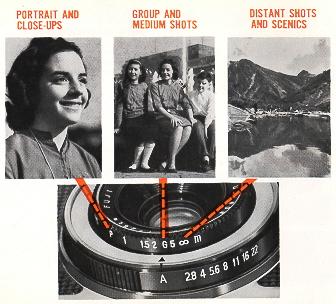 |
For portrait shots at about 2 1/2 feet (0.7 meters), turn the
Focusing Ring (No. 3) until the " P" on the Focusing Ring is in line with the
Focusing Ring Arrow (No. 4). Use the red "G" for group shots at about 10 feet (3
meters), and the red 00 for distant and scenic shots from 25 feet (7.5 meters)
and beyond. That's all there is to it.
BUT, if you want to focus way in for table-top shots and other extreme
close-ups, you can set the Focusing Ring at the white 2-foot mark. Use the other
white figures for focusing on distances in-between
Portraits and Groups, or in between Groups and Distant shots.
If you wish, you can also use the white figures to determine and control
Depth-of-Field (see Page 20). The chart on that page will tell you where the
Focusing Ring must be set for any given area of sharpness, with any setting of
the Lens Opening Ring. |
How to switch from automatic operation to manual control
and set any combination of shutter speeds and lens openings you wish
To switch from Automatic operation to Manual Control, simply move the Lens
Opening Ring anywhere off " A" position.
You now have a range of 7 lens openings and 4 shutter speeds to form any
combination you desire. For instance, you might want to simulate a night shot in
broad daylight by underexposing indoor color film outdoors.
Or you may want to get a sharp foreground with a soft, out-of-focus background,
while maintaining correct exposure.
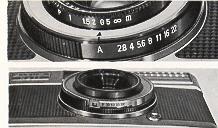 |
FIRST SELECT A LENS OPENING, with a full range of f/
stops from fl2.8 to fl22 to choose from. When you move the Ring off "A", the
camera is set for manual use.
THEN, SELECT A SHUTTER SPEED by moving the Shutter Sp00d Setting Slide
until the speed you want appears in the square cut-out.
|
Even when you operate the camera manually, you can use the Computer
Electric Eye to help you arrive at correct exposure
 |
Re-set the camera for Automatic operation, aim at your
subject, and press the Shutter Release Button until the black bar swings up
and gives you a Shutter Speed and Lens Opening combination. Using this
combination as a basis, consult the chart on this page. You'll find a
variety of other Shutter Speed and Lens Opening settings which will also
give you correct exposure...but each is most suitable for a certain kind of
picture. |
For instance, you might want to " freeze " fast action and the Computer
Electric Eye tells you that f/5.6 at 1/60 sec. is your basic correct exposure.
1/60 sec. is not fast enough to stop action, so you consult the chart and find
that f/4 at 1/125 sec. is also correct, as is f/2.8 at 1/300 sec.
Now, if you wish to shoot at 1/300th, you set the lens opening at 2.8 and
then move the Shutter Speed Slide to "300 ". You've chosen a combination of
Shutter Speed and Lens opening that's correct for the picture you want to take,
and you know you'll get correct exposure, too.
FLASH Your FUJICA HALF is fully
synchronized for electronic flash or flashbulbs
 |
The Shutter of your Fujica Half is synchronized for electronic flash, and
also Class M flashbulbs. The flashgun plugs into the standard Flash Socket (No.
2), and attaches to the camera by means of the Accessory Shoe (No. 12) or the
Tripod Socket (No. 18).
Leave the Shutter Speed Slide at A.  position. This automatically sets the shutter at 1/30 sec. Set the Focusing Ring
for the distance between the camera and the subject you're shooting. Then, set
the lens opening in accordance with the instructions supplied by the
manufacturer of the flashbulbs or electronic flash unit you're using.
position. This automatically sets the shutter at 1/30 sec. Set the Focusing Ring
for the distance between the camera and the subject you're shooting. Then, set
the lens opening in accordance with the instructions supplied by the
manufacturer of the flashbulbs or electronic flash unit you're using. |
TIME EXPOSURES
/ SELF-TIMER
 |
For exposures longer than 1/30 sec., move the Lens Opening Ring off Automatic
to the Lens Opening you're going to use. Then, move the Shutter Speed Slide to
the "B" position. Swing the Film Advance Lever to advance the film and wind the
shutter. Now, the shutter will remain open as long as the Button is depressed,
and will snap shut as soon as the Button is released. For sharp, time exposed
pictures, it's always best to mount the camera on a tripod or some other firm
support. |
 |
You can delay the actual snapping of the picture up to 10
seconds in order to get into the picture yourself! Leave the camera in
Automatic operation, or use it manually, as you prefer. Advance the film and
wind the shutter in the usual way. BUT . . . don't depress the Shutter
Release Button. Instead, move the Self-Timer Slide (No. 20) to "L" (Lock)
and rotate the Self-Timer Ring (No. 10) in the direction of the arrow. The
more you turn it, the longer the delay will be, up to ten seconds. Move the
Self-Timer Slide to " S " (Start). You'll hear a buzzing and the Ring will
start to turn. That's your signal to get into the picture. After the delay
you've set, you'll hear a click and the camera will stop buzzing. That means
you've taken your own picture with your Fujica Half. |
How to control your "Depth-of-Field" to ~ further improve
the quality of your pictures
THE DEPTH-OF-FIELD CHART
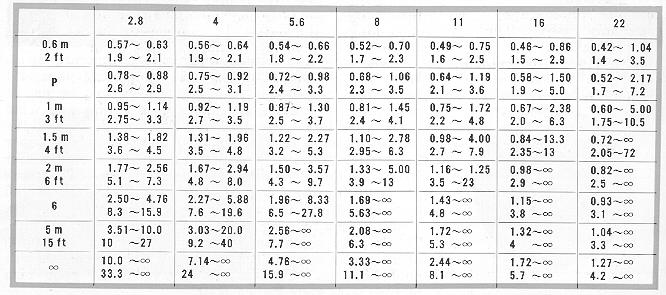
·. Depth-of-field " is the
area behind and in front of the subject You're actually focused on which will
also be in sharp focus. It varies with the lens opening and with the distance
from the subjeet to the camera. (The wider the lens opening. f/2.8 is wide open
and f/22 is almost completely closed. the narrower the depth-of-field. The
smaller the lens opening, the greater the depth-of -field. Also. the further
away the subject focused on. the greater the depth-of-field.) You can use this
characteristic of all lenses to design just the kind of pictures you want to
get. The chart on this page tells you the depth-of-field for each lens opening
and for each setting on the Focusing Ring.
How Filters help you , , take better pictures .
Filters are precision-tinted discs of colored glass that fit in
front of the lens. They improve the quality of your pictures by emphasizing some
colors. . . de-emphasizing others.
In color photography, two filters are commonly used: Type A conversion filter
which lets you use tungsten-balanced indoor film outdoors, and ultraviolet (UV)
or skylight filters that cut through haze and reduce the over-blue effect of
shooting in open shade on a bright day.
Most common black-and-white filters are: Green, which lightens foliage and gives
landscapes a brighter look. Yellow, which improves skin tones and tends to
diminish freckles and skin blemishes... also emphasizes clouds in a blue sky.
Red, which really brings out clouds by blackening the sky and gives water scenes
sparkle.
Your FujIca Half accepts screw-in filters, 22.5 mm diameter.
FILTER FACTORS
Since the filter absorbs part of the light, you have to compensate
to get correct exposure. Each filter has a factor number which indicates its
absorption. For example, a medium yellow filter has a factor of 2, which means
it absorbs half the light. To compensate in automatic shooting, divide the ASA
number of the film by the filter factor and set that number in the ASA Film
Speed Setting (No. 23). For example: Using a medium yellow filter and a film
having an ASA of 100. Since the filter factor is 2, set the ASA setting at 50.
For manual exposures, open the lens one f/stop wider for a filter factor of 2
117/2 stops for a filter factor of 3, and so on. Or, choose an equivalently
slower shutter speed.
FOR EXAMPLE: Filter factor is 2. Normal exposure is f/8 at 1/125 sec. Open lens
to f/5.6 or set shutter at 1/60 sec.
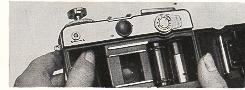
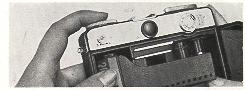
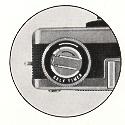
How to hold your FUJICA HALF
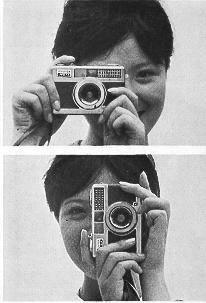 |
The Fujica Half nestles in your hands very snugly and securely. However, its
wise to form the habit of placing your left forefinger under the lens to avoid
interference with the Light Gathering Window (No. 7).
With camera in its normal position (Film Advance Lever on top) the picture
will be vertical in composition. For horizontal compositions, hold the camera
with the Film Advance Lever at either side, whichever is more comfortable and
convenient.
Hold the camera steadily, against your cheek and squeeze ... don't push...
the Shutter Release Button. |
How to care for your FUJICA HALF
Your Fujica Half is ruggedly built to give you long years of
trouble-free service. Like any precision instrument, it will perform better for
a longer time if it is cared for properly.
Always keep it in its soft leather pouch when it's not in use. Keep the lens
capped and the shutter un-wound. Be careful not to bang it or drop it while
you're carrying it. In other words, treat it as you might a fine watch.. . meant
to be used continuously, but abused... never!
Clean the front and rear of the lens infrequently... about once every three
months. A drop of lens cleaning fluid I will loosen dirt and dust. Wipe the lens
I gently with a lens tissue until it is dry. I NEVER use a solvent on the lens.
NEVER wipe the lens with facial tissue I which leaves a deposit of lint, or with
a I handkerchief which may damage the hard I chemical coating.
REMOVE FINGERPRINTS IMMEDIATELY.
They are acid . .. and, if not removed, will etch themselves into the
coating of the lens. Use lens fluid and lens tissues to remove them.
If you use the camera constantly, it is advisable to clean the
inside once a week. Blow out large dust particles with an ear syringe. Then, get
into the corners with a lens tissue wrapped around a toothpick. NEVER use
anything metallic that might scratch the insides.