If you find this manual
useful,
how about a donation of $3 to:
M. Butkus, 29 Lake Ave.,
High Bridge, NJ 08829-1701
and send your
e-mail address
so I can thank you.
Most other places would charge
you $7.50 for a electronic copy
or $18.00 for a hard to read Xerox copy.
This will help me to continue to host this site,
buy new manuals,
and pay their shipping costs.
It'll make you feel better, won't
it ?
If you use Pay Pal, use the link below.
Use the above address for a check, M.O. or cash.
CLICK HERE FOR
KODAK RETINA IIIc
WORD DOCUMENT
CLICK HERE FOR KODAK
RETINA IIIc PDF
MADE FROM FILE ABOVE
Kodak Retina IIIc PDF
scanned from instruction manual

THE KODAK RETINA IIIc
is a perfected miniature camera to meet the highest demands. It has interchangeable lenses, a coupled rangefinder combined
with the new viewfinder with reflected line frame, a built-in exposure meter, the new Synchro-Compur shutter with light value
settings and self-timer a collapsible lens panel which locks open absolutely rigidly, as well as a large number of other technical
refinements.
This camera will be your companion for many happy hours; in your job, when traveling, at home, in every weather and every
season. You can thoroughly rely an it.
The RETINA IIIc was tested according to the strictest standards before it reached you. It combines utmost precision with
unsurpassed performance and thus satisfies every possible requirement for first-class results. The name
Kodak is your guarantee for that.
Make the best use of the many advantages of your camera. And here is at once the most important piece of advice: Read the first
part of these instructions (pages 5-12) especially carefully - whether you are a beginner or an experienced photographer - and
practice the operations described without a film in the camera. The controls of your RETINA work equally well with or without
film. Then, once you hove mastered the elementary manipulation, load the camera with a film and take your first pictures. The
later sections in this booklet will give you a number of further tips for successful pictures. So don't skip that part of the instructions
but follow the advice given there. You will soon realize how easy picture taking is with the RETINA
IIIc.
KODAK AG · STUTTGART-WANGEN GERMANY
First get to know the main points of operation
Contents
|
5 Opening and closing the camera
6 Holding the camera
7 Setting the distance
8-9 Finding the light value
10-11 Setting the light value
12 Tensioning and releasing
13 Opening the camera back
14 Inserting the film
15 Setting the film counter
16 Setting the film speed
17 Unloading the camera :
|
18 Depth of field
19 Zone focusing
20 Speed synchronization
21 Self-timer
22-23 The interchangeable lenses, telephoto shots
24 Wide-angle shots
25-28 Some important hints
29 30 RETINA accessories
31- 33 General view of RETINA 111 c
34 Some more hints |
Parts of the camera
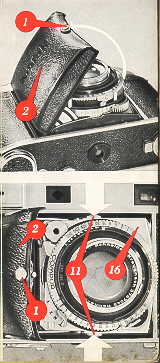 |
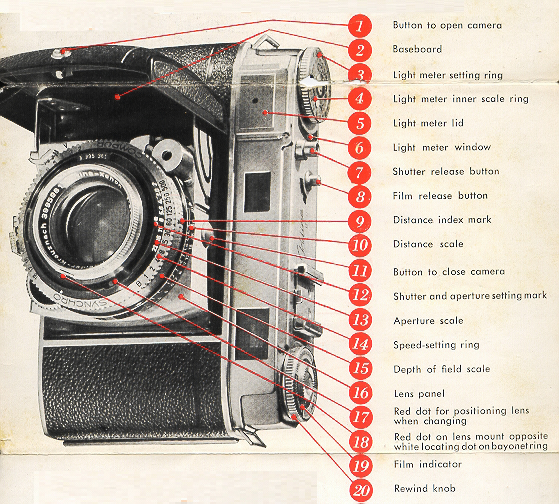
Hold the RETINA in your hand and push the button (1) towards the word 'Kodak. At the same time pull open the baseboard (2)
until it audibly clicks into position. The camera is now ready to shoot.
Before you close the camera, remember to set the focusing scale (10) to inf. Only then can you close the camera. Simultaneously
press in the two buttons (11) at each side of the lens panel (16); the baseboard (2) will then easily fold up even with a filter
screwed into the lens. |
Handling really simple
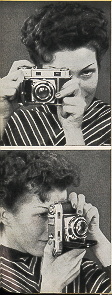 |
Whenever possible grip the camera with both hands. The illustrations show the position for horizontal and upright pictures. They
are, however, mainly intended as a guide; you can, of course, hold the camera in other ways, too. So try a few positions to find
which suits you best. And when you have found your ideal hold, stick to it! |
Setting the distance
 |
Hold the camera in the shooting position and look thorough the eyepiece (34) of the combined view and range finder. You will see
the subject as well as the reflected line frame superimposed on it (we shall have more to say about that on page 27). |
In the
center of the field of view you will also notice a bright diamond-shaped rangefinder field. Until the camera is focused for the
correct distance, this field shows part of the subject with double outlines. To set the distance turn the focusing knob (30) until the
outlines of the double image move together and coincide, so that only one image is visible. The lens is now accurately set to the subject
distance.
All distances are measured from the subject to the plane of the film in the camera. This corresponds approximately to the rear
upper edge of the chromium-plated top of the body. Precise focusing in this way with various subjects at different distances.
Close the camera now and again and then pretend that you have just noticed a goad subject and want to focus the camera an it.
Try the same with the camera held upright.
An important feature of your RETINA:
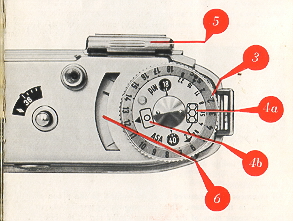 |
The light values
The RETINA 111 c has a built-in photo-electric exposure meter. This eliminates difficult calculations and gives you the correct
light value. The latter is a number corresponding to the amount of light required for correct exposure.
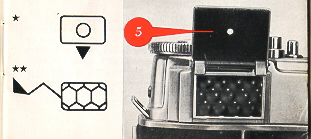
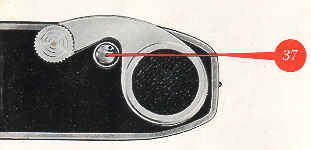
Point the camera at the subject, directing it slightly downwards. A black pointer will move in the window (6). Turn the meter setting ring (3), thus moving a red pointer until the latter
coincides with the black pointer of the exposure meter. If you have taken the reading with the cover (5) closed, read off the light
value from the index mark (4b) * an the setting ring (3). |
Setting exposures by light values
 |
If the painter of the exposure meter does not move appreciably with the cover closed, open the cover (5) by gently pressing on the
ribbed upper edge. In this case read off the light value apposite the index mark (4a) for the open cover **. |
 |
The green numbers on the setting ring (3) show aperture settings far exposure times longer than 1 second, or exposure times at
small apertures. Far instance, if you want to use aperture f/ll at a light value setting of 6, the green figure 11 shows the correct
exposure time to be 2 seconds.
See page 25 for various applications of the exposure meter. |
One operation sets any aperture-speed combination
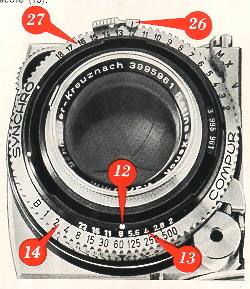
The Synchro-Compur shutter of your RETINA carries the following three scales
The Shutter Speed Scale (14): The numbers signify fractions of a second, thus 2 stands far 1/2 second, 15 for 1/15 second, 125
for 1/125 second, and so on.
The Aperture Scale (13): The stop numbers indicate relative apertures. The largest stop is f/2, the smallest f/22.
The Light Value Scale (27): The red figures from 2 to 18 are the light value settings.
The light value setting required for any shot may be determined from the built-in light meter (see page 8).
To set the light value obtained an the shutter, pull the light value lever (26) slightly outwards and move it to the appropriate light
value number. If this light value is outside the range of movement of the light value lever, adjust the ring carrying the light value
scale (27) and shutter speed scale (14) accordingly, You can also set in-between light values, e. g. 11.5.
Far instance, once you have set the light value to 12, the index mark (12) will indicate one of the following aperture speed
combinations:
Shutter speed
| in seconds: |
1/8 |
1/15 |
1/30 |
1/60 |
1/125 |
1/250 |
1/500 |
| Aperture |
f/: 22 |
16 |
11 |
8 |
5.6 |
4 |
2.8 |
If you don't wont to use the combination opposite the index mark (12), select the required combination by turning the speed ring.
You will notice that this clicks into place at each setting, to ensure accurate shutter speeds. When one selects a faster shutter
speed, the aperture-speed coupling automatically opens the lens aperture. Adjusting the aperture to a smaller stop alters the
shutter setting to a slower speed, thus keeping the exposure constant all the time,
If you want to set the exposure without reference to the light value, make sure that you adjust first the shutter speed and then the
aperture. If you do it the other way round, the aperture-speed coupling would alter the aperture when setting the shutter speed.
|
|
To set the shutter speed, turn the shutter speed ring, until the required speed figure is opposite the shutter speed Index mark (12
. To change the aperture, pull the light value setting lever (26 slightly outwards and move it to the required value on the aperture
scale (13).
Even when you have set the exposure in this way, you can use the aperture-speed coupling to adjust either the aperture or the
speed at will by turning the ring
It may also happen that the aperture lever or speed ring reaches the limit of its movement when adjusting the aperture speed
coupling to the required aperture or shutter speed respectively. This indicates that the lighting conditions are not suitable tar the
aperture or speed you intended to use.
|
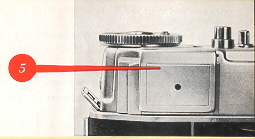
Quick winding and releasing
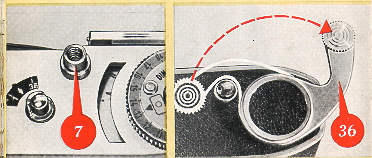 |
Look through the finder eyepiece, sight the subject, and press the release button (7). If the shutter is not tensioned, you cannot
press the button.
To tension the shutter, pull out the rapid-winding lever (36) in one movement as for as it will go. Then let it shoot back into its
original position. If it does not move back, you did not pull it out far enough, so carry
on to complete the transport movement. |
This,
at the same time tensions the shutter, and - provided you have a film in the camera - winds
on the film by one frame and advances the film counter (see page 15). Now you can release. You will notice how smooth the
release button operates; this is important to avoid camera shake.
Make a habit of operating the rapid-winding lever immediately after every exposure so as to have your camera always ready far
action. Keeping the shutter tensioned - even for some time does not harm it in any way.
Preparing for the first exposure
 |
You should by now be familiar with the most important operations and can take your first picture. For that, of course, you must
have a film in the camera. Provided you have no special type of picture in view, choose a medium-speed film of about 28 degrees
BS. (50 ASA).
Before you insert the film you have to open the camera back. Proceed as follows. |
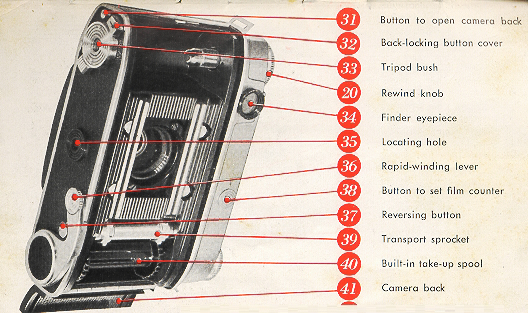
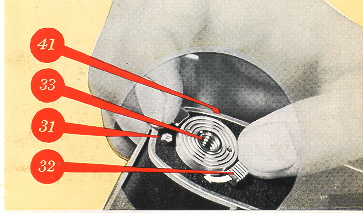
On the bottom of the camera you will find the tripod bush (33) . This is surrounded by a double lever (32). If you push the milled
end of the lever in the direction of the arrow, the opposite end uncovers a button (31). Depress this button, and the camera back
(41) will spring open.
This lacking system has obvious advantages. You can only open the camera deliberately, and not by any accidental movement or
knock.
Now insert the film in the camera
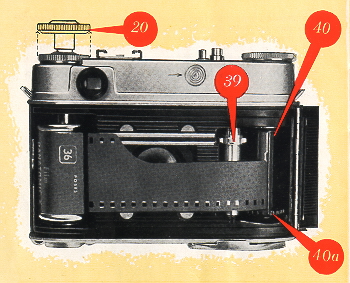 |
Before inserting the film, pull out the rewind knob (20) to its second stop. Turn the built-in take-up spool (40) by its serrated
flange (40a) until the slit in the core points upwards. Now push the trimmed film end into the slit until it Is just visible on the other
side of the spool core. Then draw the film across the film track and insert the cassette into the cassette chamber.
Push back the
rewind knob (20) into its normal position, carefully turning it at the same time in the direction of the arrow 0 tension the film.
Check that the teeth of the transport sprocket (39) properly engage the perforations at the rawer edge of the film, and that at least
tow perforations at the upper edge overlap the film track (see illustration). Now close the camera back. |
To get the RETINA ready for the first exposure you still have 0 set the film counter.
Push the button (38) in the direction of the arrow and at the same time depress the film release button (8) Repeat this
until the diamond-shaped mark  near No. 36 an the film counter (38a) is opposite the notch in the upper edge of the film
counter window.
near No. 36 an the film counter (38a) is opposite the notch in the upper edge of the film
counter window.
Remember to set the film counter
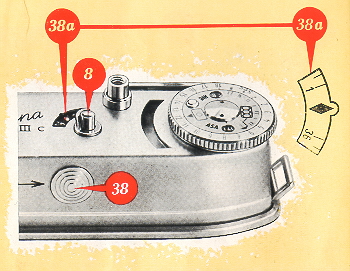 |
If you are using a 20-exposure cassette, set to the index mark
between No. 20 and 25. Now work the rapid-winding lever and press the film release button (8). Repeat this until the film counter indicates No. 36 or 20 respectively. At the
same time the rewind knob (20) should rotate against its arrow if the film is advancing properly.
The film counter always indicates the number of shots still available. When it has reached No. 1. - in other words when the whole
film is exposed - a transport lo* comes into operation. Neither the rapid-winding lever nor the release button will work further. |
This prevents the film end from being pulled out of the cassette, which would make rewinding impossible. The film release
button (8) incorporates a safety, catch to prevent accidental operation.
Setting the correct film speed
 |
Always remember to set the speed of the film in the camera
a) On the film indicator (19).
b) On the exposure meter.
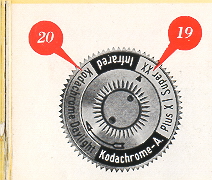
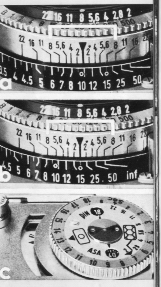
a) The film indicator (19) on top of the rewind knob is a small but useful reminder which always shows you what type of film the
camera is loaded with. Grip the rewind knob with two fingers and turn the inner serrated ring with the thumb of the other hand
until the triangular index mark paints to the type of the film loaded in the camera. |
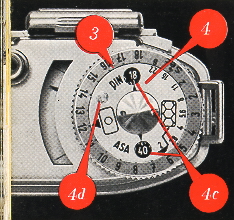 |
b) Turn the inner disc (4) of the exposure meter setting ring by means of the knob (4d) until the appropriate speed number of the
film in the camera appears in the window (4c), For instance, use 40 far an 40 ASA film. If you forget this setting, you may obtain
incorrect light values and thus wrong exposures. A second window is provided for DIN speed numbers.
Now you can really take your first picture |
When the film is finished: Unloading
 |
To rewind the exposed film depress the reversing button (37) in the base of the camera and half pull out the rewind knob (20) to
get at it more easily. Then turn the rewind knob in the direction of the arrow until the reversing button ceases to rotate. This is
easily observed by the small black dot near the rim of the button. |
You have now rewound the film into its cassette. Open the camera back, fully pull out the rewind knob, and remove the cassette.
Do not load or unload the film in direct sunlight or strong artificial light, or you may fag the first few exposures. After removing the
exposed film, rewrap it in its original packing for full protection against the light, until you are ready to process it.
Points for good pictures: Distance, Depth
of field
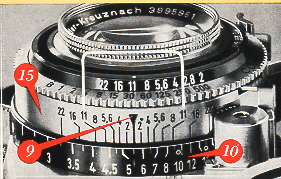 |
To permit instant readings of the depth of field for any aperture and distance, a depth of field scale (15) is arranged
symmetrically around the distance index (9).
Suppose you have set the aperture to f/8 and the distance to about 5 1/2 feet (see also page 28). This is how you read off the
depth. To the left of the distance index the line marked with the figure 8 is opposite 4 1/2 feet. |
Zone focusing for action
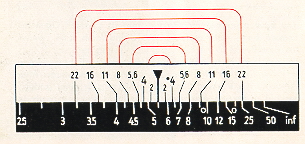 |
To the right of the index another line with the figure 8 points
to 8 feet. This tells you that
with a setting of about 5 1/2 feet at f/8 You have a depth of field zone extending from 4 1/2 to 8 feet Within this zone everything
will be sharp. |
Zone focusing
 |
Technically good exposures depend largely on the skilled combination of appropriate distance, shutter-speed, and aperture
settings. However, you may come across subjects where you just haven't the time to work out the ideal setting or to use the
rangefinder if you don't want to miss the picture (as in sports and action shots, children at play, etc.). For such occasions your
RETINA carries two zone focus settings: one for near and one far distant subjects.
a) For near subjects set the distance to the small circle near the 10 feet mark, and the aperture to f;8. This gives you a depth of
field from about 6,5 to 20 feet
b) For more distant subjects use the small circle near the 15 feet mark and an aperture of f/8. This gives a depth of field from
about 9.5 feet to inf.
c) With these settings you must, however, have adequate light, the painter of the exposure meter with the cover closed - should
indicate a light value of at least 12. |
live shots with flash
 |
Your RETINA has a speed-synchronized Synchro-Compur shutter. That means that you can take flash shots at any shutter speed
up to the fastest setting of 1/500 second with all available flash bulbs and electronic flash units,
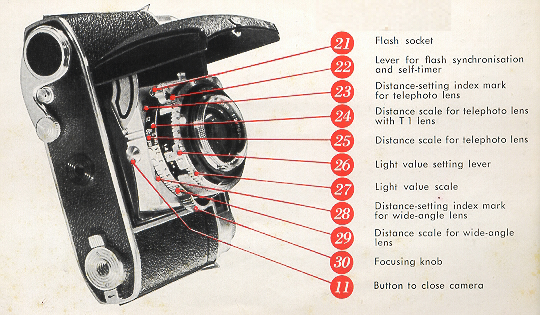
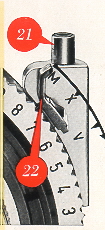
The holder Of the flash socket (21) carries three letters engraved an it M, X and V.
M and X are synchronizing settings for flash. V is the self-timer setting. The three settings are adjusted by means of the green
synchronizing lever (22). The flash is fired on releasing the camera shutter. The table (right) shows the suitable shutter speeds
and the required setting of the synchronizing lever for the different types of flash. The aperture to be used can be Obtained from
the so called guide numbers which are included with each package of flash bulbs. Divide this guide number by the distance; that
gives you the aperture number to use. For instance, if the guide number is 120 and you are 15 feet from the subject
120/15 = 8.
In other words you set the aperture lever to f/8. |
The built-in self-timer
If you want to include yourself in a shot, set the synchronization lever (22) to V. But first operate the rapid-winding lever. Start the
self timer mechanism by pressing the release button. The shutter will go off after about 10 seconds; you therefore have sufficient
time to take your place in the picture. Once the self-timer is tensioned, the lever (22) cannot be moved away from V.
If you use the self-timer for flash shots, the camera works with the X-synchronization. As the self-timer runs dawn, the
synchronizing lever automatically moves to X. Be sure to use the appropriate shutter-speed setting far
X-synchronization, (see
table).
Wider scope the L RETINA RETINA lenses
 |
The standard lens of the RETINA is a 6-element 2 inch
RETINA Xenon C f/2 or RETINA Heligon C f/2
The interchangeable part of the standard lens can be removed from the shutter by turning the mount to the left as far as it will go.
Far easy removal and safe storage we strongly recommend the special container designed for the standard lens. In place of the
standard lens removed, two alternative units can be inserted as required: |
a) A telephoto lens, the 3 1/8 inch (80 mm)
RETINA Longor-Xenon C f/4 or RETINA Heligon C f/4; or
b) A wide-angle lens, the 13/a inch (35 mm)
RETINA Curtar-Xenon C f/5.6 or RETINA Heligon C f 5.6.
Preferably avoid changing lenses in brilliant sunshine.
Telephoto shots
 |
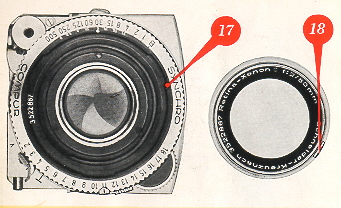
Before inserting the lens place it in position over the mount so that the red dot (18) on the lens rim is exactly opposite the red dot
on the bayonet ring (17). To lack the lens securely and correctly in place, turn it clockwise as far as it will go,
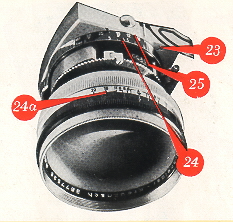
until the red dot is opposite the white dot on the bayonet ring. Before exposing with the telephoto lens measure the distance] of
the subject with the rangefinder of your RETINA, and read off the distance against the index (9) on the focusing scale (10). Then
turn the camera towards you and transfer the measured value to the focusing scale for the telephoto lens (25) marked in white
figures on block. To do this turn the focusing knob until the appropriate distance on the telephoto scale is opposite T-index mark
(23). Do not, however, use the black ring (25a) on the telephoto lens itself for setting the distances. This ring is part of the depth-of-field indicator and serves only to show the depth of field available. |
The telephoto lens focuses from infinity down to 6 1/2 feet. With the T l supplementary lens fitted over the front, the focusing range
extends from 3 1/2 to 6 1/2 feet. In this case transfer the distance reading of the rangefinder to the scale (24) marked with yellow
figures on black.
When reading off distances, you will find the scale marked with subdivisions which are repeated on the focusing score for the
telephoto lens. This facilitates more accurate transfer of the readings to the telephoto focusing scales (25 and 24).
Wide-angle shots
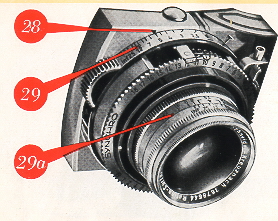 |
Set the distance in the same way as with the telephoto lens. Transfer the distance figure obtained with the rangefinder to the
wide-angle distance scale (29) and read off from the mark (28). Always sure to set the distance on the correct focusing score
when using the interchangeable lenses.
You will find small circles on the focusing scales for the wide-angle lens (at 10 feet) and far the telephoto lens (at 15 feet and at
about 50 feet). These are the markings for the zone focus settings. |
When the focus zone of the wide-angle lens is used and the aperture set at f/11, the depth of field will be from 5 feet to about inf.
With the telephoto lens, if the close-up (15 feet) focus zone is used and the lens set at f/11, the depth of field is from about 12
feet to about 21 feet. With the same lens aperture and the zone focus set far distance at about 50 feet, the depth of field is from
about 25 feet to inf.
Like the telephoto lens, the wide-angle lens carries a depth of field indicator (29a). Its rotating ring is engraved with a distance
scale in the same colors as the focusing scale corresponding to the lens in use. The depth of field scales on the interchangeable
lenses indicate only the depth of field. They are not to be used for setting exposures.
The interchangeable lenses use the same aperture and shutter speed as the standard lens. However You cannot set a larger
aperture than the largest stop of the appropriate lens (f/4 with the telephoto lens and f/5.6 with the wide-angle lens). Otherwise the
picture will be underexposed.
Finally, a few valuable hints
 |
Two ways of using the exposure meter The exposure meter of the RETINA III c can be used in two
different ways: for reflected light readings and for incident light readings.
Reflected light readings are taken from the camera position towards the subject as described an p. 8. This method is suitable for all subjects without strong contrasts: of light and shade and
where there is no specially dark or exceptionally brilliant background or surroundings (e. g. sky or water). Do not let direct light,
sky light, or strong artificial light strike the honeycomb cell of the exposure meter as you may otherwise obtain
too high readings,
leading-to underexposure.
For incident light readings the camera is point ed from the subject towards the taking position. With this method the diffusing
screen (5b) must always be fitted over the cell of the exposure meter irrespective of whether the cover is open or closed. Always
let the direct light from the light source reach the screen. This method is particularly suitable far determining the light value in
against-the-light shots and snow subjects, as well as close-tips. When not in use, the exposure meter incident light diffusing
screen should be retained in the elastic strap which is provided in the cover of the ever ready case. |
We have thought of everything to make your camera a joy
to use
If you have carefully read the previous sections, you will surely agree that the RETINA III c is much easier to handle than you first
thought. However, if you should still hove any daubs an some point, please turn to your photo dealer or get in touch with us.
But, before you put down this instruction booklet, we would like to give you a few more hints.
The film release
If the rapid-winding lever should ever lock, pressing the film release button (8) will free it without wasting a frame or causing a
double exposure. There may be various reasons for this. For instance the winding lever will lack if you try out the camera with the
shutter set to 1 second and work the lever before the shutter has closed. Never use farce, but simply press the film release (8).
Alternatively, check whether the film counter has reached No. 1. In that case the film is finished and must be unloaded.
Easy film changing
If you want to unload a partly-exposed film (e. g. to change from black-and-white to KODACHROME), rewind the film into its
cassette as described an page 17. However, take care not to draw the trimmed film leader completely into the cassette; stop
rewinding immediately when the reversing button (37) ceases to rotate. Also remember to note on the beginning of the film leader
the number of the lost exposure read off the film counter.
When reloading the partly-exposed film, proceed as described on page 14. As before, set the film counter to the $ mark before
No. 20 or 36, according to the length of the film. Close the camera back and advance the film by alternately working the rapid
winder (36) and pressing the film release button (8). On no account press the shutter release (7)! Carry an until the film counter
indicates the-same number at which you originally unloaded the film. To be an the safe side, advance the film by an extra frame.
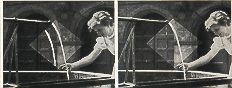
The line frame finder
 |
When you look correctly through the eyepiece of the finder, you will see a reflected line frame (34a). It outlines your picture area
and is always plainly visible. This helps you to find the correct field of view and prevents faulty sighting. This is especially
important with color shots, as you cannot easily trim a color transparency. |
Parallax
To compensate far parallax with close shots between 2~ and 6 feet you have to imagine two lines (dotted in the illustration)
between the pairs of opposite marks (34b) in the line frame. With shots at such. close range the subject must not go beyond
these imagined lines.
If you wear spectacles
The finder of the RETINA has been designed to give a complete view of the picture area, even if you are wearing spectacles.
Should your vision be faulty, however, and you do not wear spectacles (and thus cannot see the finder image sufficiently clearly)
we can supply a correction lens to special order. Just let us know your spectacle prescription. This
correction lens is screwed
into the mount of the eyepiece. How ever, no correction lenses are available far astigmatism.
Now you really know your RETINA
Aperture-shutter speed combinations
If you want to the aperture-shutter speed combination by turning the speed-setting ring towards the short exposure times, the
aperture lever may not go beyond a certain point. In that case the intended picture is not possible. However, if the aperture lever
comes up against the limit of its movement when you try to set a small aperture, you can still take the picture. Simply mount the
camera an a tripod and take a time exposure with the shutter set to B. The green figures on the meter setting ring show the
exposure required at the aperture setting wanted.
Exposure settings without light values
You can of course also set the exposure in the usual way without utilizing the light value scale. The only point to note is that the
shutter speed must be set first and the aperture afterwards. If you proceed in the reverse order, setting the shutter speed will also
change the aperture due to the aperture-speed coupling.
The right finder for the right lens
When taking pictures with the telephoto or wide-angle lenses, use the RETINA multiple finder specially designed far the
interchangeable lenses of the RETINA. This shows the correct field of view with each lens. If you use only the standard and
telephoto lenses, the frame finder model c is sufficient. Both finders provide for parallax correction.
When you buy extra lenses
When you acquire a wide-angle or telephoto lens, be sure that it is the same make (Xenon or Heligon) as the standard lens. Your
camera is designed in such a way that you can use only interchangeable Xenon lenses with the standard RETINA Xenon lens
and interchangeable Heligon lenses with the standard RETINA Heligan lens.
Also make sure that the standard lens supplied with the camera is not interchanged against the standard lens of another
RETINA. The serial number of the standard lens must therefore always correspond to the serial number engraved an the bayonet
ring.
More scope with accessories
The world-wide popularity of the RETI NA is based as much on its famous precision and unsurpassed performance as an its
versatility. The term RETINA Photography is not empty description; it covers the many applications of the wide range of
accessories.
The Kodoblitz.
Be ready for action with your RETINA at any time and under any light conditions: get the handy KODABLITZ flash
gun with the grained soft-light reflector.. Its 22.5 volt anode battery will also operate two to three extension units without additional
power source.
The lens Hood and Filters.
The new rectangular lens hood, suitable with a hood extension also for the wide-angle lens, and the
various color filters are indispensable aids to good pictures
The RETINA Frame Finder Model c.
With it you can follow moving subjects and view them in natural size before they actually
enter the field of view. This frame finder is designed for the standard and telephoto lenses, and its parallax correction also makes
it suitable far close-ups with the supplementary N-lenses.
The Optical Multiple Finder.
This indicates the exact field of view with the telephoto and wide-angle lenses.
The Close-Up Rangefinder.
The RETINA close-up rangefinder with its two supplementary lenses opens up a whole new field of
small subjects. The close-up rangefinder and two N-lenses permit shots between 38 1/4 and 11 5/8 inches from the camera.
The Table Stand.
The highly versatile table stand has been developed for close-ups of subjects which. require or permit long
exposure times, and far all shots where quick setting-up and absolute steadiness of the camera are important.
The Close-Up Attachment.
The three it-lenses with the close-up attachment permit shots of live subjects or of rapid movement at
four fixed near distances, ranging from 11 to 6 inches.
The Stereo Attachment.
If you are interested in three dimensional photography, the stereo attachment will give you true
stereoscopic pictures which look amazingly life-like in the stereo viewer.
The Ground Glass Focusing Adapter.
This is a valuable aid far the accurate determination of depth of field and
distances for
shots requiring special arrangement, and for check ing of special effects before exposure.
The Micro Adopter.
Doctors, biologists and all scientists and science students will find the micro adapter the ideal equipment for
making black-and-white or color records of their microscope investigations.
The Cowing Stand.
If you want to copy documents, important letters, valuable prints and the like, use the copying stand, which also
incorporates its awn complete lighting unit.
LIGHT VALUE CORRECTION with the use of filters
| Kodak Filter |
Factor |
Reduce Light by Value Setting by |
| Light Yellow FI |
1 1/2 X |
1/2 |
| Medium Yellow FII |
2 X |
1 |
| Yellow-green FIII |
2 X |
1 |
| Orange F IV |
3 X |
1 1/2 |
| Red FV |
7 X |
3 |
| Blue F VI |
2 1/2 |
1 - 1 1/2 |
| KODACHROME Daylight Filter |
1 1/2 |
1/2 |
| KODACHROME photoflood Filter |
4 X |
2 |
| Polarizing Screen |
2 1/2 |
1 - 1/2 |
Infra-red shots
On the right side of the distance index mark (9) there is a small red dot. You use this red dot in place of the black index mark
when exposing infra-red film. In other wards, turn the focusing knob to bring the red dot opposite the figure for your subject
distance. For infra-red shots you must use a suitable infra-red filter in front of the lens.
Double Exposures
The double exposure lock of the RETINA prevents accidental double exposures. To make a deliberate double exposure for
special purposes, press the reversing button (37) after the first exposure and keep it depressed while tensioning the shutter with
the rapid-winding lever (36). The film remains in the same position for a second exposure.
Note that operating the rapid winder after the second exposure also advances the film counter, although you have actually saved
a frame by the double exposure.
A last tip
Protect your lens against damage and especially avoid touching the glass surface and the shutter blades when they are exposed
while you change the lens. The best means of cleaning the glass surfaces and finder windows, is a soft rag as used for cleaning
spectacle lenses.