If you find this manual
useful,
how about a donation of $3 to:
M. Butkus, 29 Lake Ave.,
High Bridge, NJ 08829-1701
and send your
e-mail address
so I can thank you.
Most other places would charge
you $7.50 for a electronic copy
or $18.00 for a hard to read Xerox copy.
This will help me to continue to host this site,
buy new manuals,
and pay their shipping costs.
It'll make you feel better, won't
it ?
If you use Pay Pal, use the link below.
Use the above address for a
check, M.O. or cash.
Back to main camera
manual page
CLICK HERE FOR PETRI MF-3
PDF MANUAL
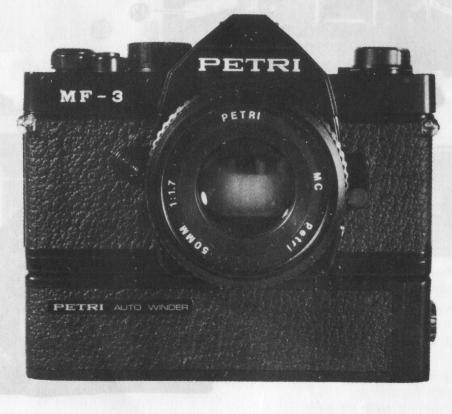
Petri MF-3
Bedienungsanleitung
Petri MF-3
Mode d'emploi
Petri
MF-3 istruzioni per l'uso
Petri MF-3
Manual de Instrucciones
Click here for
Petri MF-3 PDF
version
made from html page
-
Better printing
Click here for Petri MF-3 Word document
made from this page
 |
Welcome to the exciting world of PETRI. You
new camera is one of a family of professional quality cameras designed with
the serious photographer in mind. And the name PETRI is your assurance of
superbly crafted optics and outstanding mechanical performance and
reliability. |
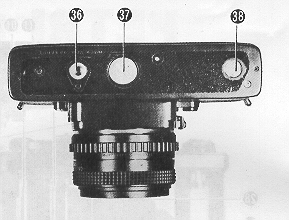
Description of Controls
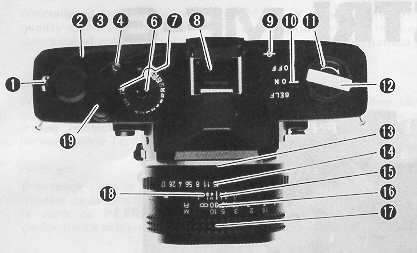 |
1. Exposure Counter
Window
2. Film Advance Lever
3. Shutter Speed Index
4. Film Rewind Button
6. Shutter Speed Dial
7. Film Speed ASA Window
8. Hot Shoe
9. Film Plane Reference
10. Main Switch
11. Film Rewind Knob
12. Film Rewind Crank
13. Lens Flange
14. Aperture Ring |
 |
15. Aperture/Distance Scale Index Line
16. Depth of Field Scale
17. Focusing Ring/Distance Scale
18. Infrared Mark
19. Shutter Release Button
20. Lens Mount Release Button
21. Self timer LED
22. Removable Door Hinge
|
 |
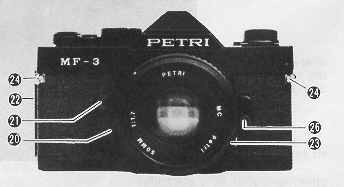
23. Cable/Remote Release
Socket
24. Carrying Lugs
26. "X" Sync PC Outlet
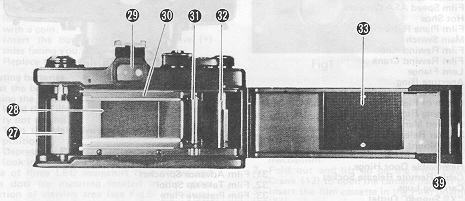
27. Film Chamber
28. Film Aperture
29. Viewfinder
30. Film Guide Rails |
 |
31. Film Advance Sprocket
32. Film Take-up Spool
33. Film Pressure Plate
36. Tripod Socket
37. Battery Compartment Cover
38. Auto-winder Coupler
39. Back Cove |
POWER SUPPLY
 |
Your MF-3 is powered by
two, 1.5 volt silver oxide batteries (Eveready S-76, Mallory MS 76, G 13 or
equivalent).
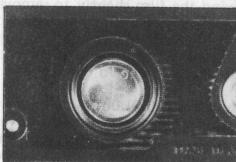
Battery installation
1. Open the battery compartment by
unscrewing the battery compartment cover
(37)
with a coin.
2. Insert the batteries with the positive
(+)
sides facing you. (Fig.1)
3. Replace the cover and tighten it firmly. |
Testing batteries
Test the batteries for sufficient power
levels by taking the following procedure:
1. Wind the Film advance Lever (2) if
previously not wound.
2. Turn the Main Switch Lever (10) to
"ON"
position.
3. Depress the Release Button (19)
slightly and
look into the viewfinder.
One of three LED indicators (two arrows
and one dot) for metering located in the upper
portion of viewing area (see Fig.5) will illuminate if
there is sufficient power. If batteries are below the
operational voltage of the camera system, replace them with a fresh set.
NOTE: Turn back the main switch lever to "OFF"
position when you are not taking pictures.
FILM LOADING
Your MF-3 accepts 35mm, Black & White or
Color film standard cassettes.
To load the camera:
 |
1. Press the
release button to clear the camera mechanism.
2. Fold out and lift up on the
Film Rewind Crank (12) to open the camera back. (Fig.2)
3. Insert the film cassette in
the Film Chamber (27), then push down the Film Rewind Knob (11) and turn it
slightly to lock the cassette in place.
|
4. Pull film leader across the Film Aperture (28) and
insert the end of leader into one of the slots in the film take-up spool.
(Fig.3)
5. With the film rewind crank in the folded out
position, rewind the film slightly to remove any slack in
the film cassette. Recheck to see that the film remains
secured to the take-up spool and that it is properly
aligned with the Sprocket (31).
Fold down rewind crank.
6. Close the Back Cover (39) until
you hear an audible click, which indicates that the cover
is locked in the closed position. Advance the film by alternately winding the
advance lever and pressing the shutter release button
until the number "1" appears in the Film Counter Window
(1). As the advance lever is wound,
the film rewind knob should rotate, indicating that the
film is advancing properly.
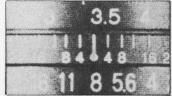
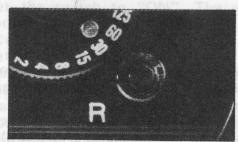
SETTING FILM SPEED
For properly exposed photographs, your MF-3's electronically controlled metering
system must be set for the correct ASA (or DIN - for DIN equivalents,) rating of
film you are using.
To set the film speed:
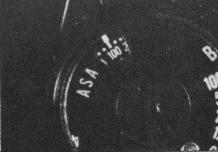 |
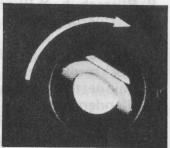
1. Lift the collar on the
Shutter Speed Dial (6).
2. Turn the collar until the ASA rating
for
your film appears in the ASA Window.
(Fig.4)
3. Release the collar to lock the setting
in
place. |
SHUTTER SPEED SELECTION
 |
The MF3 has a
shutter speed range of 4 seconds to 1/1000 second, plus "B" (Bulb) for Time
Exposures. To set the shutter speed, turn the shutter speed dial until the
desired shutter speed is aligned with the Shutter Speed Index (3). When
using shutter speeds below 1/30 of a second, it is advisable to use a tripod
and a cable release or the exclusive remote controller to eliminate the
possibility of vibration due to the camera movement. The MF-3 is equipped
with a threaded Cable Release Socket (23) and Tripod Socket (36) for use
with these accessories. |
TIME EXPOSURES
When making time exposure photographs,
your camera should always be tripod-mounted and used with
a locking cable release. The MF-3's
electronic shutter is capable of time exposures of up to 4
seconds.
For the time exposures of over 4 seconds
in duration:
1. Align "B" setting on shutter speed
dial with
the shutter speed index.
2. Advance the film and press in on tip
of
cable release to open the shutter. Turn the
cable release lock to hold shutter open.
3. After the desired exposure time in
seconds
has elapsed, release the cable release lock
to
close the shutter.
FOCUSING THE CAMERA
Your MF-3's focusing screen includes a central horizontal split-image
rangefinder, which is surrounded by a microprism collar. (Fig.5)
To focus accurately:
1. Center the split-image rangefinder on your key
subject and turn the Focusing Ring (17) until the upper and lower portions of
your subject become one, clear vertical image.
2. The surrounding microprism collar
will
a) appear fragmented when the image is entirely out of focus, b)
appear shimmering but viewable when image is nearly in focus and c)
appears clear when your subject is in focus. It is especially useful when there
are no pronounced vertical lines on your subject, making the use of the
horizontal, split image rangefinder difficult.
3. The entire focusing screen may be used for
both focus and composition of your photograph. The human
eye tends to ignore minor differences in sharpness.
Therefore, the horizontal split image rangefinder and/or
the microprism collar should always be used for
critical focus when possible.
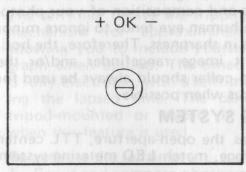
METERING SYSTEM
Your MF-3 has the open-aperture, TTL centerweighted average, match LED metering
system.
Setting the exposure:
 |
1. Advance the film.
2. Set the Main Switch (10) to "ON".
(Fig. 6)
3. Select a desired shutter speed by
rotating the shutter speed dial. |
4. Depress the shutter release
button quite slightly so that one of the LED indicators in viewfinder
illuminates. (Fig. 7)
5. The LED indicators will tell you
whether the present setting is over, under or correct exposure.
 |
6. When the red warning light (+) lights
it is meaning of Overexposure In this case the diaphragm ring of the taking
lens should be turned to the I-) illumination or the shutter speed dial
should be turned to a higher speed until the OK signal lamp lights. |
7.
When the red warning lamp I-) lights, it is meaning of
Under-exposure. In this case the diaphragm ring of the
taking lens should be
turned to the direction the (+) illumination
or the shutter speed dial should be
turned to the opposite direction until the
OK signal lamp lights.
8. The proper exposure of film is
obtained
whenever the OK signal lamp lights. The
range that the OK signal lights is 0.3 EV.
When a certain
aperture size (F-stop number) is desired because of the
depth of field effect (refer to the next paragraph, set
the desired F-stop first and turn the shutter speed dial
until the OK signal illuminates.
NOTE: When both red LEDs illuminate, you have gone
beyond the cameras metering range and should, if possible
alter the aperture so that a different speed can be used.
DEPTH OF FIELD
 |
The aperture setting
determines the near and far areas in which items other than your key subject
will remain acceptably sharp. This "zone of focus" is referred to as depth
of field. Your lens features a depth of Field Scale (16), which allows you
to select the zone of focus which will appear in the final photograph. (Fig.
9)
|
 |
Under normal lighting
conditions, selecting a larger aperture opening (eg: F2.8 or F4( will allow
you to keep your key subject in sharp focus while putting distracting
elements in out of focus the foreground or background of your photograph.
Under same conditions, selecting a smaller aperture opening (eg: F11 or F16)
will bring both near and distant objects in focus. (Fig.10 & 11) |
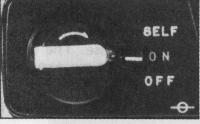
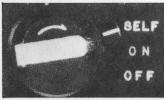
SELF TIMER
The self timer delays the tripping of the shutter mechanism for approximately 10
seconds, allowing you to include yourself in the photograph when desired. The
timed delay function is fully electronic, with a self timer LED displaying the
lapsed time. The camera should be tripod-mounted or placed on a firm support
when this feature is used.
To activate the self timer:
 |
1. Focus and compose
photograph.
2. Adjust controls for correct exposure
display.
3. Turn the main switch lever to "SELF"
position. (Fig.12)
4. Press the shutter release button.
5. Position yourself in photograph area within
10 seconds. |
NOTE: If you decide not to use the self
timer after setting it, turn back the lever to the
original position. Also after photographing with self
timer, turn back the lever to "ON" or "OFF" position unless you intend to take
the next one with self timer. Mount
the eyepiece cover (inserted in hot shoe) on
the eyepiece whenever you photograph without looking
through the viewfinder.
FLASH PHOTOGRAPHY
The MF-3
is synchronized for
electronic flash photography by using either the hot
shoe (8) or the "X" Sync PC Outlet
(26). With either connection, the shutter should be
set at the red 1/60 second marking on the shutter speed dial.
When photographing under lighting conditions that
require the use of supplementary flash illumination,
use an electronic flash unit for consistency of
results.
INTERCHANGING LENSES
Any wide-angle or telephoto,
interchangeable lens with K type bayonet mount can be
mounted on your MF-3 camera body.
To take off the lens:
1. Push the Lens Mount Release Button
(20). 2. Hold the camera and lens body steadily, and
rotate the lens body counter-clockwise.
3. Rotating approx. 65 degrees the lens
will
then become free.
To mount the lens:
1. Join the red index marks both on the
camera and lens.
2. Rotate the lens body clockwise until
it
snaps
REMOVING FILM
When you have finished exposing the last frame in your film cassette (12,
20, 24 and 36 exposure settings are coded in red on your film counter dial),
remove the cassette.
To rewind the film:
 |
1. Push in the Film
Rewind Button (4). (Fig.13)
2. Fold out the film rewind crank and
turn in
direction of arrow.
3. When the crank turns freely (without
tension or "drag"), pull up on the crank to
open the camera hack. The film counter
will automatically reset to zero.
4. Remove the exposed cassette for processing. Insert a fresh roll of film
while the camera back is still open, or close the back for storage. |
NOTE: Do not load or unload your camera
under direct sunlight.
CARING FOR YOUR
CAMERA
1. Never force any camera operation.
Consult this instruction manual if any questions
occur.
2. Remove batteries when storing camera.
Batteries can leak as they age, causing damage to your
camera. Always inspect the batteries for signs of leakage before installing
them in your camera.
3. Keep the lens cap on when not taking
photographs. The cap protects your lens from dust or
dirt particles.
4. Clean your camera's interior.
Periodically remove any dust or film particles from
the film chamber, rear lens element, take-up
spool area or film pressure plate with an air blower.
Inspect film pressure plate for accumulated deposits from film backing,
and clean with lens cleaner and tissue if required.
5. Keep your camera and film away from
direct sunlight or heat. Never store your camera or film on the rear window
deck, glove compartment or other hot areas in your
car.
6. Protect your camera from moisture. Do
not store your camera in a moisture-retaining
enclosure or environment. In areas of high humidity,
extra care should be taken to insure that your camera is kept in a comparatively
cool, dry location.
7. Do not touch shutter curtain.
SPECIFICATIONS
Camera Type: 35mm
electronic single lens reflex camera with TTL, open-aperture,
exposure balance system
Film Format: 24mm
x 36mm
Lens Mount: K
type bayonet mount
Flange back focus distance:
45.44mm
Shutter: Magnetically
controlled cloth curtain focal plane shutter with shutter speed from 4 to
111000 sec. and B (Bulb) Flash (X) synchronisation at 1/60 sec.
Electrically controlled self
timer of 10-second duration with flickering lamp
Viewfinder: Fixed pentaprism type
Magnification: 1 X (with f=-55mm
lens) Dioptre: -0.9
Field of view:
93% for both
horizontal and vertical Focusing with horizontal
split-image center with surrounding
microprism
collar on matt fresnel
screen
Informations: Optimum, over and underexposures.
Metering System: TTL,
open-aperture, match LED metering system. Average metering (center
weighted) with two CdS cell
metering range: EV2 -
EV19 (ASA 100)
Film Speed
range: ASA 25 -
3200
Film Advance: 135°
rotation of wind lever with standoff angle of 30°
Shutter Release: Electrically
controlled solenoid switch
Film Counter: Progressive
type,
Automatically resets when camera back is
opened.
Power Source: 2
X S-76 (or MS 76 or G 13) 1.5-Volt silver oxide battery,
Battery test with LEDs in viewfinder
Rear Cover: Removable
hinge type
Dimensions: 136.5
x 83.2 x 51 mm
Weight: 530
gm.
Attachable accessories: PETRI
auto-winder.
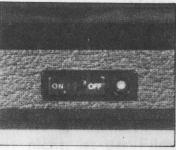
PETRI AUTO-WINDER
Specifications
Power source: 4
pcs. of AA size (alkaline) battery
Wind speed: approx.
2 frames per second at maximum shutter speed.
Photographing with the auto-winder
 |
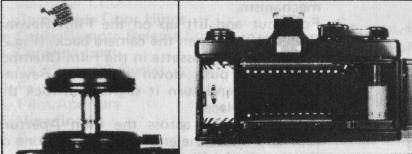
 |
1. Couple the winder with
the camera body. (Fig.18)
2. Tighten the screw. (Fig.19)
3. Set the switch to "ON". The winder
advances the film, if the film has not been advanced.
4. Set the exposure and focus. |
5. Depress the release button fully to activate
the shutter. The winder will immediately start advancing the film. At this
moment, if you release your finger from the release
button, only a single shot is made. If you keep depressing
it, continuous shots at a rate of 2 f/sec. can be made.
6. When you have finished exposing the
last frame in your film cassette, take procedures
as described in "REMOVING FILM". You need not remove the
winder from camera body when removing film
.
NOTE: Set the switch at "OFF"
position when the winder is not in use.