and historical purposes, all rights reserved.
This page is copyright© by
This page may not be sold or distributed without
the expressed permission of the producer
Back to main camera manual page
If you find this manual useful,
how about a
donation of $3 to:
M. Butkus, 29 Lake Ave.,
High Bridge, NJ
08829-1701
and send your e-mail address
so I can thank you.
Most other
places would charge
you $7.50 for a electronic copy
or $18.00 for a hard
to read Xerox copy.
If you use Pay Pal, use the link below.
Use the above address for
a check, M.O. or cash.
Problems opening PDF files
or printing problems
- click here
Click here for PDF version of this manual
-
better printing
CLICK
HERE FOR A PDF MADE DIRECTLY
FROM A MANUAL
CLICK HERE FOR OTHER LANGUAGES
FOR ABOVE MANUAL
Ricoh KR-5 Super Mode d'emploi
Ricoh
KR-5 Super Bedienungsanleitung
Ricoh KR-5 Super Manual de Instrucciones
Table of Contents
|
DESCRIPTION OF PARTS BATTERY LOADING FILM LOADING SETTING FILM SPEED METER/SHUTTER "ON-OFF" CONTROL CORRECT EXPOSURE SETTING SHUTTER SPEED SETTING APERTURE VIEWING AND FOCUSING |
UNLOADING FILM TAKING FLASH PICTURES RICOH SPEEDLITE 180 AND XR SPEEDLITE 240 USING SELF-TIMER CHANGING LENSES DEPTH OF FIELD PROPER CARE OF YOUR CAMERA MAJOR SPECIFICATIONS OF KR-5 SUPER |
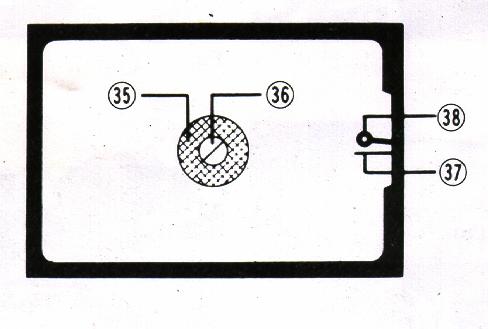
DESCRIPTION OF PARTS
1. Film Rewind Knob/Back Cover Lock Release Knob
2. Film Rewind Crank
3. Film Speed Dial (ASA/DIN)
4. Film Speed Lock Button
5. Hot Shoe/Flash Contact
6. Shutter Speed Index Line
7. Shutter Speed Dial
8. Cable Release Socket
9. Shutter Release Button
10. Meter/Shutter "ON-OFF" Index Mark

11. Film Advance Lever
12. Exposure Counter
13. Neck Strap Eyelet
14. Self timer LED
15. Self timer Lever
16. Lens Release Lever
17. Lens Locator Node
18. Depth of Field Scale
19. Focusing Ring
20. Distance Scale
21. F-Stop Ring
22. Sprocket Teeth
23. Film Guide Rail
24. Viewfinder Eyepiece
25. Flash Ready LED
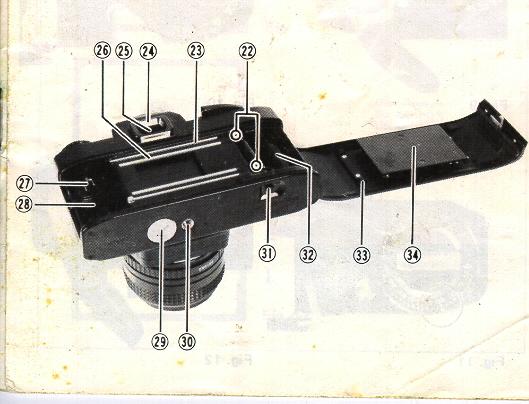
26. Film Rail
27. Film Rewind Shaft
28. Film Chamber
29. Battery Compartment Cover
30. Tripod Socket
31. Film Rewind Release Button
32. Film Take-up Spool
33. Back Cover
34. Film Pressure Plate
35. Microprism-image Band
36. Split-image Spot
37. Exposure Meter Needle
38. Shutter Speed Needle
We are most gratified that you have selected the KR-5
SUPER which we are sure will give you many delightful years of picture-taking
pleasure. The KR-5 SUPER is a 35 mm SLR camera which assures you of superb
optics and outstanding mechanical performance and reliability and which will
justify your choice for years to come.
Before Using Your KR-5 SUPER
Please read this instruction booklet carefully and familiarize yourself with the equipment and its features thoroughly. Your pleasure in using your KR-5 SUPER will be greater if you know your camera properly.
BATTERY LOADING
The built-in through-the-lens CdS exposure metering system of your KR-5 SUPER operates on power activated by two 1.5V SR-44 silver oxide batteries, which are supplied together with your camera.
1. Remove Battery Compartment Cover (29) by unscrewing it
counterclockwise with a coin (Fig. 1).
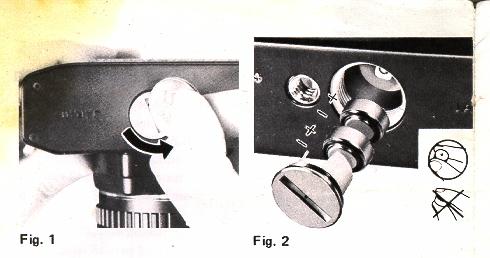
2. Place the two batteries into the compartment with
the plus (+) side down, as illustrated in the battery holder of Battery
Compartment Cover (29) (Fig. 2). Make sure that the batteries are correctly
placed. If incorrectly placed, Exposure Meter Needle (38) in the viewfinder will
not move at all.
3. Replace Battery Compartment Cover (29) by screwing it clockwise until it stops but do not force.
Tips for Better Results
Before loading, wipe off the surfaces of the batteries
with a clean and dry cloth to ensure they are free of fingerprints or stains.
When your camera is not used for a long period, remove the batteries and keep it
in a cool, dry place.
The batteries will last for about one year in normal use.
We suggest you replace them regularly once a year birthday or sooner.
* The batteries may explode if disposed of in fire.
* Replace the batteries when the Exposure Meter Needle (37) in the viewfinder does not move in direct sunlight or other bright lights with Film Advance Lever (11) moved to "ON" position (Refer to "METER/SHUTTER ON-OFF CONTROL"). For replacement, use two new Mallory MS76, Eveready S76 or equivalent.
FILM LOADING
Your KR-5 SUPER is designed to accept any standard 35 mm color or black and white film roll in cartridge ( 12, 20, 24 or 36 exposures).
1. First of all, press Shutter Release Button (9) to see that the shutter has been released. (Refer to "METER"/SHUTTER ON-OFF CONTROL")
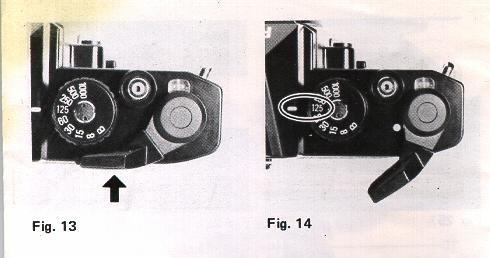
2. Pull up Film Rewind Knob (1 ) until Back Cover (33)
snaps open (Fig. 3). Then, pull it out all the way to allow for insertion of the
film cartridge.

3. Swing open Back Cover (33) and place a film cartridge
into Film Chamber (2B) (Fig. 4).
4. Push down Film Rewind Knob (1) to its original position
by turning Film Rewind Crank (2) clockwise or counterclockwise so that Film
Rewind Shaft (27) engages the film cartridge and that the film cartridge is
seated in place (Fig. 5).
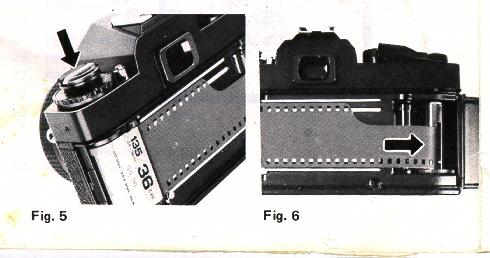
5. Draw the film leader across the camera back and insert
it into one of the slits of Film Take-up Spool (32) (Fig. 6). To bring the slit
into a convenient position, rotate Film Take-up Spool (32) in the direction of
arrow with your finger.
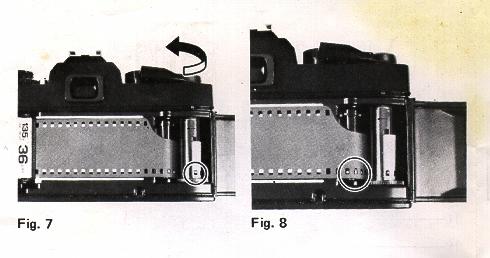
6. Rotate Film Take-up Spool (32) by advancing Film
Advance Lever (11 ) to take up any slack in the film and check to see that the
film tip is firmly hooked onto Film Take-up Spool (32) (Fig. 7) and that
sprocket holes on the film are fully engaged on Sprocket Teeth (22)
(Fig. 8).
7. Close and press Back Cover (33) firmly until it
snaps shut.
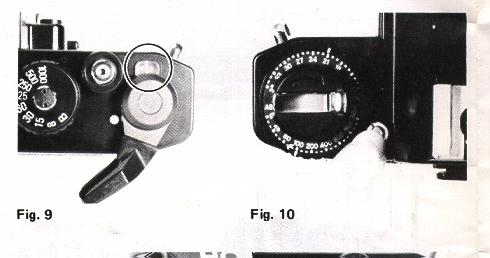
8. Advance Film Advance Lever (11 ) two or three
times, after depressing Shutter Release Button (9) each time, until the number
"1" is opposite the index line in Exposure Counter (12) (Fig. 9). Because the
first portions of the film can not be used for picture taking as they have
already been exposed to light and two or three blank exposures should be fired
before taking your first picture. Now it is ready for your first picture.
Tips for Better Results
* As you advance Film Advance Lever (11), Film Rewind knob (1 ) will simultaneously rotate counterclockwise indicating that the film is properly advanced.
Each type of film, color or black and white, has its own sensitivity to light. This sensitivity is assigned by a numerical value described as an ASA rating (U.S.A. Standard) or a DIN rating (Europe and most other countries). in most cases, both ASA and DIN ratings are imprinted on the film package, as well as the data sheet packed with the film and film cartridge itself. The higher the film speed rating, the more sensitive the film is to light, that is, less light is required for a proper exposure. The film speed, therefore, is an important element in insuring that the through-the-lens metering system of your camera determines the correct shutter speed and f-stop combinations for a given lighting situation.
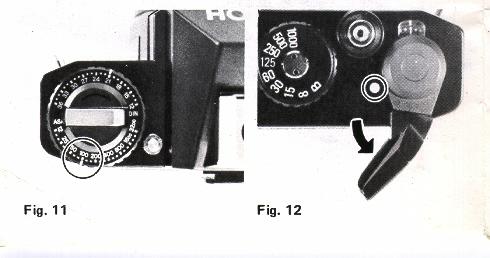
1. Depress Film Speed Lock Button (4) (Fig. 10) and rotate
the outer ring of Film Speed Dial (3) until the ASA (or DIN) number of your film
is exactly opposite the index line on the outer ring of Film Speed Dial (3) and
click stops. For example, if the film is ASA 100, make the correct setting at
"100" (Fig. 11).
Tips for Better Results
Film Advance Lever (11) controls exposure meter "ON-OFF" and shutter release "LOCK-UNLOCK" to protect your camera from unnecessary depletion of the batteries and accidental shutter release when not taking pictures. 40 degree pre-advance and 135 degree advance angle assures faster winding and permits continuous operation for sequence photography.
2. Whenever picture-taking is completed, be sure to move Film Advance Lever (11) to "OFF" position (Fig. 13). The electric circuit is switched off and Shutter Release Button (9) is locked.
Your KR-5 SUPER has a built-in through-the-lens full aperture CdS exposure meter which measures the light coming through the lens and enables you to set the proper exposure for a given lighting condition. The correct exposure is obtained by setting the shutter speed and f-stop in the correct combination for the film, subject and lighting conditions.
1. Set the desired shutter speed opposite Shutter Speed
Index Line (6) by rotating Shutter Speed Dial (7) (Fig. 14).
(Read "SETTING THE SHUTTER"). Shutter Speed Needle (37)
in the viewfinder moves according to the shutter speed you set.
2. Move Film Advance Lever (11 ) to "NO" position
(Fig. 12)
3. Hold your camera, look at your subject through the Viewfinder Eyepiece (24) and check Exposure Meter Needle (37).
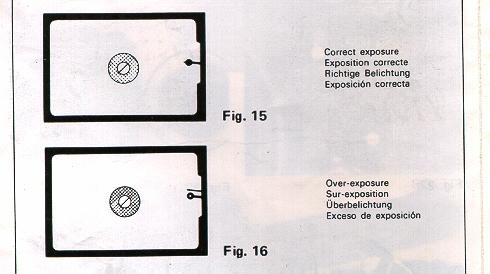
4. Rotate F-Stop (lens opening) Ring (21) and align
Exposure Meter Needle (37) with Shutter Speed Needle (3B) (Fig. 15). If Exposure
Meter Needle (37) goes above Shutter Speed Needle (38), this means
"overexposure" (Fig. 16): select a faster shutter speed or a smaller lens
opening. On the contrary, if the needle goes below Shutter Speed Needle (38),
this means "underexposure." (Fig. 17); choose a slower shutter speed or larger
lens opening.
[Mike: The object is to get the two arms to match. As
you move the shutter speed to a faster speed, the arm with the circle will go
higher on the viewfinder requiring you to change the aperture. As you
choose a slower shutter speed the arm with the circle will be lower in the
viewfinder. Slower shutter speeds can mean camera shake or blur if the
camera is steady but the objects being photographed are moving faster then
the shutter can freeze them. Choosing film speed fast enought is an option
to capture action]
If you want to use a specific f-stop for depth of field
control, you may set the f-stop first and then the shutter speed, while other
procedures are the same as above.
This setting may be used when you take a portrait or the
like, intentionally making your subject attractive with the background or the
scene in front of it blurred. How your subject turns out in the picture depends
on the f-stop setting. (Refer to "DEPTH OF FIELD").
Exposure Compensation
Though you learned how correct exposure is obtained, in unusual lighting conditions, the desired effect or the correct exposure will not be obtained in the final picture and exposure compensation is necessary.
Back-lit subjects
When the light is behind the subjects,
2. If it is impossible to approach the subject, adjust
either shutter speed or lens opening to overexpose. When you adjust the lens
opening, open up the aperture by 1 or 2 stops.
2. If it is impossible to approach the subject, adjust either shutter speed or lens opening to underexpose. When you adjust the lens opening, close down the aperture by 1 or 2 stops.
* When the Shutter Speed Dial (7) is set at ''B" (Bulb), set the desired f-stop and expose manually because metering with the built-in exposure meter is not possible.
[Mike: it might be possible to find an extended exposure by using a higher ASA rating. If you temporally change the ASA rating of your 100 ASA film to 400, find the correct exposure in dim lighting. For example if at ASA 400 the exposure is F2 at 1/15, you can use the half rule, half the ASA for a extra F-stop or shutter speed. Therefore F2 at 1/15 at 400 would be F2 at 1/8 at ASA 200 or F2 at 1/4 with ASA 100. Now to get you more depth of field, 1/4 at F2 is now 1/2 at F4 and 1 second at F5.6. So if you can get the meter to give you a correct exposure, you can use this simple rule to change shutter speeds and film speeds.]
* Outside of the meter's coupling range, the exposure meter will not respond correctly. For example, coupling range for ASA 100 film is from 1/8 sec. at f/1.4 to 1/1000 sec. at f/16 (EV 4 - 18). If the light is too dim, use supplementary lighting.
SETTING SHUTTER SPEED
The shutter controls the length of time the light is allowed to strike the film. The speed at which the shutter opens and closed is measured in fractions of a second that correspond to the numbers on Shutter Speed Dial (7). For example, "500" is 1/500 sec., '`125" is 1/125 sec., and so on.
* Simply turn Shutter Speed Dial (7) until the desired
shutter speed is set opposite Shutter Speed Index Line (6) (Fig. 14).
Generally speaking, when shooting outdoors in bright or
hazy sunlight, "125" ( 1/125 sec.) is suitable for most pictures. When
taking your subjects in motion, "250" (1/250 sec.) to "1000" (1/1000 sec.)
should be used .... Faster speeds will "freeze'' extremely fast moving subjects
(sports, racing cars, etc.). When indoors in a wallet room, "60'' (1/60
sec.) should be sufficient to take your subjects, depending upon the film you
are using. in poorly lit places, or to achieve the maximum depth of field, "30"
(1/30 sec.) to "8" (1/8 sec.) are available.
When set at "B", the
shutter will remain open as long as Shutter Release Button (9) is depressed
(preferably by a cable release). The "B" setting is used for long night exposure
using street lights or electric signs as a light source, or under poor lighting
conditions when flash cannot be used.
Tips for Better Results
* When using slow speeds (below 1/30 sec.), use a tripod or other firm support to prevent the movement of the camera and blurred pictures. In shooting with a telephoto lens, be careful to minimize the camera shake especially.
* Do not set Shutter Speed Dial (7) between marked speeds, but at click stop in accordance with indicated speeds only.
* Shutter Speed Dial (7) does not revolve between "1000" and "B".
SETTING APERTURE
The lens opening determines the amount of light entering
the lens and exposing the film. The smaller the f-stop (f/2.0, f/2.8,
etc.), the wider the lens opening and the greater the amount of light entering
the lens. The larger the f-stop (f/16, f/11, etc.), the smaller the lens
opening and the smaller the amount of light entering the lens. As the lens
opening is moved from f/16 to f/11, the amount of light entering the lens is
doubled. As the lens opening is moved from f/2.8 to f/4, the amount of
entering light is cut in half (Fig. 18).

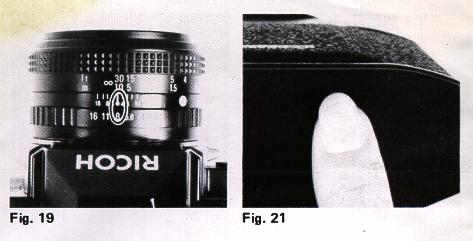
* Rotate F-stop Ring (21) until the desired f-stop is
opposite the aperture index line (Fig. 19). Click stop is provided to prevent
accidental movement from the setting made.
Tips for Better Results
* If necessary, you may set F-stop Ring (21 ) between
two f-stops.
VIEWING AND FOCUSING
Since you are viewing through the lens, there is no
parallax problem ..... What you are viewing in the viewfinder will exactly
appear in your picture. This enables you to determine the e tact composition of
your subjects before pressing Shutter Release Button (9). Even when you shoot
close ups, there is no danger of accidentally cutting off a portion of your
picture. To assure the sharpest possible pictures, your KR-5 SUPER has a three
way focusing screen with diagonal Split image Spot (36), Microprism-image Band
(35) and Fresnel field, and you can select three way focusing according to your
subject.
1. Lock into Viewfinder Eyepiece (24) to compose your subject.
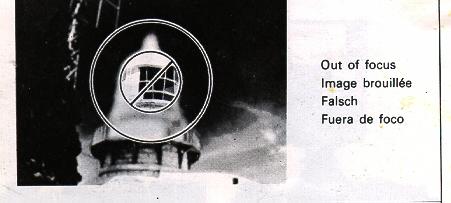
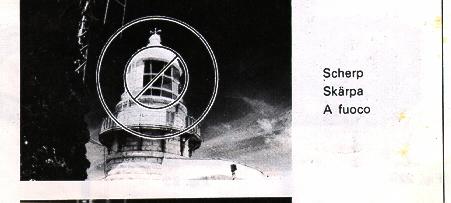
2. Split-image Focusing ... is helpful for the subject
with either vertical or horizontal lines. Rotate Focusing Ring (19) until
the split image in Split-image Spot (36) forms a single image. When it is out of
focus, your subject is split into two parts (Fig. 22).
3. Microprism-image Focusing ... is good for the subject
which lacks clear vertical or horizontal lines. Rotate Focusing Ring (19)
until the image in Micropnsm-image Band (35) appears sharp (Fig. 22).
4. You can also focus with any part of the area surrounding Milcroprism-image-Band (35). This is most useful when taking pictures with ultra telephoto lenses or in close-up photography with bellows unit, macro lenses or extension rings because the other focusing aids may darken appreciably.
UNLOADING FILM
After the last picture on the roll of film has been taken,
rewind the film and unload your camera.
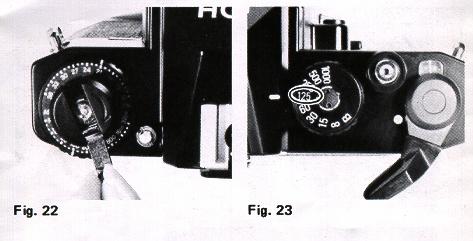
1. Press Film Rewind Release Button (31 ) (Fig. 21).
2. Line up Film Rewind Crank (2) and turn it clockwise
until Film Rewind Release Button (31) stops revolving and you feel the film
tension released (Fig. 22). This indicates that the film has been completely
rewound into the cartridge. 3. Open Back Cover (33) by pulling up Film
Rewind Knob (1).
4. Remove the film cartridge and gave the film processed
as soon as possible.
Tips for Better Results
* Always unload your camera in the shade or in a poorly-lit place, never in direct sunlight or other bright light.
* When you reach the end of the roll of film, Film Advance Lever (11 ) will tighten and refuse to advance. If this happens, do not advance Film Advance Lever (11) by force for "Just one more shot", otherwise the film will be torn out of the cartridge.
* Film Rewind Release Button (31) will remain in place once it is pressed, and return automatically to its original position when Film Advance Lever ( 11 ) is advanced.
TAKING FLASH PICTURES
You can use a flash at night or in a dimly lit room as well as for supplementary lighting in outdoor photography. The camera and electronic flash will be fully synchronized with the shutter speed at "B" and 1/8 sec. to 1/125 sec.
* Mount a flash unit with a built-in hot shoe contact on Hot Shoe (5).
[Mike: most flash units you will find today will have an Auto flash mode. Find the F-stop of the Auto mode (some better flash units have 2 or 3 F-stops choices) and set the lens aperture to that Auto F-stop and the shutter speed to the maximum shutter speed (1/125). Your flash should show a range in feet that this flash will Automatically adjust the light from the flash to provide a very effective exposure]
Tips for Better Results
* Use a flash unit with a built-in hot shoe contact only
because the camera is not equipped with flash terminal for a flash unit
with connecting cord.
* "125" (1/125 sec.) on Shutter Speed Dial (7) is marked
in red as a reminder for electronic flash synchronization (Fig. 23).
* Do not use other makes of flash units that have special
signal pins exclusively for their cameras, as this may damage the circuitry of
the camera.
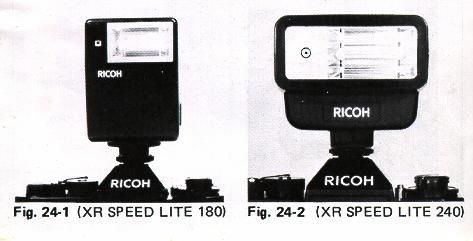
RICOH SPEEDLITE 180 AND XR SPEEDLITE 240
Use Ricoh XR Speedlite 180 or 240 (Fig. 24) for
convenient, easy to take flash photography.
If you use Speedlite 180 or 240 thrystroid type automatic
flash units:
* You don't have to set F-stop each time, depending on the
camera to-subject distance. Once it is set, flash unit automatically controls
the amount of light for correct exposure.
| FILM SPEED | F-stop to be set | automatic
flash range |
|
| XR SPEEDLITE
180 |
ASA100 FILM | F/4.0 | 2.6 - 15 feet |
| XR SPEEDLITE
180 |
ASA 400 FILM | F/8.0 | 2.6 - 15 feet |
| XR SPEEDLITE
240 |
ASA100 FILM | F/5.6 | 3.3 - 14.3 feet |
| XR SPEEDLITE
240 |
ASA 400 FILM | F/11 | 3.3 - 14.3 feet |
* Flash Ready LED (25) lights up on the viewfinder
frame when the flash is fully charged. So you don't have to remove your eye from
the camera to check if the flash is recycled and ready for the next shot.
(Fig.27)
* Recycling time is very short when camera-to-subject is closer. Consequently, the battery life is prolonged compared to the non-thrystroid type automatic flash units or ordinary manual type flash units.
Exposure for manual type flash unit
The exposure is determined by the guide number of the electronic flash unit. The guide number represents a relationship between the light output of the flash and the speed of the film. Guide numbers for electronic flash units are found in the technical specifications. Using the guide number, you can determine the correct f-stop for a given flash situation using the following formula:
F-stop = Guide number divided by Flash-to-subject distance.
For example, if your flash unit has a guide number of 16 (ASA100.m) or 52.8 (ASA 100 ft) for the type of film you are using and your subject is 2 meters (6.6 ft) from the flash unit as indicated on Distance Scale (20) after focusing, divide 16 (52.8) by (6.6). The answer is 8; therefore, set F-stop Ring (21) to 8 (f/8).
Tips for Better Results
* Most electronic flash units have a built-in dial or exposure table which enables you to quickly compute f-stops based on flash-to-subject distances.
Your KR-5 SUPER has a built-in Self-timer which delays the
shutter release about maximum of 10 seconds. This enables you to include
yourself in your own pictures and is also of benefit in taking close-ups or
photomicrographs where camera movement must be avoided.
1. First, advance Film Advance Lever (11).
2. Merely move Self-timer Lever (15) counterclockwise
(Fig. 25).
According to the degree you have moved it down, you can
adjust the operating time. For the maximum delay, move it until it stops.
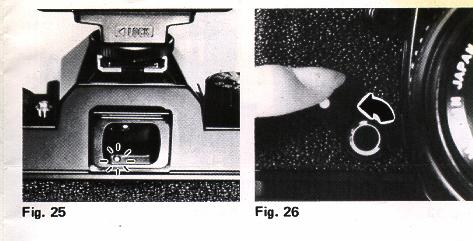
3. Press Shutter Release Button (9) to start the
self-timer moving. Then the self-timer LED lights up to indicate the self-timer
is activated (Fig. 26).
Tips for Better Result
* The camera should be placed on a tripod or other sturdy support when using self timer.
* When using a tripod with a long thread length (more than 5.7 mm), be careful not to forcibly screw in the thread further than the depth of the socket.
To mount the lens on the camera
1. Mount the lens by lining up the red dot on the lens
mount with the matching dot on the camera mount (Fig. 27).
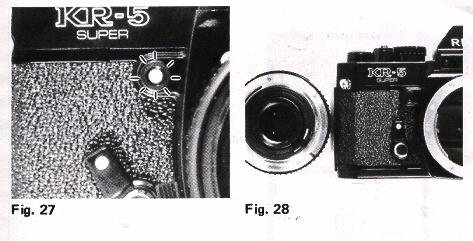
2. Grasp the lens firmly around the lens barrel and turn
it clockwise until it clicks into place.
To remove the lens from the camera
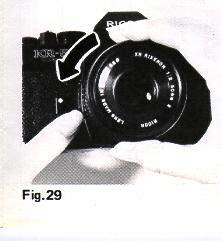
1. Grasp the lens firmly around the lens barrel in one
hand.
2. With the other hand, hold the camera body and press Lens Release Lever (16) and turn the lens counterclockwise until it stops (Fig. 28). The lens now can be removed. You can also change lenses easily without looking even in the dark by means of Lens Locator Node (17). Line up Lens Locator Node (17) with Lens Release Lever (16) and turn the lens clockwise for mounting the lens. For removing the lens, press Lens Release Lever (16) and turn the lens counterclockwise until Lens Locator Node (17) and Lens Release Lever (16) line up.
Tips for Better Result
* Do not touch any of the internal parts or permit dust or curt to enter the camera body when removing or attaching lenses.
* Protect the inside of the camera by putting on the body cap whenever the camera is carried or kept with the lens removed.
When you focus on a specific subject, an area in front of and behind the subject will appear acceptably sharp in your picture.
This area of acceptable sharpness is called "Depth of Field". The depth of field is determined by the F-stop you select and the distance from the in-focus subject to the film plane. As you get closer to your subject, or as you open your lens (for example, from f/16 to f/2.0 the depth of field becomes shallower. By stopping the lens down (for example, from f/2.0 to f/16), the depth of field becomes deeper.
INTERCHANGEABLE LENSES AND ACCESSORIES
A wide range of XR RIKENON interchangeable lenses including extremely wide angle lenses, telephoto lenses, zoom lenses and various accessories are available to enable you to expand the pleasure of your picture taking. XR RIKENON interchangeable lenses and accessories are made of selected high quality materials under strict quality control to assure you of high performance and full satisfaction. Select XR RIKENON interchangeable lenses that will meet your needs.
Since the camera is designed to accept any lens with the "K-type bayonet mount, your KR-5 SUPER affords you the opportunity to select any interchangeable lens or accessory of the K-" type bayonet mount available on the market.
[Mike: you can use any K-mount lens including AF lenses. The AF lens
may be difficult to focus as they are not made to be a manual focus lens.
Any PK, Pa/r (lens made with Pentax and Ricoh "Program" pin or Auto PK (Pentax
lens with the "auto" pin as well as the Ricoh only "program" contact pin) lens
can be used but the metering remains the same. See my
initial Chinon web site about the "program" type of lenses. You must
change the shutter and F-stop individually to get the needles to match even
though you have a "program" lens.]
PROPER CARE OF YOUR CAMERA
* Always carry your camera with its carrying case and neck strap. Use the lens cap to protect the lens When not taking pictures.
* Protect your camera from dust, dirt, water, rain, dampness, salt air and rough handling.
* Never expose your camera to excessively high or low temperatures for an extended period of time. In extremely hot climates, do not leave your camera inside closed automobiles during the daytime or in direct sunlight.
* In extremely cold climates, expose your camera to the outer air only when in use ... When using, expose your camera gradually to the outer air to prevent the lens from clouding.
* If exposed to an extremely cold climates, the exposure meter batteries may fail to operate properly. Keep your camera inside your clothing until taking a picture.
* Never touch the surfaces of the lens, metal focal plane shutter curtain, reflex mirror, etc. with your fingers.
* To clean the lens, gently wipe it in a circular motion with a lens cleaning paper or a son, clean and lintless cloth.
* Do not wipe the camera body with chemicals, such as benzene, thinner, etc. Use only soft cloth or cotton swab sprinkled LIGHTLY with alcohol on the camera body. Do not use them on the lens because it can affect coating.
* When your camera is not in use for an extended period of time, put the lens cap, remove the batteries, place your camera in its carrying case together with silica gel or other desiccant and store it in a dry and cool place.
* Never store your camera in places where the temperatures are excessively high or low.
* Do not attempt to disassemble or repair your camera yourself. If service is necessary, get in touch with your dealer or authorized Ricoh service station.
* Do not leave your camera near the magnetic objects like radio, television set, etc.
MAJOR SPECIFICATIONS OF KR-5 SUPER
Camera Type:
35 mm SLR with metal focal plane shutter.Film Format:
24x36mmFilm Size and Capacity:
35 mm perforated film in 12, 20, 24 or 36 exposures.Standard Lenses:
50 mm XR RIKENON F1.7 lens
50 mm XR RIKENON F2.0 lens
Filter size: 52 mm screw-in typeLens Mount:
"K'' type bayonet with 65 rotating angleShutter:
Vertically moving Copal CCS metal focal plane shutter with speeds from 1/8 to 1/1000 sec. plus B.View finder:
Fixed eye-level pentaprism
Exposure meter needle and Shutter speed needle visible.
Viewing magnification 0.83X
Field of view covers 93% of actual picture areaFocusing:
Diagonal Split-image spot in microprism-image band surrounded by Fresnel field.Exposure Meter:
Two CdS photocells TTL full open metering for center-weighted average light reading coupled to shutter speeds, film speeds and f-stops.Exposure Coupling Range:
EV 4 - 18 (ASA 100 film with 50 mm f/1.4 lens)Film Speed Range:
ASA 12 ~ 3200 (DIN 12 ~ 36)Exposure Meter Power Supply:
Two 1.5V silver-oxide batteries (SR-44, Mallory MS76, Eveready S76 or equivalent).Flash Synchronization:
X Synchronization for electronic flash unit at "B" and 1/8 sec. to 1/125 sec.Flash Contact:
"X" contact on hot shoe for cordless electronic flash unitFilm Loading:
Multi-slit easy loadingFilm Wind:
Single stroke film advance lever with 135 degree winding angle (40 degree play)Film Rewind:
Film rewind crank by pressing film rewind button on base of cameraExposure Counter:
Additive, automatic resetting.Other Features:
Self-timer
Self-timer LED/shutter release LED
Hot shoe
Shutter release lock (with film advance lever)
Meter on/off switch (with film advance lever)
ASA/DIN dial lock
Cable release socket
Tripod socket
Flash ready LEDDimensions:
139.9 (width) x 91.3 (height) x 48.0 (depth) mm (Body only)Weight:
540g (Body only)
* Specifications are subject to change without notice.