Ricoh super 44
127 film format camera
This camera manual library is for reference
and historical
purposes, all rights reserved.
This page is copyright© by  ,
M. Butkus, N.J.
,
M. Butkus, N.J.
This page may not be sold or distributed without
the expressed
permission of the producer.
I have no connection with any camera company.
If you find this manual
useful,
how about a donation of $3 to:
M. Butkus, 29 Lake Ave.,
High Bridge, NJ 08829-1701
and send your
e-mail address
so I can thank you.
Most other places would charge
you $7.50 for a electronic copy
or $18.00 for a hard to read Xerox copy.
This will help me to continue to host this site,
buy new manuals,
and pay their shipping costs.
It'll make you feel better, won't
it ?
If you use Pay Pal, use the link below.
Use the above address for a
check, M.O. or cash.
www.PayPal.me/butkus
Venmo @mike-butkus-camera Ph. 2083
<<<
IF YOU WOULD LIKE THIS OR ANY PDF FILE
PRINTED, BOUND AND MAILED TO YOU,
SEE THIS OUTSIDE COMPANY'S OFFER >>>
Back to my camera manuals site
CLICK HERE TO Ricoh Super 44 PDF
VERSION
OF THIS HTML MANUAL

(4-2-02)
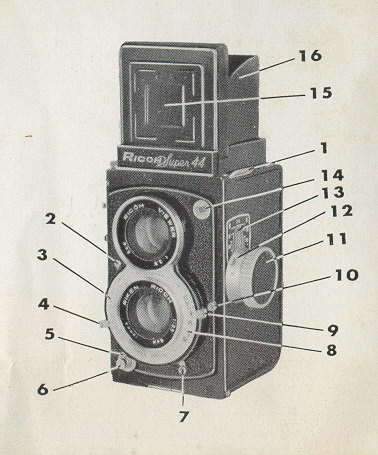 |
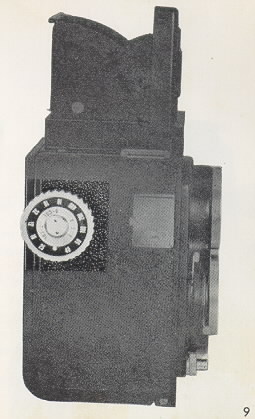
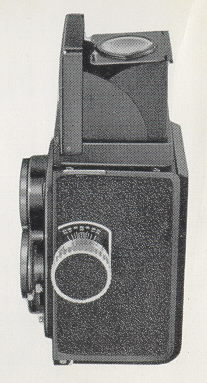
1. Carrying strap connection
2. Shutter winding lever
3. Shutter speed dial
4. Shutter speed selector lover
5. Shutter protector ring
|
PRINCIPAL PARTS
 |
6. Shutter release button
7. MA synchronization lever
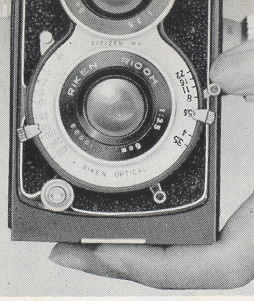
8. F stop dial
9. F stop selector lever
10. Self-timer lever
11. Focusing knob
12. Distance dial
13. Depth-of-field dial 14. Synchro terminal
15. Eyelevel finder front Plato
|
|
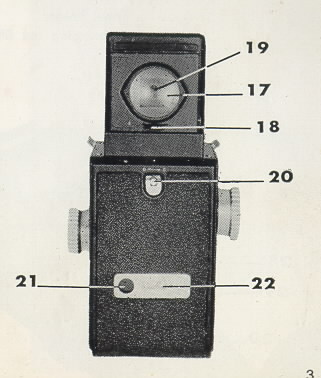
16. Focusing hood
17. Magnifier for critical focusing
18. Magnifier release catch
19. Viewing aperture for eyelevel finder
20. Back cover locking tab
21. Exposure number window
22. Button for opening exposure number window
23. Film winding knob
24. Film exposure index dial
25. CORDLESS flash contact
26. Accessory shoe
|
|
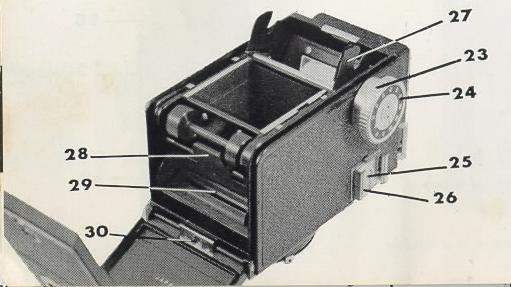
27. Take-up spool. holder
28. Tongue for bringing out film roll holder
29. Film roll holder
30. Tripod bushing |
FILM LOADING
 |
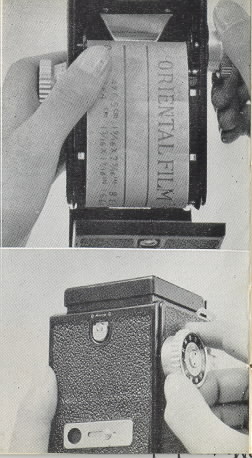
1. Raise the back cover locking tab and turn it counter-clockwise to open the
back cover.
ALWAYS AVOID DIRECT SUNLIGHT
Please use 127 roll film.
|
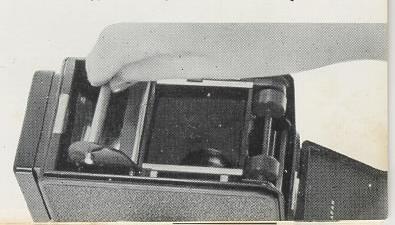 |
2. Insert empty spool into take-up
spool holder which has sprung outward for easy insertion.
3. Push the empty spool axle in a downward led movement and make doubly
sure the spool is properly engaged. Give the knob a few turns to confirm
whether the spool and the knob move together. |
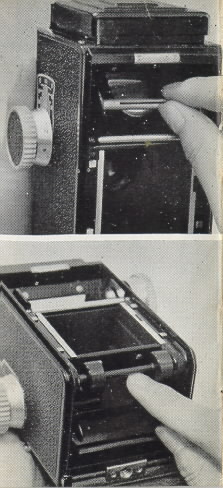 |
4. Push the tongue of the film roll
holder and the film roll holder will spring outward.
5. Taking care that the film roll does not unroll, break the film
roll seal and insert the roll (with the black side facing downward) into the
film roll holder. Push the film roll inward and the film roll holder will
return to its former position.
|
 |
 |
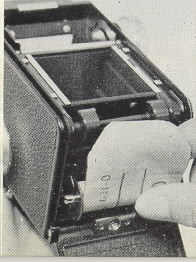
6. Carefully pull out the tapered end
of the film and invert it in the longer slot of the empty take-up spool.
|
 |
|
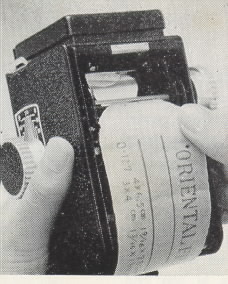
7. As you slowly turn the knob make sure the film is being taken up smoothly.
Then close the back cover. The reverse order of opening it is now used to close
it.
8. Push the exposure number window button to the right and a red window
(exposure number window) will appear. Turn the take-up knob until the number 1
appear in the red window. After the number 1 is centered in the window push the
exposure number window button to the led to close it.
|
|
9. It is convenient if you match the film ASA number with the black dot
on the side of the take-up knob by pushing the stem with the fingernail.
The D-COL numbers indicate daylight color film and the T-COL numbers indicate
tungsten color film ASA numbers, respectively.
Now the camera is ready for photography. After film number 1 is exposed turn
the take-up knob until the film number 2 appears and then close the rod window.
This procedure is repeated until the last film number 12 has been exposed. |
 |
UNLOADING THE FILM
 |
After film number 12 has been exposed take-up the remainder of
the film. Under subdued light open the bock cover. Push the spool holder to the
led and Rib out.
Take out the exposed film roll and carefully seal the tapered
end.
Now take out the empty spool in the film roll holder and
insert it in the take-up spool holder in the same manner prescribed in numbers
(2) and (3).
|
HOW TO FOCUS
|
|
 |
|
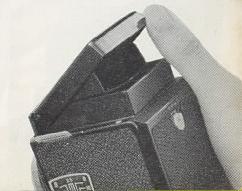
1. Lift up the back end Of your focusing hood.
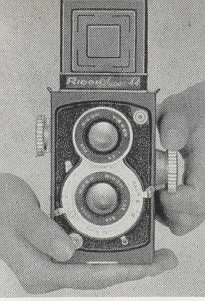
2. Hold the camera in your right hand and put the thumb on the shutter release
button.
3. While looking into the focusing hand, turn the focusing knob slowly. When the
image appears the clearest the subject is in focus.
|
 |
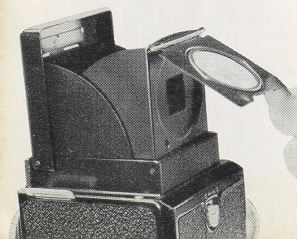 |
| 4. For critical focusing use the
magnifier. Lid up on the tab at the bottom of the focusing hood and bring
the magnifier into proper position. |
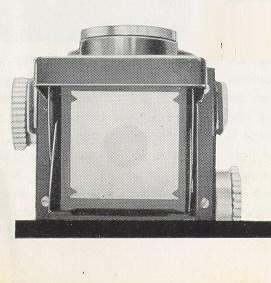
PARALLAX CORRECTION MARKS
When taking a picture in which its
center is a vital question, please note the PARALLAX CORRECTION MARKS.
The red and yellow triangle marks at the top and bottom of the focusing
glass are parallax correction marks. In close-up photography the center
measured from the red marks to the very bottom indicates the center of your
picture. Conversely, for infinite distance, the center measured from the
yellow marks to the very top indicates the center of your picture. |
 |
EXPOSURE
 |
F STOP AND SHUTTER
In order to take a photograph, it is necessary for a certain amount of light to
pass through the lens and reach the film. This is termed exposure.
The F stop and shutter serve the purpose of controlling the amount of light. The
F stop serves as the entrance for the light and the shutter id door. If the
entrance is enlarged a larger amount of light enter and vice versa. And again,
the longer the door is opened the larger amount of light is allowed to enter and
vice versa.
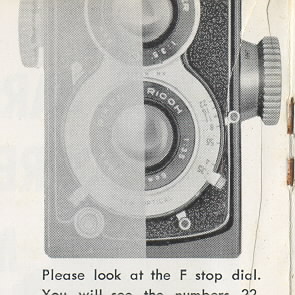
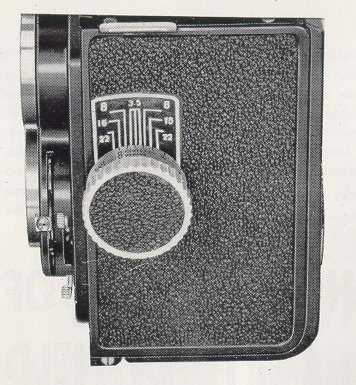
Please look at the F stop dial. You will see the numbers 22, 16, 11, 8, 5.6, 4
and 3.5. When the number used is 22 the light entrance is the smallest, 16 twice
as large, 11 again twice as large as 16 and 50 on. However, 4 and 3.5 are an
exception because in this case it is 1.5 times and not two times.
|
 |
Next, looking at the shutter dial,
the numbed B. 1, 2, 5, 10, 25, 50, 100, 200 and 400 can be seen. 1 means one
second, 2 1/2 second, 400 1/400 of a second.
In other words these figures indicate the time that the door is open. B is
open as long as the shutter release button is depressed. It is used when a
time of two seconds or over is desired.
Film is exposed by the numerous combinations of the F stop and shutter.
To make proper exposures, refer to an exposure table, an exposure meter or
ask an experienced photographer. |
TAKING THE PHOTOGRAPH
|
 |
|
A Measure the proper exposure. Move the F stop and shutter speed selector
levee and push down the shutter winding lever until it stops. After the shutter
is wound the shutter winding lever returns to its former position. Therefore,
whether the shutter is wound or not can be determined by moving the shutter
winding lever. If the lever moves lightly then the shutter is wound.
To prevent Failure In an emergency, establish a standard procedure of raking
photographs and rag no chances In losing o good short
Focus the subject to be photographed and gently release the shutter button.
|
 |
 |
|
When using the self-timer, first wind the shutter, push down the self-timer
lever. and release the shutter button. From the time the self-timer starts till
the shutter is released takes about 10 seconds.
It is perfectly all right to wind the shutter Aver the self-timer has been
pushed down.
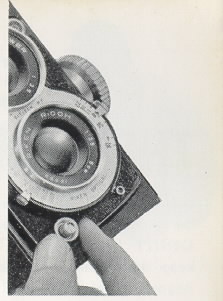
When you use the accessory release, remove the shutter button protector ring and
attach the release.
|
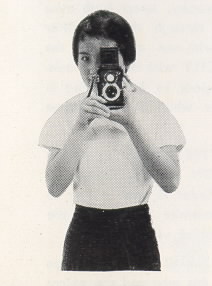
STEADY THE CAMERA

A. This is the CHEST-LEVEL position. To prevent any movement of
the camera, keep the carrying straps taut. |
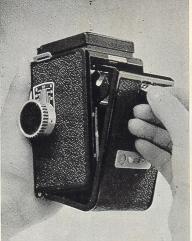
B. This is the EYE-LEVEL position. Press one end of the camera firmly
against the face to steady it. |
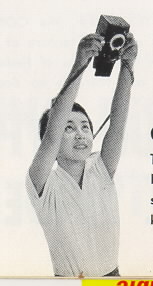
C. This is the ABOVE EYE-LEVEL position. Here also note how the
carrying straps are used to full advantage in keeping the camera steady. |
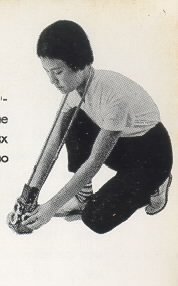
D. This is the GROUND LEVEL position. Use the lens cap or a matchbox
under the camera to steady it. |
Before taking a photograph, steady the camera and release the shutter GENTLY
because it is important to keep the camera from moving.
Regardless of how good the lens or exposure, moving the camera will
certainly spell trouble.
· When taking eye-level photography, keep bath eyes on the subject. While
looking through the magnifier (without raising the magnifier) with one eye, view
the subject to be photographed DIRECTLY with the other eye. The white outlined
frame will appear to be floating in mid-air. The area seen within the white
outlined frame is what you photograph.
CONTOUR TYPE EYE-LEVEL FINDER
· This finder, the CONTOUR TYPE FINDER, is a new and exclusive feature of this
RICOH camera. Compared with other types of finders, this finder is much easier
to use and there is no danger of mistake in sighting the
· Taking full advantage of this new and convenient finder, we hope you will
enjoy taking many snapshots with your twin-lens reflex.
MAKING BEST USE OF DEPTH-OF-FIELD
· When a subject is in sharp focus at a certain point, there is a considerable
area on both sides of the point of focus in which a clear image can be obtained.
This area is termed the. depth-of-field. The depth-of-field increases as the F
stop number becomes larger. This relation can be easily understood by referring
to the depth-of-field din 1.
 |
· As illustrated in photo, suppose a
subject is in sharp focus at 15 feet. At F 8 any object between 10 feet and
30 feet and at F 22 between 6 feet and infinity will be in sharp focus.
Therefore when you determine the F stop take the depth-of-field more into
consideration. In taking portraits where you want to blur the background in
order to bring out or emphasize the model, use a smaller F stop number. On
the other hand, if you desire a clear photograph of a distant scenery, use a
larger F stop number.
|
FLASH PHOTOGRAPHY
MX Synchronizing
Regardless of how dark the place, flash photography will enable you to take
photographs just as well as in the sun.
In flash photography there are F Class and M Class flashbulbs, electronic flash,
etc. The SUPER 44 has a two stage X and M synchronizing shutter. By simply
matching the type of flashbulb with M or X, all speeds from B. 1 second to
1/400th of a second are art exact synchronism. This synchronization is shown in
the table.
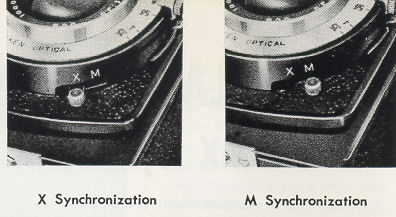
| Flash type |
X Synchronization |
M Synchronization |
| F Class flashbulbs |
B. 1-1/50 |
Not advisable |
|
M Class flashbulbs |
B. 1-1|25 |
all speeds |
| Electronic flash |
all speeds |
will not synchronize |
There are many types of flash unit. On the RICOH SUPER 44, there is a
flash contact in the center of the accessory shoe which makes a cord
unnecessary, if Ricoh flash unit is used. For maximum results it is best to use
an exclusive flash unit.
 |
Ricoh flash unit has a built-in contact
so that by merely engaging it in the accessory shoe, a cord becomes entirely
unnecessary for flash photography. There is NO DANGLING CORD, NO BULB
FAILURE DUE TO FAULTY CONNECTIONS. Of coupe, all conventional flash unit
WITH CORDS can also be used.
<< So you can use an auto flash with a single hot shoe contact.
The best would be an off the flash unit with the electric eye on the camera
>> |
EXPOSURE IN FLASH PHOTOGRAPHY
· In actual use, good results cannot be obtained by merely matching up the
flashbulb and synchro mechanism alone because it will either turn out
underexposed or overexposed. Here again, the vital question is the exposure. The
exposure is determined by the brightness of the flashbulb and the distance
between the flashbulb and the subject. This relation is simply represented by a
guide number. When you purchase flashbulbs, the guide number is always clearly
given. If you divide the guide number by the distance from the subject, you will
know the proper F stop. Conversely, if you divide the guide number by the F
stop, you will obtain the distance.
· The camera is a precision built instrument that requires the utmost care and
attention.
THE CARE OF THE CAMERA
1. Take extreme care in cleaning the lens. Brush lightly with a lens brush
and wipe fingerprint marks off with soft chamois, soft bleached cotton or gauze
daubed with a little alcohol applied with a circular motion beginning at the
center and working out.
2. When you have taken photographs at the seashore or in extremely damp
weather, wipe your camera well with a dry, soft cloth.
3. Do not leave the camera with the shutter wound for a long period because
it may weaken the shutter spring.
4. Do not change the shutter speed after you have already wound the shutter.
S. To preserve the life of the shutter, place the synchro setting at X.
6. When leaving the camera in the case, set the distance at infinity.
7. The white bag included with the camera is a drying agent, silica gel.
8. When you have not used your camera for a long period, it is good to take
it out and release the shutter one or two times.