Ricoh TF-200
posted 9-7-03
This camera manual library is for reference
and
historical purposes, all rights reserved.
This page is copyright©
by

M. Butkus,
NJ.
This page may not be sold or distributed without
the expressed
permission of the producer.
I have no connection with any camera company
On-line camera manual library
Back to main on-line
manual page
If you find this manual
useful,
how about a donation of $3 to:
M. Butkus, 29 Lake Ave.,
High Bridge, NJ 08829-1701
and send your
e-mail address
so I can thank you.
Most other places would charge
you $7.50 for a electronic copy
or $18.00 for a hard to read Xerox copy.
This will help me to continue to host this site,
buy new manuals,
and pay their shipping costs.
It'll make you feel better, won't
it ?
If you use Pay Pal, use the link below.
Use the above address
for a check, M.O. or cash.
CLICK HERE FOR Ricoh TF-200
PDF VERSION OF THIS PAGE
CONTENTS Page
|
Nomenclature 2
Using the Strap 4
Inserting the Battery 5
Opening the Lens Shield 7
Checking the Battery 8
Loading the Film 9
Setting the Film Speed 13
Holding the Camera 13
|
Viewfinder 14
Wide-angle/Telephoto Lens Selector 15
Shooting Distance 16
Auto-Focus Shooting 18
Pre-Focus Shooting 20
Flash Photography 22
Using the Self-Timer 24
Proper Care of Your Camera 26
Major Specifications 28 |
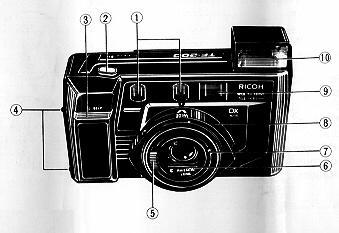
NOMENCLATURE
|
1. Distance Measuring Windows
2. Shutter Release Button
3. Self-timer LED
4. Strap Lugs
5. Lens Shield Switch |
 |
|
6. Lens Shield
7. Photocell
8. Lens Selector (wide-angle/telephoto)
9. Viewfinder Window
10. Built-in Flash Unit
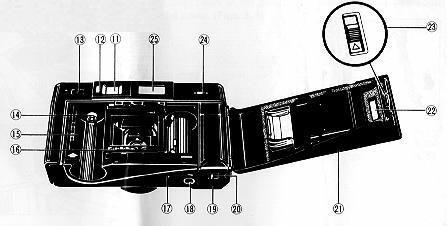
11. Viewfinder Eyepiece
12. Camera Shake Warning/Flash Ready Lamp
13. Flash Switch
|
14. Film Rewind Shaft
15. Film Chamber
16. Film Guide
17. Manual Film Rewind Switch
18. Tripod Socket
19. Battery Compartment Cover |
|
20. Battery Compartment Cover Lever
21. Back Cover
22. Film Loaded Window
23. Back Cover Lever
24. Self-timer Button
25. LCD Control Panel |
 |
USING THE STRAP
| Attaching the strap (Figs. 1, 2) Pass the
strap end through the camera's Strap Lugs and fasten it in the strap buckle. |
|
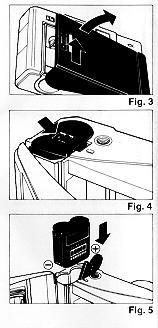
INSERTING THE BATTERY
|
The camera will not operate unless the battery is installed. It is important
to make sure that the battery is inserted correctly.
1. First, open the Back Cover by pushing up on the Back Cover Lever, and then
push the Battery Compartment Cover Lever in the direction of the arrow and pull
open the cover. (Figs. 3, 4)
2. Insert the 6 volt lithium battery, checking that the + and-- on the
battery are lined up correctly according to the polarity diagram inside the
battery compartment. (Fig. 5)
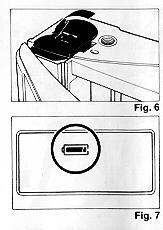
3. Close the Battery Compartment Cover by pushing it in the direction of the
arrow. (Fig. 6)
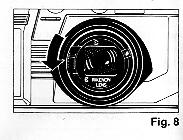
* When the battery is inserted correctly, the Battery Condition Mark appears
on the LCD Control Panel. (Fig. 7) |
 |
Batteries for Use
|
Lithium battery (6V) DURACELL DL223A, PANASONIC BR
P2P or equivalent
* Please remove the battery from the camera when you do not use the camera
for a long period of time (more than 3 months)
|
 |
OPENING THE LENS SHIELD
|
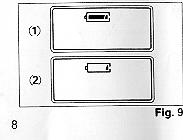
1. Open the Lens Shield by sliding the Lens Shield Switch down toward the
mark of (< (opening). (Fig. 8)
* You can only fire the camera when the Lens Shield is completely
open.
* If the Lens Shield is opened while the Shutter Release Button is pressed
down, a frame will be exposed.
* To avoid tripping the shutter inadvertently and wasting battery power,
always keep the Lens Shield closed when you are not taking pictures. |
 |
CHECKING THE BATTERY
|
A 6 volt battery is required to power the camera. If half of your pictures
are taken with flash, the battery will expose about 1,000 frames. If you use 8
rolls of 24-exposure film a year, the battery should not need changing for about
five years.
When the battery is completely exhausted, the Low Battery Warning Mark C
appears on the LCD Control Panel. Please replace with a new lithium battery. |
 |
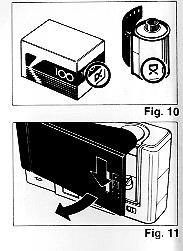
1. If the  mark is showing in the LCD Control Panel, the battery is in good condition.
2. If only the  mark is showing, the battery is nearly exhausted (under normal temperatures) and
has only enough power left to expose the remaining film in the camera. In this
case, be sure to change the battery after you are through exposing the
roll in the camera. (Fig. 9)
mark is showing, the battery is nearly exhausted (under normal temperatures) and
has only enough power left to expose the remaining film in the camera. In this
case, be sure to change the battery after you are through exposing the
roll in the camera. (Fig. 9)
* Cold temperatures will reduce battery efficiency. In freezing weather, the
mark
may turn off and only the
 mark
may show in the LCD Control Panel. When the camera returns to normal
temperatures, the Battery "ALL Right" Mark
will
reappear. If you are taking pictures in cold weather, keep the camera warm and
take it out only when you need it.
mark
may show in the LCD Control Panel. When the camera returns to normal
temperatures, the Battery "ALL Right" Mark
will
reappear. If you are taking pictures in cold weather, keep the camera warm and
take it out only when you need it.
* When appearing the
mark in the LCD Control Panel, don't use the flash.
LOADING THE FILM
|
Film to use (Fig. 10)
* Use 35mm roll films that are marked with the letters "DX" on the box and
cartridge.
* Do not use special-purpose films such as 35mm instant
reversal film, etc. because the camera may not be able to transport and expose
them properly.
* If non-DX film is loaded into the camera, the camera will
automatically set itself to ISO 100.
1. Open the Back Cover To open, hold the camera bottom side up and push the
Back Cover Lever downward. (Fig. 11) |
 |
|
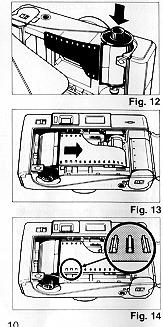
2. Load the film
Load the film by sliding the film cassette down into the Film Chamber and
pull out the film leader to the *** mark. (Figs. 12, 13)
Please make sure that the film is within the Film Guides. (Fig. 14)
Press the Back Cover shut so that the Back Cover Lever returns to its
original position. The film is automatically advanced until the number "12, 20,
24 or 36" appears in the LCD Control Panel (depending upon the film length).
* Always avoid direct sunlight when loading the film. |
 |
|
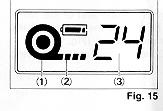
3. Close the Back Cover (Fig. 15)
As soon as you close the Back Cover, the LCD Control Panel will show the
following signs:
(1 ) Camera Loaded Mark.
(2) Film Advance Mark. (This mark will race toward the right to tell you the
film is winding.)
(3) Exposure Counter. After prewinding is completed, the film will set itself
for the first shot and the counter will show you the number of pictures you can
take with it (the number of exposures left on the film).
|
 |
* If the Film Advance Mark does not move, the counter number does
not appear and the camera will not fire - the film is not loaded properly. Open
the back and repeat the above loading procedure.
4. At the end of the roll the camera will automatically stop, the counter
numbers will disappear and the Film Advance Marks will disappear.
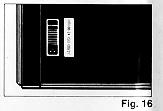
5. Check the Film Loaded Window (Fig. 16)
The Film Loaded Window will show you at a glance the type of film that is loaded
in the camera as well as its speed and the number of exposures it contains.
| Mid Roll Rewinding If you wish to rewind
the film before the end of the roll is reached push in the rewind button on
the bottom of the camera. A pen can be used for easy access. (Fig. 17) |
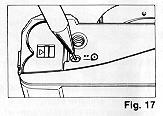 |
* You can close the Lens Cover when the film is being rewound.
SETTING THE FILM SPEED
Automatic film speed setting DX films are provided with
black-and-silver patterns corresponding to film speeds which the camera reads
and automatically sets. Your camera accepts DX films with
speeds ranging from ISO 50 to 1600.
* If non-DX film is loaded in the camera, the camera will automatically set
itself to ISO 100.
HOLDING THE CAMERA (Fig.
18)
1. Use both hands to steady the camera.
2. Be careful not to place your fingers over the lens, or focusing windows.
3. When holding vertically always position with the flash side up.
VIEWFINDER
|
1. Look through the viewfinder Wide-angle (Fig. 19)
Telephoto (Fig. 20) Bright Frame (Figs. 19-A, 20-(A) Close-up Correction Marks
(Figs. 19-(B), 2 -(B)
* The field of view through the Viewfinder will automatically expand or
contract to suit the lens you are using.
* If your subject is 1.5 meters (5 ft) or more away from the camera, your
picture will contain everything you see within the Bright Frame regardless of
which lens you are using. (Figs. 19-(A), 20-(A)
* If your subject is between 1.0 (3.3 ft) and 1.5 (5 ft) meters from the
camera, your pictures will contain only the area seen within the Close-up
Correction Marks.
(Figs. 19-(B), 20-(B) |
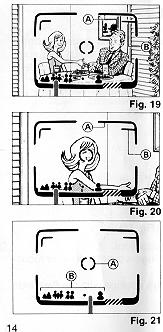 |
2. Auto-Focus Frame (Fig. 21-(A)
The auto-focus system focuses automatically on any subject that
appears within this small square.
3. Zone Marks (Fig. 21-(B)
These marks indicate the focusing distance. When the autofocus
indicator pointer stays in the striped area, the subject is too close to the
camera. You should move further away from the subject.
WIDE ANGLE/TELEPHOTO LENS SELECTOR
|
1. Switching lenses
Your camera's wide and tele lenses let you select the composition that best
suits your subject. Exposure control, focusing, and film advance are automatic.
Set the lens to wide-angle. (Fig. 22)
To set the lens to wide-angle (38 mm focal length), turn the Lens Selector
all the way to the left (counterclockwise) until you feel a click.
Set the lens to telephoto. (Fig. 23)
To set the lens to telephoto (65 mm focal length), turn it all the way to the
right (clockwise) until you feel a click. |
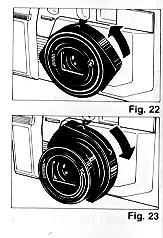 |
* When changing lenses, please make sure you do not have your fingers near
the moving lens components.
* The shutter won't trip unless the Lens Selector is fumed as far as it
will go either to the left or right.
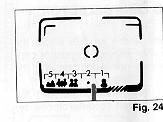
SHOOTING DISTANCE (Fig. 24)
|
For subjects that are less than 1 m (3.3 ft) away from the camera, it is not
possible to obtain sharp focus.
1. When the Shutter Release Button is depressed slightly, the Auto-Focus
Indicator Pointer will point to the
 for subject 1.0 m--1.2
m (3.3 ft--4.0 ft). If you are closer than 1 m (3.3 ft) away from your subject,
the pointer will stay in the striped area in the viewfinder. for subject 1.0 m--1.2
m (3.3 ft--4.0 ft). If you are closer than 1 m (3.3 ft) away from your subject,
the pointer will stay in the striped area in the viewfinder. |
 |
If you are much closer than 1 m (3.3 ft) the pointer may move to
any of the positions.
2. The · symbol will appear for subject 1.2m--1.7m (4.0 ft --5.6 ft) away.
3. The  symbol will
appear for subject. 7m - 2.6m(5.6ft --8.6 ft) away.
symbol will
appear for subject. 7m - 2.6m(5.6ft --8.6 ft) away.
4. The  symbol will
appear for subject 2.6 m--5.0 m (8.6 ft --16.5 ft).
symbol will
appear for subject 2.6 m--5.0 m (8.6 ft --16.5 ft).
5. The a  symbol
will appear for subjects 5.0m -oo (16.5 ft - oo).
symbol
will appear for subjects 5.0m -oo (16.5 ft - oo).
As you can see, there is slight degree of overlap in the distances covered by
the zone marks. This will not cause any focus problems. Your camera has focusing
zones that assure maximum sharpness at any focusing distance.
Note: Due to the above mentioned overlap, you may occasionally notice that
the needle may move from one figure to another even though the subject distance
did not change. This does not mean that your camera has focused improperly. It
just means that an "in-between" zone has been selected.
AUTO-FOCUS SHOOTING
|
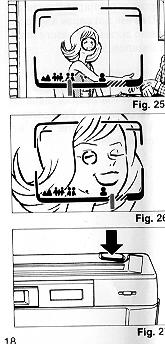
1. Set the subject you wish to take within the Auto-Focus Frame in the center
of the Viewfinder. (Fig. 25)
2. When you press the Shutter Release Button halfway, the Auto-Focus
indicator (pointer) in the Viewfinder will point to one of the Distance Symbols
corresponding to the distance of your subject. If the Auto-Focus Indicator does
not move out of the striped area on the right, you are too close to your
subject.
You should move at least 1 m (3.3 ft.) from your subject for proper focusing.
(Fig. 26)
3. Gently press the Shutter Release Button down to take the picture. The film
will advance automatically, as soon as the shutter has been released. (Fig. 27)
After shooting, the film will automatically advance to the next frame
and the Film Advance Mark in the LCD Control Panel will move to the left. |
 |
* Please be careful not to cover the Distance Measuring Windows at
the front of the camera accidentally, as this will cause incorrect focusing.
* Please keep the Distance Measuring Windows clean so that focusing is accurate.
If it gets dirty, it should be wiped clean with a soft cloth.
* Please keep your fingers and camera strap away from the fens front and Flash
Lamp face.
Notes: Though rare, the lens may not be able to focus itself properly in the
following cases:
1. If the subject is backlit (light behind the subject); if the subject is
illuminated by a very bright light source; if the subject is illuminated by
strong reflected light, such as light reflected from the front windshield of a
car.
2. If the subject is a black of dark object that cannot reflect enough light.
3. If the subject is photographed through a glass window.
4. If the Auto-Focus Frame is aimed at a strongly reflective object such as a
mirror or metallic surface.
In these cases, it is best to use pre-focus to "lock" the focus on a more
"normal" subject at the same distance. While holding focus, turn the camera to
the original subject and shoot.
(Also see PRE-FOCUS SHOOTING.)
PRE-FOCUS SHOOTING
|
When the main subject you wish to focus on is outside of the Auto-Focus
Frame, or if the subject is difficult to focus upon, you should use pre-focus
shooting.
When the subject is outside the Auto-Focus Frame:
1. If you want to photograph two people, there may be cases where
neither of them can be set within the Auto-Focus Frame in the center of the
Viewfinder. If you release the shutter then, only the background will be in
focus, and the people who are the main subject will be out-of focus. (Fig. 28)
2. Move the camera so that one of the people is within the Auto-Focus Frame.
Press the Shutter Release Button halfway so that the indicator pointer moves and
the focusing distance is indicated. Hold your finger in that position on the
Shutter Release Button. (Fig. 29) |
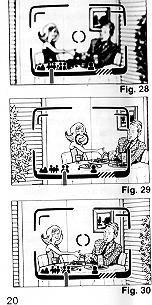 |
3. Now return the camera to its former position so that both people are in
the Field of View Frame again, and press the Shutter Release Button fully to
take the picture. (Fig. 30)
When the subject is difficult to focus on:
1. When you take subjects that are difficult to focus on, find another subject
at about the same distance from the camera. You can pre-focus on that subject in
the same way as described above.
* When you remove your finger from the Shutter Release Button, the pre-focused
condition is cleared, so that you can pre-focus again as many times as you wish.
Note: The RICOH TF-200's meter locks in the correct exposure at the same time
that the Shutter Release Button is depressed. (This is especially useful for
pre-focus shooting.)
FLASH PHOTOGRAPHY
|
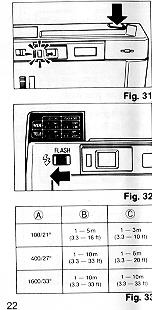
1. If the underexposure warning lamp turns on (Fig. 31)
Press the Shutter Release Button about halfway down, if the Underexposure
Warning Lamp (red lamp) turns on, you should use flash to take your picture.
2. Switch on the flash (Fig. 32)
(1) Just push the Flash Switch to the left. The Built-in Flash Unit will pop
up and the flash will start charging.
(2) In about three seconds, the Flash Ready Lamp (same as the Underexposure
Warning Lamp) will turn off to tell you the flash is ready for firing.
|
 |
* The shutter will not trip until the Flash Ready Lamp turns off.
3. Flash shooting range (Fig. 33)
Film Speed (ISO)
(B) Wide-angle Lens
(C) Telephoto Lens
|
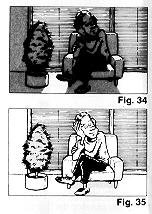
Using the flash as fill-in light
On bright sunny days when your subject is backlit (light source is behind
your subject), you will notice that your subject is too dark (shaded). An
excellent way to brighten the dark picture is to use a flash. This is known as
"fill flash". Simply turn on the flash, and take the picture for beautiful
results. (Figs. 34, 35)
* After you are through taking your flash pictures, be sure to push the
Built-in Flash Unit down. |
 |
If the Flash Unit is left in popped up position for more than an
hour, the red lamp will turn on and the shutter will not trip when you press
down the Shutter Release Button. In such cases, wait about three seconds (after
you have depressed the shutter release button) until the red lamp turns off
before taking your picture.
USING THE SELF-TIMER
|
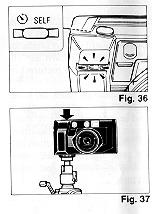
1. Turn on the Self-timer (Fig. 36)
Press in the Self-timer Button on the back of the camera. The
Self-timer LED will turn on and blink slowly to tell you the camera is in the
Self-timer mode. (it will blink once a second and continue for 60 seconds).
2. Start the Self-timer
To start the 10 second self-timer, press down the Shutter Release
Button. (Fig. 37) (Pressing down the Shutter Release Button will also focus the
lens on your subject). |
 |
* To turn off the Self-timer, just press in the Self-timer Button a
second time or close the Lens Shield.
Please note: Once you press down the Shutter Release Button,
however, there's no way you can stop the Self-timer.
|
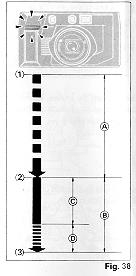
3. Reading the self-timer signals (Fig. 38)
(A) 60 sec. (start it within 60 sec.) ) 10 sec. , D (7-sec.... 3-sec.)
(1 ) As soon as you press in the Self-timer Button, the Self-timer LED will
turn on and blink slowly at the rate of once a second, and continue blinking for
one minute.
(2) If you press in the Shutter Release Button within one minute after
turning on the Self-timer, the Self-timer LED will stop blinking and show a
steady light for seven seconds. It will then start blinking rapidly at the rate
of three times a second.
(3) Three seconds after the Self-timer LED starts blinking rapidly, the
shutter will trip to take your picture and the Self-timer LED will turn off. |
 |
* The Self-timer will turn itself off if you don't use it within one minute
after it is activated.
* If you are taking flash pictures with the Self-timer, be sure to wait until
the Flash Ready Lamp turns off before pressing in the Self-timer Button.
MAJOR SPECIFICATIONS
Type: . 38/65 mm lens shutter type with automatic
focusing Lens: 38 mm f3.5 3 elements/3 groups 65 mm f6.0 6 elements/6 groups
Focusing: Automatic focusing with pre-focus facility
Distance measuring (shooting) range: 1 m (3.3 ft)--no Distance less than 1 m
(3.3 ft): pointer stays in striped area. (out of focus warning)
Shutter/Aperture: Programmed AF type electronic stutter,
1/6--1/1500 sec. speed. Aperture f3.5--f27
Self-Timer: Built-in electronic type with LED indicator.
Operating delay of approx.10 sec.
Viewfinder: Albada type with adjustable bright-frame
viewfinder for telephoto and wide-angle (with parallax correction marks).
Magnification: Telephoto 0.61x, Wide-angle 0.39x, Field of view 83%.
Viewfinder Information: Field of View Frame, Parallax
Correction Marks, Auto-Focus Frame, Zone Marks and Auto Focus Indicator
Exposure Adjustment: With SPD photocell. Exposure coupling
range: Telephoto EV 7.5 --EV 18.5 (ISO 100) Wide-angle EV 6-EV 17 (ISO 100)
Film Speed Range: ISO 50--ISO 1600 Compatible with DX-code
system
Film Advance/Rewind: By a built-in motor. Automatic prewinding
system.
Film Loading: RICOH auto-load system
Exposure Counter: Countdown system
LCD DISPLAY: Film loaded. Film advance. Film reverse
completion. Number of remaining exposures on film. Battery low warning.
Built-in Flash: Activated via Flash unit switch. (Daylight
fill flash possible)
Flash range--Telephoto 1.0--3.0 m (3.3--10 ft.) with ISO 100 film.
Wide-angle 1.0--5.0 m (3.3--16.4 ft.) with ISO 100 film
Guide Number: 14 (ISO 100m). Exposure adjustment through
flashmatic system
Interval Between Flashes:
About 3 seconds.
Number of Shots Possible:
If half of your pictures are taken with flash, the battery will expose about
1,000 frames: and if you use 8 rolls of 24-exposure film a year, the battery
should not need changing for about five years.
Power Source: 1 Lithium battery DL 223A, BR-P2P (6 volts)
or equivalent.
Dimensions: 135.5 mm (L) X 72 mm (H) X 52 mm (D) (5.3" X
2.8" X 2")
Weight: 39Og. (13.7 oz.): (without batteries)
~ Specifications and appearance of this camera are subject to change without
notice.