and historical purposes, all rights reserved.
This page is copyright© by
This page may not be sold or distributed without
the expressed permission of the producer
I have no connection with any camera company.
On-line camera manual library
If you find this manual
useful,
how about a donation of $3 to:
M. Butkus, 29 Lake Ave.,
High Bridge, NJ 08829-1701
and send your
e-mail address
so I can thank you.
Most other places would charge
you $7.50 for a electronic copy
or $18.00 for a hard to read Xerox copy.
If you use Pay Pal, use the link below.
Use the above address for a
check, M.O. or cash.
Back to main camera manual page
CLICK HERE FOR A
Ricoh XF-30 PDF VERSION OF THIS PAGE
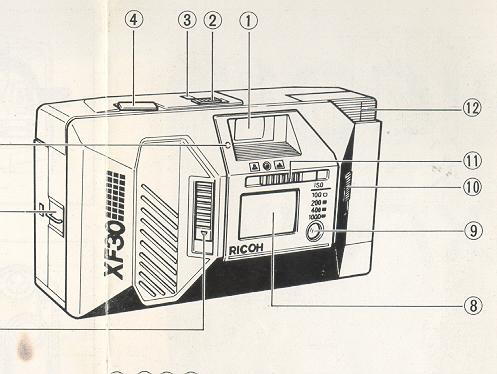
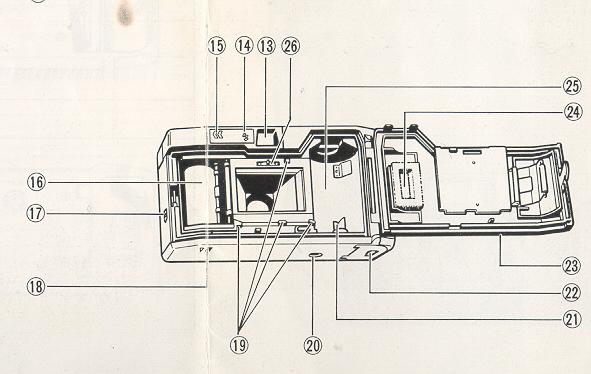
NOMENCLATURE
|
||
 |
|
10. Film Speed Selector 11. Focus Control Selector 12. Flash Unit 13. Viewfinder Eyepiece 14. Flash Ready Lamp 15. Film Loading Monitor 16. Film Take-up Spool 17. Back Cover Lever |
19. Film Guides 20. Tripod Socket 21. Film Rewind Shaft 22. Battery Compartment Cover 23. Back Cover 24. Film Loaded Window 25. Film Chamber 26. Sprocket |
We are most gratified that you have selected a RICOH 35mm
camera. Before using your camera, please be sure to read these instructions
carefully.
Click on the pages below to see images from the manual
 |
 |
 |
 |
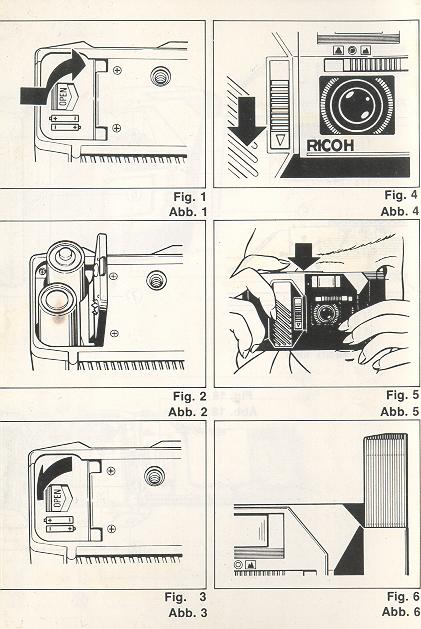
INSERTING THE BATTERIES
The camera will not operate unless the batteries are installed. It is important
that the batteries are inserted correctly.
1. Push the Battery Compartment Cover in the direction of the arrow to pull
open. (Fig. 1)
2. Insert two batteries, checking that the (+) and ( - ) on the batteries are
lined up correctly according to the polarity diagram inside the battery
compartment. (Fig. 2)
3. Close the Battery Compartment Cover by pushing it in the direction of the
arrow. (Fig. 3)
Batteries for Use
Two Alkaline penlight batteries, or two Manganese penlight batteries.
Do not use Nickel Cadmium batteries.
Please remove the batteries from the camera when you do not use the camera for a
long period of time.
OPENING THE LENS SHIELD
1. Open the Lens shield by sliding the Lens Shield Switch in the direction of
the arrow. (Fig. 4)
The Lens Shield is interlocked with the safety mechanism of the camera. You can
fire the camera only when the Lens Shield is completely open. This feature
prevents wasted shots!
2. If the Lens Shield is opened while the Shutter Release Button is pressed
down, a frame will be exposed.
CHECKING THE BATTERIES
1. Cover the Photocell with your hand and press the Shutter Release Button down
halfway. (Fig. 5)
2. If the Flash Unit pops up, then the batteries are in working order. (Fig. 6)
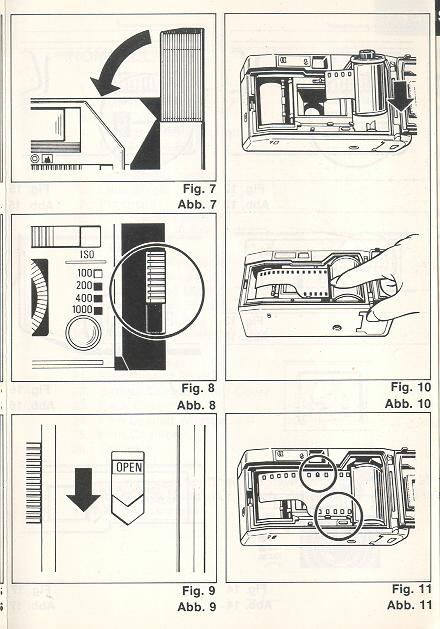
3. Push the Flash Unit back down. (Fig. 7)
In normal temperature (at 20 degrees C, with new Alkaline
batteries)
Without using the Flash Unit:
More than 100 rolls of 24 exposure film can be shot.
Using the Flash Unit for all shots:
More than 10 rolls of 24 exposure film can be taken.
Please replace both batteries for new ones of the same kind in the following
cases:
a. The Flash Unit does not pop up when you have covered the Photocell with your
hand and the Shutter Release Button is pressed in halfway.
b. The shutter cannot be released (apart from when the Lens Shield is closed).
c. The Flash Ready Lamp takes more than 30 seconds to light up.
d. The Film Advance or Film Rewind does not operate.
e. The batteries have been in the camera for more than one year. (Even without
using the camera, the batteries will lose power naturally).
* Generally, in cold conditions, the capacity of the batteries decreases, and in
some cases, the camera may not operate correctly. You should either warm the
batteries or keep a spare set in your pocket, inserting them just before you use
the camera. Incidentally, if the capacity of the batteries has decreased in cold
temperatures, it will regain full capacity in normal temperatures, so do not
throw the batteries away.
SETTING THE FILM SPEED
1. The film speed is indicated on the outer packaging (or inner container) of
the film. E.g. ISO 100.
2. Slide the Film Speed Selector to set the speed of the film. (Fig. 8)
Please set the Film Speed Selector only to click-stop position. Do
not use mid-way positions.
Please be careful when you take a picture with ISO 1000 film in bright sunlight,
the picture may be overexposed.
Applicable Films
Use films with ISO 100, 200, 400 or 1000.
LOADING THE FILM
1. Push the Back Cover Lever downwards in the direction of the
arrow to open. (Fig. 9)
2. Load the film into the Film Chamber, pull out the film leader,
press the film container's outlet so that the surface becomes level with the
rail surface, and place it over the Film Take-Up Spool. (Fig. 10)
3. Please make sure that the film is within the Film Guides. (Fig.
11)
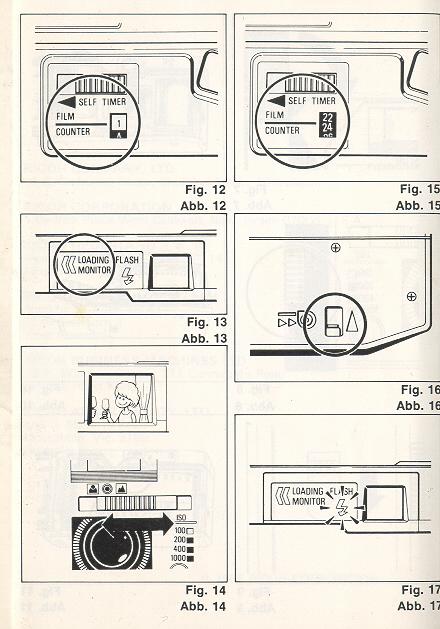
4. Press the Back Cover shut so that the Back Cover Lever returns
to its original position. The film is automatically advanced until number "1"
appears in the Film Counter Window. (Fig. 12)
5. If the Film Loading Monitor (small window) rotates rapidly, then
the film is advancing correctly. If the monitor does not rotate, the film has
not advanced correctly, so please reload the film. (Fig. 13)
Always avoid direct sunlight when loading the film.
The Film Loaded Window is to confirm whether film is in the camera or not.
If the film leader end tip is bent, correct it before loading.
If film container does not fit well into the Film Chamber, insert it in while rotating slightly.
If the Flash Unit is popped up, snap it down before loading.
* Film can be loaded even when the Lens Shield is closed.
VIEWFINDER (Fig. 14)
1. Measure the approxi mate distance to the subject with the eye.
2. Slide the Focus Control to set for the marking according to the distance.
![]() Long distance (suppose
to be mountains)
Long distance (suppose
to be mountains)
![]() Middle distance (2.5m:
8.2ft) (not sure)
Middle distance (2.5m:
8.2ft) (not sure)
![]() Short distance
(suppose to be a person close up)
Short distance
(suppose to be a person close up)
Pay attention not to smudge the viewfinder with fingerprints, etc.
Focusing is not possible for distances of Em (3.25 ft) or less with necessary
close-up lens.
SHOOTING AND FILM ADVANCE
1. Press the shutter Release Button gently so as not to shake the camera: The
shutter is released and the film automatically advances by one frame.
In a dark place, the Flash Unit pops automatically up when the shutter Release
Button is half pressed. In this case, the shutter cannot be released until the
Flash Ready Lamp lights. (Refer to "Flash Photography".)
REWINDING THE FILM (Auto reverse)
After the end of the film has been reached, the film is automatically rewound.
As the film is being rewound, the Film Loading Monitor will rotate and the Film
Counter will run backwards. (Fig. 15)
When the film is fully rewound, the motor stops automatically and "S" is seen in
the Film Counter. You can now open the Back Cover to unload the film.
If you wish to rewind the film before the end of roll is reached, (to change to
faster film for indoor shots etc.) push the Manual Film Rewind Switch with a
ball point pen, etc. (Fig. 16)
You can close the Lens Shield when the film is being rewound.
UNLOADING THE FILM
1. Gently slide down the Back Cover Lever and take out the film container.
2. Press to shut the Back Cover. At that time, the auto set mechanism is
automatically activated and the motor is operated until number "1" appears in
the Film Counter Window.
The motor is operated when the Back Cover is closed: This is to reset for film
advance mode and is not a malfunction.
FLASH PHOTOGRAPHY
When flash is requited, the Flash Unit automatically pops up into vertical
position.
1. Check that the Flash Ready Lamp is lit, then take the picture. (Fig. 17)
2. When you have completed flash photography, please be sure to push the Flash
Unit down. This turns off the flash.
Flash Photography Distance
Shooting Range: 1--3 m (3.3--9.8 ft)
If the Shutter Release Button is kept pressed halfway down before the Flash
Ready Lamp comes on, the Flash Unit will not be charged.
Be careful not to put your finger in front of the flash window. If the Shutter
Release Button is pressed before the Flash Ready Lamp lights, the shutter will
not be released.
* You can use the Flash Unit as a fill-in light for daytime photography too.
Cover the photocell with your hand and press the Shutter Release Button in
halfway. Then the Flash Unit pops up.
USING THE SELF-TIMER--
Now it's you turn to cut into the shot!
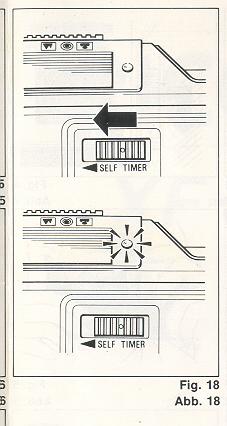
1. Slide the Self-Timer Switch fully in the direction of the arrow. Then the
Self-Timer LED (red lamp) on the front of the camera blinks on and off. The LED
starts to blink more rapidly two seconds before the shutter is released, to
indicate that the shutter is going to be released. The shutter will be released
about 10 seconds later. (Fig. 18)
If you wish to clear the self-timer once it has started, close the Lens Shield.
When using the self-timer with flash photography, put the SelfTimer Switch on
after the Falsh Ready Lamp is lit. (When the surrounding light is not
sufficient, the Flash Unit pops up immediately after the Self-Timer Switch is
activated.)
PROPER CARE OF YOUR CAMERA
Take the case off the camera, remove dirt, dust, film waste from the camera,
wipe it with a silicon-processed cloth, etc. and store in a well-ventilated
place that is as dry as possible.
If there is dirt on the lens or viewfinder, do not touch directly with your
fingers. Use a blower to blow the dust away, or wipe the surface gently with a
soft cloth.
Camera malfunction can be caused by shock, humidity, salt, etc. After using the
camera at the beach or places where there are chemicals, wipe it particularly
carefully.
Take care not to expose the camera to sudden changes in temperature, as they may
cause malfunction.
Do not expose the camera for a long period of ti me i n extremely high
temperatures, such as in your car or on the beach, as this may cause
malfunction.
* Do not place the camera near equipment that has strong magnetism such as
television or radio.
Remove the batteries before storing the camera, and keep the camera in a place
that is free of dust and humidity.
Avoid keeping the camera in a closet, etc. where the camera may be affected by
mothballs, insecticides, etc.
Do not attempt to disassemble or lubricate the camera. This should be done in a
specified service center.
MAJOR SPECIFICATIONS
Type: 35mm lens electronic shutter type
Lens: 35mm color Rikenon f4.0 lens
Focusing: By zone-focus marks from 1.0 to infinity
Shutter: Programmed type electronic shutter, 1/30 - 1/500 sec.
Self-Timer: Built-in electronic type. Operating delay of approx. 10 sec.
Viewfinder: Reverse Galilean viewfinder
Magnification 0.53X, Field of view 80%
Exposure Adjustment: With CdS photocell, Exposure Coupling Range EV9 - EV17 (ISO 100)
Film Speed Range: ISO 100 -1000.
Film Advance/Rewind: Electric motor with Film Transport Monitor.
Automatic 1st frame setting. Automatic film rewind at the end of film
Film Loading: RICOH Auto-Load system
Exposure Counter: Additive, automatically resets to zero when the camera back is opened
Built-in flash: Automatic pop-up electronic flash in dim light
''Guide Number: 10 (ISO 100, m)
Exposure adjustment through flashmatic system
Interval Between Flashes: About 6 seconds
Number of Shots Possible: With new Alkaline batteries (under normal temperature of 20°C) without using the flash unit: more than 100 rolls of 24 exposure film; when using the flash unit repeatedly; more than 10 rolls of 24 exposure film
Power Source: 2 penlight Alkaline batteries or 2 penlight Manganese batteries (Nickel Cadmium) batteries cannot be used.
Dimensions: 121mm, 4.8"(W) x 66mm, 2.5"(H) x 45mm, 1.8"(D)
Weight: 225g, 7.9OZ. (without batteries)
Specifications and appearance are subject to change without notice.