historical purposes, all rights reserved.
This page is copyright© by
This page may not be sold or distributed without the
expressed permission of the producer
I have no connection with Ricoh Cameras, Japan
To main camera manuals page
This camera manual library is for reference and
historical
purposes, all rights reserved.
This page is copyright©
by
![]() ,
M. Butkus, N.J.
,
M. Butkus, N.J.
This page may not be sold or distributed without the
expressed
permission of the producer
I have no connection with Ricoh Cameras, Japan
To main camera
manuals page
| To Part I | To part II | To Part IV |
![]()
Problems, suggestions - Web Master
| 29. EXPOSURE METERING MODE | 30. CONTINUOUS SHOOTING MODE | 31. RED-EYE REDUCTION MODE [PF] |
| 32. MULTI EXPOSURE MODE | 33. PREVIEW MODE | 34. AUTO BRACKETING MODE |
| 35. MANUAL FILM SPEED SETTING MODE | 36. EXPOSURE COMPENSATION MODE | 37. AE LOCK |
29. EXPOSURE METERING MODE
|
This camera has 2 types of exposure metering systems: Center-weighted average exposure metering and Spot metering mode. Choose the appropriate metering mode according to the situation or subject you are shooting. Center-weighted metering This system measures the viewing area, emphasizing the center portion. This metering mode is ideal for general shooting and landscape shooting.
|
Spot metering

|
This system only measures the central spot (inside the microprism area).
|
|
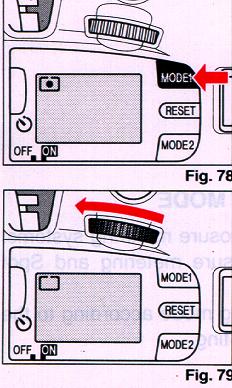
2. Turn the Dial and set the exposure metering mode. By turning to the right, the spot metering (I) will be set. By turning to the left, the center-weighted metering (Up) will be set. (Fig. 79) Press the Shutter Button halfway to return to the "Normal Display". |
30. CONTINUOUS SHOOTING MODE
|
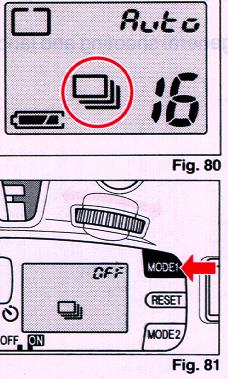
[MODE 1] The Continuous Shooting Mode has been set when the ~ mark appears in the LCD Panel (Fig. 80). Continuous shooting occurs for as long as you press the Shutter Button. About two shots can be taken in one second. The number of shots that can be taken also depends on the condition of the batteries.
|
|
1. Press the MODE 1 Button until [three
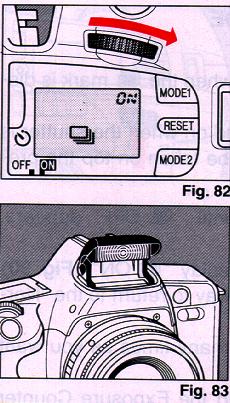
squares] OFF appears. (Fig. 81) 2. Turn the Dial to the left to display [three squares] ON.
3. Press the Shutter Button halfway to return to the "Normal Display". * To cancel the mode, press the RESET Button or follow steps 1 and 2 above, reversing the [three squares] ON and the [three squares] OFF displays. * For combining this mode with other functions, refer to "Combining the Functions" on P.45.
|
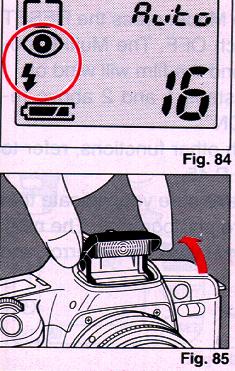
31. RED-EYE REDUCTION MODE [PF]
|
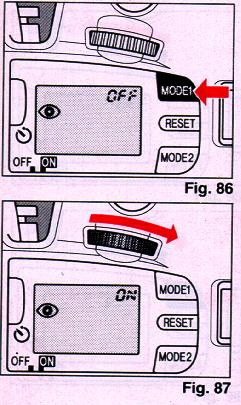
[MODE 1] The Red-eye Reduction Mode is set when the Built-in Flash is open and the <eye mark> mark is displayed as shown in the illustration. (Fig. 83, 84) To reduce the effect of red eyes in flash photography, the flash will pre-flash several times before the shutter is released with the main flash. When this mode is used with other flash units, the Built-in Flash will also pre-flash if it is open. * When the Built-in Flash has not been opened, the AD mark will not appear in the "Normal Display".
|
|
1. Pull up the Built-in Flash to open
it. (Fig. 85) 2. Press the MODE 1 Button until " <ID OFF > appears. (Fig. 86)
|
32. MULTI EXPOSURE MODE>
|
[MODE 1] In this mode, the film will not wind on when the shutter is released, and the next shot will be taken on top the previous shot.
|
|
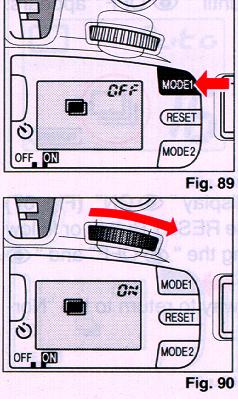
1. Press the MODE 1 Button until " [dark
double square] OFF" appears. (Fig. 89)
2. Turn the Dial to the right to display " [dark double square] ON". (Fig. 90) 3. Press the Shutter Button halfway to return to the "Normal Display". 4. Press the Shutter Button as many times as you want the frame to be overlapped. * The film will not wind on and the Exposure Counter number will not change. 5. To cancel the Multi Exposure Mode, press the RESET Button or turn
the Main Switch OFF.
|
|
* When developing the film, make sure you indicate that you have used multi exposure photography. The multi exposed negative may be mistaken for an error and may not be printed.
|
33. PREVIEW MODE
|
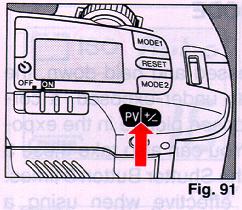
[MODE 1] Normally, the image seen through the viewfinder is an image with the aperture open. The Preview Mode sets the actual aperture you have selected allowing you to confirm the depth-of-field of the image. 1. While looking through the viewfinder, press the Preview/Exposure Compensation Button. (Fig. 91) * The aperture will be set to the aperture opening you have selected and you can confirm the areas that are focused. * The viewfinder image will darken when the aperture is set. |
Canceling and Setting the Preview Mode.
The Preview/Exposure Compensation Button is used for two Modes. When the Preview Mode has been set, this button is used to view the preview. If the Preview Mode has been canceled, this button can be used to set the exposure compensation.
Canceling the Preview Mode
|
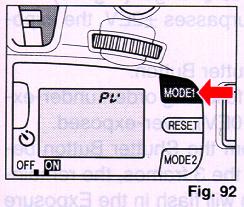
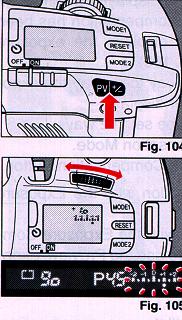
1. Press the MODE 1 Button until "PV" appears. (Fig. 92)
|
|
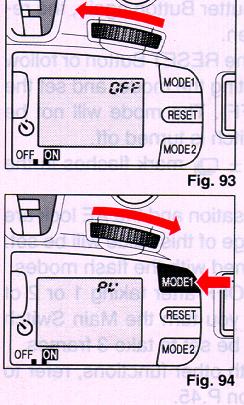
2. Turn the Dial to the left to display "OFF". (Fig. 93) Setting the Preview Mode Follow steps 1 and 2 of "Canceling the Preview Mode", reversing "PV" and "OFF". (Fig. 94) For setting the exposure compensation with the Preview/ Exposure Compensation Button, refer to P.54.
|
34. AUTO BRACKETING MODE
|
[MODE 2] When the shutter Button is pressed and held down, the camera will take
3 frames of an under-exposed, a correctly exposed, and an over-exposed picture
in the exposure range you have selected. You can also take these 3 frames
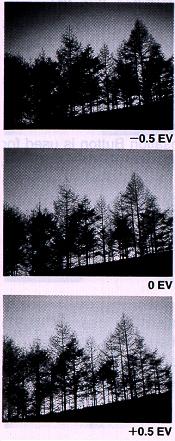
one by one by pressing the shutter Button 3 times. When exposure compensation is applied to this mode, the exposure range will be based around the exposure compensation value selected. Exposure range is set to +/- O.5EV Auto bracketing frames will be -1.5, -1.0, -0.5
|
|
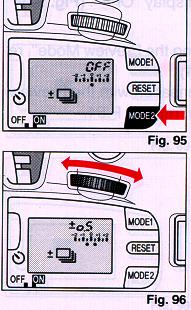
Example when the exposure range is set
to +/- 0.5 EV 1. Press the MODE 2 Button until " [three squares] " appear.
(Fig. 95)
* The exposure range display and the exposure indicator are also displayed. 2. Turn the Dial to set the exposure range. (Fig. 96) * When the exposure range surpasses +/- 2EV, the exposure indicator (DOT) will flash. 3. Press and hold down the Shutter Button. * 3 frames will be taken in the following order: under-exposed, correctly exposed (+/- 0EV), over-exposed.
|
* If you remove you finger from the shutter Button before it has finished shooting the 3 frames, the remaining frame number(s) (1 or 2) will flash in the Exposure Counter. By pressing the Shutter Button again, the remaining frame(s) will be taken. [MIKE: you must shoot all three, only the middle exposure will be according to the meter]
4. To cancel this mode, press the RESET Button
[MIKE: everything is reset!]
or follow the same procedures for setting the mode,
and set the exposure indicator
to 0 (OFF). The mode will not be canceled when the Main Switch is turned off.
* When this mode is set, the [three squares] mark flashes in the normal display.
* When the exposure compensation and the AE lock are combined, the exposure range of this value will be set.
* This mode cannot be combined with the flash modes.
* If you turn the Main Switch OFF after taking 1 or 2 of the 3 frames, the next time you turn the Main Switch ON, the Auto bracketing will be set to take 3 frames. [again]
35. MANUAL FILM SPEED SETTING MODE
|
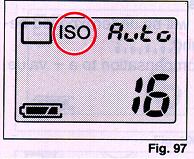
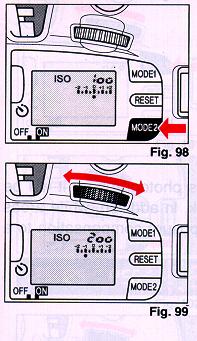
[MODE 21] The Manual Film Speed Setting has priority over the automatically read film speed setting. This mode is used to set the film speed of films without the OX code or to set a different film speed than that indicated on a DX film. |
|
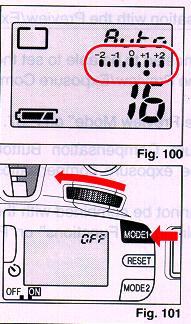
1. Press the MODE 2 Button until "ISO"
appears. (Fig. 98)
2. Use the Dial to display the film speed you wish to set. (Fig, 99) * The exposure indicator displays the exposure difference of the automatically read film speed setting and the manually set film speed setting. * When the exposure indicator (DOT) exceeds 2 EV, it will flash. * The film speed you have selected will be displayed for about 2 seconds when the Main Switch is turned on.
|
36. EXPOSURE COMPENSATION MODE
[MODE 2]
In AE Photography, when there is an excessive contrast between the subject and the background, the subject may be under (dark) or over (light) exposed. When this occurs, and when you cannot bring the camera close to the subject, the Exposure Compensation Mode can be used. (Use the AE Lock when you can bring the camera close to the subject. See P. 42.)
Also, an image may come out gray when white or black is dominant. The light and dark colors of your picture can be shot correctly by using this mode.
You can also set this mode to shoot photos intentionally under exposed or overexposed.
Exposure compensation can be set up +/- 4.0 EV in 0.5 EV increments.
Shooting in Backlit Conditions

|
In backlit conditions the subject will
be underexposed because of a very bright background.
|
Dominantly white subject
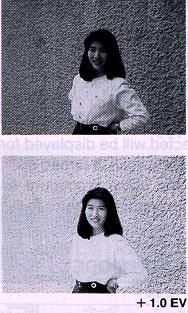
|
If a dominantly white subject is photographed, it will be underexposed and appear dark. In addition, white areas will come out gray. Set the exposure compensation to a plus (+) value. |
Dominantly dark-colored subjects
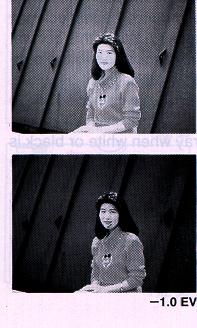
|
If a dominantly dark-colored subject is shot, the whole image will be overexposed, making the subject light (white) and dark-colored areas will come out gray. Set the exposure compensation to a minus ( - ) value. |
|
Press the Shutter Button halfway to display the exposure indicator in the viewfinder display. 1. With the Exposure Compensation Mode.
|
|
Setting the Exposure Compensation with the Exposure Compensation Mode Set the exposure compensation with the Exposure Compensation Mode when
you wish to use the Preview/Exposure Compensation Button for the Exposure
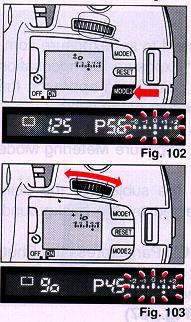
Compensation Mode. (Fig. 101) 1. Press the MODE 2 Button until the exposure compensation value display and the exposure indicator are displayed. (Fig. 102) * The exposure indicator also appears flashing in the viewfinder. This allows you to set the exposure compensation while looking through the viewfinder. |
* The dot (DOT) of the exposure indicator will flash when it surpasses +2 or -2.
3. Press the Shutter Button halfway to return to the "Normal Display".
4. To cancel exposure compensation, cancel the Exposure Compensation Mode or press the Reset Button.
* To cancel this mode, follow the same procedure as setting the mode, but change the exposure compensation value in
* When you have finished shooting with the Exposure Compensation mode, be sure to return the exposure compensation value to +/- 0.
Setting the Exposure Compensation with the Preview/Exposure Compensation Button.
|
The Preview Mode must be canceled to be able to set the exposure compensation with the Preview/Exposure Compensation Button. See "Canceling and Setting the Preview Mode" on P.37. * Exposure compensation cannot be combined with the Manual Mode. See "Combining the Functions" on P. 45.
|
37. AE LOCK
|
The AE Lock function can be used to set exposure compensation in AE Modes
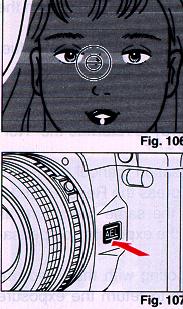
(see "Exposure Compensation 1. Bring the camera close to the subject to the point where exposure is not affected by the background. (Fig. 106) * If there is no display in the LCD Panel, press the Shutter Button halfway and it will appear. The mode cannot be set when this display is not showing. 2. Press the AE Lock Button. (Fig. 107) |
· The exposure value will be locked. · The "AEL" mark will
flash in the viewfinder.
3. Compose your picture and press the Shutter Button to shoot.
* The photo will be taken with the locked exposure value. When the photo has been taken, the AE Lock will be canceled and the AE Lock mark (AEL) will disappear.
* To cancel AE Lock before releasing the shutter, press the AE Lock Button again or turn the Main Switch OFF.
* If the AE Lock Button is kept pressed while shooting, It is possible to
shoot again with the locked exposure