and historical purposes, all rights reserved.
This page is copyright© by
This page may not be sold or distributed without the
expressed permission of the producer
I have no connection with Ricoh Cameras, Japan
This camera manual library is for reference
and historical
purposes, all rights reserved.
This page is copyright©
by
![]() .
M. Butkus, N.J.
.
M. Butkus, N.J.
This page may not be sold or distributed without the
expressed
permission of the producer
I have no connection with Ricoh Cameras, Japan
Back to main Camera Manual site
| To Part I | To part II | To part III |
![]()
Problems, suggestions - Web Master
| 38. FLASH COMPENSATION | 40. FLASH MODES | 41. OTHER FLASH UNITES | 42. COMBINING THE BUILT-IN FLASH AND THE RICOH TTL FLASH |
| 43. CHANGING THE RESET SETTINGS | 44. CHANGING THE FUNCTION OF THE PREVIEW/EXPOSURE COMPENSATION BUTTON | 45. INFRARED FILM | 46. DIOPTRIC LENSES |
| 47. INTERCHANGEABLE VIEWFINDER SCREENS | 48. RELEASE SWITCH | 49. CARE OF BATTERIES | 50. DATA BACK 3 |
| 51. PROPER CARE OF YOUR CAMERA | Major Specifications |
38. FLASH COMPENSATION
[MODE 2]
Depending on the subject or the special effects you wish to achieve, the amount of light emitted by the flash can be adjusted. This mode can be used to create a correct balance between flash light and natural light, or to create special effects by producing light or dark photos with flash photography.
The light emitted by the Built-in Flash, the Ricoh Speedlite 303P or any other
Ricoh TTL type flash can be adjusted with this mode. It can be adjusted up
to 2.0 EV in 0.5 EV increments.
 |
If the picture is dominantly white, or is in a backlit condition, the main subject may be underexposed. In this case, set the flash compensation to a plus (+) value. Adjust the flash compensation to a plus (+) value.
|
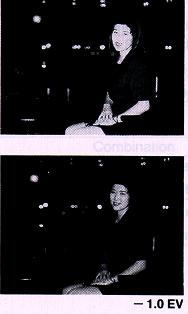 |
When the main subject is comparatively small and the background is distant, or when the picture is dominantly dark-colored, the subject may be overexposed. In this case, set the flash compensation to a minus ( - ) value. Adjust the flash compensation to a minus ( - ) value.
|
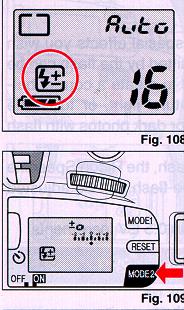 |
The Flash Compensation Mode is set when
"lightning bolt and +/_" is displayed as shown in the illustration. (Fig.
108)
* The flash compensation value display and the exposure indicator are
both displayed.
* If the settings are not changed within 5 seconds of pressing the Mode Button, the LCD Panel display will return to the "Normal Display".
|
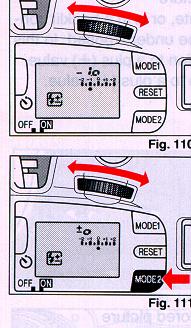 |
2. Turn the Dial and set the flash compensation value. (Fig, 110)
3. Press the shutter Button halfway to return to the "Normal Display". 4. To cancel the Flash Compensation Mode press the RESET Button or follow the procedures for seeing the mode and set the flash compensation value to +0. (Fig. 111)
|
Possible combinations with the Continuous Shooting Mode, Multi Exposure
Mode and Auto Bracketing Mode.
| Combination | Function when modes are combined |
| Continuous Shooting Mode + Multi Exposure Mode |
Multi exposure with continuous shooting when the Shutter Button is pressed and held down. |
| Continuous Shooting Mode + Auto Bracketing Exposure Mode |
Auto Bracketing Exposure Mode. |
| Multi Exposure Mode + Auto Bracketing Exposure Mode |
3 times exposure of Auto Bracketing Exposure on the same frame. |
| Continuous Shooting Mode + Multi Exposure Mode + Auto Bracketing Exposure Mode |
3 times exposure of Auto Bracketing Exposure on the same frame. |
Combinations with the Flash Photography.
| Combination | Function when modes are combined |
| Auto Bracketing Exposure Mode + Bulb Mode |
Bulb Photography (Auto Bracketing Exposure Mode cannot be used.) |
| Self-timer Mode + Bulb Mode |
The Self-timer will not start. |
Combinations with the Self-timer Mode
| Combination | Function when modes are combined |
| Continuous Shooting Mode + Self-timer Mode |
2 continuous frames will be taken with the Self-timer. |
| Multi Exposure Mode + Self-timer Mode |
After Self timer Photography, the film will not be wound on. |
| Auto Bracketing Exposure Mode + Self-timer Mode |
Self-timer Photography with Auto Bracketing Exposure Photography (3 continuous frames) |
| Continuous Shooting Mode + Self-timer Mode + Auto Bracketing Exposure Mode |
Self-timer Photography with Auto Bracketing Exposure Photography (3 continuous frames) |
| Continuous Shooting Mode + Self-timer Mode + Multi Exposure Mode |
After one frame is taken with the Self-timer, the film will not wind on. (Continuous Shooting Mode will not function.) |
Other Combinations
| Combination | Function when modes are combined |
| Exposure Compensation + Manual Photography Mode |
You cannot combine these modes. |
| Auto Bracketing Exposure Mode + Flash Photography |
The Auto Bracketing Exposure Mode will not function. |
40. FLASH MODES
The following Modes can be achieved using the Built-in Flash.
1. Program Auto Flash Mode
This mode is normally used when shooting. By just opening the Built-in Flash, the shutter speed and aperture will automatically be set. The aperture setting can be changed with the Program Shift Mode.
2. Daylight Synchro Mode
Even in daylight, the flash can be used to automatically create a good balance between natural light and flash light. The flash light ratio is 1:4.
Red-eye Reduction Mode
The pre-flash of this mode makes it possible to minimize the red-eye effect of the subject that sometimes occurs when using flash photography in dark places.
4. Slow Synchro Mode (Shutter Priority Flash Mode)
The background in a photo often comes out dark because of the distance limit of the flash light. By setting a slow shutter speed you can create a good balance between the subject and the background with flash photography.
5. Aperture Priority Auto Flash Mode
For flash photography with a good depth-of field (portraits etc.) you can freely select the aperture setting. The shutter speed will be automatically set. However, if a small aperture is set, the flash light distance will be reduced.
6. Flash Compensation Mode
The amount of light emitted by the flash can be regulated or normal photography or special effects. It car be adjusted up to REV.
Major Specifications of the Built-in Flash
TTL Flash System
G. No. 11 (ISO 100/m)
Distance Range
At F2.8 Approx. 4m /lS0 100
Image Angle Coverage
28 mm
However, the flash light may cause vignetting around the edges of the picture,
depending on the size and length of the lens, and when the shooting distance is
short.
The border of the image may become dark depending on the characteristics
of the lens and the aperture value.
Uses the TTL (Through The Lens) Flash System
With the sensor of the Built-in Flash, the light reflected from the subject is measured and the light emitted from the flash is controlled.
Uses the Advanced Thyristor Flash System (IGBT)
When the distance to the subject is short, only a small amount of flash light is emitted, making the recharging time short.
The value of the aperture automatically changes depending on the film speed.
However, if the maximum aperture (F) value of the lens is darker than the set F value, it will be set to this value.
ISO 100: F2.8
ISO 200: F4.0
ISO 400: F5.6
ISO 800: F8.0
The highest shutter speed in flash photography is 1/100 seconds.
If the Shutter speed is set above 1/100 ( 1/125 sec., 1/500 sec. for example), the shutter will automatically be released at 1/100 seconds.
Flash Marks
[lightning bolt] :On: Charged
[lightning bolt] :Quick flashing: Correct Strobe Exposure
[lightning bolt]: Slow flashing: Indicates that the flashes are charged, when
using both the Built-in
Flash and an external flash.
[Sun + lightning bolt] : Synchro Mark Lights during daylight synchro and slow
synchro.
| Film speed | ISO 25 | ISO 200 | ISO 400 |
| F2.0 | 2.3 - 12 FT | 4.6 - 25 FT | 6.6 - 36 FT |
| F2.8 | 1.6 - 6.6 FT | 3.3 - 18 FT | 4.6 - 25 FT |
| F4.0 | 1.6 - 4.6 FT | 2.3 - 12 FT | 3.3 - 18 FT |
| F5.6 | 1.6 - 3.3 FT | 1.6 - 9.2 FT | 2.3 - 12.8 |
| F8.0 | 1.6 - 2.3 FT | 1.6 - 6.6 FT | 1.6 - 9.2 FT |
| F11 | 1.6 FT | 1.6 - 4.6 FT | 1.6 - 6.6 |
| F16 | 1.6 - 3.3 FT | 1.6 - 4.6 FT | |
| F22 | 1.6 - 2.3 FT | 1.6 - 3.3 FT |
* Daylight Synchro
with long distance, it becomes 2x normal flash photography.
Working out the flash distance range (Long distance flash range)
Flash distance range (m)=Guide Number (G. No.)* DIVIDED BY Aperture (F)
* With ISO 100, G. No. =11
1. Program Auto Flash Mode
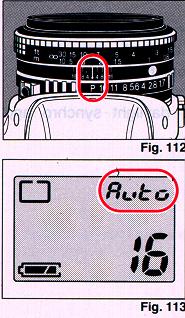 |
This mode is used in normal shooting. 1. Set the camera and lens to the Program AE Mode (Fig.112, 113) |
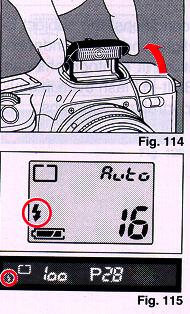 |
2. Open the Built-in Flash by pulling upwards on the sides of the flash.
(Fig. 114) 3. Check to see if the displays in the LCD Panel and inside the viewfinder are displayed. (Fig. 115) * The display inside the viewfinder shows the shutter speed (set at 1/100 sec.) as well as the aperture value.
|
* If the flash mark does not blink, change the shooting condition (make the distance shorter, change the aperture value with the Dial) before shooting.
* The distance range of the flash will vary depending on the film speed and the aperture setting. See the table on page 48. (4m for ISO 100 film with aperture set at F2.8)
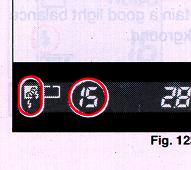
6. The flash mark ( d' ) will not appear when the flash is charging. When repeating flash photography, make sure the flash mark is lit to show that the flash has fully charged. (Fig. 116)
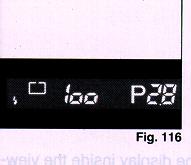 |
6. The flash mark ( d' ) will not appear when the flash is charging. When repeating flash photography, make sure the flash mark is lit to show that the flash has fully charged. (Fig. 116) |
* A slow shutter speed is often set and the camera may shake.
* With the program shift, you can freely set the aperture value by turning the Dial.
* When the flash is used in bright light conditions, [SUN and lightning bolt]
will appear in the viewfinder to indicate that it has automatically been set
to the Daylight Synchro Mode or the Slow Synchro Mode. In this case, to obtain
a good light balance, the aperture may automatically be set to a smaller aperture.
 |
When taking pictures in backlit conditions, the subject is affected by strong background light and dark (underexposed) subjects may result. Natural lit photographs can easily be obtained by using the Built-in Flash even in daylight. This mode also enhances portrait photographs. |
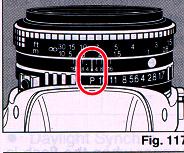 |
1. Make sure the shooting mode is set
to Program AK. (Fig. 117, 118)
2. Open the Built-in Flash.
|
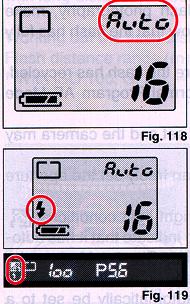 |
3. Make sure the LCD Panel, the display
inside the viewfinder, the daylight synchro mark (SUN and lightning bolt)
as well as the aperture and shutter speed displays are showing. (Fig. 119)
4. Release the shutter
|
 |
5. To shoot again, make sure the Load (lightning bolt) mark is on before releasing the shutter. (Fig. 120) |
* The aperture will automatically be set according to the amount of light. If the conditions are bright, the aperture setting will be small (large number) and the distance range of the flash will consequently be short. (See the table on P.48)
* When an ISO 100 film is loaded and the aperture is set at F5.6, the distance range of the flash is 4m. This may vary depending on the type of film, the aperture value and the lightning conditions. Refer to the chart (table/ graph) on P.48.
* When an external flash is installed and used with the Daylight Synchro Mode, the light emitted will be half of that emitted in normal flash photography.
* When shooting evening or dark images, or when the aperture is set to a small aperture, the daylight Synchro flash will not be effective and normal flash photography will occur, producing a dark background. In this case, the daylight Synchro mark (AS) will disappear.
* When you wish to shoot a well lit background, set the shutter speed to a slow setting and change the mode to the Slow Synchro Mode.
4. Slow Synchro Mode (Shutter Priority Flash Mode)
In normal flash photography the background comes out dark. This mode allows you
to obtain a good light balance between the subject and the background.
 |
If you set the shutter speed to a seeing below 1/90 sec. (1/2 sec. for example), the actual shutter speed will automatically be set by the camera to a seeing between 1/2 sec. to 1/100 sec. depending on the brightness of the subject and the background. The shutter will be released at this speed when the picture is taken. |
 |
We recommend you use this mode when shooting indoors and evening or night scenes. |
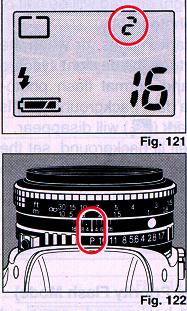 |
1. Set the shutter speed to a seeing
under 1/90 sec. (Fig. 121) 2. Set the lens aperture on "P". (Fig. 122) |
 |
3. Check the actual shutter speed in
the display inside the viewfinder. (Fig. 123) 4. Release the shutter. * If the shutter speed is set to "bulb", the flash will fire during the bulb shooting.
|
You can freely set the aperture value and shoot with the flash.
2. Open the Built-in Flash.
4. Release the shutter.
* If a small aperture value is set, the flash distance
will decrease. (Refer to the table on P.48.)
Refer to page 43.
41. OTHER FLASH UNITES
Basic operations are the same as for the Built-in Flash. Refer to each mode for operating the Built-in Flash. Refer to the instruction manual of other flash units.
1. Take note of the following when using Ricoh flash units (SL-303P) set to non-TTL automatic flash mode.
* The camera's aperture will not be automatically set. Be sure to change the Program AE Mode to Aperture Priority Mode or Manual Mode, and set the aperture value according to the specified flash value.
* The blinking correct auto flash indicator mark (lightning bolt) only functions with the TTL. Even if the mark flashes, it is not relevant here.
2. Note the following points when performing flash photography with the Ricoh SL 323 or other grip type with flash synchro terminal.
* The shutter speed and aperture value will not be automatically set because there is no special signal contact for the flash. Therefore, set the shutter speed and aperture value as explained in the instruction manual before using.
* Do not use the synchro terminal together with the Hot Shoe.
3. Do not use another maker's signal pin on the flash as this can cause trouble with the exposure, or damage the circuits of the camera.
* When using any other flash than a Ricoh product and inserting it into the hot shoe, please do not touch the synchro contact. If you touch the synchro contact, you may be subjected to a shock.
42. COMBINING THE BUILT-IN FLASH AND THE RICOH TTL FLASH
Note the following points when using the Built-in Flash and an external flash.
2. When the Red-eye Reduction Mode is set, the Built-in Flash will pre-flash followed by the flash of the external flash. When the flash range is not sufficient with just the external flash, the flashing mark (lightning bolt ) will not appear and the Built-in Flash will flash with the external flash. However in this case, it is necessary to set the shutter speed from "Auto" to Manual (shutter Priority Mode, Manual Exposure Mode) and set the value to less that 1/50 sec.
3. The flash mark (lightning bolt ) will flash inside the viewfinder when the Built-in Flash and the external flash are charged. (It will be lit when only one of the flashes is charged.
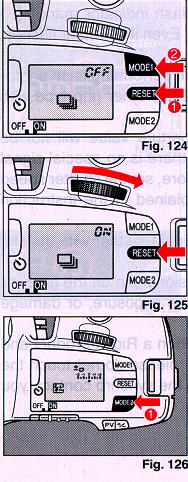 |
It is possible to change the initial settings of the Reset Button. These
can be set according to your needs. 1. Press and hold down the Reset Button. Then press the appropriate Mode
Button of the mode to be set. (Fig. 124)
3. Release the Reset Button
|
44. CHANGING THE FUNCTION OF THE PREVIEW/EXPOSURE COMPENSATION BUTTON
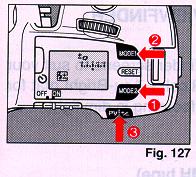 |
The Preview/Compensation Button can also be used to instantly recall the mode you most frequently use.
1. Press the appropriate Mode Button to display the mode to be set.
Do not release the Mode Button. (Fig. 126)
2. While keeping the Mode Button pressed, press and hold down the other Mode Button, and then the Preview/ Exposure Compensation Button. (Fig. 127)
|
Shooting with an Infrared film
Always re-adjust your focus to the infrared focusing mark when using infrared
films and infrared filters. This is necessary because the infrared rays have longer
wave lengths than the visible light rays you see and focus with, and the camera
lens focuses them slightly further back inside the camera. Therefore visual focusing
cannot be accurate without some compensation.
(As of 2020 there is still B&W
film being made. But much easier to user an IR Digital Camera.
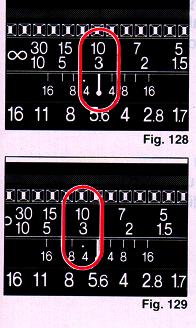 |
1. Attach the infrared filter and focus on the subject. Read the indicated
distance off the lens barrel.
(Fig. 1 28)
2. Shift that distance setting over to the red infrared index mark.
Set the exposure in accordance with the operating instructions for the
film. (Fig. 129)
|
The viewfinder eyepiece has a built-in -1 correction (suitable for most normal vision).
If a dioptric lens is fitted, you do not have to wear eyeglasses when taking pictures. Slip the lens in the groove in the finder eyepiece.
Dioptric lenses are available in 7 types:
-4, - 3, - 2, - 1, +1, +2 and +3 (Diopters)
Ricoh offers a choice of 3 viewfinder screens to suit your needs or taste. Each features Ricoh's Acu-Bright mat for optimum brightness and easier focusing in dim light.
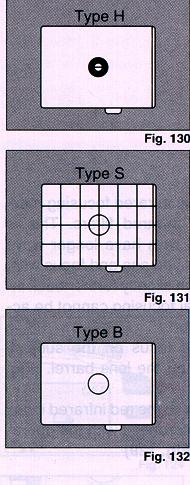 |
Horizontal split type screen (MH type) Lined matte type screen (MS type) All Matte type screen (MB type) |
48. RELEASE SWITCH
By using the separately sold Release Switch, the shutter can be released from a distance.
1. Turn the Main Switch OFF.2. Connect the Release Switch to the Release Socket of the camera.
3. Turn the Main Switch ON.
4. Press the Release Switch to shoot.
49. CARE OF BATTERIES
2. The capacity of the batteries depends on the brand and type of batteries.
3. Before installing, be sure to clean all moisture and skin oil off all battery contact surfaces in order to avoid future problems of corrosion and poor electrical contact. Remove batteries when the camera is not used for a long period of time.
4. Removal of the battery case may result in a loss of camera memory. The film may also advance two or three frames when the batteries are replaced.
CARE OF FILM
* Use up a loaded film as quickly as possible and have it developed as soon
as it is removed. Leaving a film loaded inside the camera for a long time will
deteriorate the color etc.
Nomenclature of the date imprinting feature (Fig. 133)
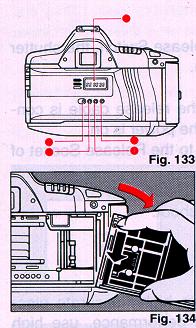 |
(1) Display Panel (2) Mode Selector Button (3) Year/Hour Adjust Button (4) Month Adjust Button (5) Day/Minute Adjust Button
|
Attaching the Data Back 3
 |
( 1 ) Open the Back Cover and push down
the release pin on the back cover. The cover will come off. (Fig. 134)
(2) Attach the Data Back 3 to the camera while pushing down the release
pin on the Data Back 3.
|
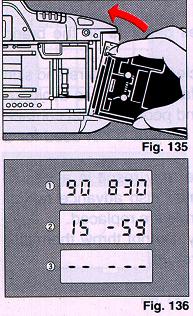
Imprinting Mode (Fig. 136)
Examples of date imprinting
1) August 30, 1990
2) 15:59 (Time)
3) No imprinting
The date imprinting
mode can be divided into 3 types; year/month/day, hour/minute, and no imprinting
Selecting imprinting mode (Fig. 137)
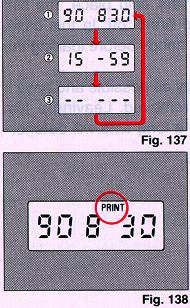 |
Each time the Mode Selector Button is pressed, the display changes as shown below. 1) Date (Year/month/day) 2) Time (Hour/minute) 3) No imprinting |
Checking imprinting (Fig. 138)
After shooting, the word "PRINT"
appears in the Display Panel to confirm correct imprinting.
"PRINT" is
not imprinted on the picture.
Resetting the date and time
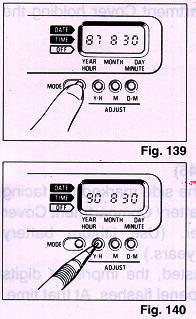 |
(1 ) Press the Mode Selector Button
to show the mode to be changed. (Fig. 139)
(2) Press each Adjust Button until the desired digit is displayed. Digits can be changed fast by keeping the button pressed. (Fig. 140)
|
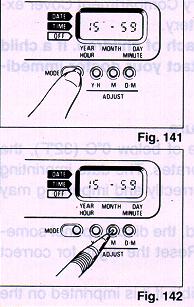 |
(1 ) Press the Mode Selector Button
for Time display mode. (Fig. 141)
(2) Press the Month Adjust Button according to the radio or telephone time signal. The time count starts from 0 seconds, and the minutes will not change when it is 0 to 29 seconds. At 30 to 59 seconds the minutes will move up. (Fig. 142) * It is recommended that the minute digits be adjusted after adjusting the seconds digits.
|
Battery Replacement
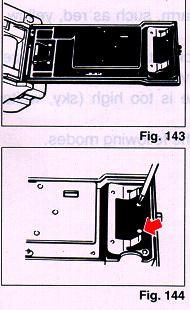 |
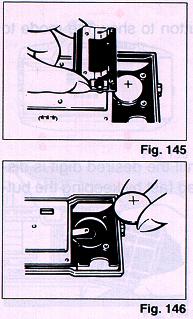
(1 ) Open the Back Cover. (Fig. 143)
(2) Remove the screws from the Date Battery Compartment Cover with a small (+) screwdriver. (Fig. 144) (3) Remove the Battery Compartment Cover holding the roller section. (4) Remove the battery. (Fig. 146) (5) Load the new battery with the side marked (+) facing upwards. Then,
close the Battery Compartment
|
 |
* When the battery is exhausted, the
imprinted digits become faint or the display panel flashes. At that time,
replace the bakery.
* Do not open the Date Battery Compartment Cover except when replacing the battery. * Keep the battery out of reach of children. If a child swallows the battery, contact your doctor immediately.
|
Notes on date imprinting feature
* When the battery is replaced, the display panel sometimes shows wrong digits. Reset the digits for correct indication.
* The date is sometimes illegible if it is imprinted on the following objects.
(1 ) Objects whose color is warm, such as red, yellow, orange, etc.
(2) Objects whose composition is the same as the size of the imprinted date (gravel, dense leaves, etc.)
(3) 0bjects whose luminance is too high (sky, white wall, etc.)
* Imprinting is not possible in the following modes.
(1 ) Print off mode.
2. Excessive shock, humidity or salt may cause camera malfunction. When you use the camera at the beach, in a corrosive atmosphere, or in a place where chemicals are used, carefully wipe it clean.
3. Do not expose camera and film to extreme temperature.
4. Do not leave your camera in a car at the beach, in the desert, or in other high temperature conditions to prevent possible damage.
5. When using a tripod, do not try to force a long screw into the socket. (The screw length should not extend more than 5.7 mm (1/4~).)
6. Store camera in a humidity and dust free place.
7. This camera is not waterproof. If it comes into contact with any kind of liquid (water, rain, drink etc.), the electrical and metal parts will rust and cause damage to the camera. Contact a Ricoh camera service center if your camera has been exposed to any liquid.
Type:
35mm programmed SLR camera with focal plane shutter,
Automatic exposure and Manual exposure control
Mount:
Ricoh system R-K mount
Shutter:
Electrically controlled, vertically moving focal
plane shutter;
Automatic - 1/3000 sec.- 32 sec.
Manual - 1/2000 sec.- 16 sec.,
Bulb
Exposure. Coupling rang.
EV 0-18 (ISO 100 with standard F1.4
lens)
Photographic modes
Programmed automatic exposure mode with
program shift Aperture-priority automatic exposure mode Shutter priority automatic
exposure mode Manual exposure mode
Self-timer:
Electronically operated 10 sec. delay with LED
indicator
Viewfinder:
Field of view 91% horizontally and vertically
Magnification 0.80X (with 50mm standard lens)
Exp. metering system
Two selectable TTL full open metering
systems
Flash modes:
Fully Automatic TTL metering with built-in flash and speed light 403P, 303P 1. Program flash AE2. Aperture priority flash AE
3. shutter Priority flash (Slow Sync. Flash) AE
4. Manual flash
(Red Eye Reduction, Flash Compensation)
(Automatic fill
flash with 1:4 ratio, 1:2 with external flash)
Synchro speed:
1/100 sec.
Exp. compensation:
+4 EV
Flash Contact:
Hot shoe and synchro terminal
Film loading:
Ricoh Auto-load system, automatic 1st frame
setting
Film advance:
Automatic with a built-in motor, two selectable
modes;
S (single) and C (continuous, approx. 2 frames/sec)
Film rewind:
Automatic rewind at the end of film, manual
rewind possible,
Film leader can be left unretracted
ISO seeing:
ISO 25 - 5000/DX 12-6400 Manual (Manual override
possible)
Program preview button
Electronic program preview button
Remote control:
Remote control socket
Automatic Bracket Mod
+/- 0.5 EV -14 EV adjustable
Back cover:
Removal (Databack 3 for date imprinting)
LCD display:
Exposure counter, ISO, Red Eye Reduction Mark,
Flash compensation mark, Battery indicator, Exposure compensation mark, Multi-exposure
mark, +2 EV Value indicator, Continuous shooting mark, Shutter speed, Spot/Average
metering mark,
Creative mode button 1
1) Auto/Manual Shutter
2) Spot/Average metering
3) Discontinuous shooting
4) Red eye reduction
5) Multi-Exposure
6) Preview/Exposure Comp.
Creative mode button 2
1) Manual ISO setting
2) exposure compensation
3) Flash compensation
4) Auto bracket exp.
Reset button:
Reset to initial mode setting
Power source:
Four alkaline batteries
Dimensions:
Approx. 151 x 107.5 x 62 mm/5.9 X 4.2 X 2.4 inches (WxHxD)
Mass/Weight:
Approx. 550 grs/19.4 oz.