ROAMER I and ROAMER II
posted 7-12-'03
This camera manual library is for reference
and historical
purposes, all rights reserved.
This page is copyright©
by

.
M. Butkus, NJ.
This page may not be sold or distributed without
the expressed
permission of the producer.
I have no connection with any camera company.
On-line camera manual library
Back to main on-line
manual page
If you find this manual useful,
how about a donation of $3 to:
M. Butkus, 29 Lake Ave.,
High Bridge, NJ 08829-1701
and send your e-mail address
so I can thank you.
Most other places would charge
you $7.50 for a electronic copy
or $18.00 for a hard to read Xerox copy.
This will help me to continue to host this site,
buy new manuals, and pay their shipping costs.
It'll make you feel better, won't it ?
If you use Pay Pal, use the link below.
Use the above address
for a check, M.O. or cash.
Click here for a Roamer I and II PDF
made from this file
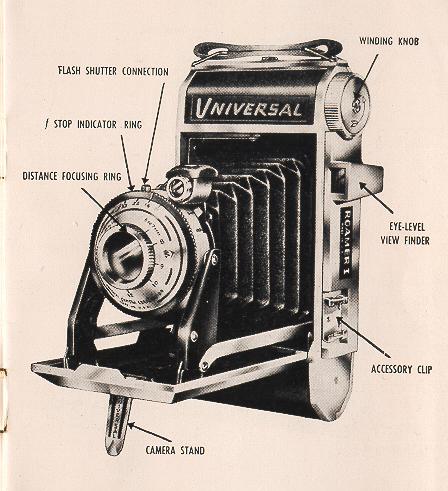
The ROAMER Cameras
 |
The universal requirements of the vast picture. taking
public are reflected in the design of both the Roamer I and Roamer II
folding cameras.
The versatility of these folding c cameras makes them ideal for the
photo fan who requires a highly effective camera, yet one which is easy to
carry and easy to use. Our Design Engineers have developed these precision
picture-taking instruments, which require only a minimum of adjustment on
the part of the camera user. The exacting construction, and the many
built-in features make these Roamer cameras outstanding recorders of
family, friends, and other "kept-for life" events.
It was with the realization that photography has long been graduated from
a "pastime", and is now a necessity, that the Roamer I and Roamer
II cameras were developed.
It is advisable to practice with empty camera, after you have read the
instructions outlined ill this manual.
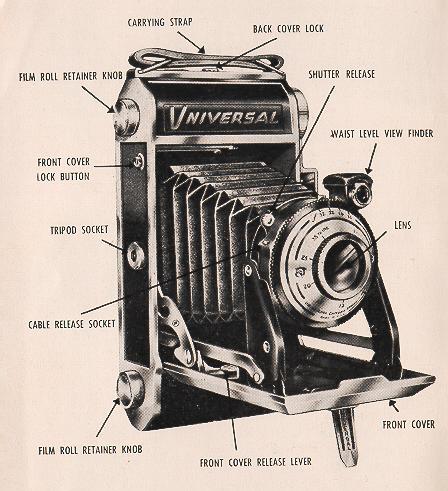
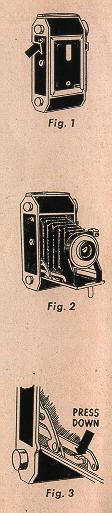
OPENING
Press button (fig. 1), and pull down the front until it locks into
position, as indicated in (fig. 2). The camera is now open for picture
taking
TO CLOSE
Before closing the Roamer I, or Roamer II, make certain that the
distance focusing ring is turned back to infinity position and that the
waist-lever view finder is in vertical position.
Then, press down the release lever (fig. 3 ) and close the front.
|
· DISTANCE FOCUSING
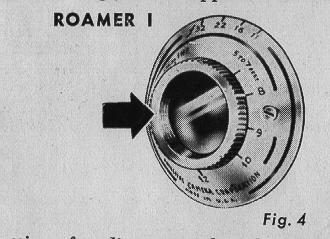 |
To set the lens for the distance between the camera and subject to be
photographed, rotate the knurled focusing ring (figs. 4 and 5) until the
distance required is opposite the distance marker.
|
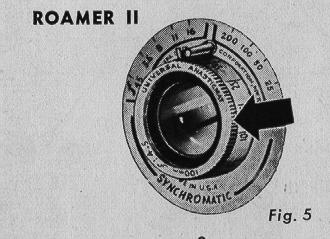 |
Settings for distances other than those indicated on the
focusing scale can be made by approximating the distance setting desired. |
· LENS OPENING
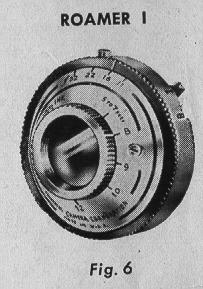 |
ROAMER I
The Roamer I has an Achromat (color corrected) coated lens.
To set the diaphragm opening through which the light passes when the shutter
opens for the exposure, rotate the f stop indicator ring. (fig. 6 shows setting
at fl6.)
Each stop opening, from f32 to F11 permits twice as much light to reach the
film as the preceding stop. |
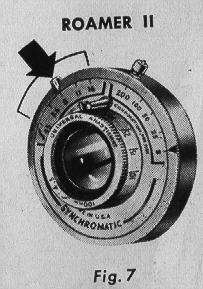 |
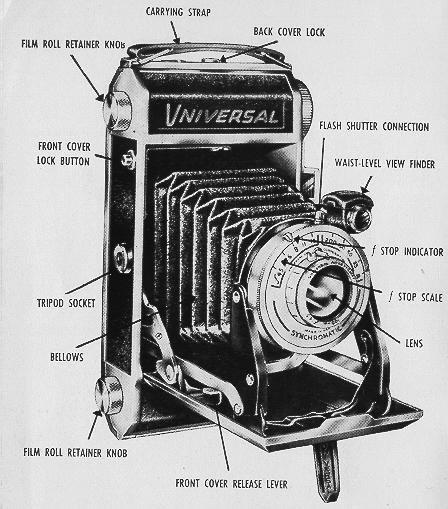
ROAMER II
The Roamer II has an f4.5 anastigmat, color corrected, coated lens. The f
stop marks are indicated on the top of the lens mount. The f stop indicator can
be moved in either direction for the desired aperture. Figure 7 shows the lens
set at f8.
To use f stops not marked on the scale of the Roamer I or Roamer II, set the
indicator between the two nearest numbers.
|
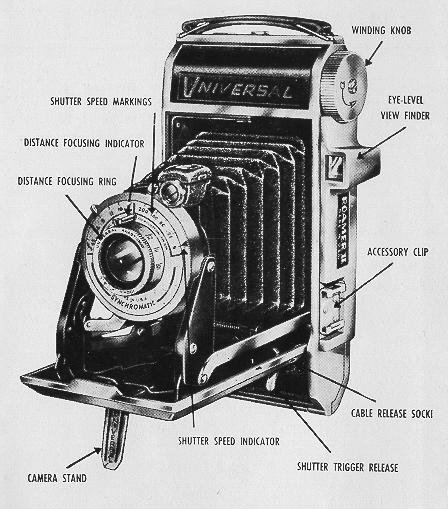
· SPEED ADJUSTMENT
 |
ROAMER I
There are two positions on the Roamer I shutter, "Instantaneous" for
snapshots, and "Bulb" for long exposures. For all ordinary pictures keep the
speed indicator on "I" (fig. 8 ) . For time exposures move the timing lever to
"B" (fig. 9 ) . It is recommended that a cable release and a tripod or other
firm support be used for "B" exposures.
ROAMER II
Shutter speed markings are indicated on the front of the lens mounting
for convenient, time saving adjustments. Turn the shutter speed ring until
the indicator is opposite the desired speed. The Roamer II scale is marked
for speeds from 1/25 to 1/200th of a second, "B". Figure 10 shows the
shutter set at "B".
In using Bulb, the camera should be placed on a tripod or other firm sup
port. Use of a cable release is recommended.
|
· THE VIEW FINDERS
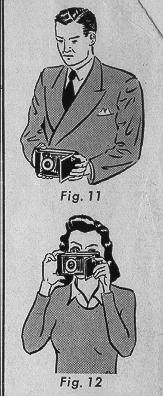 |
WAIST-LEVEL VIEW-FINDER
This viewfinder enables you to take full length pictures of
subjects without stooping. To take horizontal pictures with this finder, simply
turn the camera and finder to the side (fig. 11).
EYE-LEVEL TELESCOPIC VIEWFINDER
This finder is ideal for action and candid shots. Hold the camera
firmly at eye level and frame the subject in the viewfinder window (fig.
12).
|
· RELEASE
 |
ROAMER I - The Roamer I is equipped with an
automatic self winding shutter. It is important that the camera be held
steady during exposure, otherwise a blurred picture will result. Press down
the shutter release, slowly and smoothly. The release will return to its
original position as you remove your finger--the picture is taken on the
first down stroke.
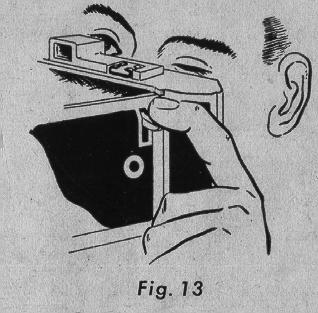
ROAMER II - The Roamer II is equipped with a unique
trigger shutter release. When using the eyelevel finder, hold the camera
steady and push the trigger release smoothly downward with the index
finger of the left hand (fig. 13). To trip the shutter trigger when using |
the waist level view-finder, it is most convenient to use the index finger of
the right hand.
For horizontal pictures, using the waist level viewfinder, is advisable to
use the thumb of the left hand. A few moments practice with this shutter trigger
and you will soon discover the full advantage of this release.
When taking Bulb pictures, make certain that the camera is held steady on a
tripod or other solid support. Locate the subject in the viewfinder. Press
the shutter lever to open the shutter. Hold for the required length of time, and
then release. The picture is now taken, and the film should be advanced for the
next exposure.
· LOADING
 |
Both the Roamer I and Roamer II are especially designed to use either 120 or
620 size film.
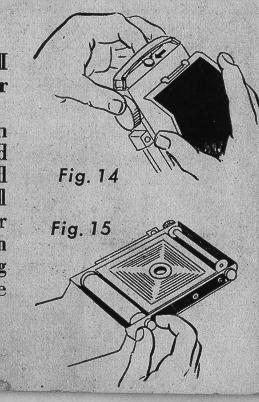
To load, push button sideways, in direction of the arrow (fig. 14), and open
the back. Pull out the film roll retaining knob, and place the full roll of film
in the lower film chamber (fig. 15). Put the take up spool in the upper c
chamber The retaining knobs will automatically center the film rolls.
Now break the seal on the film roll and pull the end of the paper across to
the empty spool. Thread the end of the paper through the longer slot in the
take-up spool as far as it will go (fig. 16). Turn the winding knob two or three
turns in the direction of the arrow, and then close the back cover. |
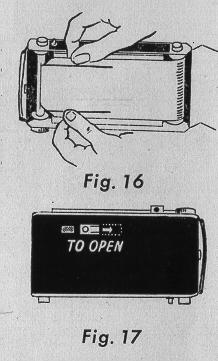 |
Push up the safety film window guard (fig. 17), and turn the
winding knob until the figure "1" appears in the window. The film is now
ready for the first exposure. After each exposure, turn the wind knob until
the next number appears in the window.
It is advisable to slide open the film window guard only when advancing
film. |
· UNLOADING
After the 8th exposure has been made, turn the winding knob until the end of the
protective paper is completely wound onto the take up spool. Now, as you did in
the loading operation, open the back of the camera. Do not pull the end
of the paper to tighten the film roll--this may scratch the film. Pull out the
film roll retaining knob, and remove the exposed roll of film. Moisten the
gummed sticker and seal the roll. The film is now ready to be developed.
PHOTOFLASH UNIT
 |
The Roamer I and Roamer II have built in flash
synchronization. For taking flash pictures, an accessory flash cable and
flash unit must be slid into the synchronizing clip. The camera synchronizer
in
camera synchronizer Insures perfect t timing between the opening of the
shutter and the flash of the bulb.
Follow the instructions that accompany each Roamer Cable l lash, and Mercury
Photoflash Unit, for setting up, and battery and bulb loading. Do not use the
exposure data in the Mercury Photoflash Instruction Sheet, however, as it does
not apply to either the Roamer I or Roamer II. See pages 18 and 19 for all flash
bulb exposure data which applies to these folding camera. |
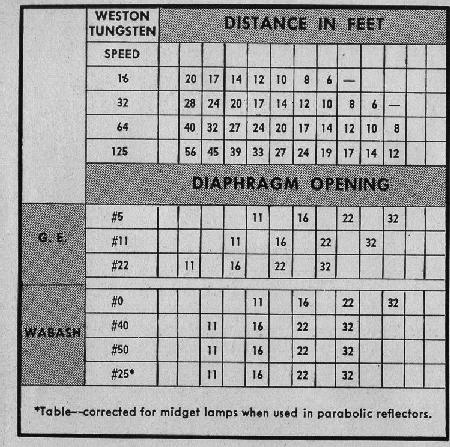
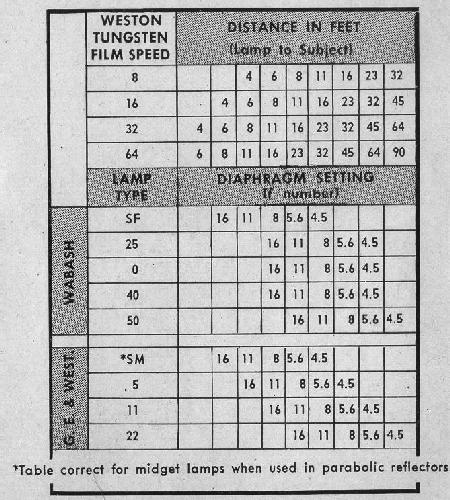
To determine the proper distance and lens setting for photoflash exposure
with the Roamer I and Roamer II:
1. Locate the speed rating of the film you are using under the column
marked Tungsten Weston.
2. Read across until you reach the distance in feet between camera and
subject to be photographed.
3. In the lower section of the exposure chart find the G. E. or
Wabash bulb number you are using.
4. Read across the flash bulb line you have located. The point at
which the distance column and the flash bulb line meet is the diaphragm opening
to be used.
For example, with the ROAMER I, if the Tungsten Weston film speed you are using
is 32, the distance from the camera to subject is 10 feet, and the bulb being
used is a G. E. #22, then the diaphragm should be set at f32.
An example with the ROAMER II: If the Tungsten Weston film speed you are using
is 32, the distance from the camera to subject is 16 feet, and the bulb being
used is a G. E. #11, then the diaphragm should be set at F11.
If there is no diaphragm number listed at the point where your readings meet,
the distance between camera and subject must be altered.
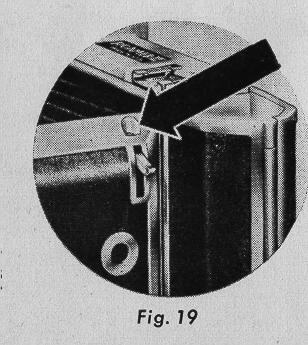
· CABLE RELEASE
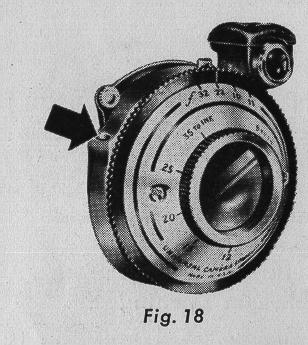 |
The location of the Roamer I cable release connection is shown in figure 18,
and the Roamer II cable release connection is shown in figure 19.
Two of the many cable release types for the Roamer cameras are:
Leitz cable release
Ellen cable release (with solid end)
Consult your local photographic dealer--he has a complete selection of cable
releases. |
· TRIPOD SOCKETS
Both the Roamer I and Roamer II are equipped with two tripod
sockets for convenient picture taking in horizontal or vertical position.
PHOTOFLASH UNIT
With the photoflash unit and flash cable adapter you can get those
"impossible" pictures, day or night, indoors or outdoors.
UNIVERSAL ROAMER FLASH CABLE ADAPTER
This compact flash cable adapter together with the Photoflash Unit
keeps your Roamer camera active day or night, indoors or outdoors.