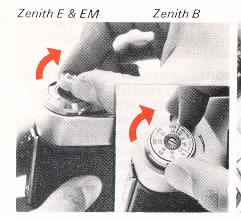
Zenith EMAKA - Revueflex EM
The Zenith EM was also sold by
Kalimar as the SR300,
and badged as the
Cosmorex
SE.
It was available in both black and chrome finish.
It was also sold as the Revueflex EM
This camera manual library is for reference
and historical purposes, all rights reserved.
This page is copyright© by  ,
M. Butkus, NJ.
,
M. Butkus, NJ.
This page may not be sold or distributed without
the expressed permission of the producer.
I have no connection with any camera company.
On-line camera manual library
If you find this manual useful,
how about a donation of
$3 to:
M. Butkus, 29 Lake Ave.,
High Bridge, NJ 08829-1701
Most other places would charge
you $7.50 for a electronic copy
or $18.00 for a hard to read Xerox copy.
This will help me to continue to host this site,
buy new manuals, and pay their shipping costs.
It'll make you feel better, won't it ?
If you use Pay Pal, use the link below.
Use the above address for a check, M.O. or cash.
Back to main camera
manual page
CLICK HERE FOR Zenth EM PDF MADE
DIRECTLY FROM MANUAL
- English -
CLICK
HERE FOR Zenth EM PDF VERSION
FROM MANUAL BELOW
Zenth EM in Word format
Zent-EM gebruiksaanwijzing
Zenit-E gebruiksaanwijzing

This handbook is primarily written and illustrated around the latest SLR
camera from the USSR - the Zenith EM. Though this camera boasts many advanced
features over its predecessors, the Zenith E and its earlier meterless version
the Zenith B the basic instructions may be applied equally well to all models.
Where any differences occur between models these have been noted, and inset
illustrations provided, if necessary, in the appropriate section of the book.
Though many hints and tips towards better photography have been included, this
handbook should in no way be thought of as a comprehensive guide to general
photographic techniques. There are numerous useful books of this type
available and if you are just taking your first shaky steps in photography it
would certainly benefit you to consult your local library or bookshop.
Your Zenith camera is sturdily built and will work happily under widely
varying conditions. Do remember, though, that it is a precision-built optical
instrument and should therefore be handled carefully and protected from
violent shocks, damp, dust and sand and sudden changes of temperature. Take
care of your camera and it will give you years of reliable service and
brilliant pictures. The wide range of accessories available, particularly
those from the USSR, which offer outstanding value-for-money, enable you to
cope with almost any photographic situation. You can build up as complete a
system as you need at your own pace.
To get the best possible results from your Zenith study this book
thoroughly to make sure that you are familiar with the essential features
of the camera before you start taking pictures. Refer back to the book any
time there is something you are not sure of. Many operational features of this
camera are unique and probably somewhat different from other cameras you may
have owned. It is therefore strongly recommended that after carefully reading
the instructions you shoot a 'test' roll of film, have this film processed,
and examine the pictures before exposing additional rolls. This test roll will
verify that you are using your new camera correctly and allow you to make any
necessary changes in camera operation. Additionally, it will confirm that all
the camera controls are functioning perfectly.
N.B. A policy of continual product development means that there may be
minor differences in design or specification between your camera and these
instructions.
|
Contents
Specification... P1
Loading your camera ... P3
Picture-taking technique ... P7
Using your camera's built-in meter ... P8
Exposure hints ... P10
Setting camera and lens controls ... P12
Choosing shutter speeds and apertures ... P16
Viewing and focusing ... P18
|
Depth of field ... P20
Taking the picture ... P23
Removing exposed film ... P24
Taking flash pictures ... P26
Using the self-timer ... P29
Changing lenses ... P31
Care of camera and accessories ... P33
Trouble-shooting ... P35
Taking better pictures ... P37
Choosing lenses and accessories ... P40
|
The illustration/description of equipment and accessories
throughout this book - is for information only and should by no means be
considered an offer of sale.
Format
24 X 36mm; using standard 35mm cassettes of 12,20 or 36 exposure. color or
black and white film.
Shutter
Horizontal traveling Focal Plane type, speeded 1 /30,1 /60,1/125,1/250 and
1 /500th second plus B (brief time). Linked to self-timer giving approximately
7 seconds delay.
Flash synchronization
Switch control for bulb & electronic synchronization at 1 /30th sec.through a
standard 3mm co-axial socket.
Viewing/Focusing system
Eye-level pentaprism/instant return mirror shows upright laterally correct
image. Bright Fresnel focusing screen with central ground glass/microprism
spot on Zenith EM. Plain fine ground screen on E & B models.
Exposure meter
Built-in selenium cell with match-needle shutter/aperture read-out. Calibrated
for: Film speeds 25-500 ASA/13-28 D I N. apertures f/2-f/32. shutter speeds 1
/500th sec. to 30 seconds.
Frame counter
Additive 0-36 manual resetting type.
|
Standard Lens
|
Helios 44m (''EM'')
|
Helios 44 (E&B)
|
Industar 50 (E & B)
|
|
Construction
|
6 elements in 4 groups
|
6 elements in 4 groups
|
4 elements in 3 groups
|
|
Focal length
|
58mm
|
58mm
|
50mm
|
|
Diaphragm type
|
Fully automatic instant re-open -optional manual over-ride
|
Manual Pre-set
|
Manual
|
|
Aperture range
|
f/2 - f/16 with click stops at full and half apertures
|
f/2 - f/16 with half apertures click stops at full apertures
|
f/3.5 - f/16 (no click stops) |
|
Distance scale
|
0.55m - infinity
|
0.5m - infinity
|
0.65m Infinity
|
|
Angle of view
|
40 degrees
|
40 degrees
|
45 degrees
|
|
Filter size
|
52mm screw
54mm push-on
|
49mm screw
51mm push on
|
33/35mm screw
36/37 mm push on
|
|
Lens mount
|
'Universal' (42mm) thread accepts standard single pin automatic
lenses and accessories
|
'Universal' (42mm) thread accepts standard non-automatic lenses and
accessories (Some early E & B models fitted with 39mm mount)
|
Loading your camera
Precautions:
(a) Your Zenith camera accepts any standard 35mm cassette, of color or black
and white film.
(b) Always load the film in subdued lighting conditions. If outdoors look
for a shady area or shield the camera from direct sunlight with your body or
coat.
(c) Whenever possible avoid loading in a dusty place or at the seaside
where strong salty wind is blowing.
(d) When loading take care not to touch the shutter blinds.
(e) Make sure Shutter Release has not been set in the 'T (or Time) Lock'
position. (See p. 13).
Procedure
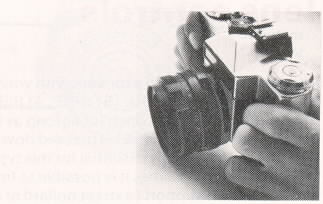
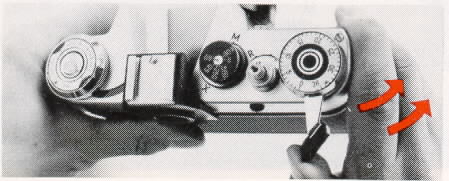
1. Raise the Back Lock-catch [20] and swing the Camera Back [38] open.
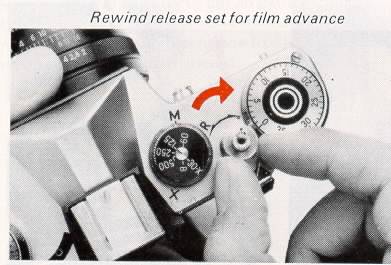
2. Before loading ensure rewind release mechanism has been cleared. With
the EM camera the Rewind Release Ring [3] must be turned :clockwise so that
the three dots are fully lined up. Turn Film Transport Lever [1 ] through a
couple of short strokes till no further movement is possible while holding
back Sprocket wheel [32] lightly with finger. The Sprocket should rotate in
time with the lever action and not free-wheel.

3. Push up the Cassette Retaining Spindle [28] from inside the camera.
Place the cassette into its chamber [ 27] ensuring that the cassette's
projecting end faces down. Push Rewind Knob [22] back to its original position
to hold the cassette in place - you may need to turn it clockwise a little
until it seats properly in the cassette spool.
4. Draw out from the cassette enough film (about 3") to insert the leader
into the Take-up Spool [34].
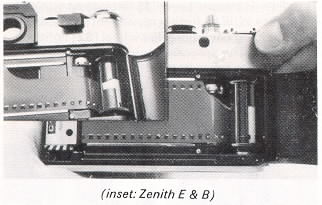
With the EM camera the leader can be inserted into any one of the spool's
slots - with E & B cameras fix the film's leading edge under the Take-up Spool
spring (turn the bottom knurled flange with finger to get this uppermost).
With all models ensure that one perforation hole is caught by the Take-up
Spool tooth, also see that the Sprocket wheel [32] engages in a perforation.
5. Make sure film cassette lies flat, then alternately depress Shutter
Release Button [2] and turn Film Transport Lever [1 ] until perforations on
both sides of film are engaged by the Sprocket Wheel [32]. The film should
also be taut around the Take-up Spool -turn bottom spool-flange with finger
towards cassette position to take up any slackness.
Note - Film is advanced by sprocket drive, so it is most important for
sprockets to engage film perforations properly.
6. Complete film wind, if necessary, to its limit. Press Shutter Release
Button [2] then close the Camera Back [38]. Firm pressure only required on the
Zenith EM as the back has a self-locking catch. With E & B models this catch
[20] must be returned manually to the locking (downward) position.
7. Take up any slackness of film within the cassette (especially important
with shorter than 36 exposure lengths) by slowly turning Rewind Knob [22]
clockwise till slight resistance is felt. On the Zenith B the Rewind Knob is
ready to hand. On the Zenith E & EM cameras, the Rewind Knob is spring-loaded
and recessed within the exposure meter controls.
To bring the knob into rewind position press it down firmly, twisting it
slightly anti -clockwise at the same time - to re - lock the knob press down
fully whilst twisting it clockwise.
8. Move Film Transport Lever (2) through two or more short strokes (letting
it return to the starting position after each stroke) until no further
movement is possible, watching to see if the Film Rewind Knob [22] turns while
doing so. If the Rewind Knob turns it shows that the film is correctly loaded
and moving properly through the camera. If it doesn't turn, and you have taken
up the slack as described in step 7, then the film may not be securely
attached to the Take-up spool or properly engaged by the Sprocket Wheels.
9. Now turn Frame Counter Dial [4] until the number '0' shows against the
Frame Counter Index [33] and press the Shutter Release [2] once more.
If you are not going to take photographs immediately do not wind on the film
at this stage since it is always best to leave the shutter in the fired
position, just in case the camera is put away without being used for some
time.
10. If you are ready to take photographs, wind Film Transport Lever [1]
fully, and your first film frame is in position, as shown by the
Frame Counter Index [33].
Notes:
(a) Always make sure the Transport Lever [1 ] has been fully wound. This is
easiest when you move this lever in two short strokes. When the lever stops
during the second stroke, you are assured that the camera's film, shutter and
frame-counter are all ready for exposure. Failure to wind the Transport Lever
fully may result in a 'blank' exposure.
(b) To maintain accuracy in use, the Frame Counter Dial [4] must be zeroed
only after winding the film/shutter. After this, every time you wind on the
dial will come to rest with the next division opposite the Counter index [33].
The counter tells you how many frames (pictures) you have taken and when it
reaches 12, 20 or 36 (depending on film in use), you will need to rewind the
film into its cassette and put in a new film. Color film especially should not
be left in the camera for long periods and for the
best results should be processed as soon as possible after exposure.
Incidentally do carry a spare film - nothing is more annoying than to run e
out of film just before the best shot turns up
(c) The disc on the rewind knob of Zenith B models is there simply to
remind you of the speed or type of film you are using - it has no effect on
the camera mechanism what so ever. To set the reminder disc hold the rewind
knob, then apply s finger or thumb pressure to the disc and turn it until the
film speed or type lines up with the red mark.
Picture-taking technique
Once the camera is loaded you have to consider three aspects of taking a
picture exposure, focus and composition. The first two of these are purely
technical; the following sections, together with a little experience, will
soon enable you to handle your Zenith with sufficient enough ease to leave you
free to concentrate on the third aspect, composition, which is the artistic
one.
Exposure
Though sometimes thought to be photography's biggest problem, obtaining
correct exposure is not really so difficult thanks to the latitude of modern
day films. There are three governing factors: sensitivity to light of the film
(usually expressed as an ASA speed rating); shutter speed, which controls the
amount of time the image is allowed to affect the film; and the lens aperture,
which controls the brightness of the image falling on the film. There are two
methods of obtaining the total amount of exposure required for a film of
certain sensitivity under certain conditions of lighting. First is by using
the exposure tables supplied with the pack of film you buy -these of course
only hold good under average subject and lighting conditions, but are usually
a quite accurate guide and certainly more than adequate to begin with. A
better and far more accurate method (especially important with color slide
films, as the slide is your final result) is to measure the brightness of a
scene by means of an exposure meter.
The Zenith B owner can probably work quite happily with the first method
but if preferred can always purchase a separate handheld exposure meter (our
own excellent Leningrad 4, for example). For convenience and speed of use,
Zenith EM and E models incorporate a sensitive built-in photoelectric meter
[23] to help obtain correct exposure under widely varying conditions. No
batteries are required since at its heart is a selenium cell that converts
light reflected by your subject into electrical energy which directly
activates the meter needle [15].
Whichever method is chosen it is recommended to use a minimum shutter speed
of 1/1 25th second where possible. (certainly for the majority of outdoor
subjects). This speed is fast enough to prevent most 'blur' due to camera or
subject movement, yet is slow enough to permit picture taking in a wide
variety of lighting conditions with today's sensitive films. If it's necessary
to shoot at 1 /60th or 1 /30th second, hold the camera as steady as possible
-ideally by using a tripod, or by bracing your arms on a nearby table or other
support.
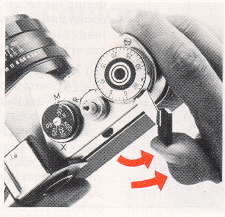
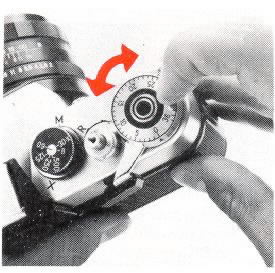
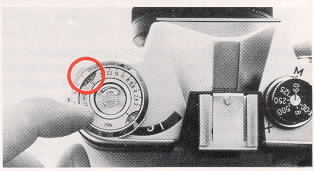
How to use your camera's built-in exposure meter
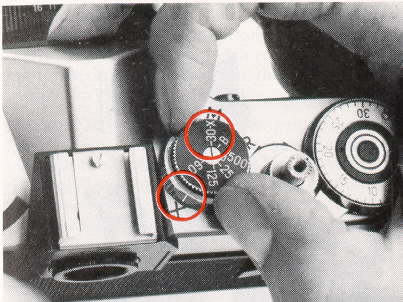
1. Set Film Speed - Beneath the Aperture Indicator Dial
[18] are two scales of figures. One scale marked for films rated at 25, 50,
100, 200, 400 and 500 ASA registers in the ASA speed Indicator Window [17],
and the other marked in DIN ratings of 13,16,19,22,25 and 28 registers in the
DIN speed Indicator Window [16]. Turn the Aperture Indicator Dial until the
speed number for your film shows against the index mark in the appropriate
window. Should your film be rated at an intermediate speed, simply position
the ASA or DIN index mark between the next smaller and larger number (for
example for a 64 or 80 ASA film set the ASA index mark between 50 and 100, for
a 23 DIN film set the DIN index mark between 22 and 25). On some E and EM
camera as there are dots between the marked numbers indicating these
intermediate film speeds, but in any event if you do as described your meter
will operate well within the exposure tolerances (latitude) of most film
types.
2. Aim Exposure Meter [23] at your subject -
see last paragraph on page 10.
(For a practice reading aim the meter at a brightly-lit scene, or, if indoors,
at a nearby lamp - making sure your fingers do not obstruct the meter window).
As you do so you will note the Exposure Meter Needle [15] moves to a certain
position and then stops. Holding your camera in this position you now . . .
3. Match the Needle [15] so that it is centered beneath
the Meter Cursor [14] by turning the Shutter Speed Indicator Dial [19].

4. Your Light Measurement or Reading has now been taken.
Each combination of lens opening (f/number) and shutter speed shown on the
Aperture Indicator Dial [18] and Shutter Speed Indicator Dial [19] will give
the right amount of exposure. For example in the illustration shown, these
scales show that correct exposure will be obtained with a shutter speed of
1/125th of a second and at a lens opening of f/8 era speed of 1 /250th of a
second and a lens opening of f/5.6 etc The combination chosen will of course
depend on the subject to be photographed (see p.16) and the appropriate
shutter speed and aperture should be set on the camera and the lens.

Note: Only the numbers appearing in black on the
Shutter Speed Indicator Dial [19] can actually be set on the camera. The Red
numbers 15, 8, 4 and 2, appearing next to the Black numbers 30-500, represent
fractions of a second. "15" is 1 /15th second, etc. These appear for
information purposes only, say for when using your camera's meter to determine
exposure with cameras lacking a built-in meter. The set of Red numbers 1, 2,
4, 8,15 and 30 which are furthest from the Black numbers 30-500 on this Dial
[19] show exposure time in whole seconds and can be used in certain
circumstances
(see 'Time Exposure', p. 12) when so indicated by the exposure meter
reading (See "In extremely dim light" following).
Helpful hints for better exposure
Remember that your exposure meter measures all the light that reaches its
cell and 'averages out' the brightness or contrast range before giving a
reading. With subjects of average contrast (e.g. scenes lit from the front, or
at an angle from the side, where there are no heavy shadows and dark and
bright areas are fairly balanced) the right amount of exposure is indicated
automatically. However, to obtain the best results with subjects of widely
varying brightness range it is wise to take a few precautions.
* If your main subject is much lighter than the background (e.g. a portrait
of an illuminated face against a darkened doorway, arch or foliage) or, if it
is much darker than the background (e.g. a person, boat or chalet set against
a seascape or mountain scene directly lit by the sun) move right
up to your main subject until it fills the viewfinder, and take a close-up
reading with the exposure meter. Set the appropriate exposure combination
found from this reading on your camera and lens controls before returning to
the original viewpoint to take the picture.
* Take a substitute reading. Sometimes a close-up reading is not possible:
if this is the case aim the exposure meter at an alternative subject of
average contrast under the same lighting (the back of one's hand is a good
example or ideally a sheet of neutral grey card). Again. use an appropriate
combination from this reading on the camera and lens controls. Alternatively,
close the lens aperture by 1 to 2 stops (f/ #'s) as compared with a
straightforward meter reading of the former subject and open up the aperture
by 1 to 2 stops to that indicated for the latter subject - this too will prove
more correct in most circumstances of this nature.
* Always be careful to aim the exposure meter exactly in the direction of
the subject. Inadvertent tilting of the camera, into the sky for example when
taking landscape views, can falsify the reading and in this case lead to
under-exposure. It is best to aim the meter downwards slightly when
taking landscapes and similar outdoor pictures to avoid adverse influence on
the reading from the bright light of the sky.
* Against the light, unless you're purposely striving after a silhouette
effect, with your main subject very deep in shade against full highlight
detail, then you must open the lens aperture by at least one stop to that
indicated by an exposure meter reading.
* If using color slide film, avoid subjects with great brightness
differences. Even a close-up reading of the shadow areas often results in
excessive exposure for the sunlit areas, which then appear too light and burnt
out when the slide is projected. A straightforward average brightness reading
under conditions of uniform frontal or side angled lighting yields slides of
good color saturation which correspond most closely to the natural color
impression.
* In extremely dim lighting, the Exposure Meter Needle [15] may rest near
the right- hand edge of the transparent window. Should this occur, place your
hand close in front of the Exposure Meter Window [23] and watch the needle
carefully. If the needle moves when you block the meter cell the exposure
meter is able to function in the existing light - remove your hand and
determine exposure in the normal way. However, if no needle movement occurs
when you place your hand in front of the meter cell the existing light is
insufficient and the exposure meter cannot be used. In this event, either a
time exposure or use of a flash gun is recommended.
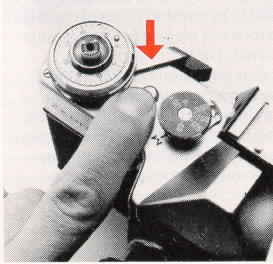
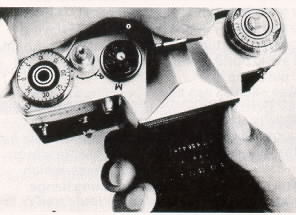
Setting the camera and lens controls
Shutter Speeds
Lift the Shutter Speed Dial [5] and turn it until the required speed aligns
with the index dot in the center of the dial (see p.9). Release the dial,
making sure it drops fully home and is correctly lined up, and the speed will
be set. Shutter speeds may be selected before or after the Film Transport
Lever [1] has been wound. However, the following points must be observed to
avoid mechanical damage: (a) Always lift the Shutter Speed Dial before turning
it to another speed and lower it fully before shooting; (b) Always turn the
Shutter Speed Dial to one of the marked speeds (30. 60, etc. that indicate
fractions of a second, or B. that indicates a hand controlled time exposure) -
NEVER to a position between marked speeds; and finally (c) DO NOT turn the
Shutter Speed Dial the short distance between B and 500.
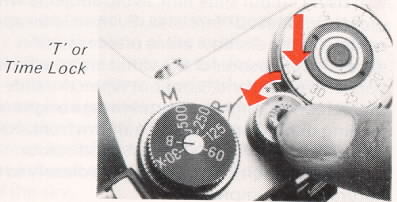
Long Exposure Times (Time Exposures)
Time exposures of one second duration or longer. enable you to take
photographs in lighting conditions that would be too poor for normal
picture-taking, e.g. city streets at night or dimly lit interiors. To take a
time exposure with your Zenith set the Shutter Speed Dial [5] to B'. At this
setting the Shutter will remain open for as long as the Shutter Release Button
[2] is pressed down. A sturdy tripod is really essential for this type of
work, though sometimes it is possible to find an alternative firm support (a
street lamp or church pew, for example). A cable release, preferably the
locking type, is also recommended for extra steadiness. If such a release is
not available the shutter can be kept open for extended periods, via the 'T'
lock, simply by pressing the Release Button [2] down firmly and turning at the
same time in an anti-clockwise direction, (as seen from top of camera) until
it stops.
The shutter will remain open for as long as desired and is closed on
completion of exposure by pressing down the Release Button once more and
returning same, clockwise, to its normal position. To reduce the risk of
vibration it is recommended that a piece of black card (or even one's hat) be
held in front of the lens as the Release Button is pressed and turned -the
lens is then uncovered for the required time (using a stopwatch or slow count)
and then recovered to end the exposure while the Release Button is returned to
its normal position. Obviously this procedure only applies to long exposures
of several seconds.
Note: After using the 'T' or Time lock on the Release
Button always make certain that the Release Button [2] is turned fully
clockwise and with the Zenith EM, that the Rewind Release Ring [3] is still
turned fully clockwise and the three dots are properly aligned. This will
ensure correct operation of shutter and exposure counter in subsequent
pictures.

Your camera's Tripod Bush accepts a standard A," Whitworth screw. When
fitting a tripod or other bush mounted accessory (e.g. flashbar) care should
be taken to see that this is screwed in just finger-tight only (this applies
to the carrying -case retaining-screw also). If there is a safety locking nut
on the accessory, turn the main screw up to three revolutions only, then hold
it in position and lock into place with the safety nut.
Apertures
First the Helios 44M, the standard lens supplied with the Zenith EM camera;
this is designed to be used in Automatic or Manual mode. When the Auto/Manual
Switch [36] is set to 'A', the aperture remains fully open for viewing and
focusing and closes down automatically to a pre-selected f/number value when
the Shutter Release Button [2] is pressed down. When the Auto/Manual Switch
[36] is set to 'M', the aperture closes down immediately to whatever f/number
has been selected on the Aperture Ring [24]. Thereafter apertures are changed
manually by moving the Aperture Ring into any of its click stop' positions.
Normally the lens would be used in Automatic mode, in which case the lens
opening required (f/2, f/2.8, f/4, etc.) is selected b turning Aperture Ring
[24] until that f/number (or position mid-way between marked lens openings, so
indicated by the Exposure Meter Aperture Indicator Dial [18]) aligns with the
red Distance/ Aperture Index Mark [11 ] (see p.9). As soon as pressure is
taken off the Shutter Release Button, the aperture automatically returns to
its wide-open position. For Zenith E & B cameras the standard lenses are the
belies 44 with pre-set aperture mechanism or the lndustar 50 with a purely
manual, non-click stopped mechanism.
Operation is as follows:
Helios 44 - Turn the Diaphragm setting ring (which has
click-stops at full apertures) until the f/number required is set against the
red index dot on the front ring of the lens. Now turn the Pre-set Diaphragm
Ring until its red index dot is also aligned with the dot on the front ring
and the lens is at full aperture for viewing and focusing. After focusing turn
the Pre-set Ring as far as it will go in a clockwise direction (as seen from
top or back of camera) - this closes the lens down to the pre-selected
aperture in readiness for picture taking. With practice you do not even have
to look at the lens after initially setting the aperture required - with the
camera held to the eye, simply turn the Pre-set Ring fully anti-clockwise for
wide aperture viewing and focusing, then turn it fully clockwise after
focusing to take your picture, assured that the aperture will be closed down
to its predetermined setting. You can even change apertures without taking the
camera from your eye; first set the lens to full aperture, then turn Diaphragm
Setting Ring each click to the left selects one larger aperture, each click to
the right selects one smaller aperture. Remember of course to close down to
the newly selected aperture with the Pre-set Ring as previously described.
Industar 50 -Turn the Diaphragm Setting Ring at the front
of the lens until its index dot aligns with the figure 3.5 on the Diaphragm
Scale, viewing and focusing at eye level. You must now take the camera away
from your eye, since the aperture required for picture taking can only be set
after focusing (it is usually too difficult to see or focus clearly when the
lens is closed down, since less light enters the viewfinder).

Choosing shutter speeds and lens openings
As seen from an earlier illustration, your exposure meter indicates various
combinations of shutter speed and aperture that will each produce good results
under given conditions of lighting and film sensitivity. However, you will
often need to select a particular shutter speed or aperture to suit your
subject so how do you choose ? For example, the suggested shutter speed of
1/125th second, while fast enough to stop most normal subject movement (people
walking etc.), would not be enough to freeze the really fast action of
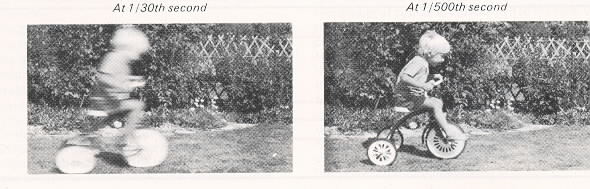
subjects such as children at play, sports events or racing cars- here a speed
of 1 /250th or 1 /500th second would be best.
Again, if taking a landscape type picture, a small aperture of say f/11 or
f/16 would be needed to obtain maximum sharpness (see Depth of Field).
Summarizing then; with moving subjects, choice of shutter speeds is of most
importance, to stop the motion use the fastest speed possible that lighting
conditions will allow; where you need your subject to be sharp over a long
range from foreground to background, then choosing a small lens aperture is
more important. It's worth knowing too the relationship between shutter speed
and aperture settings (especially important if using exposure tables, as these
generally detail changes of aperture according to lighting conditions at a
fixed shutter speed - most commonly our suggested 1/125th second). These
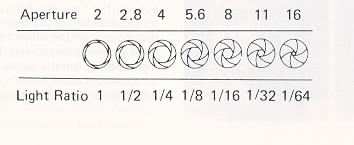
settings are so designed that altering from one figure to another on either
scale, will double or halve the amount of light reaching the film. An aperture
of f/5.6 is wider than, and will transmit twice as much light as, an aperture
of f/8. and at the sometime is smaller than. and will transmit half as much
light as, an aperture of f/4. Likewise a shutter speed of 1/125th second is
slower than, and will transmit twice as much light as, a speed of 1 /250th and
is at the same time faster than, and will transmit half the amount of light
as, a speed of 1 /60th second. Thus if you start from a given combination, say
1/125th at f/8, and you decide that a shutter speed of 1 /250th would be
better for the subject and you want to finish up with the same amount of
exposure, you will need to compensate for the fact that only half the
necessary light is reaching the film by opening the aperture one division to
f/5.6. If you had decided that 1 /500th were the best speed you would need to
open the aperture by two divisions (from f/8 to f/4) since 1/500th is two
divisions up from, or a quarter the speed of, 1/125th second. Remember though
that all combinations of shutter speed and aperture are a compromise. There is
really no 'correct' exposure for any subject. it all depends on the effect you
want.
Viewing and focusing
First make sure your lens is securely attached to the camera by turning it
clockwise until no further movement is possible.
Look through the viewfinder eyepiece [30] and you can feel safe in the
knowledge that there'll be no parallax problems (no more cut-off heads in
close-up portraits and the like) as you are viewing and focusing, by means of
a ground-glass screen,
through the actual lens that takes the finished picture. There's a built-in
safety margin of course, in common with many other modern single lens reflex
cameras, the viewfinder showing an overall area some what smaller than the
total film area. This ensures that everything you see in the viewfinder
appears in the finished picture despite the fact that slide mounts and masks
in printing equipment actually cover part of the film's image.

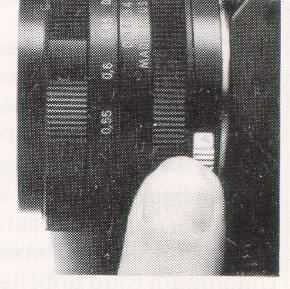
Focusing should always be carried out with the aperture wide open, unless
of course you want to preview 'depth-of-field', so follow the previous
instructions concerning aperture operation for the three standard lenses. With
the camera held to your eye turn the Focusing Ring [12] towards the right for
close distances or towards the left for far distances, until the subject is
sharp and clear on the large ground-glass screen. The Zenith EM camera has in
addition in the center of its screen, two aids for speedier critical focusing,
a microprism spot which is composed of literally hundreds of tiny prisms that
distort and accentuate an out-of-focus image. Simply focus the lens until you
obtain a single undistorted image at the center and you are at the point of
sharpest focus. This microprism works well for the majority of subjects and
conditions but for subjects lacking in contrast or color the fine ground-glass
collar around the central spot is probably more helpful - it's quite handy
when using long telephoto and wide angle lenses too. (Aim your camera at this
instruction book from about 2 feet away and you'll see how these focusing aids
work). You can of course also use the Distance Scale [26] of your lens, which
is calibrated in metros, to set the focus. Generally there's no need to check
distance, it's almost always easier to use the viewfinder; the only time it
becomes necessary is when taking flash pictures (see p. 26) or when 'depth
-of-field' is important.
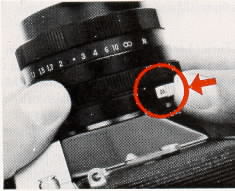
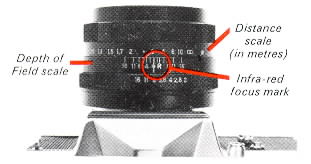
* The Red 'R' just to the right of the Distance Indicator [11] on the
Helios 44M shows the correction required for infra-red films. When using
infra-red films, first focus in the normal manner, and note the indicated
distance. Then move the Focusing Ring [12] so that that distance is now
aligned with the Red 'R'. Remember - this is needed only when using infra-red
films which are sensitive to light rays which focus at a slightly different
plane than ordinary light rays.
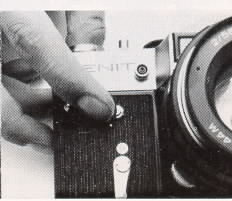
* A 16mm diameter prescription lens can be inserted into the Viewfinder
Eyepiece [30] and held in place by Retaining Ring [31]. Spectacle wearers may
find this helpful for critical work.
On certain E/EM models the detachable Retaining Ring (31) has been replaced by
an optional 'slip-on' holder. If difficulty is experienced in obtaining either
of these accessories we recommend you contact Visual Aids, East Street,
Bromley, Kent, BR1 1QX.
Depth-of-field
All photographic lenses, when focused on a given subject, will show some
objects in front of and behind that subject more or less sharply. This 'range'
of extra sharpness is called 'depth-of-field' and varies with different
lenses; it's greatest with wide-angle lenses, and least with telephoto lenses.
With any lens, you'll find your depth-of-field is always greater (more things
in focus) at small lens apertures such as f/11 or f/16 and lesser (fewer
things in focus) at larger lens apertures such as f/3.5, f/2.8 or f/2. Depth
-of -field is also greater in cases of more distant subjects than it is with
close-up subjects and increases nearly twice as much beyond the subject. your
main point of focus, than it does in front of the subject (towards the
camera).
If your picture is such that you want both nearby and distant objects to be
in sharp focus then generally the smallest possible aperture should be used.
However, the aesthetic quality of a picture can often be improved by having
the principal subject in sharp focus while other objects in the scene are soft
and out-of-focus. Here a larger aperture is necessary to produce the
'differential focus' that de-emphasizes distracting background and/or
foreground detail and thus isolates, and concentrates your viewer's attention
on, the principal subject.
You may want to 'preview' depth -of -field prior to exposure. This can be
done in two ways, first by pressing the Shutter Release Button [2] smoothly
until it reaches the definite stopping point, just before firing the shutter.
This closes the aperture
down to its pre-set value and enables you to get an idea (despite the dimness)
of what will or will not be sharp - the final photograph will be at least as
sharp if not sharper than the viewfinder image. The second method is to turn
the Auto/Manual Switch [36] to the M position which has the effect of manually
closing the aperture down to the pre-selected lens opening-this is probably
easier to master than the first method but you must remember to return the
Switch after use to the 'A' position ready for normal operation. With the
Hellos and industar 50 lenses, follow the previous instructions regarding
aperture operation and
you'll see that even though they lack the automatic aperture closing feature,
depth-of-field can still be previewed prior to taking the picture.
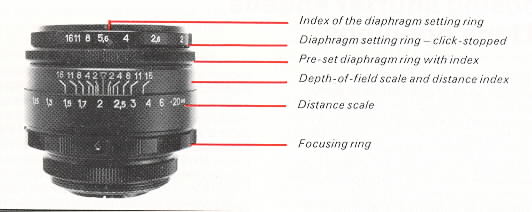
Using the depth-of-field scale [25]
The scale consists of the aperture numbers repeated each side of the
Distance Index [11 ] and shows, at any given focus distance, the nearest
limits and furthest limits of acceptable sharpness. Taking the Hellos 44M lens
as an example, if this is focused at 4 metros, the depth -of-field stretches
from 3 meters to 6 meters at an aperture of f/5.6 while at an aperture of f/16
objects from 2 meters to infinity (  ) will be acceptably sharp in the final picture. Note: For the sake of reading
clarity some figures are omitted from the scale; however, it's a simple matter
to 'fill in' those missing if you remember they follow the aperture sequence
exactly, with those proceeding left from the index [11] showing the near
limits of sharpness and those proceeding right showing the far limits. Now for
some practical examples
) will be acceptably sharp in the final picture. Note: For the sake of reading
clarity some figures are omitted from the scale; however, it's a simple matter
to 'fill in' those missing if you remember they follow the aperture sequence
exactly, with those proceeding left from the index [11] showing the near
limits of sharpness and those proceeding right showing the far limits. Now for
some practical examples
(a) You're taking a landscape view where you want everything needle sharp
from the foreground all the way to the background. Easy you say, close the
aperture right down to f/1 6 - the snag is that the sky has clouded over and
the light is too poor to use
this aperture at a reasonable shutter speed. The remedy obtain the maximum
depth-of-field required with the minimum of 'stopping-down' (decreasing
aperture size). Focus through the viewfinder on the closest object and note
the distance (say 3m) registered against the Index [11], then focus on the
most distant part of your subject and note this distance (say 10m) also. Now
look at your lens and move the Focusing Ring [12] until both distances appear
just between an identical pair of aperture numbers (f/8. in above example), on
the Depth -of- Field scale [25]. Set the lens to the aperture thus found, use
your exposure meter to determine the correct shutter speed for an exposure at
this aperture, then set this speed on the Shutter Speed Dial [5]. Everything
between the two distances (3 to 10 metros) shown by the matching aperture
numbers (f/8) on the Depth-of-Field scale [25] will appear sharp in the final
photograph.
(b) If you need absolute maximum depth-of-field at any given aperture focus
on the 'hyperfocal distance'. This is found by aligning the infinity mark (
) against the Distance Index [11]. The distance then found to be aligning with
the near limit of depth-of-field for the aperture required will be the
'hyperfocal distance'. If the lens is now refocused so that this distance
aligns with the Index [11] everything will be sharp from half the f distance
to infinity.
(c) To obtain a 'differential focus effect, determine the closest and most
distant parts of your subject as described in example (a) above, then refocus
the lens so that the distance of the important part of your subject aligns
with, or is near to, either the near or far limits (according to whether you
want foreground or background out-of-focus) on the Depth-of-Field scale [25]
when using a largish aperture, say f/4. Set lens and camera controls as
necessary and you'll be assured of obtaining a picture of high subject impact.
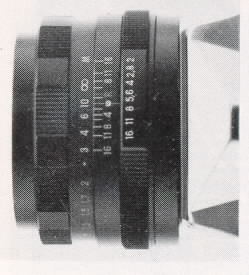
Here we can see that the 10 meter focal setting is in fact the hyperfocal
distance for an aperture of f/8 which gives us the maximum depth-of-field
possible from that lens, extending from half that distance (5 metros) to
infinity.
Taking the picture
Poor first-time results are largely attributable to camera shake, so it's
very important to ho/d the camera steady using both hands. You will probably
find it most convenient to grip the camera firmly with your right hand and
fire the Shutter Release Button with your right fore-finger This way your left
hand can easily turn the Focusing Ring and give extra support at the same
time. Always press the Shutter Release Button downwards smoothly and firmly -
NEVER jab at it (On the Zenith EM make sure you do not accidentally restrict
movement of the Shutter Speed Dial while depressing the Release Button)
For each Successive Exposure . . . just move the Transport Lever until fully
wound and you're ready for your next shot. If lighting conditions have not
changed it is only necessary to frame the subject, focus and fire the shutter.
If taking a photograph in a slightly different direction or if the sun clouds
over, take a further meter reading or consult film exposure tables and make
any adjustments to camera and lens controls that might become necessary before
firing the shutter.

Note: the extra support the left hand gives without
obstructing Meter Window [23] Note also 'correct' finger position f or smooth
release of shutter.
NOTE. Keep an eye on the Frame Counter [4]. When this registers a figure
indicating that the entire length of film has been exposed, or if the Film
Transport Lever cannot be turned, it is time to rewind the film into its
cassette ready for processing. DO NOT try to get an extra exposure if the
Transport Lever is wound forcibly the film may be damaged and disengage from
the cassette making it impossible to rewind.
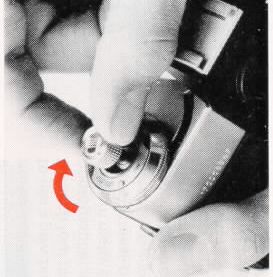
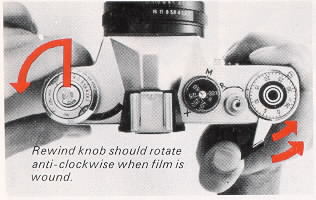
Removing exposed film
(1 ) Before attempting to rewind a film put the cap. supplied with your
camera, back on the lens. This is simply a precautionary measure to prevent
any portion of the last frame being exposed to light, since the Rewind Release
has the effect of firing the shutter even if, as sometimes happens, the
Transport Lever is only partly wound when the end of the film has been
reached.
(2) Releasing the film for rewinding. Zenith E and B models have a Rewind
Button (see below) which must be pressed and held down firmly during the
entire rewinding operation. The Zenith EM has a locking device which permits
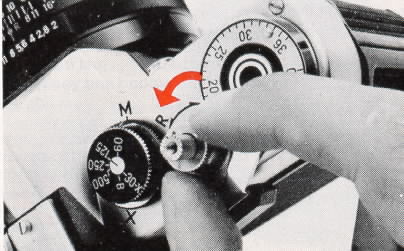
rewinding without constant application of pressure. To engage it first press
the Shutter Release Button [2] then turn the Rewind Release Ring [3] folly
anti-clockwise. Make sure the Ring is turned until no further movement is
possible and you'll then be able to rewind the whole film quite freely.
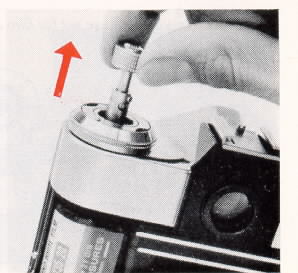
(3) Rewinding. The Rewind Knob [22] should be gripped firmly and rotated in
a clockwise direction (as indicated by the engraved arrow). While resistance
is felt you are rewinding the film back into the cassette (the knob will turn
freely without resistance when the film has been fully rewound).
Zenith EM rewind release
* On Zenith B models the Rewind Knob is ready to hand. On Zenith EM and E
models it is spring-loaded and recessed within the exposure meter controls and
must there fore be raised first into rewind position by gently pressing
against the top of the knob and turning it anti-clockwise at the same time.
Remember the Rewind Release Button on Zenith E and B models must be
held down firmly until the film has been fully rewound.
Zenith E & B rewind release
(4) Having rewound the film, remove the camera from its case, raise the
Back Catch [20] and swing the Camera Back [38] open. Pull the Rewind Knob [22]
upwards fully and take the cassette of exposed film out of its Chamber [27].
Your film is now ready for processing.
(5) The camera can now be reloaded (after observing precautions on p. 6).
If you don't want to reload till a later date return the Rewind Knob to its
'closed' position.
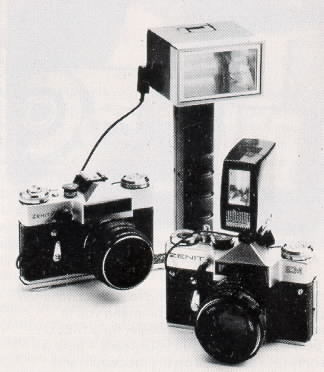
Taking flash pictures
When the light is poor some form of auxiliary lighting will be required.
This is why your Zenith has a built-in synchronizer which enables you to use
either electronic or bulb/cube flashguns. There are pros and cons for each
type - if you think you will only be taking occasional flash pictures (at
party times etc) then a bulb or cube gun is best. since its advantages of low
initial cost, compactness and lightness in weight may well outweigh the
nuisance factor and high running costs of having to use a new bulb for each
picture (or a new cube for each four pictures). For the more serious
photographer an electronic gun is the best bet. since in many cases nowadays
it too offers compactness plus almost unlimited life (the tube lasts for
several thousand flashes and gives dozens or even hundreds of flashes on a set
of batteries some can even be powered by mains supply or mains rechargeable
nickel-cadmium batteries that further cut down on running costs). More
advanced model seven boast a built-in mini-computer which automatically
regulates the duration of the flash according to subject distance for perfect
exposure. We recommend you to consult your Zenith camera dealer for advice on
the best type of gun to suit your needs-here we can only give guidance on the
procedure and technique of flash photography
1. Make sure the Flash Synchronization Selector [6] is fully aligned with
the appropriate setting 'X' for electronic flash, 'M' for bulb and cube flash.
2. The Shutter Speed Dial [5] must be set at 1 /30th second whether using
bob/cube or electronic flash.
* The shutter will not synchronize correctly (i.e. will not open at the
time the flash is at its brightest) if the wrong setting or any other shutter
speed is used.
3. Small lightweight flashguns may be safely clipped into the Accessory
Shoe [13] on top of the camera. Some electronic guns being heavier may need a
separate mounting bracket or 'flash bar' which screws into the Tripod Bush
[35] at the bottom of the camera

4. Plug your flash gun into the Flash Synchronization Socket [7] making
sure its tip is pushed in firmly.
* The short burst of light from a flash is too brief to be measured under
normal circumstances, so exposure for flash photography is governed by the
sensitivity or speed rating of the film in use, light output or power of the
gun and its distance from the subject. This is why most modern flashguns of
whatever type, have calculator dials or scales on them which indicate the
correct aperture according to film speed and distance. Obviously the type of
calculator dial or scale will vary with each make of gun, so consult the
instruction book supplied with your unit, or your dealer for exact information
the general operating rule however is . . .
5. Look through the viewfinder and focus on your subject. You can then find
from the calculator dial/scale the correct lens opening for the actual
camera-to-subject distance that is shown by your lens' Distance Scale [26].
The Aperture Ring [24] must then be set accordingly. Remember that with the
Hellos 44 and Industar 50 lenses the aperture must be closed down manually
after focusing.
* Do not press down on Shutter Release Button [2; unless actually taking a
flash picture since this will fire the flash even if the Transport Lever [1 ]
has not been wound. However, there will be no loss of film should this happen.
* If the flash unit does not fire when you press the Shutter Release Button
[2] make sure that the lead is securely plugged into the Flash Synch. Socket
[7] and that the Selector [6] is properly set in the appropriate position.
With electronic guns also check that unit is switched on and with bulb or cube
guns that. (a) the bulb/cube is pushed fully home and (b) the battery is still
fresh (most such guns have a battery check device).
* Always make sure Transport Lever [1 ] is fully wound before a new bulb is
inserted into a bulb flash gun that is connected to the camera.
* When not using flash, the Synchronization Selector [6] may be set in
either the 'X' or 'M' position.
Using the self timer
Your Zenith camera has a built-in self timer that trips the shutter after
at least a 7 second delay thus enabling you to get into the picture yourself.
Here is how to use it . . .
1. Support the camera on something firm, a tripod is best. but any stable
surface such as a nearby table or shelf will do.
2. All main controls are set as normal. i.e. Wind Film Transport Lever [1 ]
then frame and focus on the general subject area. Select the required shutter
speed and close the lens opening down to the required aperture (with the
Zenith EM you must first set the Lens Auto/Manual switch [36] to the 'M'
position).
3. Turn the Self-Timer Lever [10] downwards in an anti clockwise motion
until no further movement is possible. (As you move this Lever on the Zenith
EM camera you'll see an 'M' sticker beneath it which is there simply to remind
you to set this camera's lens to the Manual position as previously mentioned.
4. Now press the Self-Timer Release Button [9] and move into the picture
area as quickly as possible. The lever [10] will slowly return to its normal
position releasing the shutter automatically during its travel.
* Make sure the Self -Timer has been fully wound before pressing the
Release Button [9] as otherwise the shutter will not operate. ( If this
happens just move the SeIf-Timer Lever downwards again-fully this time! -and
press theTimer Release Button again.
* If you decide not to use the Self-Timer after moving the lever down,
simply take your next picture by pressing the Shutter Release Button [2] as
normal. Then before winding Film Transport Lever [1 ] press the Timer Release
Button [9] and the timer will return to normal position. NEVER leave the self
timer lover in the 'wound' position for extended periods.
* An extra tip: if the shutter speed is set at 'B' and the self -timer
mechanism is used you will obtain a 'time exposure' of between 1 and 5
seconds. The actual time of exposure will vary from camera to camera, so we
suggest you determine the time for your particular camera, as it may well come
in handy to know when taking pictures in dimly lit conditions.
* If required, the Self -Timer can also be used in conjunction with a
flashgun (of either type) observing of course the previous notes on flash
photography.
Changing lenses
Your Zenith camera is fitted with a Universal 42mm thread mount (except for
some very early Zenith B and E models which had a 39mm thread mount). A range
of 42mm mount preset diaphragm lenses, designed primarily for the Zenith E & B
but usable on the Zenith EM in Manual mode, is available from your dealer. You
are also able to choose from literally hundreds of lenses made both by other
camera manufacturers and independent lens makers.
To remove a lens just grip the whole barrel firmly and give it about three
turns to the left (anti clockwise). To attach a lens simply screw it firmly
into the camera's mount in a clockwise direction; when it stops, give it a
slight extra twist to ensure that it is securely attached.
Note: - when refitting lenses with an auto-manual control, such as the
standard lens fitted on the Zenith EM, make certain that the lens is set to
the 'A' position before taking further photographs. This ensures that you will
be able to frame and focus easily.
* Thread mount lenses, particularly those of different manufacture to the
camera, may sometimes fit with the aperture and distance scales slightly to
the right or left of the center position. This does not indicate any defect in
your camera or lens and in no way affects the camera/lens operation.
* Take care not to expose your camera's interior to dust, dirt or moisture
when the lens has been removed. Always replace the lens in the body as soon as
possible (or use a body cap obtainable from your dealer). When removing or
storing lenses, protect them from accidental damage by placing them face down
and if possible, attaching a rear lens cap (again obtainable from your dealer
but usually included with accessory lenses). This latter point is particularly
important with lenses having an automatic aperture mechanism since you should
always avoid putting undue pressure on the metal control pin at the rear.
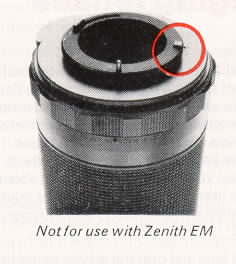
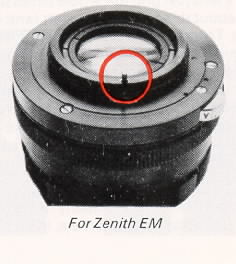
* Only standard Automatic Lenses with a single pin operating the aperture
mechanism can be used with the Zenith EM. Lenses designed specifically for use
with more advanced methods of electrically or mechanically coupled automatic
systems, which have extra keying levers on the mounting flange, should not be
used (see illustration).
* All modern big hi -quality lenses such as that fitted to your Zenith
camera are made from special grades of optical glass. During the manufacturing
process small bubbles almost inevitably occur within the glass. but these have
no adverse affect whatsoever on the functioning of the composite photographic
lens.
Caring for your camera and accessories
Your Zenith is a ruggedly-built camera designed to provide many years of
dependable performance. If you want the longest service and best performance,
always treat your camera and accessories as you would any precision instrument
- with care and respect!
* First and foremost keep them clean! Your camera should be kept in its
carrying case whenever possible. The case is designed to permit all operating
functions, except loading/unloading, to be performed while the camera is
inside. It wilt help protect your camera and lens from dust, dirt, moisture
and light knocks against hard surfaces the natural enemies of all cameras.
The Zenith EM camera can be carried outside its case if preferred [your
dealer can supply an accessory neck strap which attaches to the body eyelets
[8] & [21], but if it is, take extra care to guard it against bumps and jolts.
Remember too, that on the beach sand and sea-spray somehow seem to get
everywhere; even a closed carrying case needs extra protection (a large
polythene bag is quite good ).
The lens in particular. which can be quite easily scratched, should be
protected at all times - an Ultra-Violet filter is very good here since it
needs no exposure correction and can therefore be kept on the lens almost
permanently as protection against dust and the weather.
* When cleaning becomes necessary as it almost inevitably will with outdoor
use, any accumulated dust in the camera body can be lightly brushed away with
a soft brush, or preferably blower-brush. Don't forget to keep the Exposure
Meter Window [23] clean by the same means, as otherwise accuracy of the meter
is likely to be impaired. Exterior metal parts can be cleaned with a soft
clean cloth moistened with ether or absolute alcohol. NEVER touch the lens or
mirror surfaces with the hands - fingerprints diminish optical efficiency and
due to natural skin acidity may in time damage the delicate optical coating of
the lens and surface silvering of the mirror - only an air blower (bulb type
or similar) should be used for removal of dust. Any stubborn traces of dirt or
condensation left on the lens after this can be removed by lightly wiping over
the surface with a clean soft piece of lint-free fabric or cotton (or a pad of
surgical cotton-wool on the end of a matchstick) that has been dampened with
absolute alcohol, ether or ether spirit mixture; any smears can be removed
with a dry soft cloth. NO ATTEMPT should be made to clean the mirror or
viewing screen by wet means -air cleaning only is allowed and this is usually
best left to a specialist.
* Protect your camera from extremes of heat. or humidity. Never leave it
inside the glove compartment or boot of a car - on a hot day temperatures of
100 C can build up and most important NEVER leave your camera out in the open
sun. Heat is bad for the film and camera lubricants and the lens can act as a
burning-glass causing damage to the camera s interior. Also prolonged exposure
to intense sunlight can adversely affect the Selenium Cell! that powers the
meter on Zenith EM and E Models.
* Storage - If your camera is likely to be left unused for some time
(several days or more) always make sure the shutter and self-timer mechanisms
are released first. When wound. these mechanisms are under strong spring
tension; by releasing them you eliminate the tension and avoid any undue
strain.
Keep the camera enclosed in its carrying case with the lens cap on too. Do
not store in humid conditions unless a suitable drying agent, such as silica
gel in a sealed container, is placed alongside it.
If you do not use your camera regularly, and especially before going on
holiday or an important occasion such as a wedding etc., we recommend that you
run off a test film making sure that all variable settings including the
self-timer mechanism are used.
Trouble shooting
Your Zenith camera is designed to give you thousands of pleasurable
photographs. Like any precision instrument, your camera's controls must
be operated correctly for best results. Should you at anytime experience
any apparent malfunction with your camera check the following handy
troubleshooting chart. Chances are you will be able to solve your own problem
on the spot.
Rewind Release Ring [3] (Zenith EM Only) not turned fully to the right
(clockwise).
| If this happens . . . |
Here is why . . . |
And how to correct it . . . |
| Prior to loading, Film Sprockets [32] free-wheel
and do not turn when Transport Lever [1] is turned |
Rewind release ring [3] (Zenith EM only) not
turned fully to the right (clockwise) |
Turn Rewind Release Ring completely to the right
until no further movement is possible. |
| After loading, Frame Counter [4] skips two or
more numbers after being set to '0' position. |
Film Transport Lever [1 ] not fully wound before
counter is set to '0' position. |
Advance Transport Lever fully before setting
counter to '0' |
| Shutter Release Button [2] does not trip
shutter |
Film Transport Lever [1 ] not fully wound. |
Always operate Transport Lever in two strokes.
It will stop mid-way during the second stroke assuring you that shutter
is completely wound. |
| Exposure Counter [4 ] 'skips', counting
incorrectly. |
See above or Counter set before Transport Lever
was wound. |
See above, always wind set Transport Lever
before setting counter. |
| Film Transport Lever [1 ] does not stop after
two or more strokes. |
Rewind Release [3] (Zenith EM only) not turned
fully clockwise so that three dots are lined up. Shutter Release Button
[2 ] not turned fully clockwise (clockwise) to the right |
Turn Rewind Release Ring and Shutter Release
Button completely to the right, until no further movement is possible. |
| Self-Timer does not trip shutter. |
Self-Timer Lever [10] not fully wound. Transport
Lever [1 ] not wound. |
Wind Self-Timer Lever fully until lever points
downwards with no further movement possible. Always ensure Transport
Lever is fully wound before setting Self Timer Lever. |
| Lens does not close down to indicated aperture
when Self-Timer is used (EM only). |
Auto/Manual Switch [36] on lens not set on 'M'. |
Move Auto/Manual Switch to 'M' whenever
Self-Timer is used. |
| Flash unit fires when Shutter Release is
partially pressed, or does not fire. |
X' or 'M' Indicator [6 ] not aligned correctly. |
Move Indicator fully to 'X' position for
electronic flash or M' position for flashcubes and bulbs. |
If anything should go wrong with your Zenith and the proceeding chart has
not got you out of trouble. NEVER attempt to mend it yourself-you could turn a
minor adjustment into an expensive repair.
Remember that your Zenith and its accessories are backed up by top-class
service facilities where factory-trained specialists are available to put
things right, quickly and inexpensively.
Composition or. . . taking better pictures
Composition is concerned with what you put into your picture and where; its
final control lies in your hands. A slight amount of extra thought and/or
effort on your part can often turn what would have been an otherwise
ordinary-looking photograph into one which is stunningly attractive. There are
so many factors involved that probably thousands of books have been written on
this aspect alone however here are some basic picture-taking tips that will
help you take better pictures starting right from your very first roll of film
. . .
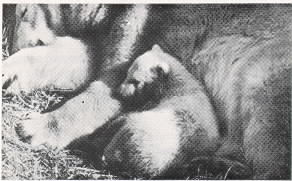
* Isolate your subject - Concentrate your viewer's attention on the subject
of your photograph, move in as close as possible. filling the viewfinder frame
and eliminating all extraneous foreground and background detail. Remember that
you can safely compose direct in the viewfinder, you see what the lens sees
(in fact there'll be a little more actual film image as previously mentioned
due to the viewfinder's built-in safety margin). Another way to eliminate
extraneous detail and gain impact for your subject is to use the "differential
focus" technique described on page 20. With some subjects (e.g. sporting
events, wildlife, distant objects of all kinds) you're unable, or it's
inconvenient, to get in close - here a telephoto lens scores as it
'compresses'' space making distant objects appear closer. Taking in less of
the field of view it also teaches you to be selective in choice of subject and
viewpoint.
* Keep it simple - a few bold masses nicely contrasting with each other are
more pleasing to the eye than a confusion of small detail. Aim to achieve
balance more than symmetry. Have objects of uneven size balancing each other
rather than a geometric arrangement of equal sized objects. Choose
surroundings and backgrounds carefully those that complement your subject
rather than take interest away from it. A person standing in front of a fussy
background such as a building (unless it is 'thrown out of focus') is seldom
as attractive as a close-up of the same person against a background of trees
or clear sky.
With color - Complementary colors suggest harmony - clashing colors suggest
conflict. Pastel shades with a tiny, brightly-colored accent can be more
effective than masses of strong color. The camera is not as selective as the
eye, which is why a bed of mixed f lowers is rarely a good subject for color
film.
* Try to include something in the foreground of landscapes. A picture of
distant scenery will often be improved just by a bush, a rustic gate or trees
in the foreground. People too, add life and impact to all kinds of outdoor
photography - a photograph of a winding country lane is good. add a person
walking down that lane and the picture may very well be great. (If nobody's
around, get into the scene yourself by using the camera's self-timer'
* Shoot from higher and lower angles Taking pictures of small children ?
Get down to their level - literally. Kneel down, so that your camera is at
eye-level with the child (instead of aiming down). The result, again, will be
a much more interesting, natural-looking photograph. Taking pictures of a
group of people ? See if there are stairs nearby so you can shoot from a
higher angle. Each person in the group will be more visible than if you shot
them at eye level.
* Avoid tilting the camera to include the top of a tall building. In the
finished picture it will look as if the building is falling over backwards.
Always use a wide-angle lens for best results when you want to take in a
broader field of view than is possible with your standard lens. (Sometimes of
course perspective distortion like this can be used to good effect for subject
impact).
* Ask your subjects NOT to look at the camera -Pictures of people are
usually much more natural looking when the people are doing something. and
looking at what they're doing. A picture of a do-it-yourself handyman absorbed
in a project is going to be more interesting - and a better photo -than a
picture of the same person -I standing up, staring at the camera. (Chances
are, his expression will be a lot more relaxed and natural too). When your
subject has forgotten about the camera is when you'll probably get your best
pictures. -
* Don't be afraid to experiment - For example ~ a silhouette of a person
watching a sunset can be much more attractive than an ordinary photograph -''
of the same scene.
* Look for unusual subjects and viewpoints. A picture of a famous building
or monument may well be attractive in its own right so take it, but also take
a picture of people looking at it or a reflection of it in a nearby window or
even some close-up details of it against a clear sky etc. Bad weather can
sometimes lead to very good pictures I A child gazing through a rain-splashed
window, the play of bright lights in the water at the curbside, a figure
walking through a snowstorm. Use your imagination, make your own 'rules' as
you progress. Your pictures will be far more interesting, far more
eye-catching.
Choosing and using accessories
The range of ancillary equipment available for your Zenith (both from the
USSR and a multitude of other sources) is so vast that we can only give very
brief details here of the when, why and how of choice and use.
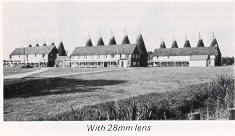
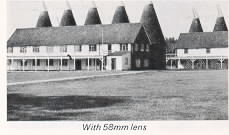
Wide-angle Lenses - are available in focal lengths from 1 6mm to about
35mm, the shorter the focal length the wider the area covered. They are used
in any situation that requires greater-than normal area coverage, e.g.,
landscapes, interiors, architectural photography etc. In space-inhibiting
situations they allow you to retain sufficient of more distant surroundings or
background to show relationship to an important close- up subject. Generally a
28mm or 35mm type is found most useful since they're relatively inexpensive,
usually have wider maximum apertures, and are less prone to distortion than
the shorter focal lengths.
 |
 |
* A feature of wide-angle lenses is their extended 'depth-of-field', useful
in landscape work especially but a possible disadvantage when it comes to
ascertaining correct focus (e.g. the microprism spot in the Zenith EM
viewfinder may not disappear entirely). Focusing is often easier if you first
set the lens to its minimum distance setting. then raise the camera to your
eye and turn the focusing ring as quickly as possible until the image appears
sharpest. (If you start with the lens at or close to the correct focusing
distance, or hold the camera to your eye for a long time, it will probably be
more difficult to distinguish the point of sharpest focus).

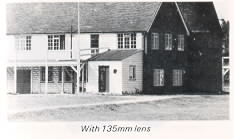
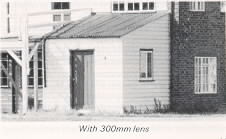
Telephoto Lenses are available in focal lengths from 85mm (1.5 x
magnification compared to standard lens) to about 1000mm. A 135mm lens is
generally found to be most useful, certainly for candid photography (children
at play, people strolling, street huskers etc.), as in most cases you'll find
you get a large enough image on the film, and, because you're further away
than normal, more pleasing perspective and some beautifully relaxed and
natural expressions. For longer range work (e.g. stadium sports, animals) a
200mm or even a 300mm lens could be a useful addition.
* Remember that telephotos magnify not only the image but also any camera
or subject movement correspondingly, so (a) always use the fastest possible
shutter speed (as a general guide a minimum speed roughly equivalent to the
lens's focal length - e.g. 1/1 25th sec for a 1 35mm lens) and (b) if you're
without a tripod try to find ways of bracing yourself to hold the camera
extra-steady during exposure (e.g. stand with your body firm against a wall or
rest both elbows on the top post of a fence). Where ever you are, try to find
a position that gives camera and lens the best possible support; this slight
additional effort will pay off in sharper clearer telephoto pictures.
* When using lenses of 200mm focal length or longer there may be some
slight ''cutting off" effect on the left hand side of the film image but this
will probably be masked off by the slide mount or in printing.
Close Up Photography comes easy with your Zenith. Many pictures (say of two
or three flowers, book or magazine illustrations) can be taken without any
accessory at all - just turn the Focusing Ring [12] of your standard lens to
its minimum distance and move your camera towards the subject until the
viewfinder image is at its sharpest . . . you'll find you can fill the frame
with an object around 6- " x 10 ~ in area. For smaller subjects you need to
get closer by using a supplementary close-up lens screwed into the filter
mount of your standard lens or extension tubes or bellows unit inserted
between camera and lens.

Supplementary lenses are easier to use since they don't require any
increase in exposure - set against this though they do reduce the camera
lens's fine resolving power at the edge of the field unless the aperture is
stopped well down. They are usually available in powers of 1. 2, or 3 dioptres;
the higher the number the closer you can approach your subject (consult your
dealer for the best type to suit your needs).
Extension tubes allow photography at even closer range than supplementary
lenses. Normally sold in sets of 3 varying lengths, they can be used singly or
in any combination to provide a number of fairly definite magnification steps,
allowing you to fill the frame with subject sizes from about 2.7 " x 4 " to as
small as 1- " x 1 " (life size). A bellows unit offers even further advantages
since magnification is considerably greater and also continuously variable
over a wide range (ideal for really small and even live subjects like
insects).
Subjects ranging from about 0.8 " x 1.2 ~ to 0.4 " x 0.6 " (2.5 times life
size - or even greater depending on lens in use) will fill the viewfinder
frame.
* Since both extension tubes and bellows units make the light rays travel a
greater distance as the lens is moved further from the film, they require an
increase in exposure over that indicated by a meter reading. The increase
required varies proportionately with the degree of extension and the focal
length of the lens and can be found from the full data tables usually provided
with tubes and bellows. This slight inconvenience in operation over the use of
supplementary is offset by the fact that optical performance of the camera
lens is not affected in any way and that a greater and more varied
magnification range is obtainable.
Photomicrography - yes, you can even take pictures through a microscope
with your Zenith !
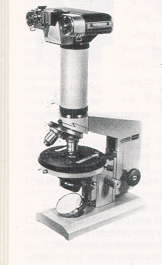
other than a rigid tripod-or copy-stand to hold your camera, complete with
lens, over the eye-piece of the
microscope. For more professional results and at higher
magnifications the camera body
should be attached direct to the microscope by means of a 42mm thread mount
CA-3 Microscope Adapter (obtainable through your dealer or direct from Zenith
House).
Lens Hoods help prevent stray light rays (from outside the picture area)
from entering the lens and causing flare due to reflections from internal
camera and lens surfaces -they generally improve picture contrast and are
certainly essential if pictures are to be taken against any strong light
source. Both folding rubber and rigid metal typos are available from your
dealer and these vary in shape and size according to lens focal length. (NEVER
use a hood intended for long focus lens with a shorter focus lens).
Filters are discs of colored glass or gelatins that are used to create
special effects or improve rendering or contrast with color or black and white
films. A selection of the most useful typos is shown opposite.
* To compensate for the light absorbed by the filter, an increase in
exposure is required (except for 1 A and UV filters). To obtain this, either
(a) determine exposure in normal way, then open up lens the number of f/stops
shown, or (b) divide ASA Film Speed by the 'Factor' listed, set the resultant
(lower) film speed on your Exposure Meter or Flash Calculator, and then
determine and set exposure in the normal way. (Consult film instructions for
recommendations for specific film types.)
Exposure
Increase
| Filter Type |
Appearance |
Purpose |
Film Types |
F/stops |
Factor |
| 1A (Skylight) |
Pale Amber |
Improves colors outdoors when light is blue |
All |
0 |
1 |
| UV (UV16) |
Colorless |
Warms colors at high altitudes or when subjects
are in shade. Darkens skies with black a white films. |
All |
0 |
1 |
| Polarize |
Neutral |
Eliminates reflections, glare from water, glass,
darkens sky, makes clouds more prominent, improves color saturation |
All |
1 1/2 |
3 - 4 |
| 81 A |
Red/yellow |
Gives most pronounced 'warming' effect, use on
overcast or rainy days. |
color |
1/2 |
1.4 |
| 82A |
Light Blue |
Reduces excessive reddishness of day-light in
early morning, late evening |
color |
1/2 |
1.5 |
| K2 (Y2) |
Yellow |
Yellow Darkens sky, makes clouds stand out
clearly. |
B&W |
1 |
2 |
| 02(G) |
Orange |
More pronounced cloud/sky
Separation.
|
B&W |
2 |
4 |
| G2(YG) |
Yellow-Green |
Lightens trees, grass, foliage;
shows flesh tones more clearly
where foliage is visible also
darkens blue skies. |
B&W |
1 |
2 |