and historical purposes, all rights reserved.
This page is copyright© by
This page may not be sold or distributed without
the expressed permission of the producer.
I have no connection with any camera company.
VP Twin
Posted 5-10-'03
This camera manual library is for
reference
and historical purposes,
all rights reserved.
This page is copyright© by ![]() , M. Butkus,
NJ.
, M. Butkus,
NJ.
This page may not be sold or distributed without
the
expressed permission of the producer.
I have no connection with any camera company.
On-line camera manual library
If you find this manual useful,
how about a donation of
$3 to:
M. Butkus, 29 Lake Ave.,
High Bridge, NJ 08829-1701
and send your e-mail
address
so I can thank you.
Most other places would charge
you $7.50 for
a electronic copy
or $18.00 for a hard to read Xerox copy.
This will help me to continue to host this site,
buy new manuals, and pay their shipping costs.
It'll make you feel better, won't it ?
If you use Pay Pal, use the link below.
Use the above address for a check, M.O. or cash.
VP Twin PDF VERSION
OF THIS MANUAL
MADE FROM THIS PAGE

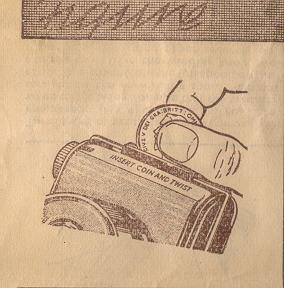 |
To Load: Use any standard Vest Pocket size roll film. Remove back cover by inserting a coin between the two top projections, and giving it a twist (Fig. 1). |
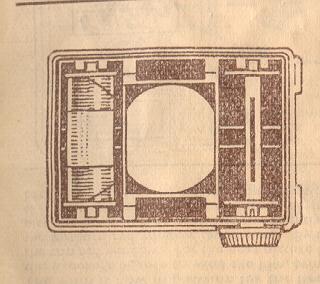 |
This camera can be loaded or unloaded in daylight.
This, however, should always be done in subdued light, not in direct sunlight. Without break) in gummed seal on the protective paper, place complete spool in opposite end from the winding key (Fig. 2) |
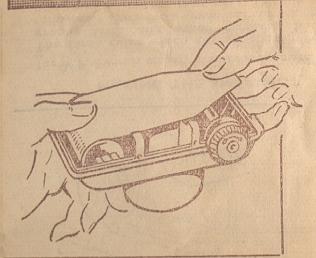 |
Holding spool in cradle with one hand (Fig. 3), bread. gummed seal on ! full spool and draw out end of protective paper until it reaches spool in opposite cradle with about half-inch to spare. (Red side of protective paper must be to the back of the camera.) |
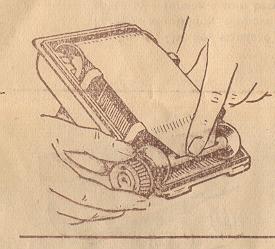 |
Thread end of protective through the wider slit in the empty
spool (Fig,4) as
far as it will go. Care must be exercised when this is being done, so that the
protective paper is started straight on the re-winding spool. Do not unroll too
much protective paper from the full spool, or the film will be fogged and
spoiled. Give the winding knob two or three forward turns (fig. 4) to bind
paper securely on the spool . Then securely replace back cover of camera.
|
Note. - When inserting empty spool In the winding key end watch that the driving spindle is upright.
The winding key only works in one direction - i.e. the direction of the Arrow
an the knob.
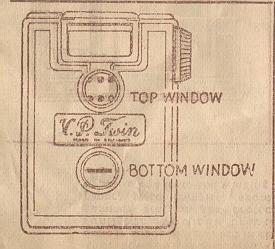 |
Watching the Red Window, turn the winding knob until the warning sign
appears through the bottom red window then turn the knob very slowly until
the figure I appears in the centre of the bottom red window (Fig. 5).
The Film is now in position for the first picture. After this exposure be sure to wind the film, bringing figure I into the top red window. For the next picture bring figure 2 into the bottom red window, and so on. By this, two separate pictures are taken on each V.P. size negative. Wind slowly , as if the number goes past the window it is impossible to wind back, the winding key being non-reversible. |
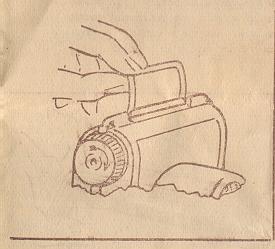 |
MAKING THE SNAPSHOT The V.P. Twin is strictly a snapshot camera.
Open the Wire View-finder which rests In back cover until it rests on top of camera in a perpendicular position (Fig. 6). |
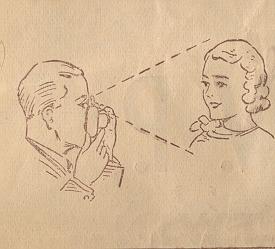 |
Place the back
of the Camera against your face
in order to steady Camera at the moment of snapping the picture.
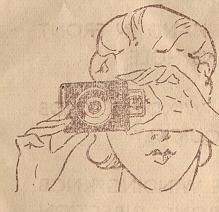
It is important to hold the Camera still while taking the picture. Looking through the view-finder , locate your subject or field inside the wire view-finder (Fig. 7), then, holding Camera perfectly steady against the face, press shutter lever in one direction only to make the exposure. Fingers must be kept away from the light opening in front of Camera. |
Whatever appears in view through the view-finder will be on the picture, as in Fig. 7.
Move closer or further away from your subject until it is perfectly framed in the wire view-finder just as you wish it to
appear on the picture. Be careful to hold Camera steady against your face at the moment of exposure.
many pictures are spoiled by the Camera being moved when the photograph is being taken.
 |
To make pictures with long dimension of picture vertical (Fig. 8), simply follow previous instructions, holding Camera to face in horizontal position instead of vertical, see Fig. 9. Best results are had by keeping the Camera on the same level as the subject: thus if a picture of a child or dog is desired, the operator should assume a kneeling positions to bring the Camera to the same level as the subject or place the subject on an elevation to the same level as the Camera. |
MAKING PORTRAITS
 |
Portraits may be made with this Camera as long as the subject is not less
than four feet away from the Camera. For other pictures eight to ten foot is
the best distance. Due to the special design of the V.P. Twin lens, anything
beyond this distance will be in sharp focus. Thus it is possible to select a
picturesque or Scenic background for your portrait Subject and thereby
greatly enhance the beauty of your picture.
|
Removing the Film: After the last film has been exposed, turn the winding
knob until the end of the protective paper passes the top red window. Then
give several additional turns to make sure that all the protective paper is
wound around the spool. Turn winding key until the driving spindle is upright,
now remove spool from cradle, moisten gummed seal on protective paper,
then seal, being careful to wrap spool immediately for protection. it is now
ready for d. development. This may be done by a photographer or by
yourself. Films should be developed at earliest possible moment after removal
from Camera. The quality of the image on all sensitized products is retained
by prompt development after exposure.
Before replacing back cover of Camera, the empty spool should be
transferred to opposite cradle to be in position for next loading of Camera.
Here again watch that the driving spindle is upright and that the empty spool
is correctly located on the driving spindle.