All YS adapter mounts (and lenses) have the identical specifications as T Mount lenses and adapters so that T adapters may be used on YS lenses for those cameras for which no YS adapters may be available. Naturally, with T adapter the operation of YS lenses would be non-automatic.
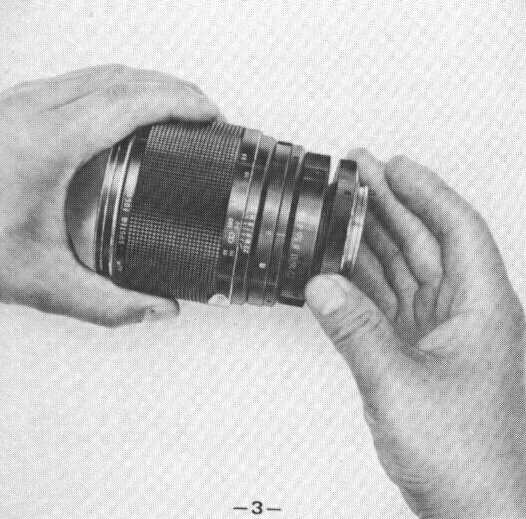
To mount or dismount a YS lens on the camera body, it is best to grasp the YS mount rather than the lens barrel itself.
Nikon, Nikkormat Model
The Nikon model YS adapter mount is for all models of the Nikon and Nikkormat camera. A separate coupler to engage the meter is included with The YS adapter.
Screw the Nikon YS mount onto the rear thread of the lens and seat it snugly against the lens. The small silver arrowhead engraved on YS Nikon adapter should now be in line with the center reference line of the lens. If they are not perfectly in line (make sure the adapter is tightly screwed onto the lens), loosen the three setscrews in the YS mount, rotate the lens to adjust alignment and retighten the setscrews.
|
|
|
|
|
|
|
|
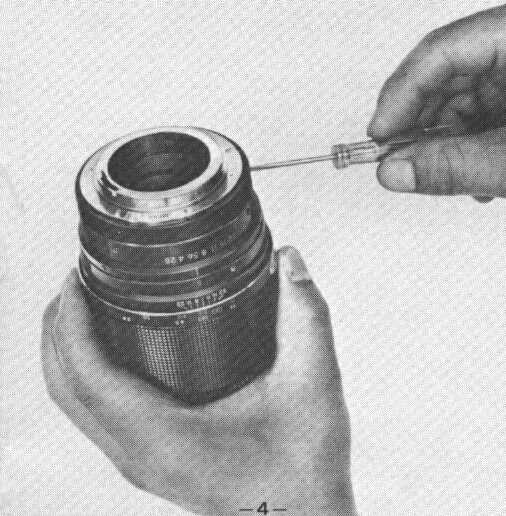
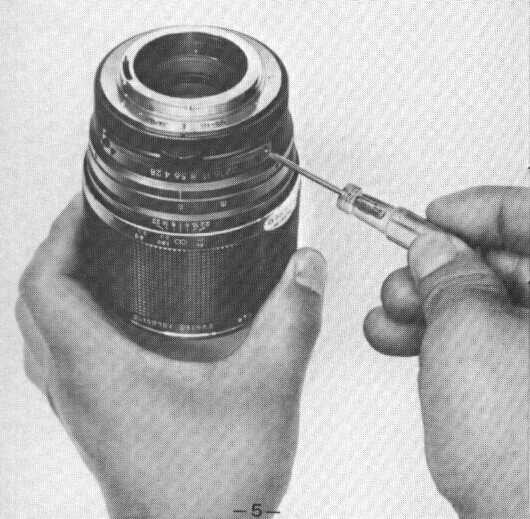
Attaching the Coupler for the Nikon Meter
Matching screw holes are provided in the lens diaphragm ring and the coupler. Place the coupler with the claw to the rear and the slot of the claw in line with the f5.6 indicator of the lens diaphragm ring. Remove the screws in the diaphragm ring which are in the mounting position for the coupler. Attach the coupler with the screws provided with the coupler rather than the original screws.
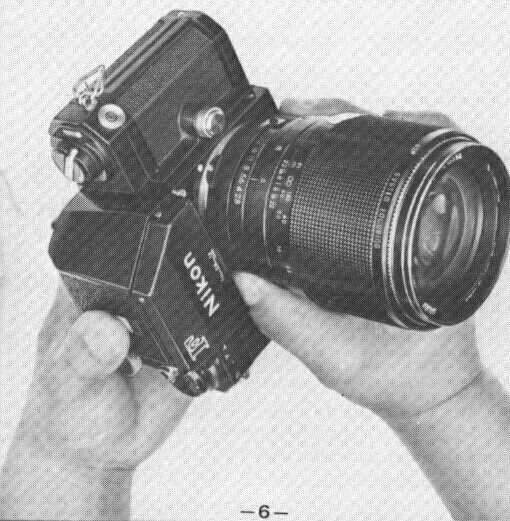
The f number indicated in the PHOTOMIC finder will agree with the f number setting of the lens when the meter arm and coupler are engaged. On the Photomic FT (N) and Nikkormat TN, seat the lens into the camera body, engaging the coupler, rotate the diaphragm to the smallest aperture and then to the maximum aperture in the usual manner. The meter will
engage and lock at the maximum f value detent.
Should orientation adjustment be required, loosen the three setscrews in the YS
mount, rotate the lens slightly to the required position so that the f setting
of the lens agrees with the meter setting aperture detent on the Nikkormat TN
and Photomic FT (N) models.
Canon Model
For Canon FX, FT,
Pellix, screw the Canon YS adapter onto the rear thread of the YS lens and seat
it snugly against the lens. The green arrowhead engraved on the rear of the YS
adapter should now be In line with the center reference line of the lens. If
orientation adjustment is indicated, loosen the three setscrews in the YS
adapter, rotate the lens to the centered position and retighten the setscrews.
Bayonet the lens to the camera body. The lens will seat in its proper position and function automatically.
For Canon F-1 (FTb)
The
following procedure applies. Remove the silver knurled screw from the lens'
diaphragm ring and then screw the Canon F-1 adapter onto the lens. The YS
adapters for Canon F-1 (FTb) are "f rated"—— and must correspond with the
maximum aperture value of the lens on which it is being mounted. The f rating is
indicated both on the adapter box and the adapter itself. The green arrowhead
engraved on the rear of the YS adapter should now be in line with the
center reference line of ^he lens. If they are not perfectly in line (make sure
that the adapter is tightly screwed onto -the lens), loosen the three setscrews
in the YS adapter, rotate the lens to adjust alignment and retighten the
setscrews.
Position the coupler over the hole from which the knurled silver screw was removed. Screw the lock pin, which is enclosed in the coupler box, into this hole engaging the coupler to the diaphragm ring.
CAUTION: You must always set the lens diaphragm to its maximum aperture (f2.8, 3.5 etc.) when mounting the lens to the camera body.
Then mount the lens to the camera body by aligning the mounting dot on the lens to the dot on the body, rotate the lock flange clockwise to secure the lens. The lens will now function properly in the same manner as your normal F-1 (FTb) lens.
Please note, however, that this mount will not function automatically with the Servo Battery Pack Unit.
No special precaution is required in removing this lens from the body.
Exakta, Exa Model
Screw the Exakta YS adapter onto the rear thread of the YS lens and seat it snugly against the lens. Bayonet the lens to the camera body.
The stroke of the plunger may be adjusted as, required by lengthening or shortening the plunger as you turn the screw head on the bottom side of the plunger. The lens will seat in its proper position and function automatically. Any slight variation in the orientation of the lens to the camera body is not significant in the automatic operation of the diaphragm.
If orientation adjustment is indicated, loosen the three setscrews in the YS adapter, rotate the lens to the centered position and retighten the setscrews.
Exakta RTL Model
Screw the Exakta RTL YS mount onto the rear thread of the YS lens and seat it snugly against the lens. Bayonet the lens to the camera body.
The lens will seat in its proper position and function automatically. Any slight variation in the orientation of the lens to the camera body is not significant in the automatic operation of the diaphragm.
If orientation adjustment is indicated, loosen the three setscrews in the YS mount, rotate the lens to the centered position and retighten the setscrews.
Exakta Twin Model
Screw the Exakta Twin YS mount onto the rear thread of the YS lens and seat it snugly against the lens. Bayonet the lens to the camera body.
The lens will seat in its proper position and function automatically. Any slight variation in the orientation of the lens to the camera body is not significant in the automatic operation of the diaphragm.
If orientation adjustment is indicated, loosen the three setscrews in the YS mount, rotate the lens to the centered position and retighten the setscrews.
Konica Autoreflex T, A Model
The YS tens, fully automatic and EE coupled for the Konica Auto Reflex series of cameras is always custom factory fitted.
The lens nevertheless utilizes a YS adapter mount system which permits removing and interchanging the Konica YS fitting with any other YS fitting so that the lens will operate automatically (and meter-coupled wherever required) on most any other SLR camera. If you remove the Konica YS fitting supplied with the lens do not use it to adapt any other YS lens to the Konica — a factory adjustment of the YS lens is required to guarantee perfect operation with the YS adapter for the Konica.
The automatic diaphragm and EE meter coupling of YS lenses for the Konica function in the same manner as on original Konica lenses. Set the base ring on the YS fitting to the "EE" position so that it is aligned with the green arrowhead. Set the diaphragm to f/22. Set the M-A preview ring directly above the diaphragm to the "A" (automatic position). The lens will now function fully automatically in the EE mode. For MANUAL operation, set the base ring to the "MA" position and operate the diaphragm manually. The M-A ring should remain on the "A" setting — except when you want to preview the scene at the shooting aperture. Then move it to the "M" setting and back to "A" before tripping the shutter.
Leicaflex SL Model
Remove the knurled chrome plated screw from the diaphragm ring. Screw the Leicaflex YS mount onto the rear thread of the lens and seat it snugly against the lens. The green arrowhead engraved on the side of the adapter should now be in line with the center reference line of the lens. If they are not perfectly in line (make sure the adapter is tightly screwed onto the lens), loosen the three setscrews on the YS adapter, rotate the lens to adjust alignment, and retighten the setscrews. Position the coupler over the hole from which the knurled silver screw was removed. Screw the lock pin, which is enclosed in the coupler box, into this hole engaging the coupler to the diaphragm ring.
The lens mounts and functions in the normal manner.
Minolta Model
The Minolta model YS adapter fits any YS lens to all models of Minolta SR cameras to provide full automatic operation of the lens diaphragm as well as external meter coupling With Minolta SRT-101.
Screw the Minolta model adapter onto the lens.
The green arrowhead engraved on the rear of the YS adapter should now be in line with the center reference line of the lens. If they are not perfectly in line (make sure that the adapter is tightly screwed onto the lens), loosen the three setscrews in the YS adapter, rotate the lens to adjust alignment and retighten the setscrews.
Set the lens diaphragm full open, align the coupler arm of the adapter to the reference line on the back face of the adapter. Place the separate meter coupler in position so that the tongue cradles in the fork of the YS adapter. Remove the two screws from the lens diaphragm ring which are located under the slots of the coupler. Attach the coupler to the diaphragm ring with the two screws provided with the coupler. Before final tightening of the two set screws which secure the separate coupler, check that with the lens set at its maximum aperture, the coupler arm of the YS adapter is still aligned with the reference line (shift the coupler if necessary to realign) then tighten the two screws.
When the adapter and coupler are properly attached to the lens, the coupler arm of the adapter should be just touching (but not moving) the coupling pin of the camera body or else it should be very close (within 1mm) to the coupling pin when the diaphragm of the lens is fully open.
Miranda Model
Screw the Miranda YS adapter onto the rear threads of the YS lens and seat it snugly against the lens. Bayonet the tens to the camera body. A separate coupler is included for the Automex and Sensorex models. Matching screw holes are provided in the lens diaphragm ring and the coupler. Place the coupler on the lens diaphragm ring in the coupling position. Remove the screws in the lens diaphragm ring corresponding with the coupler holes. Attach the coupler with the screws provided with the coupler rather than the original screws. (When mounting or dismounting the coupler on a lens slower than f2.8 the coupler should be pushed down to disengage the meter coupling pin.) If the diaphragm setting and the meter setting do not coincide, loosen the three set screws in the YS adapter, rotate the lens for proper alignment and retighten the setscrews. (Check the alignment at f5.6, or f8, the midpoint of the diaphragm scale.)
Pentax ES Model
Remove the silver knurled screw from the diaphragm ring of the lens and then screw the adapter onto the lens. The green arrowhead engraved on the rear of the YS adapter should now be in line with the center reference line of the lens. If they are not perfectly in line (make sure that the adapter is tightly screwed onto the lens), loosen the three setscrews in the YS adapter, rotate the lens to adjust alignment and retighten the setscrews. Position the coupler over the hole from which the knurled silver screw was removed. Screw the lock pin, which is enclosed in the coupler box, into this hole engaging the coupler to the diaphragm ring.
Then mount the lens to the camera body.
The YS mounts for Pentax ES are "F rated" and must correspond with the maximum aperture valve of the lens on which it is being mounted. The f rating is indicated both on the adapter box and on the adapter itself.
The lens now will function properly in the same manner as your normal Pentax ES lens.
No special precaution is required in removing the lens from the body.
Pentax/Praktica Model
This adapter can be used with nearly all thread mount type camera bodies. To attach this adapter, simply screw the PE YS adapter onto the rear thread of the YS lens and seat it snugly against the lens. Screw the lens to the camera body. The lens will seat in its proper position and function automatically. Any slight variation in the orientation of the lens to the body is not significant in the automatic operation of the diaphragm due to the full circle design of the automatic mechanism of the YS adapter.
If orientation adjustment is indicated, loosen the three set screws in the YS adapter, rotate the lens to the centered position and retighten the setscrews.
Petri FT, V6 Model
Screw the Petri YS adapter onto the rear thread of the YS lens and seat it snugly against the lens. Bayonet the lens to the camera body. The lens will seat in its proper position and function automatically. Any slight variation in the orientation of the lens to the camera body is not significant in the automatic operation of the diaphragm. If orientation adjustment is indicated, loosen the three setscrews in the YS adapter, rotate the lens to the centered position and retighten the set screws.
PRINTED IN JAPAN