This page may not be sold or distributed without
the expressed permission of the producer.
I have no connection with any camera company.
The next page contains information on this camera.
If
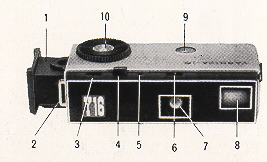
the image below looks like your camera,
click below to see the PDF manual.
On-line camera manual library
If you find this manual useful, Click here for main Camera Manual site
Yashic Y16 PDF manual
Yashica 16 PDF
how about a donation of
$3 to:
M. Butkus, 29 Lake Ave.,
High Bridge, NJ 08829-1701
and send your e-mail
address
so I can thank you.
Most other places would charge
you $7.50 for
a electronic copy
or $18.00 for a hard to read Xerox copy.
This will help me to continue to host this site,
buy new manuals, and pay their shipping costs.
It'll make you feel better, won't it ?
If you use Pay Pal, use the link below.
Use the above address for a
check, M.O. or cash.
- Direct from
manual -
CLICK HERE TO CONTINUE TO
Yashica 16 HTML INSTRUCTIONS
file made from HTML file
Better printing