This page may not be sold or distributed without
the expressed permission of the producer.
I have no connection with Yashica Co., Japan
This page is copyright© by
![]() , M.
Butkus, NJ.
, M.
Butkus, NJ.
This page may not be sold or distributed without
the expressed permission of the producer.
I have no connection with Yashica Co., Japan
On-line camera manual library If you find this manual useful,
how about a donation of
$3 to:
M. Butkus, 29 Lake Ave.,
High Bridge, NJ 08829-1701
and send your e-mail
address
so I can thank you.
Most other places would charge
you $7.50 for
a electronic copy
or $18.00 for a hard to read Xerox copy.
This will help me to continue to host this site,
buy new manuals, and pay their shipping costs.
It'll make you feel better, won't it ?
If you use Pay Pal, use the link below.
Use the above address for a
check, M.O. or cash.
Back to main caera manual page
Click here
for Yashica 230-AF PDF
version made from page below
Thank you for your purchase of a Yashica 230-AF. This is a highly developed
auto-focus SLR camera with many outstanding features. It is designed to work in
perfect harmony with its dedicated flash. This camera features three auto-focus
modes: normal auto-focus, continuous auto-focus and trap focus. These
sophisticated focusing modes, in combination with various exposure modes such as
programmed auto mode, will enable you to open up new picture-taking
possibilities. It also provides an AE lock system based on the spot metering
method, a large-size display panel for centralized information control and many
other features that have been developed with latest technology. Before you use
the camera, please read this manual carefully. It will assure you a longer
service with proper care.
The descriptions in this manual are made with a Yashica AF lens 50 mm F1.8 on
the camera. The operating procedure is the same with other Yashica AF lenses,
too.
| Names of Parts
........................... 8
Mounting and Dismounting the Dedicated Flash CS-11 AF ............16 Basic Operation ...............19 Mounting the Lens ...............20 Loading the Battery ............................. 20
Loading the Film ....................... 24
Shutter Release . ........... ....... 46
Using the Flash CS-110AF............... 48 Rewinding the Film ................52
|
Camera Functions and Applications in
Detail .......55
Display of Shutter Speed and Aperture ..........56 Using the Focus Lock ..............58 Focusing Screen . ................ 62 Program Control Diagram . . . .......... 64
Bulb Exposure .............70 Using the Self-timer .............. 72 Trap Focus Shooting ............. 76
Taking Pictures on Spot Metering ............86 |
|
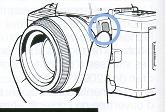
(1) Program Reset Button (2) Operating Lever (3) Display Panel (4) Light Receptor Window (5) Accessory Shoe (6) Flash Contacts (7) Direct X-contact (8) Main Switch (9) Exposure Compensation Button (10) Focus Mode Button (11) Exposure Mode Button (12) Drive Mode Button (13) Battery Holder Screw (14) Battery Holder (15) Shutter Release (16) Self-timer LED (17) Power Terminal for Flash |
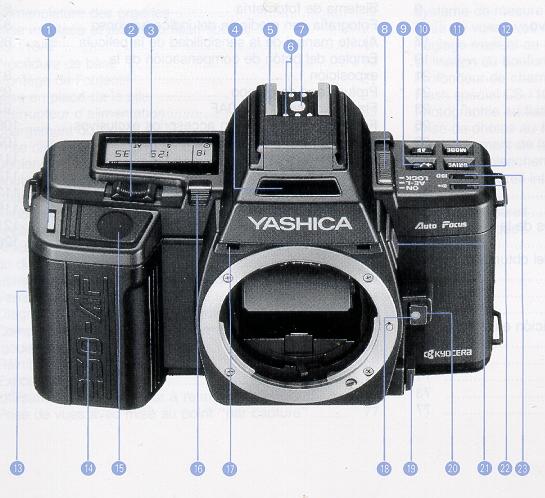
(18) Lens Mounting Index (19) AF/MF Selector Lever (20) Lens Release Button (21) AF Lock/F-Number Button (22) Electronic Signal Button (23) ISO Button |
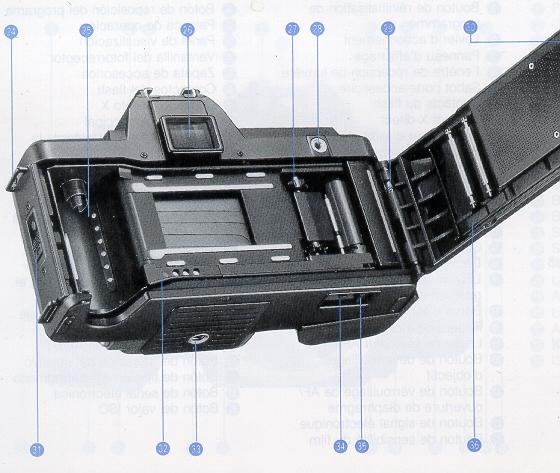
(33) Tripod Socket (34) Rewind Release Button (35) Film Rewind Switch (36) Camera Back |
(24) Strap Lug
(25) DX Contacts (26) Viewfinder Eyepiece (27) Sprocket (28) Release Socket (29) Camera Back Release Pin (30) Film Check Window (31) Camera Back Lock (32) Data Back Contacts
|
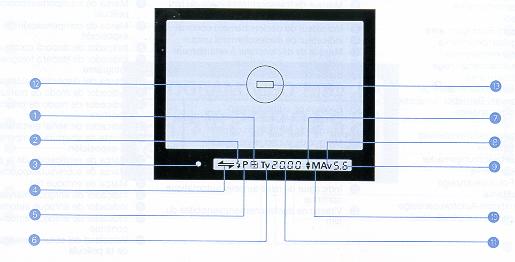
< Display Panel >
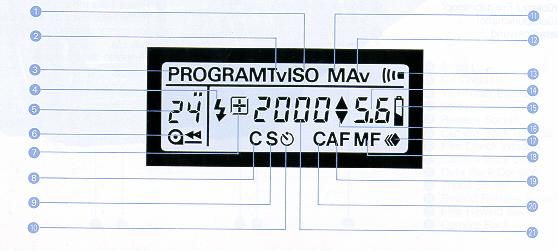
The display panel shows all information available for taking pictures with
this camera. It may not represent actual data,
| (1) Film Speed (ISO)
(2) Shutter-priority Mode Indicator (3) Program Mode Indicator (4) Flash Mark (5) Exposure Counter (6) Film Transport/Rewind Mark (7) Exposure Compensation Mark
(9) Single-frame Shooting Indicator (10) Self timer Mark (11) Manual Mode Indicator |
(12) Aperture-priority Mode Indicator
(13) Electronic Signal Indicator (14) Aperture/Exposure Compensation Setting
(16) Over/Underexposure Mark
(19) Auto Focus Indicator
|
< Display in the Viewfinder>
The liquid display section in the viewfinder will automatically brighten up when the light is dim to let you see the display
clearly even in the dark.
| (1) Exposure Compensation Mark
(2) Flash Mark (3) Sharp Focus LED (green) (4) Front M is-focus/Rear M is-focus Mark (5) Program Mode Indicator
|
(7) Over/Underexposure Mark
(8) Aperture priority Mode Indicator (9) Aperture/Exposure Compensation Setting
(11) Shutter Speed/Film Speed (12) Spot Circle (13) Focusing Frame |
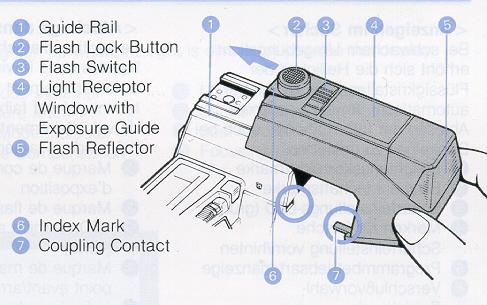 |
(1) Guide
Rail
(2) Flash Lock Button (3) Flash Switch (4) Light Receptor (5) Window with (6) Exposure Guide (7) Flash Reflector (8) Index Mark (9) Coupling Contact |
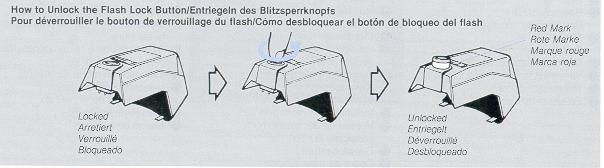
| < Mounting
and Dismounting the Dedicated Flash CS110AF> To mount the flash, first unlock the Flash Lock Button. (When it is unlocked, it will pop up and show a red mark.) Mount the flash from the front side of the camera and slide it in along the Guide Rail as far as it will go. Then, press down the Flash Lock Button and turn it clockwise until the index mark on it comes opposite the index mark on the flash, and lock the flash in place. To dismount the flash, repeat the above-mentioned procedure in reverse. * Do not apply too much pressure on the flash coupling contact.
* When attaching the flash, make sure the Coupling Contact is inserted into the camera's Power Terminal. |
|
|
|
|
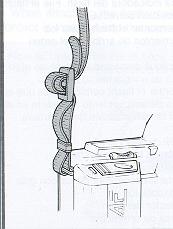
Attaching the Strap Attach the Strap as shown in the illustration.
|
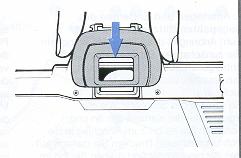
Attaching the Eyecup: Attach the Eyecup as shown in the illustration.
|
| Attach the optional FL type
Diopter Lenses as shown. The Eyecup can be attached on a Diopter
Lens.
|
Mounting the Lens
First, remove the lens cap and body cap. Then, align the red dot on the lens
rear with the red dot (lens mounting index) on the camera's Lens Release Button,
push in the lens and turn it clockwise until it locks with a click.
* To dismount it, press in the Lens Release Button and turn it
counterclockwise.
* If you are changing the lens with film loaded in the camera, take care to
avoid direct sunlight.
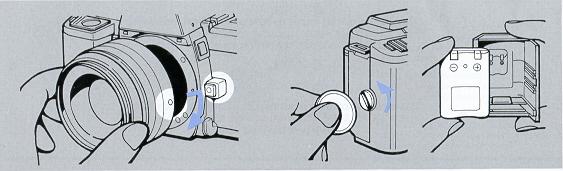
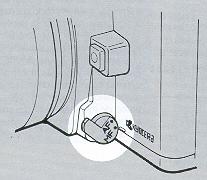
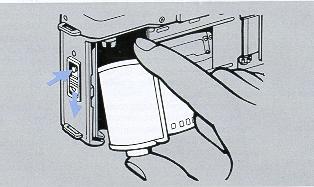
Loading the Battery
Loosen the Battery Holder Screw by turning it toward the arrow with a coin and remove the Battery Holder. Insert the lithium battery correctly, as illustrated inside the holder. Then, close the holder so that the claw on its side is engaged, install it again and lock it in place with the screw.
Use a 6 V Lithium battery (2CR5)
Main Switch
| The Main Switch of this camera has three positions. When it is set to LOCK, the camera is turned off. When it is set to AK-L, you can take pictures with a fixed exposure value on spot metering. When it is set to ON you can take pictures by measuring exposure on center-weighted metering. Set the switch depending on the subject you want to shoot. If you are not using the camera, always set it to LOCK. |
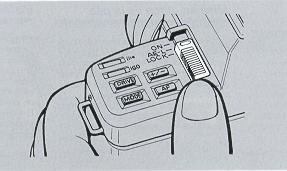 |
LOCK The camera is turned off.
AE-L The camera is turned on and takes
pictures on spot metering. If the Shutter Release is depressed halfway, the AE
lock is activated.
ON The camera is turned on and takes pictures
on center-weighted metering. Normally, set the Main Switch to ON.
* When the camera is turned on, the shutter speed, aperture and other
information will be displayed for 8 seconds in the display panel and viewfinder.
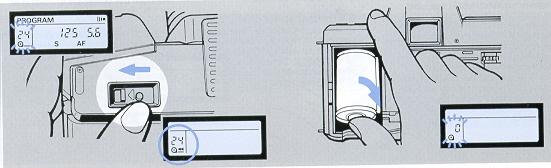
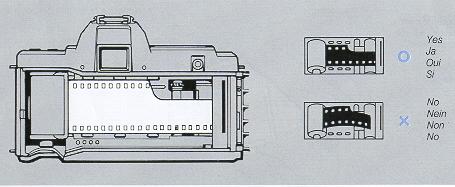
Loading the Film
|
1.
Set the Main Switch to ON, open the Camera Back and load the film.
To open the Camera Back, push down the Camera Back Lock while
pressing in the button on it. To insert the film, first fit the
recessed end of the cassette to the shaft located on top of the film
chamber and push it in. It will thus fit smoothly into position.
Always load and unload film in subdued light.
* If you use DX-coded film, the camera will automatically set itself for the speed of the film loaded in it. * Do not touch the shutter curtain or DX contacts. |
 |
| 2. Insert the film tip as
far as the orange mark ("--") and close the
Camera Back. Engage the film perforations with the sprocket teeth and make sure the film lies flat and tight as shown in the illustration, then close the Camera Back. As soon as you close it, the film will automatically advance to the first frame. · If the film is advancing properly, the Exposure Counter will show "1" and
the Film Transport Mark " |
 |
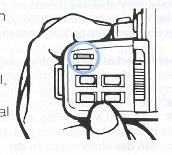
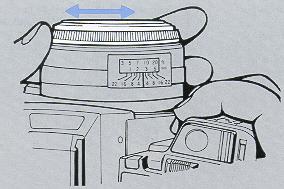
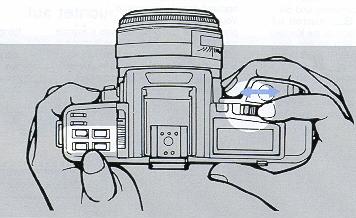
Taking Pictures
| Before taking pictures, set
the drive mode,
focusing mode and exposure mode to the desired positions
according to the subject you want to shoot.
To set the mode, move the Operating Lever to the left or right while
pressing the corresponding mode button until the desired mode appears in the
display panel.
* The display in the panel will run through quickly if you continue to push the lever for more than a second. * The Program Reset Button is very useful because the camera will automatically set the positions of the drive mode, focusing mode and exposure mode that are most convenient for taking pictures as soon as you press this button. |
 |
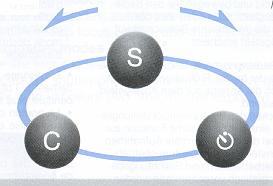
Mode description
* Drive modes There are three modes: single-frame shooting
(S) continuous shooting (C), and self-timer shooting (![]() ),
),
* Focusing modes There are four modes: auto-focus (AF),
continuous autofocus CAF), trap focus (
![]() ), and manual focus
(M).
), and manual focus
(M).
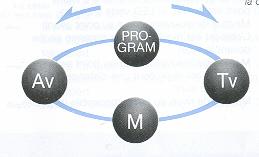
* Exposure modes There are four modes: programmed auto exposure
(PROGRAM), shutter-priority auto exposure (TV), aperture priority auto exposure
(AV), and manual exposure (M).
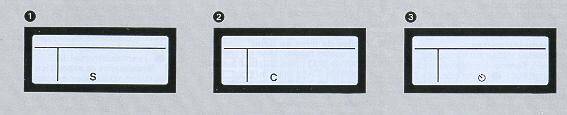
< Drive Modes
>
|
Operating Lever to the right
|
|
|
(1) Single Frame Shooting: S Each time you depress the
Shutter Release, the camera will expose one frame at a time and advance the film
to the next frame, then stop.
(2) Continuous Shooting: C While you are depressing the Shutter
Release, the camera will take pictures one after another at a rate of up to
about 1.8 frames a second.
(3) Self timer Shooting: $) When you depress the Shutter
Release, the self-timer LED in the camera front will turn on and the shutter
will trip after 10 seconds.
| <Focusing Modes>
This camera offers a versatile focusing system which
consists of four focusing modes. The auto-focus mode (AF) is
convenient for taking ordinary pictures. The continuous
auto-focus mode (CAP) allows you to take pictures in
succession by keeping your subject in sharp focus as it moves.
The trap focus mode |
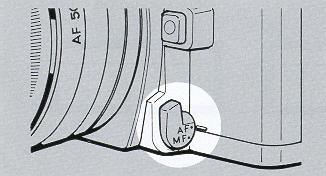 |
| Selector Lever
This lever selects the basic focusing functions of the camera. If you want to take auto-focus or continuous auto focus pictures, set the lever to "AF". If you want to take trap focus or manual-focus pictures, set it to "MF".
|
Selector Lever at AF
Selector Lever at MF
|
 |
 |
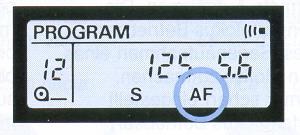
Auto Focus: AF
| If you depress the Shutter
Release lightly the camera will automatically start to focus the lens on the
subject located in the focusing frame in the viewfinder. As soon as the
green sharp-focus LED turns on, you can depress the Shutter Release all the
way to take your picture. This mode is convenient for taking relatively
static objects, because the focus is locked when the lens is focused on the
subject by depressing the Shutter Release halfway.
· If you take auto-focus pictures in the drive mode "C" the camera will automatically focus the lens for each frame and take pictures continuously.
|
 |
 |
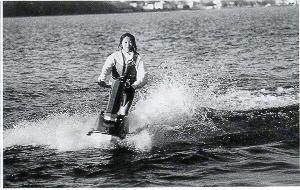 |
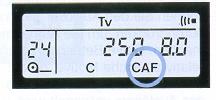
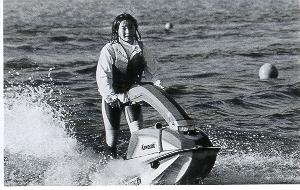
Continuous Auto Focus: CAF As long as you keep depressing the
Shutter Release lightly, the auto-focusing system will function and keep
the subject in the focusing frame in sharp focus. This mode is useful for
shooting moving subjects continuously, because it will continue to focus
on the subject as the subject moves and its shooting distance changes,
even after the lens has been once focused on it. Depress the Shutter
Release all the way when the sharp-focus LED turns on.
· If you take continuous auto-focus pictures in the drive mode "C", the
camera will automatically focus the lens on the subject and take pictures
continuously with the fixed focus.
· Use the AF Lock Button to lock the focus.
|
 |
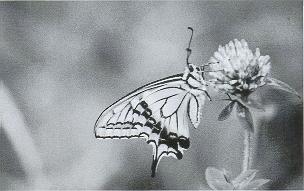
Trap Focus:
![]()
| This mode is useful for shooting
nervous animals or moving subjects at a fixed distance. Face the camera
toward the place where you guess your subject will come, set the camera to
that distance with the Focusing Ring, attach the cable switch and release
it. As soon as the subject comes to this distance and it is caught in the
focusing frame in the center of the viewfinder, the shutter will trip to
take your picture.
|
 |
 |
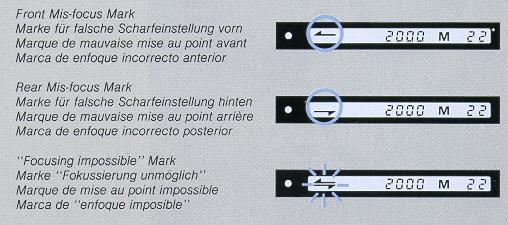 |
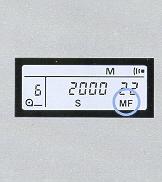
Manual Focus: MF To focus, turn the Focusing Ring with your
hand. If the subject is not correctly focused, the front mix-focus or rear
mix-focus mark will turn on. If it is in sharp focus, the green LED will turn
on.
|
|
: Front Mis-focus Mark.\ The lens is focused in front of the subject. --is: "Focusing impossible" Mark (blinks) |
<Exposure Modes>
(1) Programmed Auto Exposure: PROGRAM The camera contains a
combination program of shutter speeds and apertures and
automatically selects the optimum combination of shutter speed and aperture
depending on the brightness of the subject
(2) Shutter priority Auto Exposure: TV If you set a
shutter speed, the camera will automatically, select the optimum aperture for it
depending on the brightness of the subject, to provide correct exposure.
|
|
|
Operating Lever to the left
|
* The shutter speed is set with the Operating Lever.
(3) Aperture-priority Auto Exposure: Av If you
set an aperture, the camera will automatically control the shutter speed to
provide correct exposure.
* The aperture is set with the Operating Lever.
 |
 |
4. Manual Exposure: M In this mode, you can set your desired
shutter speed and aperture by hand.
· The shutter speed is set with the Operating Lever, and the aperture is set
with this lever while pressing in the F-number Button.
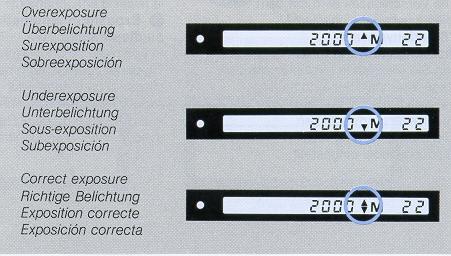
Overexposure/Underexposure Warning If you depress the Shutter
Release lightly, you may see an Overexposure ("![]() '')
or Underexposure ("
'')
or Underexposure ("![]() ")
turn on in the viewfinder. If the mark "
")
turn on in the viewfinder. If the mark "![]() "
appears, your subject will be overexposed relative to the correct exposure
measured by the camera; if the mark "
"
appears, your subject will be overexposed relative to the correct exposure
measured by the camera; if the mark "![]() "
appears, your subject will be underexposed. To obtain correct exposure change
the aperture or shutter speed so that the mark "
"
appears, your subject will be underexposed. To obtain correct exposure change
the aperture or shutter speed so that the mark "![]() "
appears, then shoot.
"
appears, then shoot.
· If you use an AF Converter (optional accessory), take pictures in the "Av" or
"M" mode. Even if the camera is set to other exposure modes, it will operate in
the "Av" mode.
|
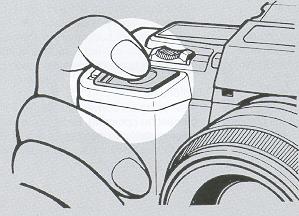
Shutter Release |
Electronic Signal Button When the mark " * When the lens is focused on the subject (in the AF and "
|
|
|
|
| Using the Flash CS- 110AF 1. Mount the Flash
* Charging the flash is possible while the display in the viewfinder and display panel turns on. |
The dedicated small-size flash CS-110AF
can be integrated with the camera to let you take beautifully exposed
pictures at night or even in backlight with ease . 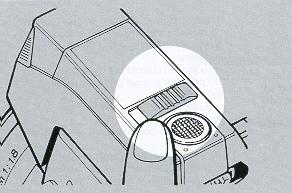 |
|
3. After making sure the mark "
As soon as the flash has fired, the entire liquid crystal display in the viewfinder will illuminate in orange color to let you see that the flash has surely fired while you take pictures. If you are taking auto exposure pictures with the CS-1 10AF, the shutter
speed is automatically set to 1/90 sec. If you are working in the manual
exposure mode, the shutter will trip with the shutter speed you have set if it
is 1/90 sec. or slower.
|
|
|
Rewinding the Film
|
If the entire roll of film has been exposed, the camera will stop winding the film and the Exposure Counter in the display panel will blink.
1.
While pressing the Rewind Release Button, slide the Rewind Switch toward
" * You can also rewind the film in the middle of a roll. |
2. It rewinding is completed, unload the film.
· Unload the film in subdued light and take the exposed film for processing as soon as possible. · After unloading the film, be sure to set the Main Switch at LOCK .
|
|
|
|
CAMERA FUNCTIONS IN DETAIL
This chapter explains the camera functions and applications of the Yashica
230-AF in detail.
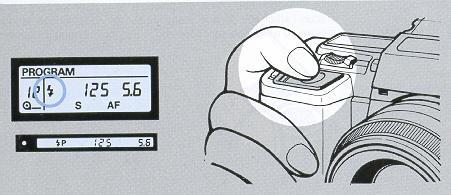
Display of Shutter Speed and
Aperture
The display of shutter speed and aperture in the display panel and viewfinder
will turn on in the following cases:
· When the Main Switch is turned on;
· When the Shutter Release is depressed halfway;
· When a mode Button (Focus Mode Button, Drive Mode Button etc.) is
pressed. The display will appear for eight seconds, then automatically turn off
to save battery. However, the shutter speed and aperture you have set will be
stored in memory. The shutter speeds are displayed in 1/2-step increments from
"2000" (1/2000 sec.) to "16" (16 sec.), and the apertures In 1/2-step
increments within the aperture range of the lens used. If the picture is taken
with an intermediate value between neighboring 1/2 steps, the camera will
display the exposure value that is most close to the value which is set. For
example, if you are using an F1.8 lens, the camera will show "1.7" if you are
using an F3.3 lens, it will show "3.5".
· In the manual-exposure and shutter-priority auto exposure modes
the shutter speeds can be set in 1-step increments, and the apertures in
1/2-step increments. Intermediate setting is impossible.
· If the exposure mode is "PROGRAM", "Tv" or "Av", the lens'
smallest-aperture value will blink when the subject is overexposed relative to
the correct exposure measured by the camera; and the maximum-aperture value will
blink if it is underexposed.
Using the Focus Lock
| If you are taking
auto-focus pictures and the subject you want to focus is not located in the
center of the viewfinder, or if the subject is difficult to focus in the
situations mentioned below, use the focus lock.
1. First, aim the Focusing Frame at your subject and focus. If the Shutter Release is depressed halfway, the lens will start focusing itself. As soon as it is focused on the subject, the green LED will turn on to tell you that focusing has been completed. 2. Lock the focus, recompose your picture and shoot. * If you are shooting in the "AF" mode, the focus will remain locked while the subject is in sharp focus and the Shutter Release is depressed halfway. * If you are shooting in the "CAF" mode, lock the focus by pressing the AF Lock Button when the subject is focused. (The focus will remain locked as long as you keep your finger on the AF Lock Button.) |
|
|
|
 |
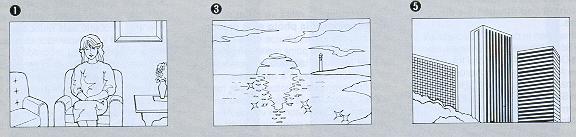
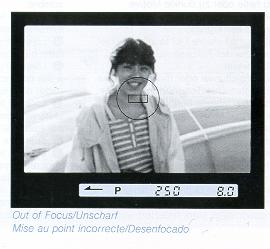
<Subjects That are Difficult to Focus>
In the following cases,
the auto-focus system will not function properly and the "Focusing
Impossible" mark "=" will blink in the viewfinder. In such cases, focus the
lens on another object located nearly the same distance as the subject,
activate the focus lock and shoot. You can also focus the lens manually. |
|
|
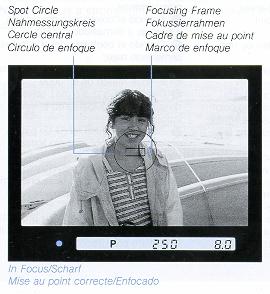
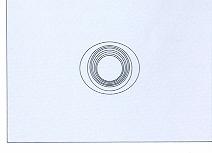
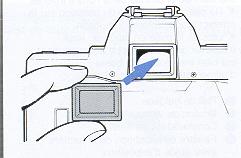
Focusing Screen
| < Focusing Frame and Spot Circle
> The Focusing Screen has a Focusing Frame for auto focusing and a Spot Circle for determining the metering range for spot metering. In addition to this standard focusing screen, three optional screens are available: matte screen for the Data Back, sectioned matte screen, and horizontal split-image/microprism collar screen. They are interchangeable depending on your purpose. |
< Manual Focusing > You can focus the lens manually on the matte screen with the aid of the Front Mis-focus/Rear Mis-focus Mark in the viewfinder. While looking through the viewfinder, turn the Focusing Ring until the image on the matte screen appears sharp. It will look blurred if the subject is not in sharp focus. · If you are far- or near-sighted, use FL type Diopter Lenses (optional). Eight different lenses are available: - 5, -4, -3, -2,0, +1, +2,and +3diopters. |
|
|
|
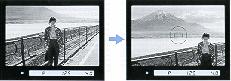
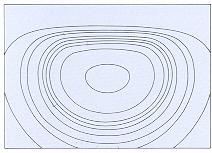
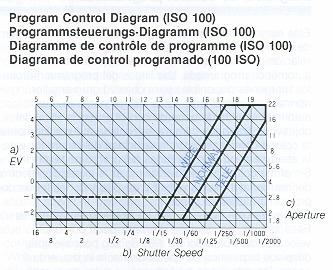
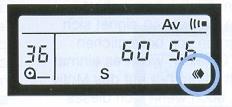
Program Control Diagram
This program control diagram shows the control
range of shutter speeds and apertures relative to EV values in the programmed
auto exposure mode. The program lines mark the available ranges for wide angle,
normal and telephoto lenses, and these ranges are automatically set according to
the focal length of the lens used. The camera automatically chooses the optimum
combination of shutter speed and aperture within the respective program lines.
However, you can also change the exposure within the range of the same EV value
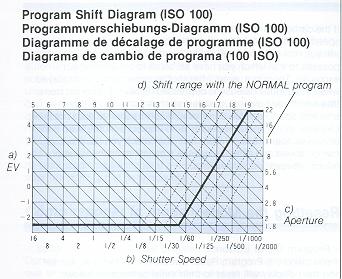
by shifting the program lines by up to +3 steps. If the correct exposure that is
set by the camera is F4, 1/125 sec., and you want to shoot with a shutter speed
of 1/60 sec., for example, shift the Operating Lever to the left by 2 steps.
Thus, an exposure value of F5.6, 1/60 sec. will be displayed and you can take a
correctly exposed picture with the same EV value.
· When the program is shifted, the program indicator will blink. After the
picture is taken with the shifted program or after the Main Switch is set to
LOCK, the camera will automatically reset the exposure value that was set before
the program was shifted.
 |
 |
|
WIDE program line: For lenses with focal lengths shorter than 35 mm |
NORMAL program line: For lenses with focal lengths of 35--85 mm |
TELE program line: For lenses with focal lengths longer than 85 mm
· This diagram shows the automatic control range with an F1.8 lens. In the
case of lenses with different F numbers, the control range becomes narrower as
the lens speed decreases. The control range with an F2.8 lens, for example, is
represented by the dotted line in the diagram.
Automatic Exposure Compensation in the Mode
If the camera cannot provide a correct aperture for the shutter speed you have
set in the shutter-priority auto exposure mode, it will automatically choose
again a shutter speed as close as possible to that which you have set so as to
provide correct exposure. Therefore even if the shutter speed which is displayed
when the Shutter Release is depressed halfway is different from that which you
have set, you can go ahead and shoot if the smallest-aperture value or
maximum-aperture value does not blink. Likewise, in the aperture-priority auto
exposure mode, even if the displayed aperture is different from that which you
have set, you can go ahead and shoot unless the smallest-aperture value or
maximum-aperture value blinks.
Resetting the Mode
< Program Reset Button >
If you press the Program Reset Button the modes that are set and their
display will reset to their initial settings as follows:
| · Drive mode . . . . . . . . . . . .
. . . . . . . . . . . . . . . . . . . · Focusing mode Selector Lever at "AF" . . . . . . . . . . . . . . . . . . . . . . Selector Lever at '`MF" . . . . . . . . . . . . . . . . . . . . . · Exposure mode . . . . . . . . . . . . . . . . . . . . . . . . . . . · Exposure compensation . . . . . . . . . . . . . . . . . . . . . · Audible electronic signal . . . . . . . . . . . . . . . . . . . . . |
Initial Setting: To "S" To "AF" To "MF" To "PROGRAM" ("P" is displayed in the viewfinder) To "0. 0" To " |
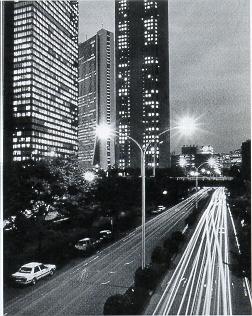
Bulb Exposure
If you are taking pictures of the sky at
night or other subjects requiring long exposure times, use bulb exposure
First, set the exposure mode to `'M'' and set the shutter speed to "bulb".
As long as the Shutter Release is held depressed, the shutter will remain
open to expose the subject. For bulb exposure, the camera must be fixed on a
tripod or a solid base to prevent camera shake. The shutter is tripped with
an optional cable switch connected to the camera.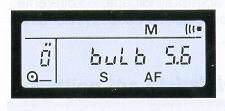 When the Shutter Release is depressed, the Exposure Counter shows "O" and, while the button is held depressed, it shows the exposure time in seconds. The counter will advance from "O" to "59" and, if the exposure time exceeds 60 seconds, it will return to "1" and count again. · You cannot use the self-timer and trap focus technique for bulb exposure. |
 |
Using the self-timer
If you are shooting group pictures or if you want to include yourself
in a souvenir picture, use the self-timer.
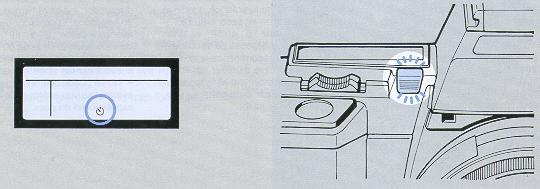
1 Set the Self-timer Mode
While pressing the Drive Mode Button, operate the Operating Lever
to show the mark "
![]() " in the display panel.
" in the display panel.
2 Focus the lens and depress the Shutter Release
to start the self-timer. Always depress the Shutter Release after the
lens is correctly focused. As soon as the self-timer has started, the self-timer
LED will turn on and the shutter will trip after 10 seconds.
· While the self-timer is running, auto focusing in the "AF" or "CAF" mode is
not possible.
· If you want to take self-timer pictures with the focus mode set to "AF" or
"CAP", make sure the green LED in the viewfinder turns on by depressing the
Shutter Release halfway' then operate the self-timer by depressing it all the
way.
· To stop the self-timer after it has started, turn off the Main Switch.
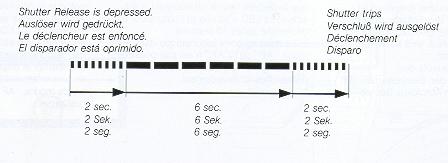
· While the self-timer is running, an audible electronic signal will sound and
the self-timer LED will illuminate in the following sequence:
When taking self-timer pictures in an auto-exposure mode, the extraneous light
entering through the viewfinder eyepiece may adversely affect the exposure.
Because this camera is designed to focus the lens and determine the exposure
when the self-timer started, do not remove your eye from the
eyepiece before the self-timer starts to prevent light from entering through it.
Trap Focus Shooting
The Yashica 230-AF features a trap focus system which allows the
shutter to trip as soon as the subject comes to the distance at which the lens
has been focused beforehand. If you use this technique, you can take photographs
of nervous animals that are usually difficult to shoot. You need only wait for
the subject to arrive in the scene with the fixed focus. Moving objects can also
be shot at your desired distance and in the composition you like even in your
absence.
1. After setting the Selector Lever to "MF", set the Focus Mode to
"
![]() ". While pressing
the Focus Mode Button, move the Operating Lever to show the mark "
". While pressing
the Focus Mode Button, move the Operating Lever to show the mark "
![]() " in the display panel.
" in the display panel.
|
|
|
|
2. Set the Exposure Mode and Drive Mode and focus the lens. Set the desired exposure mode and drive mode depending on the subject and situations. Then turn and set the Focusing Ring to your desired distance or a distance at which your intended subject is expected to come. * You cannot use the self-timer and bulb exposure in the trap focus mode. |
3. Place the camera, compose your picture and keep the Shutter Release in depressed position Face the camera toward the subject, choose your desired framing and keep the Shutter Release in depressed position with the Cable Switch. As soon as the subject arrives and it is caught in the Focusing Frame, the lens will focus on it and the shutter will trip to expose one frame if the Drive Mode is set to "S". If the camera is operating in the Drive Mode "C", it will take pictures one after another continuously while the lens is focused on the subject. |
|
|
|
* While the camera is operating in the trap focus mode, its power switch remains
on until the shutter trips.
* If you remove your eye from the viewfinder eyepiece when the Shutter Release
is kept in depressed position, attach the accessory Eyepiece Shutter. For
details, refer to the instruction sheet packed with it.
* To clear the trap focus mode after it was set, switch the Selector Lever to
"AF"
* You can also use this trap focus technique with the AF Converter. In this
case, first focus the lens in the "AF" mode and switch it then to the trap focus
mode
Metering System
This camera offers two metering methods: center weighted metering
and spot metering. Use these two methods depending on your subject and shooting
conditions.
|
|
|
<Center-weighted Metering (Main Switch at ON)>
This method measures the light with great emphasis on . the brightness of the
subject in the central part of the picture frame and also takes the brightness
of the surrounding area into account. It insures uniform exposure in the entire
frame and reacts well to both bright and dark light, making it suitable for
taking ordinary pictures.
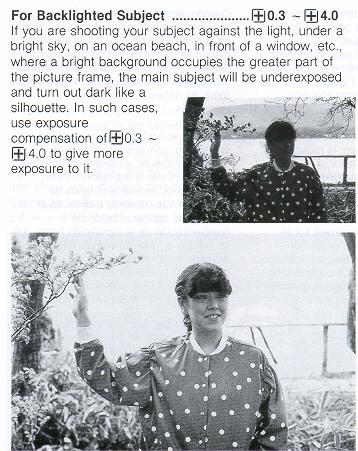
Automatic Backlight Compensation
Even if your main subject in the center of the viewfinder is
backlighted, you can take beautifully exposed pictures of it because the
exposure is automatically compensated. If the surrounding area is brighter than
the center of the picture frame in backlighted situations, the camera will
automatically measure only the central part so that the main subject is not
underexposed.
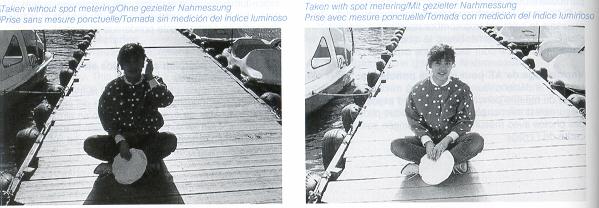
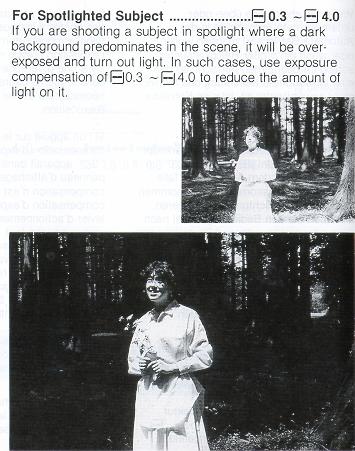
Spot Metering (Main Switch at AE - L)>
This method measures only the central part of the picture frame to determine
the exposure. If the subject is very bright against the background, such as a
spotlighted subject on the stage, or on the contrary, if the background is too
bright compared to the subject, such as a backlighted portrait, you can take
sharp pictures using this method. It is also useful for producing a dramatic
effect in your picture by setting exposure on a particular part of the subject.
* If you have selected the spot metering method, but if your subject is too dark
for it, the camera will automatically switch to the center-weighted metering
method to provide correct exposure.
AE Lock on Spot Metering
When the Shutter Release is depressed halfway in the spot metering
mode, the measured exposure value will be stored in memory. This is useful for
taking pictures on spot metering in an edge of the picture frame.
Taking Pictures on Spot Metering
1. Set the Main Switch at AE-L and aim the I
Focusing Frame at the main subject. Thus, you can set the exposure
value of your subject by spot metering.
2. Depress the Shutter Release
First, depress the Shutter Release halfway. The spot-value will be stored in
memory by the AE Lock.
If the main subject is not in the center of the viewfinder, move the camera so
that it is located in the Focusing Frame to focus the lens on it. Then,
recompose your picture with the Shutter Release depressed halfway and take it by
depressing the button all the way.
* If you take continuous exposure pictures in the drive mode "C" with an
exposure value of the subject fixed by the AE Lock, all pictures you take will
be uniformly exposed, unaffected by changes in lighting conditions in the
background.
Manual Setting of Film Speeds
If you are using non-DX-coded film or if you want to shoot with a
film speed that is different from that of your film, set the desired speed by
pressing the ISO Button and operating the Operating Lever.
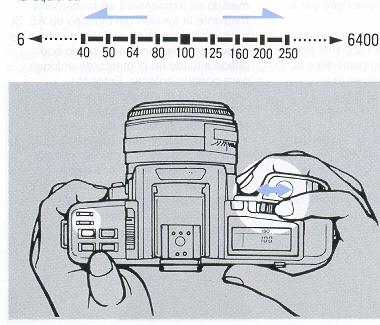 |
· Film speeds from ISO 6 to ISO 6400 can be set in 1/3-step increments.
· If you are using non-DX-coded film, press the ISO Button to confirm the ISO
speed that is set.
· Once a film is loaded and its film speed is set, the ISO value that is set will not change until the film is unloaded, even if the power is turned off.
|
Using the Exposure Compensation Button
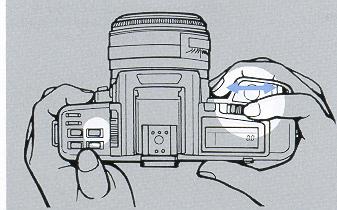 |
If you want to take intentionally
overexposed or under exposed pictures in the auto mode, or an intended
exposure is not obtained because there is an extreme difference in
brightness in the same picture frame, exposure compensation is necessary.
If you press the Exposure Compensation Button, the mark "0.0" will appear in the viewfinder and display panel if no exposure compensation is made. To make exposure compensation, move the Operating Lever to the left or right while pressing the Exposure Compensation Button and show your desired compensating value in the display. Exposure compensation is possible in the range of +4.0 EV - -4.0 EV and can be set in 1/3-step increments. |
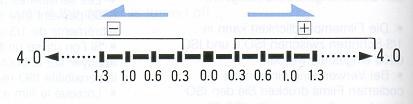 |
After taking pictures with exposure compensation, always reset it: "0.0". · During exposure compensation, only the + or - mark will turn on in the viewfinder and display panel. |
 |
 |
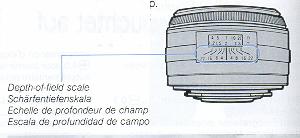
Depth of Field
When the lens is focused on a subject, not only the subject itself, but also
a certain zone in front of and behind it will turn out sharp in the picture.
This is called the depth of field of a lens and it varies as follows:
(1) The smaller the aperture, the wider the depth of field, and
vice versa.
(2) The longer the subject distance, the wider the depth of field,
and vice versa
(3) The zone of sharpness behind the point on which the lens is focused is wider
than that in front of it. In the case of different lenses, lenses with shorter
focal lengths have a wider depth of field than those with longer focal lengths.
|
The zone of sharpness can be checked on the depth-of -field scale of the lens. If you are using a 50 mm F1.8 lens and shooting a subject at 2 m with an aperture of F16, for the camera will turn out sharp. · Some zoom lenses are not provided with a depth-of-field |
|
|
|
|
Dedicated Flash CS-110AF
The CS-1l0AF operates on a CPU-matic method. Because it takes its power from the
high-performance lithium battery of the camera, its recycle time is very short
so that you can take flash pictures one after another almost continuously.
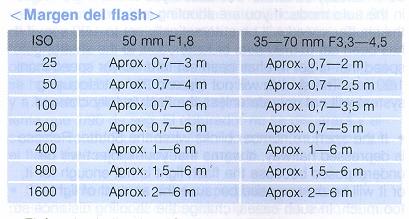
< Flash- Range >
| ISO | 50mm F1.8 | 35-70mm F3.3 - 4.5 |
| 25 | Approx. 0.7--3 m | Approx. 0.7--2 m |
| 50 | Approx. 0.7--4 m | Approx. 0 7--2.5 m |
| 100 | Approx. 0.7--6 m | Approx. 0.7--3 5 m |
| 200 | Approx. 0.7--6 m | Approx. 0 7--5 m |
| 400 | Approx. 1--6 m | Approx. 1--6 m |
| 800 | Approx. 1.5--6 m | Approx. 1 5~6 m |
| 1600 | Approx. 2--6 m | Approx. 2--6 m |
· The illumination angle of this flash covers the field of view of 35 mm lenses.
If macro pictures are taken with some types of lenses, however, it may not cover
the entire picture frame because the distance from the lens to the flash
reflector is short.
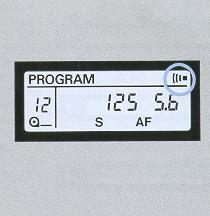
< Flash Mark and Automatic Shutter Speed Setting >
The flash will recharge in about 2.5 seconds and, as soon as it fully charged,
the Flash Mark "
![]() " will turn on in the display panel. At the same time, the shutter speed will
automatically switch to 1/90 sec. if you are taking pictures in the auto mode.
If you are shooting in the manual mode, the shutter speed will be automatically
set to 1/90 sec. if it has been set to 1/90 sec. or faster, and to the shutter
speed that is set if it has been set to a slower speed than 1/90 sec. The
shutter will not trip and the auto-focusing system will not operate unless the
flash is fully charged.
" will turn on in the display panel. At the same time, the shutter speed will
automatically switch to 1/90 sec. if you are taking pictures in the auto mode.
If you are shooting in the manual mode, the shutter speed will be automatically
set to 1/90 sec. if it has been set to 1/90 sec. or faster, and to the shutter
speed that is set if it has been set to a slower speed than 1/90 sec. The
shutter will not trip and the auto-focusing system will not operate unless the
flash is fully charged.
* If the aperture number blinks when the Shutter Release is depressed halfway,
it warns that your subject will be underexposed because the flash light is not
enough for it, or it will be overexposed because the amount of light is too
much. In such cases, change the shooting distance so that the aperture number
stops blinking.
After the flash is charged, if you do not take your flash picture immediately
with the Main Switch on, check to make sure the mark "
![]() " turns on by depressing the Shutter Release halfway before you shoot.
" turns on by depressing the Shutter Release halfway before you shoot.
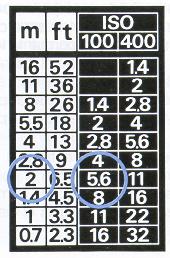
| <Exposure Guide> If you are shooting in the manual mode with the dedicated flash CS-1 10AF, you can easily find the correct aperture according to the shooting distance (with an ISO 100 or 400 film). First, estimate the distance from the camera to the subject with your eye. Then, find a distance value that is most close to your camera-subject distance in the left side of the table. In the right side of the table, you will find the correct aperture corresponding to the ISO speed of the film you are using. If you shooting a subject at a distance of about 2 m with an ISO 100 film, for example, you can take correctly exposed pictures if you set the aperture to 5.6. |
 |
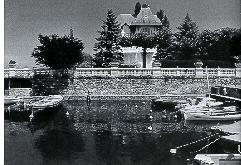
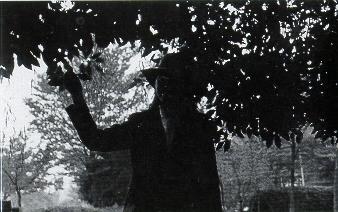
<Using Daylight Flash>
 |
In the following cases, you
can use flash even in the daytime. By using this technique, both the subject
and background will turn out perfectly exposed.
(1) When the subject is standing against a bright back" ground, such as backlighted portraits and people standing in front of a window; (2) When the subject is in the shade of a tree, or when the subject's face is illuminated by sunshine filtering through foliage; (3) Portraits in the early morning, In the evening or on a rainy day when the light is faint. |
 |
Flash Photography with
Dedicated Accessories
When flash pictures are taken with the CS-1 10AF using an AF Converter or AF
Extension Tube, the distance data on the lens is not correctly transmitted to
the camera. In this case, you will have to set the aperture manually because it
is impossible to obtain correct exposure in the auto mode. To set the aperture,
refer to the exposure guide or calculate the correct aperture with the guide
number 11 of this flash. If you want to take auto flash pictures with an AF
Converter or AF Extension Tube, use the flash CS-250AF and shoot in the "Av" or
"M" mode. It will allow you to take correctly exposed TTL auto flash pictures.
* If you take flash pictures with the CS-110AF, caution is required because part
of the flash light may be cut by the lens front edge with some types of lenses
and in close-ups.
Taking TTL Auto Flash Pictures
Combined with a TTL auto flash unit, this camera enables you to
take auto flash pictures based on a TTL direct light metering method. When the
flash selector is set to AUTO, the flash mark "
![]() " will turn on as soon as the flash is fully charged. After making sure this
mark turns on, depress the Shutter Release. The shutter speed is automatically
set to 1/90 sec. in the programmed TTL auto flash and aperture-priority TTL auto
flash modes. If you are working in the manual type TTL auto flash mode, you can
choose any shutter speed in the range of B to 1/90 sec. The automatic flash
range is very wide because the aperture is automatically set in the program mode
according to the shooting distance (the same applies to the "TV" mode, too). As
soon as the shutter is tripped, the required amount of flash is automatically
adjusted by means of the camera's light receptor to provide correct exposure.
After the flash has fired, the mark "
" will turn on as soon as the flash is fully charged. After making sure this
mark turns on, depress the Shutter Release. The shutter speed is automatically
set to 1/90 sec. in the programmed TTL auto flash and aperture-priority TTL auto
flash modes. If you are working in the manual type TTL auto flash mode, you can
choose any shutter speed in the range of B to 1/90 sec. The automatic flash
range is very wide because the aperture is automatically set in the program mode
according to the shooting distance (the same applies to the "TV" mode, too). As
soon as the shutter is tripped, the required amount of flash is automatically
adjusted by means of the camera's light receptor to provide correct exposure.
After the flash has fired, the mark "
![]() " will blink for two seconds to tell you that your subject is correctly exposed.
" will blink for two seconds to tell you that your subject is correctly exposed.
· The TTL flash units that operate on a TTL direct light metering method, such
as Contax TLA 30, can be used in the same way.
Battery Replacement
If the voltage of the built-in 6-volt lithium battery (2CR5)
decreases, the mark "
![]() " will
appear in the display panel and start to blink. Even if it starts to blink, the
battery probably still has enough power for exposing two or three rolls of film
(24 exposures). However, if you take flash pictures with CS-110AF, the battery
will be drained quickly, so it is advisable to change the battery as soon as
possible. If you continue to take pictures without changing the battery, the
camera will no longer be able to operate at all as soon as the battery is
completely exhausted.
" will
appear in the display panel and start to blink. Even if it starts to blink, the
battery probably still has enough power for exposing two or three rolls of film
(24 exposures). However, if you take flash pictures with CS-110AF, the battery
will be drained quickly, so it is advisable to change the battery as soon as
possible. If you continue to take pictures without changing the battery, the
camera will no longer be able to operate at all as soon as the battery is
completely exhausted.
· If the mark "
![]() "
turns on (without blinking), the backup battery is worn out. In this case,
contact your nearest Yashica Service Station.
"
turns on (without blinking), the backup battery is worn out. In this case,
contact your nearest Yashica Service Station.
· This camera has a safety circuit for protecting its microcomputer from strong
static electricity. However, it may fail to operate, though very rarely, as a
result of the operation of this safety circuit. In this case, set the Main
Switch at LOCK, press the Program Reset Button and operate the camera again to
take pictures
< Battery Precautions >
· Generally, the battery performance is reduced temporarily by low
temperatures. If you are shooting in cold weather, use a new battery and keep
the camera warm before shooting. Even if the battery performance is reduced by
low temperature, the battery will function normally again if the temperature
returns to normal.
· Wipe both battery poles clean with a dry cloth before use,
because poor contact may result if they are soiled by sweat, oil or grease.
· If you are going on a long trip, bring a spare battery with you.
· Do not throw a used battery into fire and do not attempt to
disassemble, heat or short the battery because it is dangerous.
· Keep the battery out of children's reach. If it is swallowed,
consult a physician immediately.
· The camera does not operate if the battery is loaded with its
plus (+) and minus (-) sides wrong.
Release Socket
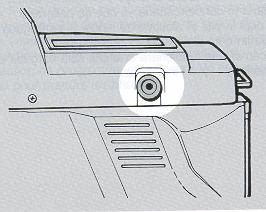 |
The Release Socket accepts such remote
control units as the Cable Switch L, Infrared Controller S and Radio
Controller. It transmits electric signal from them to operate the shutter. · If you use the Release Socket in the focus mode "AF" or "CAP", caution is required because the shutter trips as soon as the lens is focused on the subject. If you do not want to miss any shooting opportunity, therefore, you will have to take pictures in the focus mode `'MF". · Do not connect a commercially available ordinary cable release to this Release Socket because malfunction may result. |
 |
Interchangeable Camera Back
|
ACCESSORIES
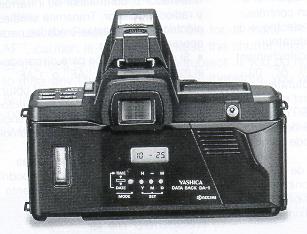 |
< Data Back DA 1 > This is a quartz-controlled liquid crystal data back that can be used in place of the standard camera back and operates in full coupling with the body without cord. You can choose two printing modes for date and time. Its auto calendar enables automatic correction of leap years as well as months with a different number of days up to the year 2019. |
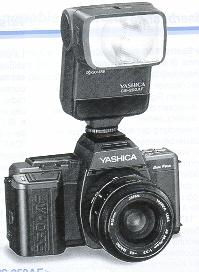
| <Flash CS-250AF> Specially developed for Yashica auto-focus SLR cameras, the CS-250AF is a high-power flash with a guide number of 25 (35 mm, ISO 100). It is compactly built and provided with a zoom flash unit that can change the illumination angle to cover the angular fields of various lenses of 28 mm to 85 mm. It also has a supplementary light for the auto-focus system to permit focusing even in dim light so that you can take TTL auto-focus auto-flash pictures with ease. Because its flash head tilts upward up to 90°, you can enjoy sophisticated flash techniques such as bounce flash. |
 |
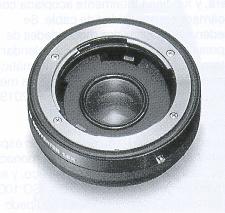 |
<AF Converter 1.6> If you attach this AF converter to Contax/Yashica mount lenses, you can take auto-focus pictures with them. It also extends the focal length of your lens by 1.6 times. Since it transmits various lens signals such as automatic diaphragm signal, you can take sharp pictures without detracting from the excellent optical qualities of these lenses. |
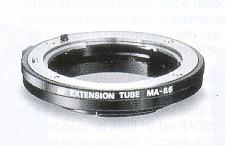 |
<AF Extension Tube MA-8.5> Mounted between the camera and lens, this extension tube for autofocus SLRs enables you to take close-ups of flowers, insects, etc. with ease using the auto-focus system |
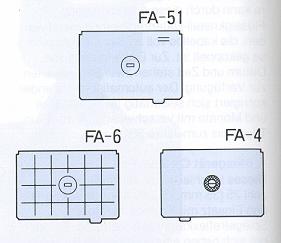 |
Focusing Screens--FA-4,
FA-6 and FA.51 > Besides the standard focusing screen for auto focusing (matte screen), there are three types of optional focusing screens matte screen for the Data Back, sectioned matte screen and horizontal split-image/ microprism collar screen. They can be interchanged depending on the shooting object and the lens used. |
Camera Care
· Do not leave the camera in hot places (on an ocean beach in summer, in a
parked car under direct sunlight, etc.) for a long time, because the camera,
film and battery may be adversely affected.
· After taking pictures at the seaside or on mountains, clean the camera
thoroughly. Salt air will cause corrosion and sand and dust will adversely
affect the internal precision parts of the camera.
· To remove dust and debris on the lens and viewfinder glass, use an air blower
or a soft lens brush. If they are soiled with fingerprints, wipe off lightly
with lens tissue. Remove dust and debris on the mirror with a lens brush.
· The lens and viewfinder may be clouded if the camera is brought into a warm
room from outside where it is cold. This cloudiness will disappear soon, but it
is always advisable to avoid sudden temperature changes because water droplets
will cause internal corrosion.
· If you are going to use the camera for important events such as an overseas
trip or wedding ceremony, be sure to test it beforehand to make sure it
functions properly. It is also advisable to bring a spare battery with you.
· To clean the camera exterior, wipe with a soft cloth. Never use benzine,
thinner or other solvents.
· The camera contains high-voltage circuits. In case of malfunction, never to
try to disassemble it because it is dangerous.
< Camera Storage >
· Keep the camera away from heat, moisture and dust. Do not store it in a
wardrobe drawer containing mothballs or in a laboratory where there are
chemicals that will cause damage to it.
To make full use of the capabilities of this camera, it is advisable to use our
interchangeable lenses and accessories. We may not be able to make repair for
the damage or trouble that might occur with products of other makes.
Specifications:
Type: 35 mm focal-plane shutter, auto-focus SLR with automatic film advance
and rewind.
Picture Size: 24 x 36 mm
Lens Mount: AF mount
Shutter Electronic vertical-travel focal-plane shutter (quartz controlled).
Shutter Speeds: 11200() to 16 sec. in auto mode, 1/2000 to 16 sec. and B (bulb) in manual mode
Shutter Release: Electromagnetic release with release socket.
Exposure Control: 9 modes of exposure control:
(1) Programmed auto exposure (P),
(2) Shutter-priority auto exposure (Tv),
(3) Aperture-priority auto exposure (Av),
(4) Manual exposure (M),
(5) Programmed TTL auto flash,
(6) Aperture-priority TTL auto flash,
(7) Manual type TTL auto flash,
(8) CPU controlled flash (CPU-matie flash),
(9) Manual flash.
Metering System: TTL full-aperture center-weighted metering TTL full-aperture spot metering (normal photography); TTL center-weighted direct light metering (flash photography); two SPD (silicon photo diode) cells.
Metering Range: EV 1--EV 20 (ISO 100, F1.8 lens).
Film Speed Range: ISO 25--5000 in DX auto mode, ISO 6--6400 in manual mode.
Autofocus System: TTL phase difference detection with CCD sensor located in lower part of mirror box; focusing is effected by depressing shutter release halfway; manual focusing possible; green LED turns on when subject is in sharp focus.
Auto-focus Sensing Range: EV 3--EV 20.
Focusing Modes: Auto focus (AF), continuous auto focus (CAP), trap focus ( 4' ) and manual focus.
Focus Lock: Activated by AF lock button. Focus is also
locked by depressing shutter release halfway after subject is focused in AF
mode.
AE Lock: Quantity of light on subject is stored in memory when
spot metering is effected.
Exposure Compensation: +4 EV---4 EV (1/3-EV steps); provided with automatic backlight compensation on center weighted metering.
Self-timer: Quartz-control electronic self-timer with 10 sec. delay; cancelable in mid-run; operation is indicated by blinking self-timer LED and audible electronic signal; automatic AE lock on self-timer start.
Flash Synchronization: X contact; shutter speed
automatically switches to 1/90 sec. with TTL flash when flash is fully charged;
synchronizes at 1190 sec. or slower in manual mode; flash mark "
![]() " turns on with flash charged and blinks to indicate correct exposure after
flash has fired.
" turns on with flash charged and blinks to indicate correct exposure after
flash has fired.
Viewfinder: Pentaprism eye-level finder (long eye-point type), 95% field of view, 0.82X magnification (with 50 mm lens at infinity).
Focusing Screen: Matte screen with focusing frame and spot circle; interchangeable screens available
Display in Viewfinder: LCD display Exposure compensation, shutter speed, film speed, aperture, over /underexposure, front mis-focus, rear mis-focus indicator, flash mark, exposure modes (P. Tv, Av and M). LED display Green sharp-focus LED.
Display Panel: LCD display Exposure compensation, shutter
speed, film speed, aperture, over/underexposure, exposure counter, exposure
modes (PROGRAM, Tv, Av and M), ISO indicator, electronic signal indicator,
battery check mark, film transport/rewind mark, flash mark, drive modes (C, S.
Hi) ), focus modes (AF, CAP, ME and
![]() ).
).
Film Winding: Automatic loading with built-in motor; automatic film advance; automatic film positioning to first frame.
Film Rewind: Automatic rewinding with rewind switch;
automatic stop when rewinding is completed; film can be rewound in mid-roll
Exposure Counter Automatic reset, additive type; counts up to
99.
Accessory Shoe: Direct X-contact hot shoe (with flash sync contact)
Drive modes: Single-frame shooting, continuous shooting and self-timer; continuous shooting up to about 1.8 frames/sec.
Camera Back: Can be opened by pushing down camera back lock; detachable; provided with film check window
Power Source: One 6-volt lithium battery (2CR5).
Battery Check: Battery check mark blinks when battery voltage decreases.
Dedicated Flash CS-110AF: CPU-matic operation (variable aperture based on distance information); approx. 0.7--6 m flash range (50 mm F1.8 lens, ISO 100)
Battery Capacity: About 25 rolls of 24-exposure film can be exposed in AF mode (50% with flash)--according to Yashica testing standards.
Others: Direct contact for data back
Dimensions: 148 (W) x 93 (H) x 50.5 (D) mm
Weight: Camera . 530g (without battery) f
lash CS-110AF 50g
* Specifications and design are subject to change without prior notice.

 Operating Lever to the right