This page may not be sold or distributed without
the expressed permission of the producer.
I have no connection with any camera company.
This page is copyright© by
![]() , M.
Butkus, NJ.
, M.
Butkus, NJ.
This page may not be sold or distributed without
the expressed permission of the producer.
I have no connection with any camera company.
On-line camera manual library
If you find this manual useful,
how about a donation of
$3 to:
M. Butkus, 29 Lake Ave.,
High Bridge, NJ 08829-1701
and send your e-mail
address
so I can thank you.
Most other places would charge
you $7.50 for
a electronic copy
or $18.00 for a hard to read Xerox copy.
This will help me to continue to host this site,
buy new manuals, and pay their shipping costs.
It'll make you feel better, won't it ?
Back to main camera manual page
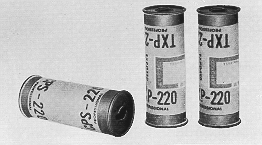
This camera ONLY takes 220 film for 24 images per roll.
There are some
web pages that state you can TRY
and use 120 film, but the spacing will be off, the winding will be off.
One person wrote to me stating her Yashica 24 has a 120 start
and 220 start marking ? Possibly and attempt in later releases to allow
120 film ?
I'm hoping to have that person send a photo of the back.
220
Film only has paper on the beginning and end of the roll,
so there is no paper
to have markers like 120 film.
|
The Yashica 24 was meant to use 220 film. The Yashica 12 to use 120 film. Check this Wiki page to see instructions on how to use 120 film in this camera. |
Yashica 24 PDF
version made from
HTML file
- Better Printing -
Yashica 24
PDF manual
- English only, direct from manual -
Yashica 24 gebrauchsanweisung
Yashica 24 mode d'emploi
Yashica 24 folleto de instrucciones
THIS CAMERA TAKES MERCURY BATTERIES,
CLICK HERE FOR INFO ON REPLACEMENTS
|
The Yashica 24 was meant to use 220 film. The Yashica 12 to use 120 film. Check this Wiki page to see instructions on how to use 120 film in this camera. There are now YouTube videos and Photo.net articles stating 120 seems to work fine. |
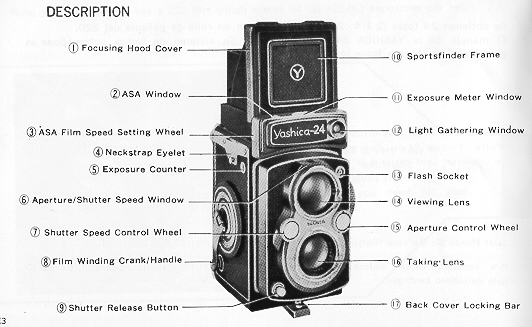
Your Yashica 24 is the newest model of the Yashica Twin-Lens Reflexes. It
provides the amazingly advanced features, such as
 |
* Fabulously sharp f/3.5 lens for color
picture-taking,
* High precision Match-Needle CdS exposure meter for foolproof exposure control, * Ultra-luminous large focusing screen plus automatic film transport for rapid and easy shooting regardless of your subjects, and affords you the use of an unusual new 220 film. |
Now, you are ready to use a 220 film which makes 24 - 2 1/4 x 2 1/4 in.
exposures per roll.
Your Yashica 24 is very easy to operate--its automatic picture taking system
gives you the absolute security that you need for your creative Photos.
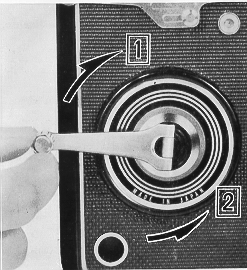
LOADING MERCURY BATTERY
 |
The CdS exposure meter incorporated in
your Yashica 24 requires a 1.3-volt mercury battery, Mallory PX-13B,
Eveready EPX-13 or equivalent. (Webmaster - see my main manuals page
for information on replacement of mercury batteries. It's usually a
WEIN cell ) |
 |
(1) Unscrew the coin-slotted Battery Cover in the direction of the arrow. |
 |
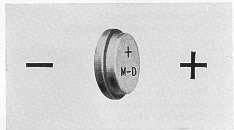
[2] Drop the battery in the Battery
Compartment as illustrated--the plus pole (+) up; the minus pole ( - ) down--then, close the Cover. |
CAUTION ON MERCURY BATTERY
The CdS exposure meter activates when the Exposure Meter Switch is
pressed. When not pressed, it prevents battery drain. When the meter does not
activate even by depressing the Switch, it shows the battery should be replaced.
There are replacement Wein Air Batteries for mercury batteries.
* Do not disassemble the battery.
* Do not throw any used mercury battery into a fire or where
children can get hold of it. When the camera is not in use for a long period of
time, remove the battery and store it in a cool, dry and safe place.
LOADING FILM (1)
|
|
|
Your Yashica 24 is used with the 220 film (6x6 cm). This film is designed to
provide 120 image size but with twice the usual number of frames per roll.
[220 film only has a paper backing in the beginning and end, not in the middle.
This allows all that film to wind on that small roll.]
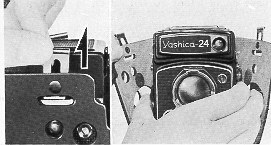
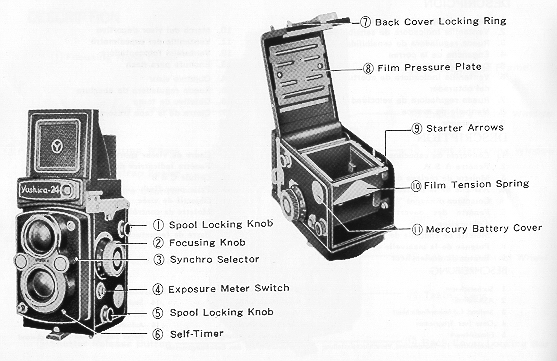
To remove the camera from the carrying case for film loading, raise the two
metal Lock slides at the top of the camera and spread the sides of the case
apart. Then, lift the camera.
You should load a film in subdued light. never in direct sun light.
 |
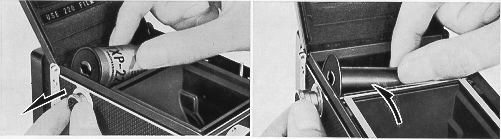
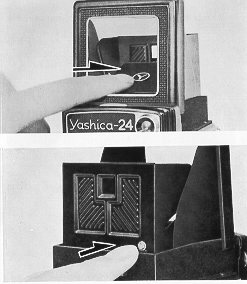
Turn the Back Cover Locking Ring on the base in the direction of the arrow marked "O" and the Cover will pop open. |
[2] Remove the Take-up Spool in the Lower Film Chamber by pulling out the Lower
Spool Locking Knob. Place the Take. Up Spool in the Upper Film Chamber by
pulling out the Upper Spool Locking Knob.
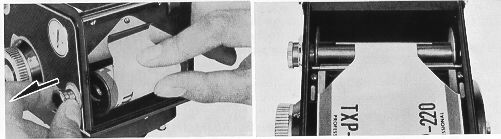 |
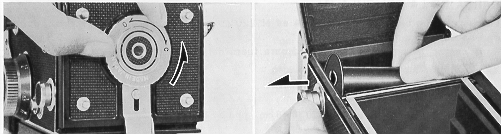
[3] Place a new roll of 220 film in the
Lower Film Chamber.
[4] Gently draw out the film leader and thread it firmly and evenly into the spool slot. |
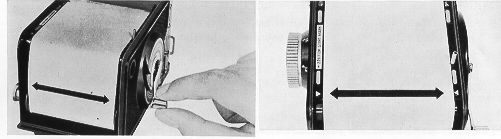 |
[5] Gently wind the Crank in the
direction of the arrow.
[6] Advance the film by winding slowly the Crank, and set the arrows on the film at the Starter Arrows for 220 film. |
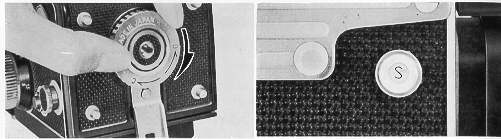 |
[7] Close the Back Cover and lock it by turning the Locking Ring in the direction of the arrow marked " C". [8] The letter "S" appears in the Exposure Counter Window. |
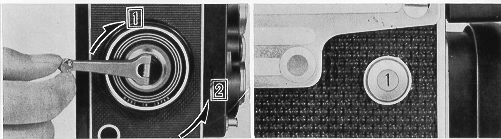 |
[9] The Film Exposure Counter is automatically reset to 'S' when the Back Cover is opened. (1) Wind the Crank clockwise until it stops. The figure "1 " appears in the Window. |
(2) Wind the Crank counter-clockwise until it stops.
The shutter is set and you're ready to shoot your first picture.
UNLOADING FILM
 |
After all 24 exposures have been taken,
wind the Crank as far as it will go, until "*" mark appears in the Window
and continue turning the Crank about another 3 turns to wind off the trailer
of the film.
|
[2] Rotate the Locking Ring in the direction of the arrow marked "O", and the
Back Cover will pop open.
 |
[3] Pull out the Lock Knob in the direction of the arrow and remove the exposed film. |
* It is advisable to place the spool of the Lower Film Chamber in the Upper
Film Chamber for the next picture-taking.
FOR CORRECT EXPOSURE (1)
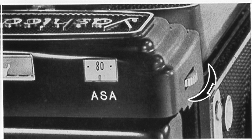 |
Set the ASA speed of your film in use at the index line in the ASA Window by turning the ASA Speed Control Wheel. The diagram shows what graduations between specific numbers stand for. You will find an ASA number printed on the film's instruction sheet. |
Shutter Speed Table for the beginner
| Light Conditions | Average Subjects |
| Bright or Hazy Sun | /500: 1/250 sec. |
| Cloudy Bright | 1/250: 1/125 sec. |
| Heavy Overcast or Rain | 1/60: 1/30 sec. |
| Indoor |
Slower shutter speeds than 1/30 sec. |
| Special purposes | 1 sec.: Bulb |
 |
[2] Set the desired shutter speed by turning the Shutter Speed Control Wheel up or down as indicated by the arrow. The exposure needle is cross-coupled to the shutter speeds. |
The aperture is determined according to light conditions.
* It is recommended to use the shutter speed of 1/500 sec. when you shoot
rapidly moving sub jects, such as car, bicycle, action in sports, etc.
* In taking pictures of ordinary moving subjects, such as man, you
can shoot it at 1/250 sec.
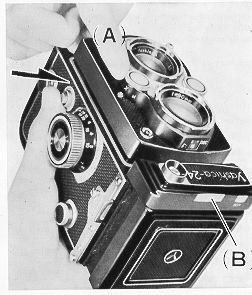 |
(B) Align the needle (cross-coupled to the shutter speeds) and the follow
pointer (cross-coupled to the apertures) (A) by changing the aperture, holding
the Exposure Meter Switch depressed. If the Switch is not pressed, the meter
does not activate.
You can find any combination of the shutter speed and the aperture for
correct exposure in the Aperture/Shutter Speed Window.
|
 |
Precise exposure is obtained when the needle and the follow-pointer are
aligned. The aperture and the shutter speed are visible in the Aperture/Shutter
Speed Window.
When the needle and the follow-pointer are not aligned, change either the aperture or the shutter speed to obtain the correct exposure reading. When the needle and the follow-pointer are never aligned, it is impossible to take your picture. - Indoor shooting, it is advisable to shoot by using a flash unit.
|
FOR BETTER PICTURES
 |
For color pictures: Color films have little exposure latitude, so particularly careful exposure reading is necessary. The best method of using a meter is to go near to the main subject and take a close-up reading. If you can not go close-up to a subject, then try to find something near at hand that is similar in tone to the subject and take a reading from this. For open views: Open views, such as distant landscapes, usually have very light shadows. The use of a lens hood is recommended to cut off the harmful reflected light to obtain the best results. For backlighted subjects: Even if the subject is in indoors and bright or strong light coming through the window is backlighting it, no adjustment is necessary as the CdS meter compensates for such extreme lighting conditions. If you want a brighter picture of your main subject, you should take a close-up exposure reading. |
FILTER
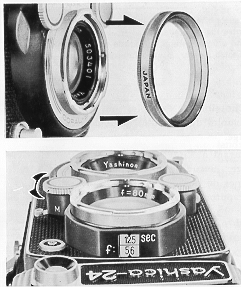 |
In blazing sunlight, in snow scene or summer beach, it recommended to use a
filter for a really dramatic effect. When using it, an increase in exposure time
is necessary. This is stated on most filters in the form of a filter factor
indicating by how much (e.g., 2 times, 3 times) the exposure must be increased
with the filter.
If you shoot the picture at f/8, 1/125. sec. using a Y2 (its filter factor is two times), please reset the aperture at f/5.6
|
LUMINOUS, LARGE VIEWFINDER
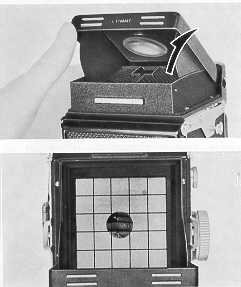 |
Open the Focusing Hood by lifting it at the back, and point your Yashica 24
at the subject.
The eight red lines on the Focusing Screen help you to judge proportion and proper composition.
|
MAGNIFYING GLASS
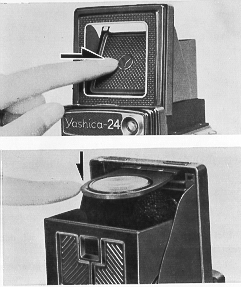 |
Raise the Magnifying Glass by pressing the front of the Focusing Hood Cover
inward, holding the Focusing Hood so that it does not close.
Always make sure that you have first lowered the Magnifying Glass before closing the Focusing Hood.
|
FOR CRITICAL FOCUSING
 |
It is advisable to use the Magnifying Glass for more critical focusing. When
using it, place your eye as close to the magnifier as possible.
Focus your Yashica 24 on the subject by turning the Focusing Knob, seeing
through the Focusing screen.
|
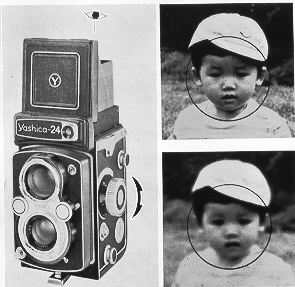 |
If the subject on the screen appears crisp, it is in focus.
If there's a slight blur on the subject, it is out of focus.
|
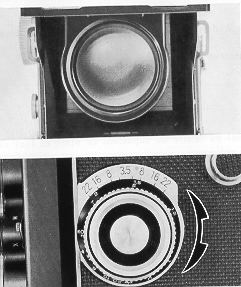
READABLE APERTURES AND SHUTTER SPEEDS
 |
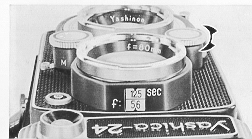
The apertures and the shutter speeds are visible on the Window on the viewing
lens.
Shutter Speed Scale B. 1, 1/2, 1/4, 1/8, 1/15, 1130, 1/60, 1/125, 1/250 & 1/500 Aperture Scale 3.5, 4, 5.6, 8, 11, 16. 22 & 32 |
RAPID CRANK FILM TRANSPORT
 |
Turn the Crank clockwise until it stops as illustrated. The film is advanced
for exposure.
[2] Wind the Crank counter-clockwise until it stops. The shutter is set for
shooting. If the Crank is not wound until it stops the shutter release button
can not be depressed
Note: When the slower shutter speeds are used, such as Bulb, 1 sec., 1/2 sec., etc., it is necessary to advance the film after the shutter have completely released. |
SPORTSFINDER FOR RAPIDLY MOVING SUBJECTS
 |
It is very convenient to use the Sports finder when you want to take pictures
of rapidly moving subjects or to shoot photos from your eye-level.
Depress the Sports finder Frame Cover until it clicks in place.
To close the Cover, push the Release Button on the back of the Lens Hood. |
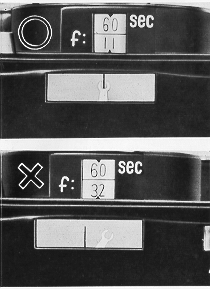
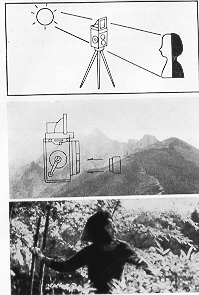
SELF-TIMER
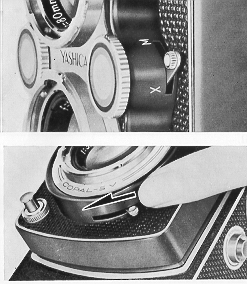 |
[1] Move the Synchro Selector to the 'X' position and set the shutter by
winding the Crank.
[2] Set the Self-Timer on the bottom of the lens barrel by swinging it as
illus bated.
[3] Press the Shutter Release Button. The shutter goes off after a delay of 8~14 seconds and you've time to take your place in your own picture.
|
FLASH PICTURES
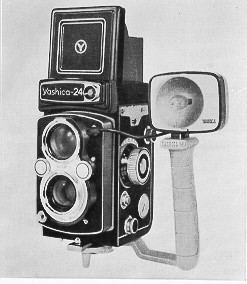 |
When using a flash gun or an electric flash, attach it on the bracket on which screws into the Tripod Socket on the base of the camera. Plug the flash cord into the Flash Socket of the camera. Correct exposure is obtained easily by consulting the guide number of the bulb or the electronic flash. The guide number is different for each film speed.. Correct f/stop is determined by dividing the guide number by the distance to your subject. |
FLASHCUBE ADAPTOR
A Yashica Flashcube Adaptor is now available. By placing it in the
accessory shoe-4 flash photos can be taken with 1 cube.
M-X SYNCHRONIZATION
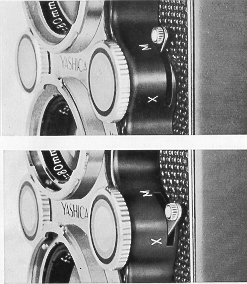 |
Set the Synchro Selector at the 'M'
position, when using an M-class bulb.
Move the Synchro Selector to the 'X' position when using an F-class bulb or a electronic flash.
|
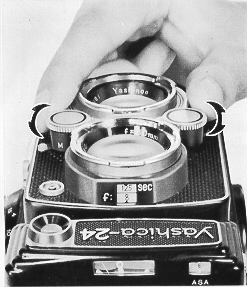
When you focus the camera on a given object, the image of it will be really
sharp on the film, Other objects to some distance in front of and behind the
object will be also sharp. The range of distance over which subjects are still
accept ably sharp is known as the Depth of Field.
You can control the extent of this sharp zone by the lens aperture. As you stop
down the lens, the zone of sharpness grows in both directions; as you open up
the lens, its depth decreases. You'll also notice that the depth of field is
greater at far distances than at near ones.
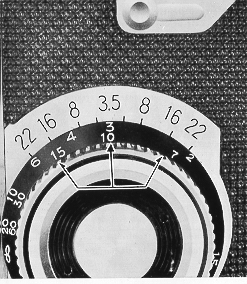 |
The Depth of Field Scale is engraved around the Focusing Knob of the Yashica
24 next to the distance scale. It is thus quite a simple matter to read off what
area will be in sharp focus for any distance setting and aperture.
With the camera focused on 10 feet the depth of field indicated the Scale for an aperture of f/16 is from about 7 feet to about 15 feet.
|
THE USE OF BULB SETTING AND CABLE RELEASE
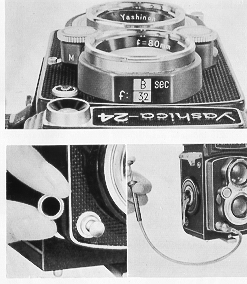 |
BULB SETTING Set the shutter to 'B' and press the release button. The shutter now remains open for any length of time until you let go of the release button. For such time exposure, the camera must be mounted on a firm support such as a tripod. CABLE RELEASE
|
CARE OF YOUR CAMERA
* Protect the camera from dust and dirt and avoid rough handling.
* If the lens needs cleaning, first brush or blow away any grit or dust, then
wipe the surface with a soft silicon cloth or use a lens cleaner.
* Do not attempt to make any repairs or remove any parts from the camera. Also,
never oil the shutter or any other parts of the camera.