and historical purposes, all rights reserved.
This page is copyright© by
This page may not be sold or distributed without
the expressed permission of the producer
I have no connection with any camera company.
This camera manual library is for reference
and historical
purposes, all rights reserved.
This page is copyright© by
![]() M. Butkus, NJ.
M. Butkus, NJ.
This page may not be sold or distributed without
the expressed permission of the producer
I have no connection with any camera company.
On-line camera manual library If you find this manual useful,
how about a donation of
$3 to:
M. Butkus, 29 Lake Ave.,
High Bridge, NJ 08829-1701
and send your e-mail
address
so I can thank you.
Most other places would charge
you $7.50 for
a electronic copy
or $18.00 for a hard to read Xerox copy.
This will help me to continue to host this site,
buy new manuals, and pay their shipping costs.
It'll make you feel better, won't it ?
If you use Pay Pal, use the link below.
Use the above address for a
check, M.O. or cash.
Back to main camera manual page
Click here for Yashica FX-70 PDF
file made from below file
- Better printing -
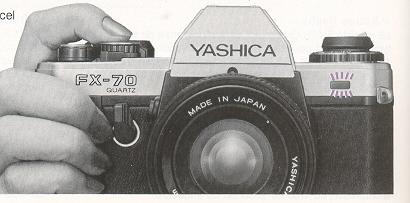
Thank you for purchasing the Yashica FX-70 Quartz. The FX-70 Quartz is an easy-to-operate automatic exposure (AE), single-lens reflex camera. This camera includes a high-precision, quartz/digital-controlled automatic exposure mechanism, convenient AE Lock, viewfinder with easy-to-read information, and electronic self-timer. In addition, automatic flash exposures can be taken when the camera is used with the dedicated electronic flash unit "CS-201 Auto". Before using the camera, be sure to read this instruction booklet carefully to learn the correct use and care of the camera.
Contents
|
|
 |
|
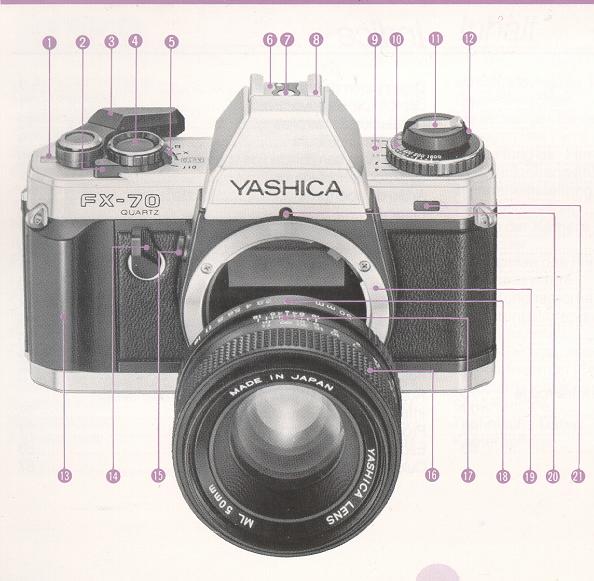
(1) Exposure Counter (2) Self-Timer Lever (3) Film Advance Lever (4) Electromagnetic Shutter Release (5) Shutter Selector (6) Flash-Ready Signal Contact (7) Direct X Contact ('hot-shoe) (8) Accessory Shoe (9) Exposure Compensation Index (10) Film Speed Dial
|
(11) Film Rewind Crank (12) Film Rewind Knob (13) Handgrip (14) AE Lock Lever (15) Lens Release Button (16) Focusing Ring (17) Aperture/Distance Scale Index (18) Aperture Ring (19) Contax/Yashica Lens Mount (20) Lens Mount Index (21) Self-Timer LED |
 |
Lens Changing
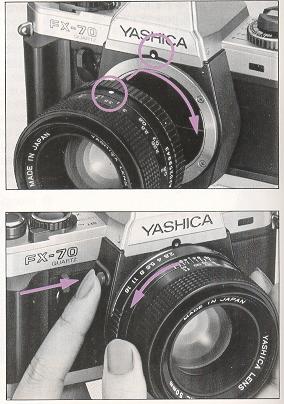 |
<Mounting the Lens> First remove the camera-body cap and then insert the lens mount into the camera-body mount, matching the red dot on the lens mount with that on the camera body. Then, gripping the lens barrel firmly, turn the lens clockwise until it locks with a click. When mounted correctly, the aperture/distance scale index on the lens will point toward the top of the camera. When using a lens cap of the snap on type, attach or remove it from the lens by pressing in the two side-tabs. <Removing the Lens> While pressing the lens release button, turn the lens counterclockwise slightly and remove it from the camera-body mount. Always keep caps on the camera-body mount and the lens mount when the lens is left off the camera. Avoid touching camera interior or lens surface with your fingers. Avoid direct sunlight when removing or mounting the lens with film loaded in the camera. |
Installing Batteries
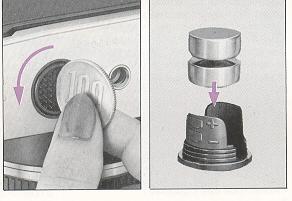 |
Batteries power all the cameras functions including shutter system, exposure control, etc. The FX-70 Quartz will not operate without batteries. Use two 1.55 V silver-oxide batteries (SR44, Eveready S76, Ucar S76, Mallory
MS-76 or equivalent) or 1.5 V alkaline-manganese batteries (LR44 or equivalent). 1. Open the battery compartment cover on camera base by turning it counterclockwise with a coin. |
|
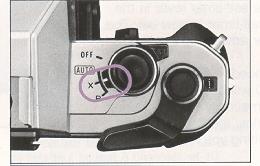
2. Insert two batteries into the battery holder according to polarity diagram shown on the holder. Then replace the holder in the battery compartment and firmly secure the compartment cover. If the battery polarities are inserted incorrectly, the camera will not operate. 3. Set the shutter selector to "AUTO" (or X, B), and while looking into the viewfinder, press the shutter release lightly to check that the viewfinder LEDs light steadily or flash. |
 |
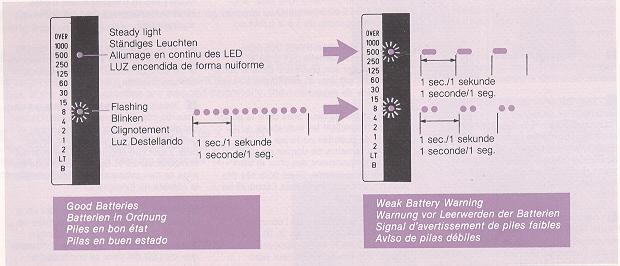
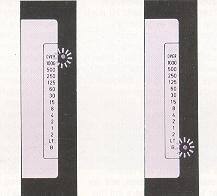
<Battery Check>
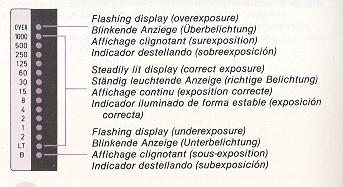
Battery condition is indicated by the LED display inside the viewfinder. When batteries are good, the LEDS will light steadily, or flash at regular intervals. When batteries are weak, the camera will warn you of this condition by changing to the flashing LED display shown in the diagram shown below. The camera will continue to operate for a period in this condition, but you should replace the batteries with new ones as soon a possible. When battery power falls below rated voltage, the LEDs will not light, and the camera will not operate. The LED display will remain lit for about 10 seconds after you release your finger from the shutter release button.
<Battery Precautions>
* Battery life is approximately 1 year with silver-oxide batteries, and about 6
months with alkaline - manganese batteries, but this may vary depending on
frequency of camera use, the strength of batteries at time of purchase, ambient
temperature, etc.
* Batteries are apt to perform poorly in sub-zero temperatures, causing picture
taking difficulties and LED failure. Keep the camera as warm as possible and
carry extra batteries just in case those in the camera should fail. Batteries
affected by such extreme temperatures will recover power after being kept warm
for a while.
* When installing batteries, wipe the cell cap and base clean. Oily residue on
battery terminals could cause poor electrical contact.
* Remove the batteries when the camera is not used for extended periods.
* Make it a rule to carry spare batteries with you on long trips.
* Do not throw batteries into a fire or attempt to take them apart.
THIS IS
DANGEROUS. Also keep batteries out of reach of small children.
Film Loading
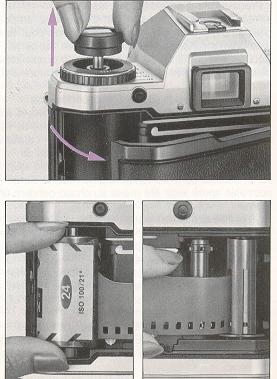 |
Always use a standard 35 mm film
cartridge (12, 20, 24 or 36 exposure roll). Avoid direct sunlight when
loading film. 1. Open the camera back by pulling the film rewind knob all the way
out. 2. Place the film cartridge in the film chamber. Then, push the rewind
knob back in, turning it slightly until it falls into position, if
necessary. 3. Draw out the film leader and insert the tip into any slot on the take-up spool.
|
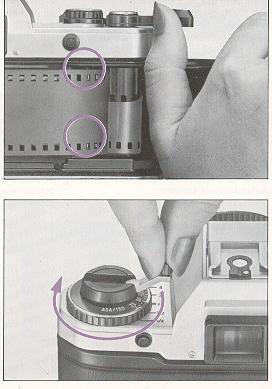
| (4) Advance the film slightly with the
film advance lever until the perforations on both sides of the film engage
the sprocket teeth. If necessary, trip the shutter for blank shots and keep
advancing the film until both rows of perforations engage the sprocket.
Close the camera back and Dress until it locks into place.
<Film Advance Lever> Use one full stroke of the film advance lever to advance the film. The electromagnetic shutter release will not function unless the lever is given a full stroke. The film advance lever is easier to I operate if it is kept in the standoff position (20 degree arc) 5. Unfold the rewind crank and turn it gently in the direction of the arrow to take up film slack. |
 |
 |
(6) Wind the film advance lever and trip
the shutter alternately until the exposure counter reads "1". Now you can
start taking pictures. If the film rewind knob rotates in unison with the
operation of the film advance lever, it means that the film is feeding
properly. When taking blank exposures, remove the lens cap and point the camera toward a bright area, or set the shutter selector "X" or "B" and press the shutter release button. If blank exposures are made with the lens cap in place and the shutter selector set to "AUTO", excessively long exposures will result.
|
|
|
 |
<Exposure Counter> The exposure counter moves each time the
film advance lever is fully stroked, and automatically resets to "S" (Start)
when the camera back is opened, regardless of whether the camera is loaded or
not. The exposure counter starts with "S", then "1", followed by even numbers
from "4" through "36". The odd numbers are indicated by dots marked between the
even numbers. The orange-colored numbers "12", "20", "24" and "36" correspond to
the number of exposures in standard 35 mm film cartridges.
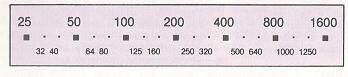
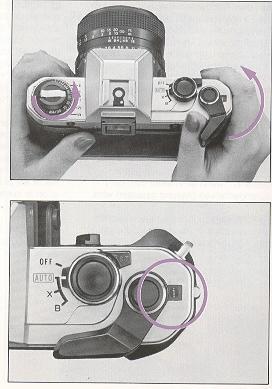
Setting the film speed
 |
Proper film speed setting is
necessary to assure correct
film exposure. The film speed number (ASA/ISO) in normally indicated
on the film box. While pressing the film-speed dial release-button, rotate the film
speed dial until the ASA/ISO film speed number for the film being used
lines up with the exposure compensation index mark "X1" (orange-colored).
Then, release the button and check to see that the dial is set on the
proper click stop. Film Speed Values (ASA/ISO)
|
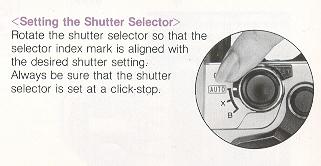
Shutter selector
| This shutter controls the amount of time the film is exposed to light. All shutter speeds on the FX-70 Quartz, including "AUTO" (automatic exposure), "B" (bulb), and "X" (Flash Sync-Speed), are controlled by an electronic circuit using a highly accurate quartz oscillating element. |
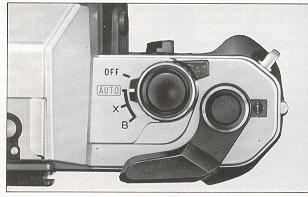 |
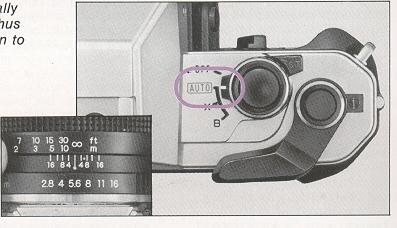
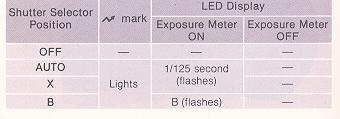
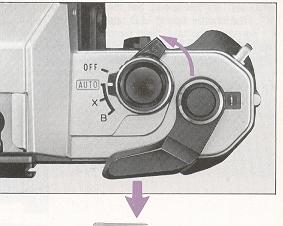
<Shutter Selector Modes>
"OFF"..... In this position, the batteries are turned off and the camera does not operate. When not using the camera, set the shutter selector to this position to avoid unnecessary battery drain and accidental exposures.
"AUTO".... In this position, the shutter speed is automatically controlled to give correct film exposure for the aperture setting selected, subject brightness, and speed of film being used. This setting is also used when making flash pictures with the electronic flash unit CS-201 Auto, (or the Contax TLA20, TLA30).
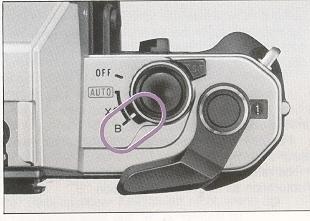
"B" ...... (Bulb) In this position, the shutter remains open for as long as the shutter release button is depressed.
"X"..... (Flash Sync-Speed) In this position, electronic
flash units other than the CS-201 Auto (or Contax TLA20, TLA30) can be used for
making flash exposures. The flash sync-speed is set at 1/100 second.
Aperture Ring
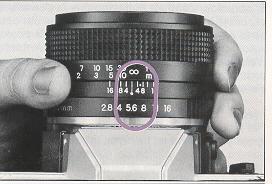 |
The aperture ring regulates the amount
of light transmitted to the film plane. The amount of light transmission is
halved when the aperture is changed to the next larger F value (for example,
when f/4 is changed to f/5.6), and doubled when it is changed to the next
smaller f value. The aperture also controls the depth of field, a lens
property giving you varying depth in the plane of focus at different
apertures. (Refer to page 76) To set the aperture, turn the aperture ring until the desired aperture setting is aligned with the aperture/distance scale index. The aperture ring can be used at in-between positions. With the exception of PC Distagon and mirror lenses, all Yashica and Zeiss interchangeable lenses feature automatic diaphragms that stop down the selected aperture when the shutter is activated. Thus, your viewfinder always gives you a bright image at full aperture of the lens used. |
Focusing
 |
Focusing with the FX-70 Quartz
is done by using any element of its convenient Freeway focusing system
consisting of a split image spot, a microprism collar and an outer matte
field.
<Horizontal Split image Spot> <Microprism Collar/Matte Field> |
| · When using long focal length lenses,
or lenses with a relatively small maximum aperture 04 or slower), or when
performing close-up photography at high magnification, the microprism collar
and split image spot may become dark, making focusing difficult. In this
case, focus using the outer matte field.
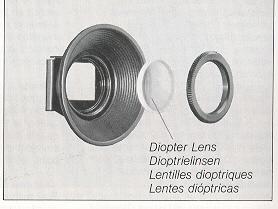
<Diopter Lenses> Special correction lenses are available for those who find it difficult to focus with their eyeglasses on. There are 8 types available: -5D (diopters), -4D, -3D, -2D, OD, + 1 D, + 2D, and + 3D. Choose the one suited to your eyesight needs. These lenses should be used with an accessory eyecup. |
 |
Holding the camera
 |
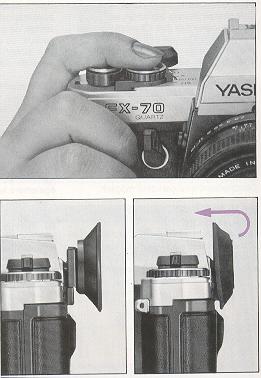
In order to take a beautiful, in-focus
photograph, it is necessary to hold the camera steadily. Since most blurred
pictures are caused by camera shake (moving the camera at the instant of
exposure), you should practice with the camera until you feel accustomed to
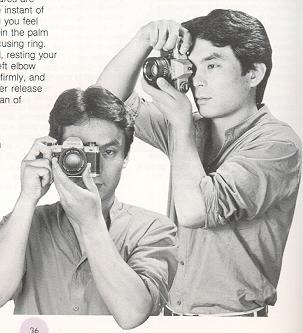
holding it properly. Hold the camera in the palm of your left hand, using your fingers to rotate the focusing ring. Hold the camera's handgrip firmly in your right hand, resting your forefinger on the shutter release button. With your left elbow against your body, hold the camera up to your face firmly, and while looking through the viewfinder, press the shutter release lightly. Besides the horizontal position, the camera can of course also be used to take pictures in the vertical position. In any event, practice until you find the positions that best suit your own photographic style. Depending on conditions, it may also be a good idea to stabilize the camera by leaning your body against a building, resting the camera on a fence or other support, etc. |
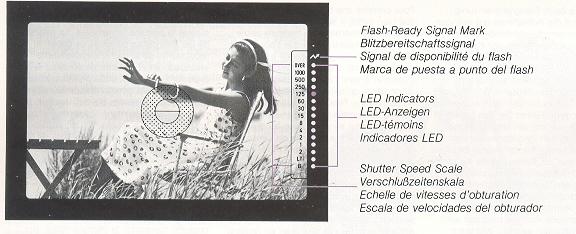
Inside the viewfinder
|
|
<LED Indicators> When the shutter release button is pressed lightly, the red LEDs (light emitting diodes) will light or flash to indicate the shutter speed at time of exposure. The LEDs will remain lit for about 10 seconds after you remove your finger from the shutter release button. <Flash-Ready Signal Mark> |
<Shutter Speed Scale>
The numbers in black at the right of the
viewfinder indicate the camera's shutter speeds in fractions of seconds (e.g.
"1" = 1 second, "2" = 1/2 second, "125" = 1/125 second, ... "1000" = 1/1000
second). The red "2" means 2 seconds, and the "LT" means automatic "longtime"
exposures up to 11 seconds. "B" indicates underexposure or use of the B (Bulb)
shutter selector setting, and "OVER" indicates overexposure.
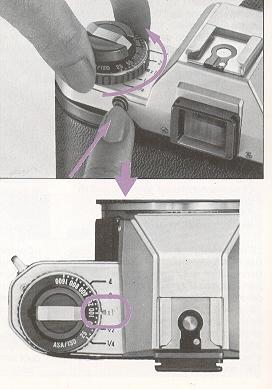
Film rewind
| When all frames on a roll of film
have been exposed, you will be unable to operate the film advance lever. Do
not attempt to advance the film further, as tom film may result Check the
exposure counter, and when it shows you have completed a roll of film,
always be sure to rewind the film into its cassette before opening the
camera back. After removing the film, have it processed as early as
possible. 1. Press the film rewind release button on the base of the camera.
Continuous pressing is unnecessary as the button is an automatically
resetting type. 2. Unfold the film rewind crank and turn it in the direction of the arrow. Keep turning until you feel a light resistance shortly before the film comes off the take-up spool and continue turning until the crank eventually rotates freely. |
 |
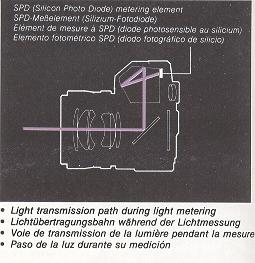
Light metering system
| The FX-70 Quartz features a TTL
fall-aperture metering system that measures the light coming through the
lens at the lens's fully open (largess aperture. The light meter is a
"center-weighted" type, meaning that the meter primarily measures subject
brightness at the center of the viewfinder, giving less emphasis to
surrounding areas. The metering method is "aperture priority", meaning that once the film speed and lens aperture have been set, shutter speed is controlled automatically in response to subject brightness, to give correctly exposed photographs. The shutter speed at time of exposre is indicated by the LED display inside the viewfinder. |
 |
 |
 |
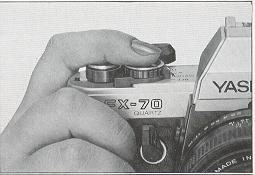
<Built-ln Exposure Meter>
The shutter release button of the FX-70 Quartz also acts as the switch for the built-in exposure meter. When the shutter release button is touched lightly, the switch is turned ON, and the LEDs inside the viewfinder light steadily or flash to indicate the exposure at that time. After removing your finger from the shutter release button, or after taking a picture, the exposure meter remains ON, turning itself OFF automatically 10 seconds later.
If the shutter release button is pressed further, the shutter will be tripped.
Since this is a centenweighted type metering system, the center ring in the viewfinder should be placed on the subject you wish to photograph in order to ensure correct exposure.
<LED Indicators during Automatic Exposure> When exposure is
correctly metered, the LED beside the shutter speed at that time will light
steadily. If the ambient light conditions exceed the metering capabilities of
the camera, the "OVER" or "B" indicators will flash to indicate respectively
over-exposure and underexposure.
|
|
· When a LED from
"1000" through "LT" lights up: Correct exposure has been metered
and a picture may be taken. The LED will light beside the correct shutter
speed for that time. If two LEDs light simultaneously, the exposure will be
made at a shutter speed in between the two indicated values. If the LED
indicates a shutter speed of 1/30 second or slower, handheld exposures may
result in camera shake. In this case, use a larger lens aperture, a flash
unit, or mount the camera on a tripod to steady it.
· When the "OVER" LED flashes: This indicates that the subject is too bright, and overexposure of the film will result. In this case, stop-down the lens aperture until the indicated shutter speed is 1/1000 second or slower. If the LED continues to flash even after the lens is closed to its minimum aperture, a separately purchased ND (neutral density) filter should be used on the lens to reduce the amount of light transmitted. · When the "B" LED flashes: This indicates that the subject is too dark, and under exposure will result. In this case, open the lens aperture until the indicated shutter speed is "LT" or faster. |
|
|
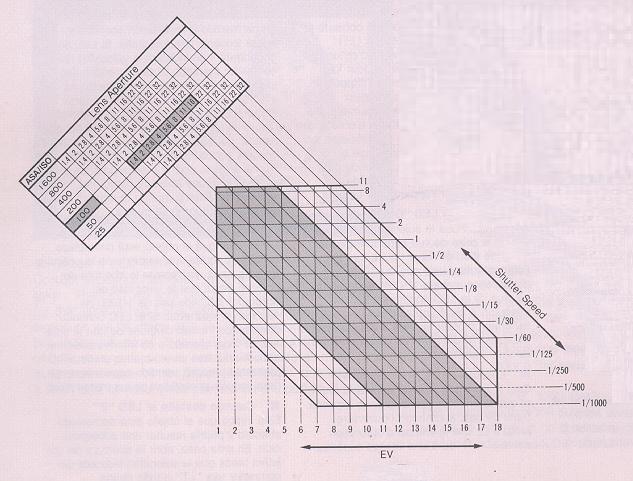
<Light Reading Range> The table gives the EV Light reading
range for various lenses, showing the inter-relationship between aperture,
shutter speed and EV (exposure values). For instance, when an f/1.4 lens at
ASA/ISO 100 is used the reading range spanning the points that the vertical
lines (EV) and the horizontal lines (shutter speed) intersect with the diagonal
lines extending from the f values of "1.4" to "16" (representing the minimum
aperture of the Yashica Lens ML 50 mm f/1.4), denotes the reading range from EV
1 to 18.
* The EV denotes the value of exposure through combination of the shutter
speed and the lens aperture that yield the same exposure effect on a film when
the photographing conditions (film speed rating and prevailing illumination)
remain the same. For example, when using EV 13 from the chart as a guide, it can
be seen that the same exposure effect is attained using the
combinations of f/16 at 1/30 sec. and f/8 at 1/125 sec.
* The table showing EV from 1 to 18 and shutter speeds from 11 to 1/1000 sec.
denotes the range over which the camera correctly meters the light in the AUTO
mode.
* That part of the operating range which is shown in color denotes the light reading range when using an f/1.4 lens at ASA/ISO 100.
Automatic Exposure
| The FX-70 Quartz gives correct
exposures automatically merely by setting the lens to your desired aperture,
thus allowing you to photograph while paying fall attention to your subject. (1) Set the Shutter Selector to "AUTO". This place the camera in the automatic exposure mode, so that the shutter speed is set automatically. |
 |
|
|
(2) Set the Aperture. Turns the aperture ring on the lens to your desired f/stop. Intermediate positions may also be used. (3) Focusing and Composing. Point the camera at the subject, and while looking through the viewfinder focus by turning the focusing ring, and compose the picture. |
 |
(4) Check the Exposure and
Shoot. Press the shutter release button lightly and check the LED indicators within the viewfinder. If any of the LEDs from "1000" to "LT" light, the indicated shutter speed will give you the correct exposure, and you may press the shutter release button further to take the picture. <Shooting at Your Selected Shutter Speed> <Shooting Away from Viewfinder in Auto Mode> |
Exposure compensation
 |
In automatic exposure
photography, there may be cases when correct exposure of the subject cannot
be achieved normally due to strong backlighting, or a large difference in
the amount of light falling on the subject and background. In these cases,
as well as when you wish to take deliberately under or overexposed
photographs for special effects, exposure compensation is necessary. The
FX-70 Quartz is equipped with a one-touch AE lock lever, and an exposure
compensation scale, both of which allow you to perform exposure compensation
when required.
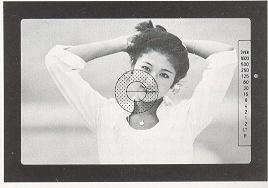
<Using the AE (Automatic Exposure) Lock Lever> |
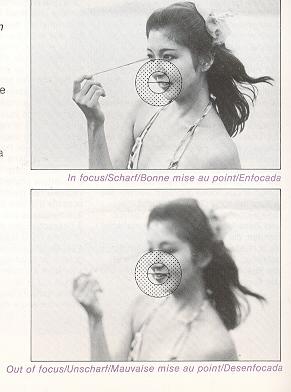
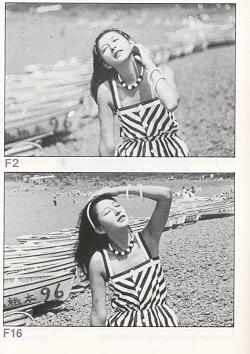
| <Examples Using the AE Lock> As shown in the photograph on the next page, when a strongly backlit subject (bright light coming from behind the subject) is photographed without compensation, the subject may appear very dark in relation to the background. In this case, approach the subject closely so that the subject fills the entire field of view in the viewfinder, and while holding the AE lock lever toward the handgrip, return to your original positin and take the picture. In this way the central subject will be exposed with the proper brightness. Using the AE lock lever in this way allows you to achieve good results simply, under such difficult conditions as backlighting, bright background lighting, or when the subject is illuminated by spotlight, etc. |
 |
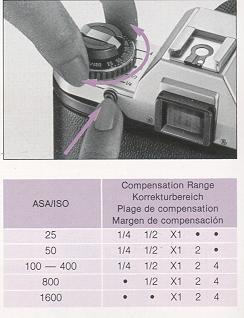 |
<Using the Film Speed Dial> For normal automatic photography, the numerical film speed value (ASA/ISO number) of the film used is set opposite the "X1" position on the exposure compensation scale, but in order to perform exposure compensation, depress the film-speed-dial release button, and turn the dial until the speed value of the film in use lines up with the desired compensation scale reading. The exposure compensation scale can be used at intermediate settings and can be click-stopped in 1/3 increments between scale readings. Always reset the ASA speed value for the film being used to "X1" when exposure compensation is no longer needed. |
· At some film speeds, exposure compensation settings cannot be used, as
indicated in the table as follows (these settings exceed the camera's film speed
range).
Values "2" and "4" Increase the Amount of Exposure
In situations such as shooting against the light or where your subject
is back-lit by a bright sky or beach scene, or when you want to overexpose
intentionally, set the dial at "2" or "4". The "2" setting corresponds to a
change of one f-stop, and the "4" to two f-stops.
Values "1/2" and "1/4" Decrease the Amount of Exposure
In situations where the background is dark because of spotlighting of
the subject or where you want to underexpose intentionally, set the dial to
"1/2" or "1/4". The "1/2 " setting corresponds to a change of one f-stop, and
the "1/4" to two f-stops.
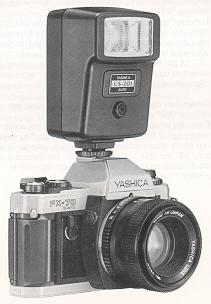
Flash Photography
| When shooting indoors or at night,
the use of an electronic flash unit is recommended. For this purpose, the
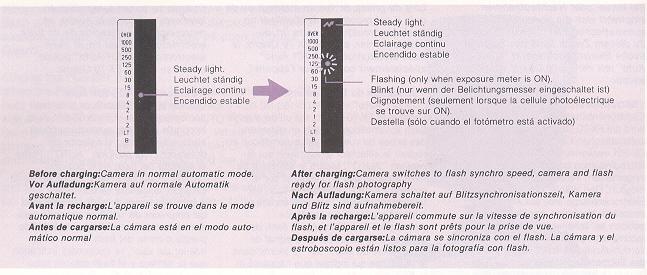
dedicated electronic flash "CS-201 Auto" can be used with the FX-70 Quartz. <Using the "CS-201 Auto"> When the FX-70 Quartz is used in combination with the CS-201 Auto flash unit, automatic flash photography can be performed with the shutter selector set to the "AUTO" position. Set the flash unit's selector to "AUTO". When the unit is fully charged, the camera will automatically switch to the flash synchro shutter speed of 1/100 second, and the flash ready signal " ~ " inside the viewfinder will light, showing that the camera and flash are ready to photograph. When the shutter release button is pressed lightly, the LED beside the "125" will flash. |
 |
 |
|

|
|
<Finder Display> <Using Other Flash Units> |
* You can also take flash pictures with the selector set at "AUTO". In this case, make sure the shutter speed indicator in the viewfinder shows 1/60 sec. or slower.
* When using other electronic flash or flash bulb unit, use one of the cordless type.
* With flash bulb units, use a shutter speed of 1/30 sec. or slower.
 |
The self-timer is used when taking group pictures or on other occasions, when you wish to include yourself in the photograph. When the shatter release button is pressed, the self-timer LED flashes to let you know the self-timer is operating. (1) First, focus the camera, then turn the self-timer lever in the direction of the arrow until it stops. The self-timer is now set. The self-timer can be set either before or after advancing the film.
|
 |
(2) Check to make sure the film is advanced, then press the shutter release button. The self-timer LED will begin flashing, and 10 seconds later, the shutter will be automatically tripped. During the last two seconds before the shutter trips, the flashing of the self-timer LED will become more rabid. letting you know that the shutter is about to be released. During the operation of the self-timer, you can cancel the self-timer by pushing the lever back to its original position. |
After completing use of the self-timer, be sure to return the self-timer lever
to its home position. If left in the set position, the self-timer will operate
each time the shutter release button is pressed.
* When using the self-timer for automatic exposures, use an eyecup to shield the
viewfinder eyepiece from outside light (refer to p. 52)
* During the operation of the self-timer, the LED indicators inside the
viewfinder will go out.
* The self-timer will not operate when the shutter selector is in the "B"
position.
"B" (Bulb) photography
| When making photographs of starts, or other photography at night requiring long exposure times (1 second or longer), set the shutter selector to "B" (Bulb). In this mode, the shutter will remain open, and the film will be exposed, for as long as the shutter release button is held depressed. In this case, camera shake is inevitable with hand-held photography, thus the camera should always be mounted on a tripod, or rested on a solid surface to keep.it immobile. To further remove any possibility of camera shake, the Cable Switch S (optional accessory) should be connected to the camera. Inside the viewfinder, the LED will flash at the "B" position, and when appropriate, another LED will light steadily beside the shutter speed appropriate for the aperture which has been set. |
 |
Release socket
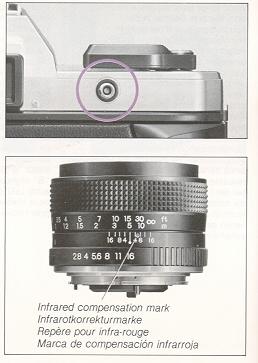 |
<Release Socket> This may be used to attach remote control devices such as the Cable Switch S. Infrared Controller S. Radio Controller, etc., or as a contact for connecting the Auto Bellows or the RTF 540 flash unit. The socket receives electrical signals from these accessories which are used to operate the shutter. · Do not connect an ordinary cable release (mechanically operated type) to
this release socket as this can cause damage to the socket device. <Infrared Compensation Mark> With infrared film (and a red filter) it is necessary to correct focusing for the long length of the infrared rays, since even if focusing appears correct within the viewfinder, it will be off at the film plane. Both Yashica ML and Zeiss T. lenses have an infrared compensation mark or red dot on the depth-of-field scale on the lens barrel (mirror lenses do not have this mark because they do not require any correction). First use the normal focusing procedure, then turn the focusing ring until the distance at which you have focused is opposite the red compensation mark. |
Depth-of-field
|
One property of lenses is that when they are focused, on a certain subject, not only the subject itself, but all objects in a certain range in front and in back of the subject will be nearly enough in focus to appear sharp to the unaided eye. This range is called the depth-of-field. The depth-of-field of a given lens varies, as follows: (1) If the aperture is stopped down the depth-of-fled increases; if the aperture is opened up the depth-of-field decreases. (2) As distance to the subject increases, depth-of-field increases as distance to the subject decreases, depth-of-field decreases. (3) The depth-of-field is greater behind the subject on which the lens is focused than in front of it; Different lenses have different depth-of-field limits. A lens of short focal length has greater depth-of-field at any set distance than a lens of long focal length. |
 |
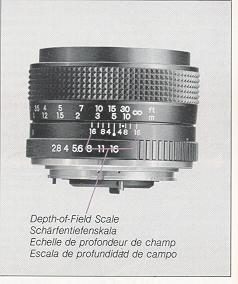 |
<Depth-of Field Scale> The actual range of depth-of-field can be checked using the depth of field scale on each lens. For example, when the 50 mm lenses are focused at a distance of 5 meters and aperture is set at F16, the depth of field will be the range of distances opposite the two 16s on the depth of field scale; in this case, objects between about 2.7 meters and infinity will appear in focus. |
Specifications
Type: 35 mm focal-plane type AE single-lens reflex camera.
Image size: 24 x 36 mm,
Lens mount: Contax/Yashica mount.
Shutter: Electronically controlled, vertically moving, metal focal plane shutter (quartz-oscillator timed).
Shutter speeds: · Auto: 11 seconds - 1/1000 second; · Manual: X synchronization (1/100 second); B (Bulb).
Synchro contact: Direct X contact ("hot-shoe"), synchronized for flash at 1/100 second. When used with CS-201 Auto, TLA30, or TLA20, automatic setting at 1/100 upon recycling of the flash unit,
Self-timer: Ouartz-timed electronic self-timer. ·
Operating time: 10 seconds. · Operating indicator: Timer LED
flashes (flashing cycle speeds up last two seconds
before shutter release). Can be cancelled during operation.
Shutter release: Real Time Electromagnetic Release System auxiliary remote release via "Release Socket" (electronic accessory connection).
Exposure control: Through-the-lens (TTL), center-weighted metering at full aperture. Aperture-priority AE type. · Light metering element: SPD (silicon photo diode). · Metering range: EV 1 - 18 (ASA/ISO 100, with F1.4 lens). Film speed setting range: ASA/ISO 25 -1600.
Exposure meter: Meter turns on when shutter release button is pressed partway (displays light for 10 seconds), LEDs displayed in viewfinder.
AE lock: Lever type (locks shutter speed at time of setting).
Exposure compensation: + 2 ~ -2 EV (by f ilm speed dial).
Viewfinder: Eye-level pentaprism type. · Field of view shows 95% of
film-exposure area. · Magnification: x0.86 (with 50 mm normal lens set at
infinity).
Focusing screen: Horizontal split-image/microprism type.
Viewfinder display: · Exposure display: 15 red LED array for correct shutter speed indication including over- and under exposure LED indicators; dedicated flash ready signal (green LED); shutter speed indicators.
Film advance: Lever type, with 130° film advance stroke, 20° standoff position.
Film rewind: Film rewind crank and rewind release button (automatic resetting type).
Exposure counter: Count increasing order, automatic resetting type.
Accessory shoe: Direct X contact ("hot-shoe") type, with terminal for coupling flash unit.
Camera back: Opens by lifting film rewind knob.
Power source: Uses 21.55 V silver-oxide batteries (Eveready S76, Ucar
S76, Mallory MS-76,
or equivalent), or 1.5 V alkaline manganese batteries (LR44
or equivalent).
See this link on a Wein Air replacement battery.
Dimensions: 135 (W) x 88.5 (T) x 50 (D) mm.
Weight: 435 grams
(without batteries).
* The above specifications and design are subject to change without
notice.
Camera Care
* Excessive heat may adversely affect the film, batteries or camera system
and result in improper exposure. Avoid leaving the camera in direct sunlight,
glove or trunk compartment, rear-seat shelf of cars and other hot areas. If the
camera has been exposed to excessive heat, allow it to cool to normal
temperature before use.
* Salt air, sand, dirt and other foreign matter will damage the camera's
internal system if allowed to penetrate inside. Take care to keep the camera
clean when using it at the seashore or in sandy areas. Shocks from dropping or
bumping are another major cause of camera malfunction. Always handle your camera
with great care to ensure years of trouble-free operation.
* Avoid touching the lens, viewfinder eyepiece and other glass
surfaces with your fingers. Blow dust and dirt away from these surfaces with a
blower/brush, or wipe gently with a soft cloth (after brushing) if necessary.
Clean smudges and smears on lens and mirror surfaces with high quality
lens-cleaning solution and tissue. Always take extra care in cleaning the lens
and mirror surfaces to avoid scratching.
* Sudden and frequent changes in temperature could lead to corrosion of
electrical contacts and cause other malfunctions. When shooting in cold or hot
areas, avoid extreme temperature changes as much as possible.
* Make it a point to always check the camera functions before taking pictures
(travel, wedding, business photos, etc.).
* It should be noted that when print films are processed, standard service-size
prints will show an area slightly less than that seen on the negative.
In order to get the best performance from this, camera, we recommend the use of
Yashica and Contax brand lenses and accessories. We take no responsibility for
damage to the camera from the use of other brands of products said to be for use
on Yashica or Contax