and historical purposes, all rights reserved.
This page is copyright© by
This page may not be sold or distributed without
the expressed permission of the producer
I have no connection with any camera company.
This camera manual library is for reference
and historical purposes, all rights reserved.
This page is copyright© by ![]() , M. Butkus, NJ.
, M. Butkus, NJ.
This page may not be sold or distributed without
the expressed permission of the producer
I have no connection with any camera company.
On-line camera manual library
If you find this manual useful, Back to main camera manual page
Click here to Chinon Intrafocus 35F-MA TABLE OF CONTENTS
Nomenclature ...........................................2
Specif ications ...............6
Installing the Batteries ................12
Battery Testing .................14
Automatic Film Loading ..........16
Motor Winder ...........18
Film Advance Indicator .............20
ASA/DIN Setting .................20
Automatic Exposure System ............22
Holding the Camera .........................22
Viewfinder ...............24
Automatic Focusing System ..............30
Focus Lock System ...................32
Shutter Lock ...........................34
Film End Indicator ..................34
Flash Photography .......38
Daylight Flash Photography ..............40
External Power Supply Socket ..............40
Self-Timer ............................42
Care of the Camera .................44
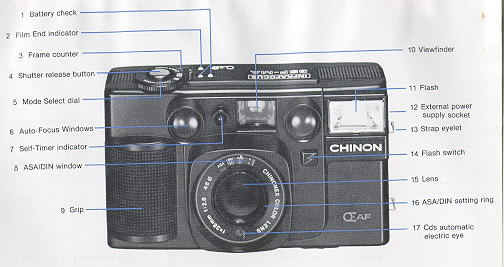
1. Battery check
2. Film End indicator
3. Frame counter
4. Shutter release button
5. Mode Select dial
6. Auto-Focus Windows
7. Self-Timer indicator
8. ASA/DIN window
9. Grip
10. Viewfinder
11. Flash
12. External power supply socket
13. Strap eyelet
14. Flash switch
15. Lens
16. ASA/DIN setting ring
17. CdS automatic electric eye
18. Flash Ready indicator
19. Film Advance indicator
20. Rewind spindle
21. Cartridge pressure spring
22. Film chamber
24. Battery compartment cover
25. Auto-Focus Ready indicator
26. Slow shutter speed warning
27. Viewfinder eyepiece
28. Film pressure plate
29. Back cover release button
30. Back cover
31. Film loading slot
32. Sprocket
33. Film Rewind lever
34. Rewind button
how about a donation of
$3 to:
M. Butkus, 29 Lake Ave.,
High Bridge, NJ 08829-1701
and send your e-mail
address
so I can thank you.
Most other places would charge
you $7.50 for
a electronic copy
or $18.00 for a hard to read Xerox copy.
This will help me to continue to host this site,
buy new manuals, and pay their shipping costs.
It'll make you feel better, won't it ?
If you use Pay Pal, use the link below.
Use the above address for a check, M.O. or cash.
PDF version - better printing

Introduction ................10
Unloading Exposed Film ........ 34

NOMENCLATURE
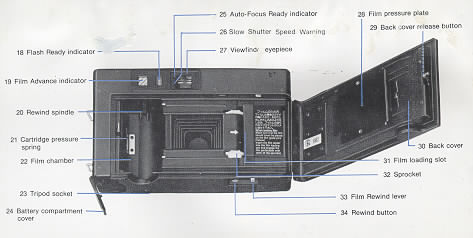
23. Tripod socket
SPECIFICATIONS
TYPE: 35 mm EE Compact camera with infrared automatic focusing system, automatic film loading
system, built-in flash and film power winder.
PICTURE FORMAT: 24x36 mm
VIEWFINDER: Bright frame, Parallax compensation mark, Slow shutter speed warning (red LED),
Auto-Focus operation indicator (green LED) and focus indicator.
SHUTTER: SEIKO programmed electronic shutter (EV 6-17: ASA 100) with automatic lock system at low
voltage; Daylight Sync. possible.
EXPOSURE METER: CdS automatic exposure system ASA 25-400 (DIN 15-27).
FOCUSING: Infrared automatic focusing system with range of 0.9M--on (2.9 ft.--=) with focus lock (cancelabl e).
FILM WIND: Automatic power winder for single frame advance.
FILM REWIND: Automatic power rewinding
FILM COUNTER: Automatically indicates number of exposures and resets to "S" when the camera back is opened.
FILM LOADING: Automatically loads film and advances to the start position when the camera back is closed.
SELF-TIMER: Electronically controlled with flashing red LED indicator for 10 seconds.
FLASH UNIT: Built-in auto flash unit with "pop-up" design.
GUIDE NUMBER: 14 (ASA 100: M), 46 (ASA 100: Ft).
RECYCLING TIME: Approximately 7 sec. with Alkaline batteries.
EFFECTIVE FLASH DISTANCE: 0.9--5M (ASA 100) 2.9-16.6 Ft (ASA 100).
NUMBER OF FLASHES: Approximately 250 with alkaline batteries.
OTHER FEATURES: Built-in battery check (red and green LEDs), film transport indicator, film end signal (LED), and shutter release lock
POWER SOURCE: Two 1.5 V "AA" size alkaline batteries (1.5 V x 2 = 3 V).
DIMENSIONS: (LxHxW) 137x77x54 mm (53/a x3 /16 X2 /B )
WEIGHT: 410 gram (15.9 oz.)
INTRODUCTION: Welcome to the world of Chinon photography! Your CHINON INFRAFOCU$ is one of the most advanced compact 35
mm cameras available today. Employing the latest state-of-the-art electronics, the CHINON INFRAFOCUS incorporates many outstanding
features such as: infra-red automatic focusing automatic loading, automatic film advance, automatic rewind and automatic flash.
Other
convenient features include: a CdS automatic exposure system, a sharp 38 mm F/2.8 all-glass four element lens, a programmed electronic
shutter and much more. In order to take full advantage of the many features of your CHINON INFRAFOCUS, please read this instruction
manual carefully, in order to totally familiarize yourself with the camera before actually starting to take pictures. We wish you years of satisfying
and carefree photography.
INSTALLING THE BATTERIES
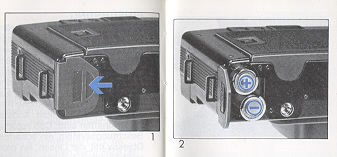
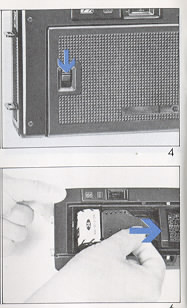
1. Slide the battery compartment cover in the direction of the arrow mark with your finger to open the battery compartment cover (Fig. 1).
2. Place two 1.5 V "AA" size Alkaline batteries into the battery compartment correctly so as to correspond with the positive (+) and negative (-)
marks shown inside (Fig 2)
NOTE:
* Use Alkaline batteries only.
* If you do not use your camera for a long period of time, remove the batteries, and store in a dry location. This will prevent the possibility of
battery leakage and damage to your camera.
* Do not use Ni-Cad batteries.
* Be sure to replace both batteries at the same time when the battery check LED fails to illuminate.
BATTERY TESTING
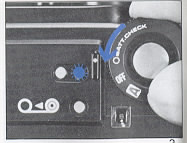
Turn the Mode Select dial to the BATT. CHECK position. If the batteries are in good condition (battery voltage is
sufficient), the green LED located on the top of the camera body will illuminate. If both red and green LEDs illuminate, battery replacement is
recommended; however, you may finish a roll of the film in the camera under this condition. If the green LED fails to illuminate, the batteries are
too weak and need to be replaced (Fig. 3).
NOTE: When checking the batteries, set the flash switch to OFF. If the batteries are checked with the switch ON, the reading will be incorrect.
AUTOMATIC FILM LOADING
 |
Always load and unload your camera in subdued light, and never in direct sunlight.
|
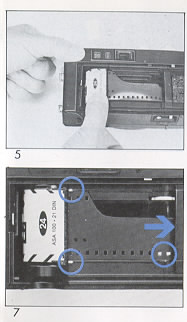 |
4. When loading film make sure that the film lies flat between the guide rails. The
film should never be placed flat on the yellow film guide pins,
as this may cause damage to the film. Insert the film leader into the film loading slot as illustrated (Fig. 7).
5. Close the back cover firmly. Turn the Mode Select dial to the "A" position from the "OFF" position. The film will automatically advance to the
figure "1" position. Now the film is in the correct position for the first picture (Fig. 8).
MOTOR WINDER: Your Chinon INFRAFOCUS has a built-in motor winding system which automatically advances the film every time you
release the shutter release button.
FILM ADVANCE INDICATOR
 |
The Film Advance indicator located on the top back side of the camera shows that the film is properly advanced by the movement of indicator (Fig. 9). NOTE: , ^ It is advisable that you have spare batteries when you plan to take a long trip or a lot of pictures. ^ If you do not use your camera for a long period of time, turn the Mode Select dial to the "OFF" position. This will prevent the possibility of accidentally tripping the shutter. |
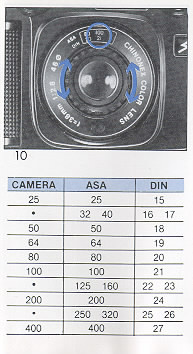 |
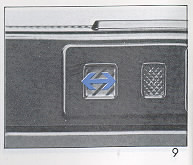
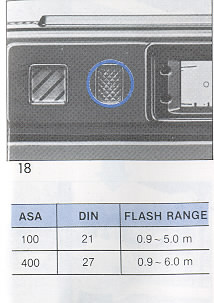
ASA/DIN SETTING Make sure the correct
ASA/DIN film speed is set on the camera to correspond with the ASA/DIN film speed indicated on
the film box. Turn the ASA/DIN setting ring to select the desired ASA/DIN speed in the
ASA/DIN window (Fig. 10).
AUTOMATIC EXPOSURE SYSTEM Your Chinon INFRAFOCUS is equipped with a CdS automatic exposure system which will control
the exposure level automatically for any picture taking situation.
|
HOLDING THE CAMERA
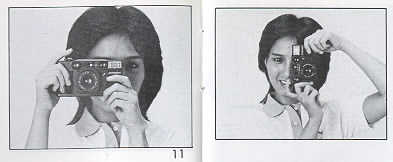 |
Hold the camera firmly with both hands and with elbows at your sides, observing
|
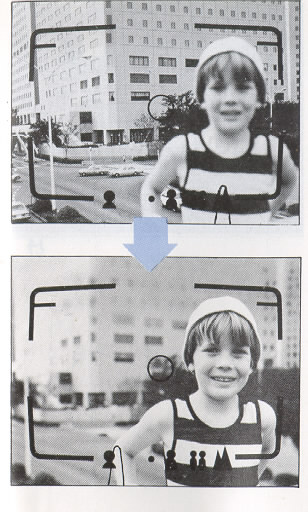
VIEWFINDER
All information necessary for perfectly composed and exposed pictures is indicated in the viewfinder and on the viewfinder
frame.
 |
(viewfinder frame) (1) Bright Line Frame (2) Parallax Correction Marks (3) Auto-Focus Mark (4) Auto-Focus Ready Indicator (5) Slow Shutter Speed Warning (6) Symbol Marks Focus Indicator (needle) |
(1) Bright Line Frame: Utilize the Bright Line Frame to compose your photograph. The image that appears within the Bright Line Frame in
the viewfinder will appear on the film. Utilize the Bright Light Frame when the camera-to-subject distance is greater than 1.5 meters (5
feet).
(2) Parallax Marks: When taking a picture closer than 1.5 meters (5 feet) or when the focus indicator (needle) points to the
![]() mark, the image
area is indicated by parallax marks in the top left and top right corners of the viewfinder. Compose the photograph within the imaginary zone
extending from the corner of the parallax marks.
mark, the image
area is indicated by parallax marks in the top left and top right corners of the viewfinder. Compose the photograph within the imaginary zone
extending from the corner of the parallax marks.
(3) Auto Focus Mark: Position the Auto Focus mark on the subject. The image within the circle is focused automatically since this is the area in
which the Auto-Focus system will focus the picture.
(4) Auto Focus Ready Indicator (green LED): At the instant when the shutter is released and the shutter release button is returned to its
former position, the Auto-Focus Ready indicator LED goes out.
(5) Slow Shutter Speed Warning (Red LED): When the Slow Shutter Speed Warning LED illuminates in the viewfinder frame, move the
subject into a bright illuminated area or depress the flash switch to utilize the camera's built-in flash system.
(6) Symbol Marks: You can visually verify the camera-to-subject distance selected by the Auto-Focus system via the four (4) symbol marks
which appear at the bottom of the viewfinder. The focusing indicator (needle) will point to the appropriate symbol.
AUTOMATIC FOCUSING SYSTEM
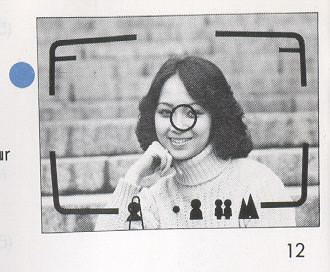 |
Your Chinon INFRAFOCUS compact camera is equipped with an automatic focusing system which
focuses the subject instantly when taking a picture. Depress the shutter release button and be sure the Auto-Focus Ready indicator LED
(green) illuminates on the viewfinder frame. It indicates that the Auto-Focus operation has been completed. The approximate distance from the
camera to the subject is also indicated on the symbol mark scale in the viewfinder (Fig. 12). NOTE: The following subjects will not be properly auto-focused: * Shiny subjects such as water surfaces or the exterior of a car body. * Subjects through a glass window. * Semi-reflective subjects. |
FOCUS LOCK SYSTEM
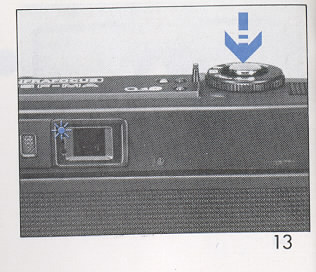 |
Depress the shutter release button halfway until the Auto-Focus Ready indicator LED is activated and hold the position. The camera locks the focus as long as the Auto-Focus Ready indicator LED illuminates and until the shutter release button is fully depressed. This feature may be used to eliminate tricky focusing situations such as a distant object situated between two people. In such a situation, first focus on one of the people, depress the shutter release button halfway until the Auto-Focus Ready indicator LED illuminates. Hold the shutter release button in the halfway position and recompose the subjects in the viewfinder, then depress the shutter release button fully (Fig. 13). |
SHUTTER LOCK
The shutter will automatically lock under the following conditions:
* Batteries installed incorrectly.
* Battery voltage
exceedingly low.
* While the film is transporting.
* While the film is rewinding.
FILM END INDICATOR
When all the film is exposed, a red LED on the top cover will illuminated, indicating the film is fully exposed.
(Fig. 14).

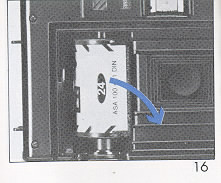
UNLOADING EXPOSED FILM
When the red figure "24" or "36" (corresponding to 24 or 36 exposure film) appears in the film counter
window or when the Film End indicator red LED illuminates, the film has been
exposed.
1. Slide the Film Rewind lever on the bottom of the
camera in the direction of the arrow all the way to the end, hold it with your finger, then push in the Rewind button as far as it will go (Fig. 15).
2. The film will automatically rewind, and the frame counter will rewind accordingly.
3. When the film is completely rewound, the Rewind button will stop rotating and an audible "click" will be heard, indicating film rewind
completion. The rewind motor will also stop when the Mode Select dial is turned to the off position, or when simply opening the camera back.
4. Open the camera back cover and remove the film cartridge from the film chamber (Fig. 16).
NOTE:
* Do not take the film out of your camera in bright sunlight.
* You should process the film immediately for best results.
* Do not slide the Film Rewind lever to lock or press the Rewind button when there is no film in the camera.
FLASH PHOTOGRAPHY
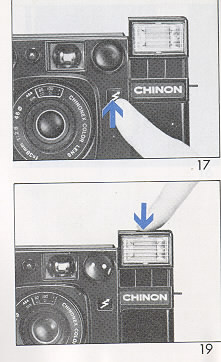 |
Your Chinon INFRAFOCUS camera has a built-in Auto-Flash unit which adjusts the exposure automatically when the
camera sets the focus to the desired distance.
|
DAYLIGHT FLASH PHOTOGRAPHY
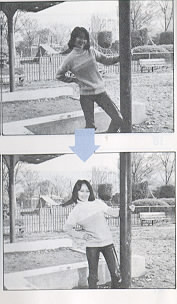 |
If the main subject has less light falling on it than the surrounding area and background. (such as in a backlight situation or when the subject is beside a sunny window in an interior), underexposure of the main subject will result. In such situations, use the auto flash for the photograph even in daylight. |
EXTERNAL POWER SUPPLY SOCKET
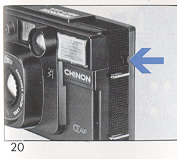 |
There is a 3 V external power supply socket on the side of the camera (Fig. 20). We recommend you to use the external power supply in the following situations: 1. When taking a large amount of pictures in succession. 2. When using flash repeatedly during a short period of time. 3. When taking pictures in cold weather. The battery pack may be placed in your pocket to extend battery life in cold weather. |
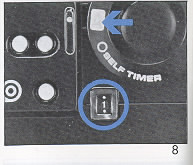
SELF-TIMER
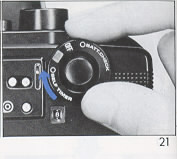 |
Your Chinon INFRAFOCUS is equipped with an electronic self-timer with a red LED Self-Timer indicator. The self-timer permits
the photographer to get into the picture. It is used for normal photographs as well as for flash photography. 1. Place the camera on a tripod or other firm support (the tripod socket is located on the bottom of the camera). 2. After you check the exposure and adjust the focus, turn the Mode Select dial to the Self-Timer position (Fig. 21). 3. Depress the shutter release button to start the self-timer, and the exposure will result in approximately 10seconds. You will notice the red LED Self-Timer indicator blinking. Three seconds before the shutter is released, the flashing frequency will increase, giving you or your audience a visual signal that the shutter is about to be released. |
NOTE: If you use the built-in Auto-Flash together with the Self-Timer, check the Flash Ready indicator as well as the three
above mentioned operations before you release the shutter.
CARE OF THE CAMERA
Your Chinon INFRAFOCUS camera is a precision instrument. When used with care it will provide years of
trouble-free service. Protect your camera from dirt, rain, dampness and excessive heat. Avoid touching the lens. To clean the lens, wipe it
gently with a soft lintless cloth or tissue. Do not use eyeglass tissues as they might damage the lens coating. Do not open and touch the inside
of camera as the high voltage (approx. 300V) in the flash circuit is dangerous.
If the film end indicator (red) lights when the film is not completely used up, rewind the film with the back cover closed ( 1 and 2 ). Opening the
back cover and closing it again will return the film to the previous position.