and historical purposes, all rights reserved.
This page is copyright© by
This page may not be sold or distributed without
the expressed permission of the producer.
I have no connection with any camera company.
This camera manual library is for reference
and historical
purposes, all rights reserved.
This page is copyright© by
![]() ,
M. Butkus, NJ.
,
M. Butkus, NJ.
This page may not be sold or distributed without
the expressed
permission of the producer.
I have no connection with any camera company.
On-line camera manual library
If you find this manual useful, If you use Pay Pal, use the link below. Back to main camera
manual page Problems opening PDF
files or printing problems
Click here for Konica
Z-up Super
SAFETY GUIDE Name of parts (Fig. 2, Fig. 3) Advanced Instructions 9. Using the Mode Switch (Fig. 17)
how about a donation
of $3 to:
M. Butkus, 29 Lake Ave.,
High Bridge, NJ 08829-1701
and send your e-mail
address
so I can thank you.
Most other places would charge
you
$7.50 for a electronic copy
or $18.00 for a hard to read Xerox copy.
This will help me to continue to host this site,
buy new manuals, and pay
their shipping costs.
It'll make you feel better, won't it ?
Use
the above address for a check, M.O. or cash.
- click here
Click here for Konica
Z-up Super
PDF version Pt. 1
PDF version Pt. 2
Parts Front
Parts Back
Parts LCD
Parts Viewfinder
Fig. 6 & 8
Fig. 9
Fig. 10
Fig. 11, 12, 13
Fig. 15, 16, 17
Fig. 18, 19
Fig. 20, 21
Fig. 22, 23, 24
Fig 25, 26
This product is a camera for taking still photographs.
Please do not use it for any other purpose. While we have given all due attention
to the safety of the product, we would ask you to use it correctly after reading
this page and the warnings and cautions regarding batteries.
The marks shown below are warning and caution notices to enable you to use the
product in such a way as not to cause any injury or damage.
1. Warning marks and their meanings
* WARNINGThis warning mark indicates that if the product is
not correctly used, the person using or handing the product could suffer fatal
or serious injury.
* CAUTIONThis caution mark indicates that if the product
is not correctly used, the person using or handing the product could suffer
slight or moderate injury, or that there is the danger of damage to inanimate
objects.
2. Warnings
* WARNINGDanger of explosion leading to major injury. Please
do not expose batteries to naked flames, or short-circuit, dismantle, or heat
them.
* WARNING Danger of death if accidentally swallowed. Please
store batteries in a place where small children cannot reach them.
* WARNINGDanger of suffocation if accidentally wound around
the neck. Please ensure that the camera strap cannot come into the hands of
small children.
* WARNINGDanger of electrocution. Please in no event dismantle
the camera, as there are high voltage circuits inside it.
* WARNINGDanger of heat generation and combustion. Please
do not use batteries other than those specified. If the batteries generate heat,
please remove them immediately and take them to your nearest service station.
* If the contents of this page and the warnings or cautions regarding batteries
have become illegible, we recommend that you exchange it for a new explanation
sheet at your nearest service station. (Payable)
Holding the Camera (Fig. 1)
Keep your elbows down to hold the camera steady.
• Whether for vertical or horizontal photography, hold the camera with both
hands and draw your elbows to your
body for steady camera holding.
• For vertical picture taking, hold the camera with the shutter button up.
and the numbers of the auto date will be recorded at the bottom of the film.
• When taking vertical pictures, make sure that the strap will not hang in
front of the lens, auto focusing window or exposure reading window.
• Be sure that the lens and the Autofocus Sensor Windows are not obstructed
by anything: fingers, strap, etc.
• If the flash is used with the camera held vertically, the flash unit should
be at the top of the camera.
Care of your camera
I) Do not leave the camera in a very hot environment, such as under the window
of a car, or in the glove compartment or trunk. Excess heat or humidity may
cause serious damage to the camera and changes in film color or damage to film
emulsion and surface.
2) Avoid sudden temperature changes (bringing camera from outdoor cold to very
warm indoor). These can cause moisture condensation inside the camera or lens,
resulting in clouding of lens or rusting of metal parts.
3) Do not leave the camera near or on electrical appliances such as a TV or
refrigerator.
4) Do not clean the camera body with alcohol, thinner or any other organic solvent.
If it is stained, wipe it with a piece of dry cloth.
5) If water has dripped onto the camera or if the camera has been exposed to
a sea breeze, wipe it well with a dry cloth.
6) Do not place camera with film inside in cabinets of furniture treated with
formal in-containing substances, or near naphtha moth repellent. (These will
affect color film quality.)
7) Avoid exposing camera to mud or sand. These can cause serious damage to moving
parts of the camera.
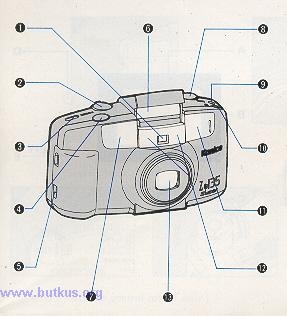
1. View-finder Window
2. Zoom Switch
3. Power Switch
4. Shutter Release Button
5. Strap Eyelet
6. Built-in Flash
7. Auto-focus Sensor
Windows 8. Mode Switch
9. Turning the Auto
Data Switch
10. Self-timer Switch
11. Self-timer Light
and Auto-focus Sensor
Windows
12. AE Photo Sensor
13. Lens and Cover
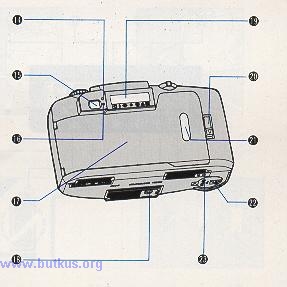
14. Green Light
15. Finder Eyepiece
16. Red Light (warning
signal)
17. Film Door
18. Tripod Socket
19. Display Panel
20. Film Door Look
21. Film Check Window
22. Battery Cap
23. Manual Rewind Switch
*9. Auto-date model
only
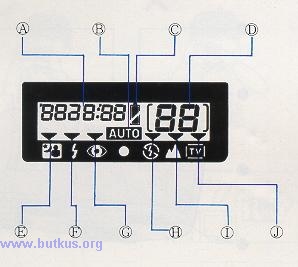
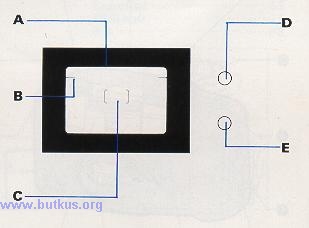
Display Symbols (Fig. 4)
The diagram shows all crystal displays in the "on" state.
(A) Date Time Display (Automatic Date Mode or optional)
(B) Auto-flush Mode Symbol (Standard Mode)
(C) Battery Power Symbol
(D) Frame Counter
(E) Night View Portrait Mode indicator
(F) Flash-ON Mode (Fill in flash) indicator
(G) Pre-flash (To reduce the red-eyes) mode display indicator
(H) Flash-OFF Mode indicator
(I) Infinity Mode indicator
(J) TV-Mode indicator
Using the Viewfinder (Fig. 5)
The finder is real image finder. It shows what the camera lens sees.
A Picture frame
B Close-up (parallax correction) marks
C Auto-focus frame
D Green Light (AE/AF Lock and close-up warning signal)
E Red Light (Indicates flash will operate and low light warning signal, Flash
recharging)
How to attach the strap.(Fig.6)
How to attach the strap
Standard Mode Operation
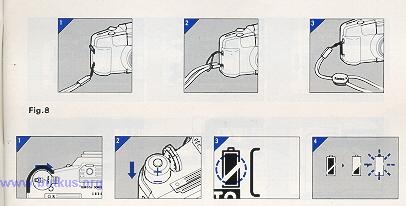
1. Loading the Battery (Fig. 8)
Use a single CR 123A or DL 123A (3V) lithium battery. This camera will not operate
without a battery loaded.
1) You can open the cover of the battery chamber by depressing the release button
of the battery chamber cover to the direction of the arrow indicated with the
protrusion of the strap adjustment tool.
2) Be sure to load a battery in the battery chamber matching the +/- sides of
the battery with the +/- marks inside the battery chamber, and close the battery
cover with a click.
3) If the battery is fresh, the Battery Power Symbol © will appear fully
black.
When to replace the battery
When the battery Power Symbol is 1/2 blank, enough power remains to finish a
roll of film before replacing the battery.
Notes on replacing battery
I) If there is a film inside the camera, please replace batteries quickly (within
20 seconds) with the power switched off.
2) If batteries are inserted while the LED is completely off, the power automatically
switches on and off after the LED has all been displayed.
3) If the battery is removed while film is in the camera, the frame count data
will be lost. When you close the battery chamber cover after battery replacement,
the film will advance several frames and the film counter will return to number
"I" when the shutter button is pressed. Resume taking pictures until the end
of the roll.
4) If battery is removed for more than about 30 seconds while film is in camera,
and the film is near the end of the roll the frame counter will blink" C "and
the film must be rewound manually.
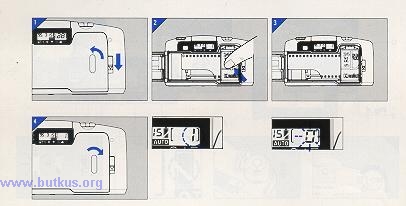
2. Loading the Film (Fig. 9)
This camera uses standard 38 mm 135 size film magazines with DX coding. The
film speed (ISO25-3200) is set automatically when the film is loaded.
1) Open the back cover by pressing the back cover release knob.
2) Place a new roll of film in the film chamber. Draw out the tip of the film,
holding the magazine in place.
* When loading film, be careful not to touch the back of the lens inside the
camera. If the lens gets dirty, wipe it gently with a soft, dry cloth.
3) Draw the film tip as far as the FILM TIP mark inside the camera. Close the
Back Cover firmly.
4) When you close the back cover the film is automatically advanced to the first
frame position.
* If the film has not been correctly loaded the Frame
Counter will blink " [ ] ".Open the Back Cover and reload the film.
* When using non-DX code films and ISO 25 films, first open the lens cover and
turn power on, then press the shutter release button to advance to the first
frame.
* Use ISO25/50/100/200/400 film for color slides.
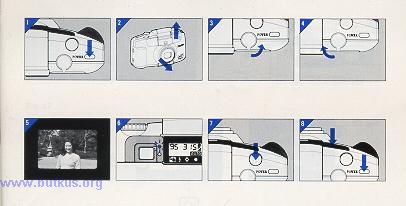
3. Taking Pictures (Fig. 10)
1) Press the power switch (3) once so that the power is ON.
2) When the camera is switched-on, the lens will be extended to the photographic
position (38 mm Wide-Angle), and the retractable flash unit will swing up.
3) Look through the viewfinder eyepiece and press the zoom switch to T to change
the frame to telephoto mode.
4) Press the zoom switch to W to change to wide-angle mode.
5) Point the camera so that subject you want to focus on is in the center of
the viewfinder (Auto-focus Frame).
6) Press the Shutter Release Button (4) halfway until the Green Light (14) comes
on. The focus is automatically set.
7) Press the Shutter Release Button all the way down to take the picture. The
film will advance one frame.
8) After you have finished taking pictures, depress the power switch. The power
will be turned off, the flash unit will swing down and lens will retract.
• Look through the viewfinder eyepiece and press the Zoom switch, and you can
quickly Zoom from Wide-Angle to Telephoto position to adjust your picture composition.
• Do not manually push the flash down, make sure to depress the power switch
and the flash will swing down.
• If power is left on the camera will automatically turn off after approximately
5 minutes.
• If you do not intend to keep taking pictures, always turn the power off.
Camera to subject Range: 135 mm 0.8 m (2.6 ft)-38 mm 0.8 m (2.6 to-00)
Special notes for your further information:
• The viewfinder may move when you trip the shutter button; however, your picture
will be taken in the original picture composition.
4. Using Auto-flash (Fig. 11)
• The flash unit will automatically flash in low light.
1) If the Red Light (16) and Green Light (14) turns on when the shutter release
is pressed halfway down, there is not enough light, and the Auto-flash will
operate.
2) Press the Shutter Release Button (4) to take a picture with flash.
3) Shutter locks until recharging is completed.
• The flash power is adjusted after automatic measurement
of film sensitivity, subject distance, and focal length.
• When flash is used to take pictures of people, use the Pre-Flash Mode.
Flash Photography Range:
39 mm ISO I00 0.8m (2.6ft) - 4.7 to (15.4ft)
IS0 400 0.8 m (2.6 ft) -9.4 m (30.8 ft)
135 mm
ISO100 0.8 m (2.6 ft) - 2.6 m ( 8.5 ft)
IS0 400 0.8 m (2.6 ft) - 5.2 m (17.0 ft)
5. Focus Lock (Fig. 12)
Aim the Auto-Focus Frame at the subject.
1) Depress the shutter Release Button (4) halfway until the Green Light (14)
turns on.
2) With the Shutter Release Button held at this point, compose the picture,
and continue pressing the Shutter Release Button fully down to take the picture.
• Focus Lock will be released if the finger is removed from the Shutter Release
Button before taking the picture.
• Automatic Exposure (AE) is locked at the same time as Focus Lock.
• Focus Lock may not operate properly under some conditions dark or grey objects,
reflective or light-emitting objects, or very small objects. When there are
no obstructions such as rain, mist, or smoke. In such cases, set the Focus Look
by aiming the camera at another object of similar brightness at about the same
distance.
• When taking pictures through a glass window, the Autofocus mechanism may
not focus properly because of reflections. To take photos through glass, press
the camera directly against the glass. For landscape photos through a window,
use the Infinity Mode.
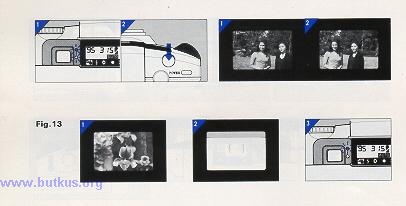
6. Close-up Photography (Fig. 13)
You can focus in as close as 0.8 m (2.6 ft), with 135 mm telephoto for extreme
close-up photos.
1) Match the Auto Focus target with your subject that you want to focus on.
Make sure subject is in the center of Auto focus target at a distance of 0.8
(2.6 ft) - I m (3.3 ft).
2) If you want to take a picture closer than 1 m (3.3 ft), compose your picture
below the close distance adjustment mark for panorama before tripping the shutter.
• As you set the lens at the Telephoto distance of 135 mm, you can zoom towards
Wide-Angle to adjust your picture composition.
• When depressing the Shutter Release Button halfway if a Green Light blinks,
that indicates either the shooting distance is shorter than 0.8 m. When the
shutter is locked, correct the distance and depress the Shutter Release Button
again.
• Camera vibration can be prevented by using a tripod and shooting with the
self-timer.
(Fig.14 Panoramic model only.)
7. Unloading the Film (Fig. 15)
1) When the last frame of the film has been exposed, the film will be automatically
rewound. When the film is fully rewound, the motor stops automatically.
2) When the rewinding has stopped, check that the Frame
Counter (a) has returned to " [ ] ", the " [ ] " will blink.
3) Open the Film door (17) and remove the film.
* Often more than the specified number of pictures can be taken (for example,
a 26 frames on a 24 frame roll). In this case, the last two frames may over-lap,
however.
8. Manual Rewind (Fig. 16)
To rewind film manually (forced rewind) before the roll is finished.
1 ) Use the Strap Ring tip to press the Manual Rewind Switch
(23). Film will begin to rewind.
Pressing the Mode Switch - 1 shifts the camera through the following modes.
• As you turn the mode switch, the mode display symbol ( V ) on the mode display
panel will move to the mode you choose.
• If you turn the mode switch slowly, the mode display symbol may not move.
• Note that the mode will not circulate. As you set the camera in one mode,
you can continue taking pictures, in that mode. The camera will stay in that
mode until you change it again.
![]()
Night View Portrait Mode (Flash
ON Mode
![]()
Flash ON Mode (Fill in flash) (User
decides to use flash)
![]()
Pre-flash Mode (To reduce the red
eyes - Standard Mode)
![]()
Using Auto Flash Mode
![]()
Flash OFF Mode (User decides not
to use flash)
![]()
Infinity Mode
![]()
TV Mode (for photos of TV screen
images
• Since all modes are fixed, you can continue
to photograph in the mode once it is set.
• When power is switched off and then back on again, it returns standard to
Auto mode.
10. Pre-Flash Mode (Fig. 18)![]()
1) Turn the mode switch and match the mode display symbol (
![]() ) with (
) with (![]() ).
).
2) When taking pictures of people's face under dim light, using flash, reflection
of flash on the retina, sometimes called "redeye" may resin. The Pre-Flash Mode
helps prevent this by firing an extra flash just before taking the picture,
causing the pupil of the eye to contact.
• The main flash will operate about I second after the preflash. Be careful
to hold the camera steady until the second flash fires.
What is red eye phenomenon?
When flash pictures are taken of people in a dark place, the flash light is
reflected from the retina and peoples eyes sometimes show up with red flash.
This is referred to as red eye phenomenon.
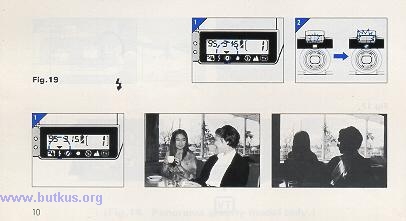
11. Day light Flash (Fig. 19)![]()
Daylight flash photography is effective for back-lit subjects, strong shadows
or on cloudy days. I) Tom the mode switch and match the mode display symbol
(
![]() ) with (
) with (
![]() ).
).
The flash will operate even in bright places.
• Slowest shutter speed is 1/30 sec. at wide angle, 1/60 sec. at the telephoto.
Hold the camera steady to prevent blurring at slow shutter speeds.
• When light is poor, switch to Night view Portrait Mode.
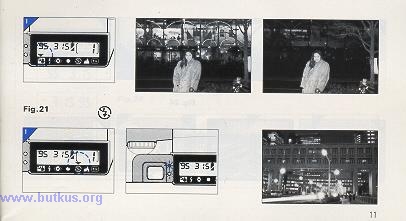
12. Night View Portrait (Fig. 20)![]()
Flash fires in synchronization with slow shutter speed.
1) Turn the mode switch and match the mode display symbol
(![]() ) with the (
) with the (
![]() ).
).
2) Under poor light, shutter will remain open for up to 3.2 sec. to achieve
correct exposure conditions.
• The AE operates normally in the flash mode, so it is possible to take correctly
exposed photographs at down and dusk, on cloudy days, or at close range, and
against dark backgrounds.
• To prevent camera shake and blurring, use the stand or a tripod.
13. Flash OFF Mode (Fig. 21)![]()
In flash OFF Mode, the flash will not fire even under poor light. Use this mode
to prevent operation of flash when not permitted, or for taking evening scenes
with available light only, for example.
1) Turn the mode switch and match the mode display symbol (
![]() ) with thee (
) with thee (
![]() ).
).
• Flash off mode the flash unit will swing down automatically and will not
fire.
• As you turn the mode to (AUTO], the flash will swing up automatically. The
camera is now set for programmed AE photography at up to 3.5 seconds without
flash.
• If the Red Light (16) blinks when the shutter is pressed halfway down, there
is not enough available light for a correct exposure in Flash OFF mode.
• To prevent camera shake and blurring in dark conditions, use the stand or
a tripod.
14. Infinity Mode (Fig. 22)
![]()
Use this mode to take photos of distant landscapes and when
shooting scenery or landscapes through a glass window. Focus
will be set at infinity for maximum sharpness.
1) Turn the mode switch and the mode display symbol (
![]() ) with the (
) with the (![]() ).
).
2) This will insure sharp focusing at very long range.
• Flash off mode the flash unit will swing down automatically and will not
fire.
• As you turn the mode to [AUTO], the flash will swing up automatically.
• The shutter speed is slow when photographing in dark conditions such as dusk
and night scenes. To prevent camera shake and blurring under these conditions,
use the stand or a tripod.
15. TV Mode (Fig. 23)![]()
This mode makes it simple to take clearly focused photos of TV screen images.
In TV Mode, the aperture is opened all the way and shutter speed is set at 1/
15 or 1/30 sec.
1) Turn the mode switch and the mode display symbol (
![]() ) with align="Konica camera icon" the (
) with align="Konica camera icon" the (![]() ).
).
2) Attach the camera to a tripod, place it directly in front of
the TV set, and frame the image through the finder.
Release the shutter.
• Turn out room lights and close curtains to prevent reflections on the TV
screen.
• Use of ISO400 film is recommended.
• TV Mode should not be used for ordinary picture-taking.
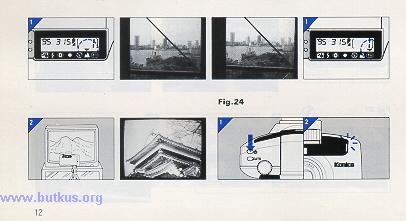
16. Self-timer mode (Fig. 24)![]()
• The self-timer is not only for close distance but for distant scenic pictures.
When taking a long distance scenic pictures, or night view evening scene using
a slow shutter speed you can get a sharp, vibration free photograph by placing
the camera on a tripod and using this mode.
1) Press the self-timer switch, and as soon as your finger leaves the switch,
the self-timer will start working.
• Focusing will be locked at the instant the self-timer starts working.
2) Set the camera on a tripod or steady surface, frame the picture, and press
the Shutter Release Button. The Self-timer will start and release the shutter
after about 10 seconds.
• If you want to cancel the operation while the self-timer is in operation,
press the self-timer button again or turn off the power switch.
17. Auto-date
(for Auto-date model only)
The Auto-date model of this camera has a quartz-controlled auto-date mechanism
(clock/calendar) that is programmed through December 31, 2019.
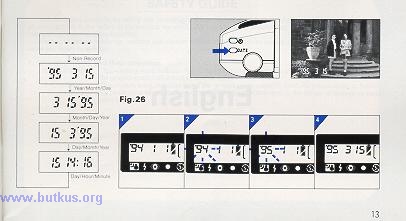
18. Changing the Display Mode (Fig. 25)
Press the "MODE" Switch and select either date or time.
• By turning the auto date switch, you can set the Auto Date to print Year/Month/Day
or Day/Hour/Minute, or choose not to print.
• Adjust the Auto-date display after replacing the battery.
19. Adjusting Date and Time (Fig. 26)
1) Depress the Auto Date switch, and display the Year/Month/Date or Day/Hour/Minute
of your choice.
2) As you keep the Auto Date switch depressed for more than 2 seconds, numbers
will blink and you can make necessary changes.
3) As you turn the mode switch to the left, you can change the blinking numbers.
• Remember that you can change numbers only to higher numbers. If you want
to choose a lower number, keep turning the mode switch to the left, and you
can start again from the lower numbers.
• As you depress the Auto Date switch, the blinking number will move to the
number you want to change.
4) After finishing the change of your Auto Date numbers, depress the Auto Date
switch again and change display from blinking, and camera is ready to print
display data.
• As you depress the Auto Date switch after changing the minute, you will see
a blinking ":" (colon). Press the Auto Date switch again, turn the display from
blinking to turn on mode and are ready for information to print.
• If you want to adjust the time up to the second, press the Auto Date switch
timed with the time tone while the display is blinking. Press the Auto Date
switch again and change it to print mode.
Specifications
Film speed
With DX film, auto setting IS025
to IS03200, with non DX film defaults IS025
Type
Auto-focus auto-exposure 35mm lens
shutter camera with built-in zoom lens
Format
24 x 36mm
Lens
38mm F3.6-135mm F3.6 focal length
Konica zoom lens (9 groups 10, elements), with lens cover
Power switch
When the power is turned on, the
flash unit swings up, the lens is
extended, and the lens cover opens.
When the power is turned off, the flash swings down, the lens retracts,
and the lens cover closes. If the power is left on the camera will turn
off automatically in about 5 minutes, and the remaining battery life
is shown on the LCD panel.
Shutter
Electronic programmed shutter, 3.2
- 1/280 sec.
AE Coupling range
ISO100: f=38mm EV2-EV 16, f=135mm
EV4.9-EV16
AE adjustment
Backlight fill in program AE using
a US light receptor element
Focusing
Infrared non scan active type autofocus
system, effective range: 0.8m (2.6ft) - (with 135mm telephoto), 0.8m
(2.6ft) - (less than 135mm focal length), Focus lock with shutter release
half stroke
Finder
Real-image zoom finder with auto
focus frame, close-up parallax marks, Green light (auto-focus/focus
lock, blinks when subject is out of range), Red light (auto flash, Flash
recharging, blinks in Flash OFF mode when available light is insufficient.)
Flash
Automatic swing-up and retractable
swing-down mechanism; flash-matic auto flash will operate automatically
in low light levels and back-lit conditions. In low light back-lit situations
the shutter speed may be slow, and we recommended to use a tripod to
prevent camera shake.
Interactive range - (ISO 100) f=38mm 0.8 (2.6ft)-4.7m
(15.4ft),/f=135mm 0.8 (2.6ft)-2.6m (8.6ft);
Flash recycling time - 7 seconds;
Exposure automatically adjust against film speed, photographic distance
and lens focal length.
Settings
Mode Switch: Night View Portrait
flash - Flash ON - Pre-flash
AUTO - Flash OFF - Infinity mode
-TV mode
Self-timer
Electronic self-timer about 10 sec.
delay, red LED lights for first 7 sec.
then blinks for 3 sec. cancel function provided.
Film transport
Automatic film advance to first
frame (Motor-drive auto loading starts when the back cover is closed),
auto wind after each frame, auto rewind at end of roll with auto-rewind
stop.
Manual rewind feature.
You can rewind the film before the roll is finished.
Frame counter
Additive type, LCD panel display
Auto-date
(Auto-date model only)Built-in digital LCD display, Imprints
time or date to the year 2019, setting for date or time recording or
cancel for no imprinting, adjustable to nearest sec.
Battery life
About 10 rolls with flash for half
the exposures (24-exposure film)
Power source
Lithium battery (CR123A, DL123A:
3V), battery power check on LCD panel
Size, weight
119.5 x 68 x 49.5mm (47 x 2.7 x
1.9") 2808 (10 oz) battery extra
Note: Specifications
and design subject to change without notice.
Above data based on
manufacture's tests.