and historical purposes, all rights reserved.
This page is copyright© by
This page may not be sold or distributed without
the expressed permission of the producer.
I have no connection with any camera company.
This camera manual library is for reference
and historical
purposes, all rights reserved.
This page is copyright©
by
![]() ,
M. Butkus, NJ.
,
M. Butkus, NJ.
This page may not be sold or distributed without
the expressed
permission of the producer.
I have no connection with any camera company.
On-line camera manual library
If you find this manual useful,
how about a donation
of $3 to:
M. Butkus, 29 Lake Ave.,
High Bridge, NJ 08829-1701
and send your e-mail
address
so I can thank you.
Most other places would charge
you
$7.50 for a electronic copy
or $18.00 for a hard to read Xerox copy.
If you use Pay Pal, use the link below.
Use the above
address for a check, M.O. or cash.
If you use PayPal.. use the link below.
CLICK HERE FOR A PRAKTICA FX 2
MADE DIRECTLY FROM MANUAL
Praktica FX 2 - Color
CLICK HERE FOR A Praktica FX2 PDF
VERSION OF THIS HTML PAGE
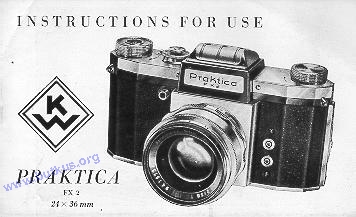
Praktica FX 2 Bedienungs - Anleitung
Explanation of Signs
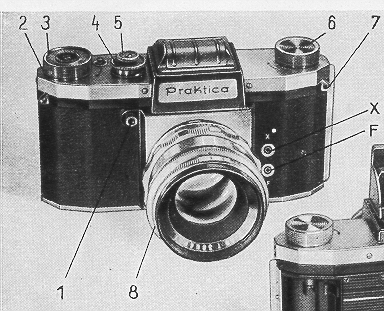
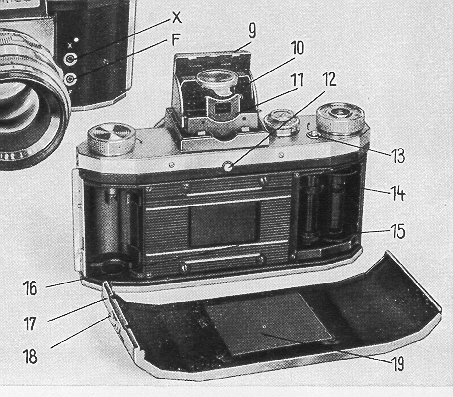
| 1 = Release knob 2 = Knob for winding the shutter and transporting the film 3 = Picture-counting disc 4 = Knob for setting the shutter speeds 5 = Knob for setting the speed groups 6 = Film rewind-knob 7 = Loops to hold the neck-strap 8 = Interchangeable lens with rotatable rings for setting distance and diaphragm, and with distance, diaphragm and depth-of-field scales X= Bipolar contact socket (X contact) F= Bipolar contact socket (F contact) |
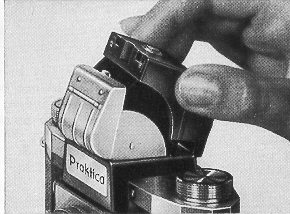
9 = Lighthood
cap 10 = Magnifying lens 11 = Rear finder mask 12 = Latch button for lighthood 13 = Release knob for rewind mechanism 14 = Film spool 15 = Film transport sprocket 16 = Picture gate 17 = Camera back 18 = Catch for camera back 19 = Film pressure plate |
Inserting the film
The camera back is unlocked by pushing the knob No. 18 in the
direction of the arrow. Open the camera back, take it off, and pull out the
rewind knob No. 6. The film cartridge must be placed into the empty chamber
with the beginning of the film projecting in the direction of the picture gate.
Pull the beginning of the film away from the cartridge and fix it into the empty
spool on the right-hand side of the camera. It is important that the sprocket
teeth catch both perforated edges of the film. Wind the
shutter by rotating knob No. 2.
Make sure that the film lies straight on film guide and sprocket,
link the camera back into the right-hand groove and close it down. The film
pressure-plate must be perfectly clean before the camera back is closed.
After having closed the camera back, make two blank exposures. The rewind knob
6 must hereby turn in the opposite direction of the arrow mark. When all these
manipulations have been performed, the counting mechanism has to be set to stroke
No. 1, and the camera is ready for the first exposures.
Changing the film
Following the 36th exposure, a certain
resistance will be noticed in winding the shutter - a sign that the whole film
is exposed and has to be rewound into the cartridge. This is done by pressing
down the little button 13 and at the same turning the rewind-knob 6 in the direction
of the arrow.
The beginning of the film will slip out of the cartridge audibly,
and the rewinding procedure is completed. Open the camera back and remove the
cartridge with the exposed film.
Shutter and film transport
a) Winding the shutter
A full
rotation of the knob 2 as far as it will go to the right (clockwise) winds the
shutter, advances the film to the next frame, and swings the reflex mirror into
the light-ray level of the lens. Take care that the release knob 1 is n o t
pressed in while the shutter is being wound up. Any not built-in self-timers
must be either wound up or removed from the camera before the shutter is wound.
b) Setting the shutter speeds
The speeds are set by means of the adjusting knob 4 and the supplementary
knob 5. The speed disc is engraved with
black figures
for the short speeds from 1/500th to 1/25th second, and
![]() (1/40th),
(1/40th),
with red figures for the long speeds from 1/10th to 1/2
second, and with "B" setting for time exposures
of any desired length.
With the shutter set to the
speeds of 1/500th to ')25th sec., and
![]() the
red triangle of the supplementary knob 5 must point towards the black triangle
on the camera top. When set to the speeds of 1/10th to 1/2 sec., the red triangle
on the supplementary knob must point to the red triangle on the camera top.
The "B" setting can be used in both positions.
the
red triangle of the supplementary knob 5 must point towards the black triangle
on the camera top. When set to the speeds of 1/10th to 1/2 sec., the red triangle
on the supplementary knob must point to the red triangle on the camera top.
The "B" setting can be used in both positions.
To set the speeds, lift the outer ring 4, turn it to the desired
number and click it in. There is only one rest-hole for 1/2 and 1/25th second,
marked by a dot between the speed numbers 1/2 and 1/25.
The speed knob may be turned in both directions either before
or after winding up the shutter.
Lens and Shutter
a) Press button No. 12, and the lighthood will spring up, uncovering
the finder lens. When the shutter is wound up, a bright, clear image will appear
on the ground-glass surface of the finder. By turning the distance meter ring
on the lens mount, you can focus the lens to the greatest possible sharpness.
Focusing should be performed with the diaphragm at full opening, and the lens
stopped down to the desired aperture immediately before making the exposure.
To facilitate focusing, the camera is equipped with a
magnifying lens, which is swung into operating position by means of lever 10.
When using the magnifying lens, a distance of 15 to 25
mm. between the eye and the lens should be observed. Only then will the image
on the ground-glass be perfectly clear.
The eye-level viewfinder in
the lighthood is very handy for sports snapshots. To disengage the sportsfinder,
swing out the flap in the front of the lighthood cap (9). bring the magnifying
lens into working position and draw out the finder mask at the back.
To close
the lighthood, press the lighthood cap (9) gently with your finger, and all
the parts will automatically slide back to their original position, except the
rear finder mask (11), which has to be pushed back beforehand.
b)The lens scales
The front ring on the lens mount is engraved
with the diaphragm scale and the index point, the middle ring with the distance
scale in meters or feet, and the back ring with a diaphragm scale showing the
depth of sharpness.
According to this scale, for instance, the Biotar lens
f/2 with a focal length of 58 mm , at a distance setting of 4 meters (12 ft.)
at an f/11 aperture, gives a sharpness reaching from 2.5 to 10 meters (7'6"
to 30').
c) Changing the lens
The lens in the camera
body is interchangeable within its threaded flange. By being turned to the left
(anti-clockwise) the lens can be removed from the camera body. Should the camera
be loaded when changing lenses, take care to protect the opening from glaring
light. Never make any alterations in the mechanism which becomes visible when
the lens is screwed out, as this might do serious harm to the shutter.
An
accessory to the Praktica is the Penta Prism. Look into it and you will see
an upright, non-reversed, enlarged ground-glass image, free from parallax error.
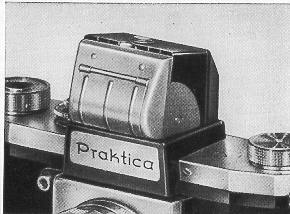
d) The Penta Prism
The Penta Prism is fitted
into the open lighthood of the camera from above, while the latch button (12)
is being depressed, whereupon it is bolted by pushing the fastening knob to
the front.
The very considerable advantages offered by the Penta Prism most
certainly compensate for the small discrepancy in size on the upper edge of
the screen image.
|
|
|
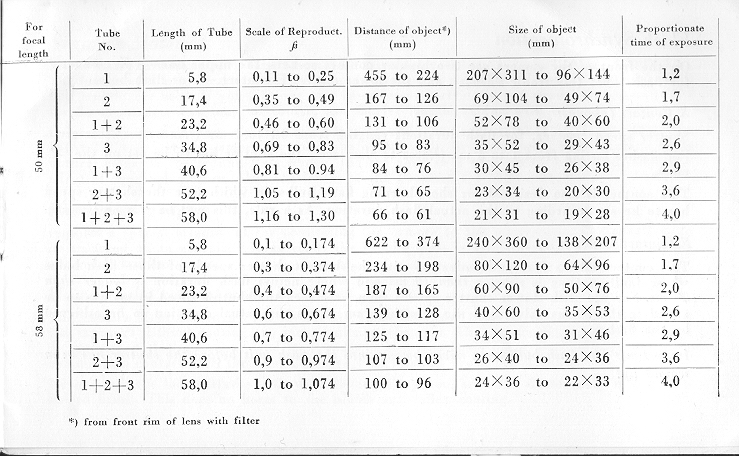
the Close up chart
Color Filters
with any type of mount can be used in the PRAKTICA (i. e. screw-in
and slip-on mounts). The same refers :o sunshades.
Flash Synchronization
On the front of the camera are two bipolar contact sockets,
the upper one - X contact - for flash tubes (electronic flashes), and the lower
one - F contact - for flash bulbs.
X Contact (above):
Shutter speed1/50 sec. for flash durations ranging from 0.1 to 1 ms (1/10000
to 1/1000 sec.). For flashes lasting from 1 to 5 ins (1/1000 to 1/200 sec.)
the shutter has to be set on the .` mark.
This contact is
also designed for short-burning flash bulbs, in which case the shutter speed
has to be set according to the actual flash duration. As a rule, this will be
1/25 or 1/10 sec.
F Contact (below):
This contact allows for synchronization with the shortest shutter
speeds of those flash bulbs whose ignition time is shorter than 10 ms and whose
actual flash duration is longer than 20 ms. For use with slower shutter speeds
than 1/500 sec., the shutter speed in ms has to be added to the 20 ms value,
and the resulting sum shows the actual duration to he achieved by the flash.
Important: The flash bulb must never be put into the flash unit before the shutter
has been wound up!
Negative Material
The PRAKTICA takes perforated 35 mm film, available either in cartridges or
in bulk film. The length of film in a cartridge is equal to 36 exposures, sometimes,
however, cartridges with half lengths are used. If you fill your own cassettes
or cartridges, you need 1.60 meters (6'5") for 36 exposures. You may, of
course, use shorter lengths if you wish to.
Color film
is sold in exactly the same lengths and packages as
black-and-white film. The PRAKTICA is just the camera for color photography,
for by pre-viewing your image in all its natural color on the ground-glass screen,
you are able, to a very great extent, to judge the effect of the final picture.
Also, the lenses of the Praktica are color-corrected.
Photomicrography
requires a special attachment for connecting the
camera to the microscope. For negatives to he enlarged on an especially large
scale, the ground glass is available with a clear glass ring and with hairline
cross.
How to take care of your Praktica
The camera is protected by
the Everready Case. The case protects the camera also during the exposure without
causing any inconvenience whatever. The camera should always be kept in the
case, with the lens screwed in. It must be kept spotlessly clean, especially
all the parts coming into contact with the film. Use a very soft-haired brush
for cleaning.
Never touch the lens surfaces with your fingers. They, too,
are to be dusted only with a soft haired brush. This does no harm to the bluish
anti-reflex coating.
You will derive continual pleasure from your PRAKTICA
if you treat it kindly. The PRAKTICA is a masterpiece of precision workmanship
and will only then be able to meet your requirements if you follow the Instructions
for Use carefully. Do not interfere with the mechanism of the
camera. Apply to the manufacturers if repairs become necessary. Subsequent oiling
or greasing of the camera may lead to functional disturbances or decrease the
quality of the pictures. Should you desire any further information or advice,
please write to the factory.
VEB KAMERA-WERKE
NIEDERSEDLITZ
Dresden A 17, Ed,ar.Andre-Strafle 56