ROLLEIMAT AF
This camera manual library is for reference
and historical
purposes, all rights reserved.
This page is copyright©
by  , M.
Butkus, NJ.
This page may not be sold or distributed without
, M.
Butkus, NJ.
This page may not be sold or distributed without
the expressed
permission of the producer
I have no connection with any camera company
On-line camera manual library
Back to main on-line
manual page
If you find this manual useful,
how about a donation of $3 to:
M.
Butkus, 29 Lake Ave.,
High Bridge, NJ 08829-1701
and send your e-mail address
so I can thank you.
Most
other places would charge
you $7.50 for a electronic copy
or $18.00 for a hard to read Xerox copy.
This
will help me to continue to host this site,
buy new manuals,
and pay their shipping costs.
It'll make you feel better, won't it ?
If you use Pay Pal, use the link below.
Use the above address
for a check, M.O. or cash.
Rolleimat AF PDF MADE DIRECT
FROM MANUAL WITH LANGUAGES
Rolleimat AF in
der praxis
Rolleimat AF dans la pratique
Rolleimat AF nell'uso pratico
Rolleimat AF
en la practica
Rolleimat AF in de praktijk
Rolleimat AF PDF
MADE FROM HTML FILE
INDIVIDUAL PARTS AND FUNCTIONS
|
I. 1/4 " tripod socket
2. Camera back
3. Film type window
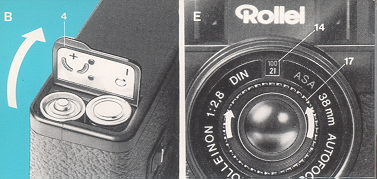
4. Cover for battery compartment
5. Ring for carrying strap, left
6. Slide catch for camera back
7. Viewfinder eyepiece
8. Rewind crank
9. Rewind knob
10. Ready-for-operation indicator for flashgun |
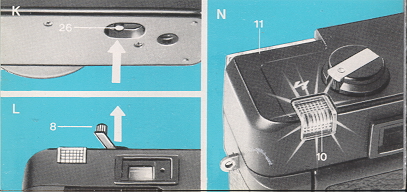
11. Flash reflector
12. Viewfinder window
13. Sliding switch for flashgun
14. Window for ASA/DIN indication
15. Lens
16. CdS cell for exposure meter
17. Knurled ring for film speed setting
18. Thread for lens hood or filter
19. Focusing window
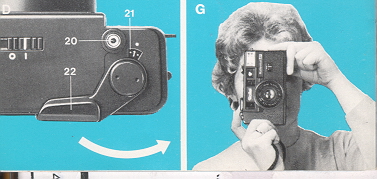
20 Shutter release |
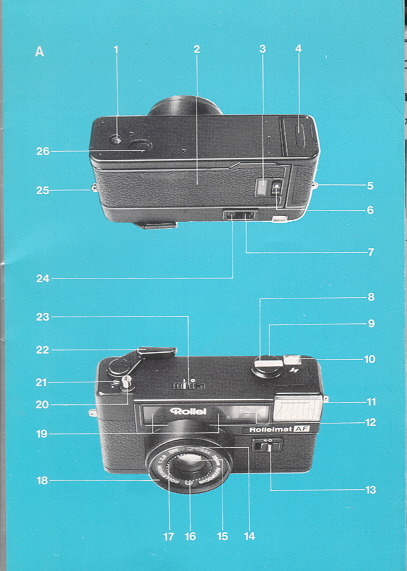 |
21 Frame counter
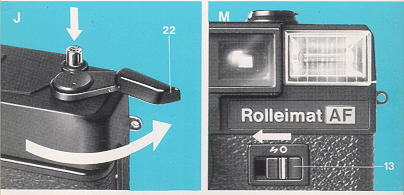
22 Rapid film advance lever
23 Main switch
24 Warning indicator for time exposures
25 Ring for carrying strap, right
26 Rewind lock
27 Take-up slit
28 Take-up spool
29 Sprocket drum
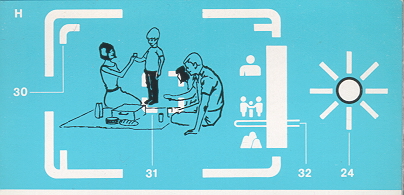
30 Parallax marks
31 Autofocus measuring field
32 Autofocus indicator
Parts 27--32 are illustrated on the back covers
|
RAPID COURSE
Insert batteries
Push cover 4 inwards in direction of arrow and open. Insert batteries supplied
with camera in accordance with the polarity diagram into battery compartment -->
fig. B. Close cover and press to secure.
Switch on camera
Set main switch 23 to "I". Camera is now ready to use.
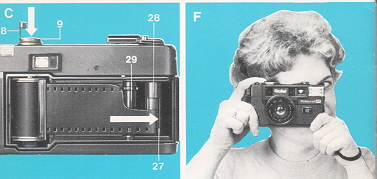
Insert film
Move slide catch 6 in direction of arrow and open camera back 2. Insert film
cartridge and push film leader into take-up slit 27. --> fig. C. Close
camera back until it locks. Alternately wind on film and press shutter release
until counter 21 is at 1
--> fig. D. Set film speed Remove lens cover. Turn knurled ring 17 until the
desired ASH /DIN value clicks into the window 14 --> Fig. E.
View subject
Keep subject within bright-line frame --> fig. H. Alight is sufficient for
exposure, time exposure indicator 24 remains dark. If red light 24 lights
up then light is too weak for handheld photographs. Use tripod for outdoor
photographs at a distance of more than 16 ft. (5 meters). Set sliding switch 13
to IS for outdoor photographs at a distance of less than 16 ft. {5 meters) and
for indoor photographs. Indicator 10 signifies that camera is ready for flash
operation --> fig. N.
Shoot!
Hold camera steady and level fig. F and C. Align measuring field 31 directly
with main subject --> fig. H. Press down shutter release 20 slowly until there
is an audible click. The distance is then being measured and set automatically.
To take the photo: keep shutter release pressed, then press fully down.
After flash photography switch flashgun off: set sliding switch 13 to 0.
Finally, wind on film -->fig. J.
HANDING THE CAMERA
Insert the batteries as described in Tip I (if this has not
already been done by your photographic dealer).
Remove the lens cover and keep it safe; always replace cover
when camera is not in operation, so that lens and measuring cell are protected
from dust.
Switch on the camera Set main switch 23 to " l ". To switch off
the camera: reset switch to "0".
Load the film Films to be used are 35 mm films (type 135) in
cartridges for 12, 20, 24 or 36 exposures. Load film in at least your own body
shadow, not in full sunlight!
Unlock camera back with catch 6 and open. Press rewind knob 9 outwards from the
inside, insert film cartridge --> fig. C. Turn rewind knob with crank 8 until it
engages in the film cartridge, then press in fully. Turn take-up spool 28 until
a take-up slit 27 is at the top. Push film leader into this slit.
Alternately press shutter release 20 and wind on film with lever 22 until the
perforations pass over sprocket drum 29 on both sides A.). Close camera back
until it locks. Again alternately press shutter release and wind on film until
counter 21 is at 1 --> fig. D.
Set the film speed Set the ASH /DIN value of the loaded film in window 14 by
means of knurled ring 17 --> fig. E. For 32, 125, 250 and 320 ASH (16, 22, 25
and 26 DIN), the lower value present in each case is to be set.
Select the picture
Place your eye close to viewfinder eyepiece 7. Do not cover viewfinder
window 12, focusing windows 19 or measuring cell 16 --> fig. F and G.
Select picture so that it is completely within bright-line frame of viewfinder.
The area outside the bright line frame enables fast-moving subjects to be
followed more easily. For close-up of 3--loft. (I--3 metros): keep picture
within parallax marks 30 --> fig. H.
Note the time exposure indicator
By red light 24 lights up, the available light is not sufficient for
(shake-free) high-speed exposures; use either the integral flashgun --> tip 6 or
a tripod.
Measure the distance Align measuring geld 31 directly with that
point on the subject which is most important for the picture --> fig. H. Press
shutter release 20 briskly, but not too quickly; the distance is now being
measured automatically, a click indicates that the measurement is "fixed". At
the same time the distance measured is indicated in the viewfinder by symbols
and indicator 32.
The viewfinder symbols mean: : person= portrait, three people = group, mountains
= landscape. The shortest possible distance from the subject is 4ft. (1.2
meters).
Shooting
After measurement, keeping the release pressed and press down fully to take the
photo.
With cable release
Use camera with tripod or on a firm base, screw cable release into shutter
release 20.
After taking the picture Turn lever 22 to its maximum extent
and let it spring back ~ fig. J. Frame counter 21 shows the number of photos
taken. Photos 12, 20, 24 and 36 are marked in red. By no more photos are to be
taken for a longer period of time, set main switch 23 to 0.
Remove the film
Pull out rewind crank 8. Press in rewind lock 26 briefly and turn
crank in direction of arrow --> fig. K and L, until the resistance of the film
movement stops (lock 26 is released again when the next film is wound on).
Unlock camera back with slide catch 6 and open. Turn rewind crank 8 to its
maximum extent and remove film cartridge. Remove film at least in your own body
shadow; avoid harsh sunlight and dust. Push in crank 8 and press in knob 9.
Close camera back until it locks.
TIPS FOR PRACTICAL USE
1. The Batteries
Two 1.5 V alkali-manganese batteries such as Varta 4006, Mallory MN
1500, National AM 3 or equivalent makes are required. Push cover 4 inwards and
open. Insert batteries as indicated on the polarity diagram in the battery
compartment fig. B. Close cover and press outwards to secure.
To check the batteries: set main switch 23 to "l", move sliding switch 13 from 0
to
 . After a few seconds the red light 10 will glow if there is sufficient battery
voltage for all electronics in the camera.
. After a few seconds the red light 10 will glow if there is sufficient battery
voltage for all electronics in the camera.
If the batteries are spent, the red light glows only after a certain time, or
does not glow at all. --> also tip 6. In addition, the shutter release is
locked. Spent batteries must always be replaced in pairs.
2. The autofocus system is activated when the shutter
release is pressed (slowly) and measures the closest object in measuring field
31. For low contrast flat objects, another object at a similar distance should
be viewed, so that the measuring system can pick up the contrast required for
the measuring process. If the light is not sufficient for taking photos, the
autofocus system is no longer operational.
To check the distance: note the autofocus indicator and the symbols in the
viewfinder; the position of the indicator must approximate to the distance of
the subject --> fig. H.
To repeat the measurement: let shutter release out completely and again press
down until a click is heard. by this movement is rushed, the shutter release is
locked by the shutter is not wound or the main switch set at 0, the shutter
release is locked and the autofocus system is out of operation.
3. To carry the camera use the carrying strap and the carrying
case. Insert the strap in either ring 5 or ring 25 as required. After attaching
the strap, the end of the strap is pulled outwards through the opening in the
case. When taking photos, the case is pushed back to release the camera.
4. Photos using a filter alter the rendition of the photo by
emphasizing the filter colors and suppressing the complementary colors. Further
details are given in the leaflet enclosed with every filter.
A filter should only moderately be screwed into socket 18. Measuring cell 16
receives only light which has already been filtered; corrections to the exposure
are not necessary.
5. Photos using the lens hood are in principle a/ways
recommended: Lens 15 and measuring cell 16 are protected from direct light
sources and stray light, and also from fingerprints, rain or snow; the
brightness and sharpness of the photos are improved
Screw the hood into thread 18 (a hood can be obtained from your local dealer, M
46 x 0. 75).
6. Flash photos for outdoor subjects at a distance of up
to 16 ft. (5 meters) or for interiors (if the red light has indicated
insufficient light for taking photos).
Move sliding switch 13 from 0 to 4 --> fig. M. Red light 10 indicates when the
camera is ready for flash operation --> fig. N. With new batteries and
continuous flash operation, this indication appears after 6--8 seconds; after
longer periods out of use or at low temperatures it will take a few seconds
longer. If the batteries are spent, the red light either does not glow for about
30 seconds or no longer glows at all.
For vertical photos keep flash reflector 11 at the top, to prevent troublesome
shadows.
The integral automatic flash mechanism controls the right exposure according to
the automatically-set distance between 4 and 16 ft. (1.2 and 5 meters).
Switch off the flashgun after those photos have been taken (switch 13 in
position 0) to save battery power. Two new alkali manganese batteries are
sufficient for about 250 flashes.
7. Care and maintenance
Clean camera and accessories at longer or shorter intervals according
to use: clean outer parts with a soft cloth and glass parts with lens-cleaning
paper, dust all inner parts with a hair brush. Remove batteries if the camera
will not be used for longer periods.
Protect the camera from sand, water, strong sunlight and shocks; replace the
lens cover and store the camera in its carrying case when not in use.
The Rollei international service along with its authorized and specialized
workshops, as well as Rollei dealers the world over, will take proper care of
your Rollei camera and will help you with all questions on photography.
DATA AND FIGURES
Type: 24 x 36 mm viewfinder camera with autofocus system, CdS
automatic programmed exposure meter and integral electronic flashgun.
Features: Rapid film loading system, forward-counting self-resetting film
counter, 120° rapid winding with lock against double exposures and blank
negatives; bright-line frame viewfinder 0.5 x with parallax marks, autofocus
measuring field, distance symbols and autofocus indicator; behind-the-lens
central shutter, shutter locked with insufficient current or flashgun ready
light not going on; time exposure warning light, autofocus locked with shutter
not wound or camera switched off, film type indicator.
Automatic exposure system: Electronic exposure control from 1/8
to 1/450 sec/f 2.8 to 17, film speed setting 25--400 ASA/15 27 DIN; CdS-cell
closed to lens, also operational when using filter; measuring range EV 6--17 at
100 ASA /21 DIN, current supplied by batteries for integral flashgun.
Lens: 38 mm Rolleinar 1:2.8 autofocus, 4 lenses/3 elements; automatic
focusing 4 ft. (1.2 m) 00 f tier thread M 46 x 0. 75.
Electronic flashgun: Guide number 14 at 100 ASA /21 DIN; operational
range 4--16 ft. (1.2--5 m); recycling time 6--8 see with new batteries, approx.
250 flashes; "Flashmatic" system with separate on/off switch, exposure program
automatically switched over to flash operation; current supplied from two 1.5 V
alkali-manganese batteries type AA.
Dimensions and weight: 5.2 x 2.2 x 2.9 in, 13.9 or (132 x 56 x 75 mm, 395
g) excluding batteries.
Accessories*: Lens cover, carrying case, carrying strap, 2 batteries.
* Partly included with camera
Technical modifications and inclusion of accessories reserved.