Whitfield Operating Instructions (short
version)
Back to pellet stove repair
Back to main Whitfield Pellet Stove Page
THERE
IS A NICE NEW INSTRUCTION MANUAL AVAILABLE FROM
LENNOX WITH DRAWING AND POWERS AND VOLTAGES.
Click her to go to link!
Photo Eye Test
-- for certain
units --
Congratulations on the purchase of your Whitfield Pellet Stove!
When you purchased your Whitfield you joined other ranks of thousands of concerned
individuals who's answer to their home heating system reflected their concern for
aesthetics, efficiency, and our environment. We extend our continued support to help
you achieve the maximum benefit and enjoyment available from your pellet stove.
Please familiarize yourself with this Owner's Manual before installing your Whitfield
stove. This manual covers, in detail, the necessary steps required in assembling and
installing your Whifield Pellet stove in a safe manner.
We at Pyro Industries, Inc., the manufacturer of the "Original Pellet Stove" thank you
for selecting a Whitfield as the answer to your home heating needs.
Sincerely,
All of us at Pyro Industries, Inc.
PELLETS - IMPORTANT: PLEASE READ
GENERAL INFORMATION
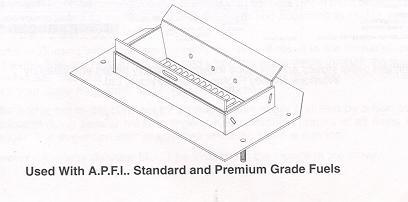
The Whitfleld Advantage has been designed to burn wood residue pellets and non-wood pellets with up to
3% ash content (i.e... cardboard, nut hulls etc...). Agricultural pellets (i.e... corn, alfalfa etc..) are not
permitted to be burned in your stove. Dirty fuel will adversely affect the performance of the stove.
Caution: The use of dirty, wet and/or high sodium content fuel may void the warranty!
Wood pellets manufactured to the Association of Pellet Fuel Industries (A.P.F.I..) Certification Standard
are available in two grades, "Standard" and "Premium". The primary difference between the two is the ash
content of the pellets ("premium" has 1% or less ash content) ("Standards" has up to 3% ash content)
The A.P.F.I., specification for "Standard Grade" residential pellet fuel Is as
follows:
HEAT CONTENT: 8200 BTU/lb. minimum
BULK DENSITY: 40 Ib./ cu. ft. minimum
MOISTURE CONTENT: 8% maximum
ASH CONTENT: 3% maximum size: 1/4" to 3/8"diameter, 11/2" long maximum
FINES: 0.5% maximum through a 1/8" screen
CLINKING
Silica (or sand) in the fuel, along with other impurities, can cause clinkering. A clinker is a hard mass of
silica formed in the burning process. Clinkering is a function of the fuel, (not the stove), but adversely
affects the performance of the stove by blocking off the air holes in the grate. Even an A.P.F.I.. approved
pellet fuel may tend to clinker. A clinker can be removed from the burn grate and placed in the ash pan
with the use of the grate scraper / ash pan tool. See Routine Maintenance for more information on
cleaning.
ASH
The frequency of removal of the ash and maintenance performed on the stove is directly proportional to
the ash content of the fuel. A stove burning fuel with .25% ash content may only need to be cleaned out
once every 1 to 2 weeks. However, a stove burning a fuel with 3% ash content may need cleaning every 1
to 2 days.
PLEASE NOTE: Pyro Industries, Inc., has no control over the manufacturing of pellet fuel and will not be
held responsible for poor stove performance or any damage caused by inferior pellet fuels.
FUEL FEED RATES
Different brands of pellets will feed at varying rates due to their size and density. This may require a
slight adjustment from the factory setting by adjusting the damper rod "in" or "out" as needed.
GRATE CONFIGURATION:
 |
|
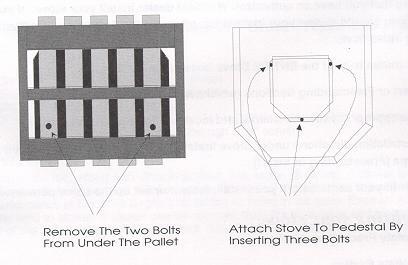
PRE INSTALLATION ASSEMBLY 1. After removing the packaging from the stove, lift the hopper lid, and remove all pre-packaged items
from the hopper. Also open the combustion chamber door and remove all pre-packaged items.
|
 |
|
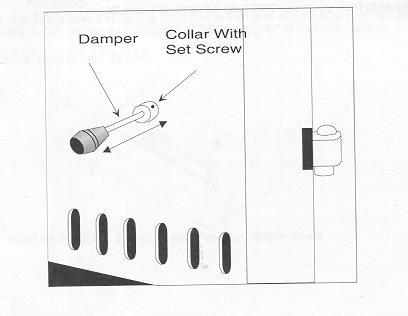
DAMPER ROD ASSEMBLY Remove the damper rod, handle and set collar from the box. Insert one end into the hole on the left side of the stove. Thread the rod into the press nut on the damper paddle. (You won't be able to see this nut.) The Damper Rod is preset at 2 1/4". Pull the rod to its fully extended position and measure from the side of the stove to the inside of the collar. If this distance is not 2 1/4", move the collar as needed and retighten the set screw with an Allen wrench. Push the rod in until the collar rests against the side of the stove. |
INSTALLING YOUR FREESTANDING PELLET
STOVE
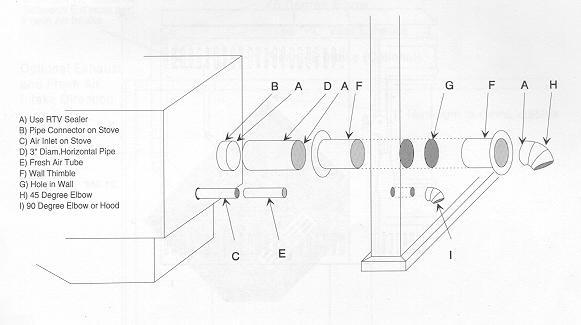
STANDARD HORIZONTAL EXHAUST INSTALLATION
1. Locate proper position for the type "L" wall thimble (F). Use a saber saw or key hole saw to cut the
proper diameter hole through the wall to accommodate the wall thimble. (G) Install the wall thimble in the
hole.
2. Position the stove approximately 12" from the wall on the floor pad. Push type "L" pipe (D) through wall
thimble (F). Squeeze a bead of high temperature silicone (RTV) sealer (A) around the end of the
machined portion of the 3" pipe connector on the back of the stove (B). Firmly push on a section of type
"L" pipe (D) until inner pipe liner pushes into the bead of RTV sealer.
3. Push the stove (with pipe attached) towards wall. Pipe (D) will go through the wall thimble (F). Position
stove no closer than 1 " to the wall.
4. Install type "L" 45 degree elbow (H) with rodent screen cap (optional) on outside end of pipe. NOTE:
The end of the exhaust pipe must extend a minimum of 12" from the outside of the building. Rodent
screen should not be less than 3/8" in mesh.
5. If installing with combustion air from outside; cut a separate hole through the wall for the fresh air tube
(E). This tube must be 1 5/8" (min.) diameter, steel only. Connect outside air pipe to air inlet on stove (C).
This tube must be terminated with a 90 degree elbow or hood. Air may also be drawn from the crawl
space under the home.
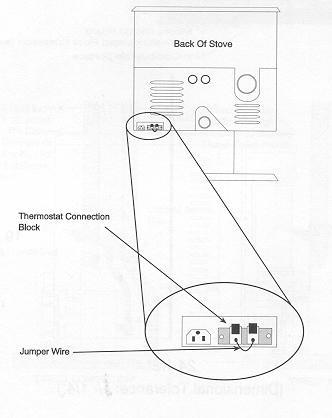
THERMOSTAT INSTALLATION
NOTE:
ALWAYS DISCONNECT POWER BEFORE PERFORMING THE THERMOSTAT INSTALLATION.
To Install A Wall Thermostat:
 |
|
1. Check the type of thermostat you are about to install, Solid State thermostats are NOT approved for use with the Advantage Series pellet stoves. Consult your authorized Whit field Dealer for more details 2. Unplug your stove from the wall outlet 3. Locate the thermostat connection block on the back of the stove. 4. Remove the jumper wire from the "jacks" on the connection block. 5. Insert the two wires from your thermostat into the jacks (one per jack). 6. Plug in the stove and you are ready to operate with your thermostat! |
NOTE: If the jumper wire is missing, and you do not have a thermostat installed,
your stove will operate on Heat Output position # 1 all the time and at all settings.
STOVE OPERATING
CONTROLS
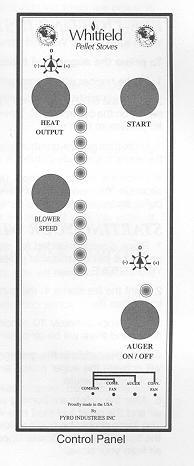 |
· Start Switch - The push button start switch activates the
convection and the combustion blowers. If the exhaust
temperature does not reach operating temperature within 30
minutes, the stove will automatically shut down. The blowers can
be restarted by pushing the START SWITCH again.
· Auger On/Off Switch - The Auger On/Off switch activates the fuel
feed (auger) motor only. The light located just above the switch
will blink when the auger is turning. The Start switch has to be
activated to give power to the Auger On/Off switch. When the
Auger On/Off switch is pressed a second time, the fuel feed will
stop and the blowers will continue to operate until the stove has
cooled sufficiently.
· Heat Output Switch - When not using the optional thermostat, the
Heat Output switch provides the ability to burn at separate five
settings. The Heat Output switch regulates the fuel feed setting
and the combustion air supply simultaneously.
· Blower Speed Switch - The Blower Speed switch controls the speed of the convection fan. Pressing this switch will increase or decrease the amount of heat exiting the stove. THE BLOWER SPEED MUST BE AT THE MAXIMUM #5 SETTING WHEN THE HEAT OUTPUT SWITCH IS ON THE #5 POSITION.
|
· Damper Control - The "push/pull" rod located on the lower left-hand side of the stove will NOT need to be manually adjusted
every time you turn the fuel feed rate up or down. However, the
damper allows the air-to-fuel-ratio to be "fine tuned". The proper
air setting will vary from stove to stove depending on installation
configuration, altitude and type of fuels being burned. If the flame
is a smoky red/orange with evidence of soot at the top, pull the
damper out until the flame begins to "dance". If the flame is short
at the higher heat output settings, or the fire goes out on the #1
setting, loosen the set collar and push the damper approximately
1/4" in towards the stove. Lock the set color in place against the
side panel of the stove.
NOTE: If the proper flame cannot be achieved with the damper
control, adjustment of the trim controls may be necessary.
· Combustion Fan Trim - The Combustion Fan Trim is located just
above the Heat Output Selector switch. Turning the Trim Control
counter clockwise will decrease the amount of combustion air
entering the burn grate. Turning the control clockwise will
increase the amount of combustion air entering the burn grate.
The Trim Control is factory set at the (0) position.
· Auger Trim Control - The Auger Trim Control is located just
above the Auger On/Off switch. Turning the Trim Control counter
clockwise will decrease the amount of fuel delivered to the burn
grate. Turning the control clockwise will increase the amount of
fuel delivered to the burn grate. The trim control is factory set at
the (0) position.
Web Master: There is a new digital (no dials) control panel if yours dies.
These trim controls should be adjusted as a last resort. Always
adjust the damper control first.
OPERATING INSTRUCTIONS
PRE-LIGHTING INSTRUCTIONS
When lighting your Whitfield Stove for the first time, the auger feed tube must be primed with pellets.
To prime the auger feed tube:
1. Fill the hopper with recommended pellet fuel and plug the stove into the wall outlet.
2. Press the START switch on the control panel. This will activate both blowers. Press the Auger ON/OFF
switch on the control panel. This will activate the auger motor. Next, press the heat output switch to
position #5 (maximum feed rate).
3. Look through the combustion chamber door and when you see the first pellets dropping into the grate
the auger is then fully primed. It will take 10 to 15 minutes to prime the auger.
4. Once the auger is primed, unplug the stove to turn off the blowers and auger for a minimum of 30
seconds. You need only do this when priming the auger. Once the stove is shut down, plug it into the wall
outlet again.
STARTING YOUR WHITFIELD PELLET STOVE
1. Place a recommended fire starter (see your dealer for appropriate fire starter in your area) in the burn
grate and put a handful of pellets on top of the starter. DO NOT USE FLAMMABLE LIQUIDS TO START
YOUR STOVE.
2. Light the fire starter in the grate with a match and close the door. Press the heat output selector switch
to position 3.
3. After approximately 10 seconds, press the START SWITCH. You will notice that the fire will become
active and there will be air coming from the heat exchanger tubes.
4. After the pellets in the grate are burning sufficiently (red hot coals), press the Auger ON/OFF switch:
this will activate the auger motor. and pellets will begin to feed into the burn grate. Your blower motors will
continue to operate.
5. After the pellets are burning well, press the HEAT OUTPUT selector to the desired setting. Combustion
air and the pellet fuel feed rate will adjust automatically as the HEAT OUTPUT selector switch is pressed.
The flame should be bright yellow in color and there should be no evidence of soot formation at the top of
the flame. Press the Blower Speed control knob to increase or decrease the desired amount of convection
air from your stove.
If operating your stove with a wall thermostat, adjust the heat output selector switch to the desired
demand mode (#2 through #5 on the heat output selector switch). Next, adjust the wall mounted
thermostat to the desired heat and your stove will automatically switch itself between a demand mode
and a pilot mode.
GENERAL OPERATING CONSIDERATIONS
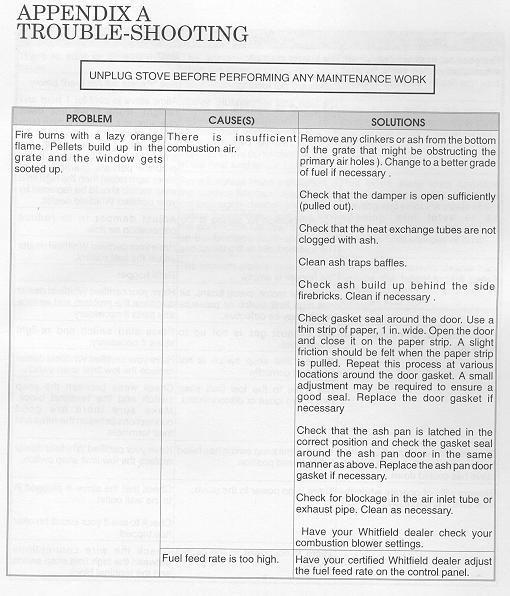
PROPER BURN CHARACTERISTICS: Your flame should be bright yellow under normal operation. If
your flame becomes reddish/orange, your stove probably needs routine maintenance. Excessive amounts
of fly ash build-up in the grate, clinkers in the grate, or leakage of air if the grate is not properly seated will
starve the fire for air. (See ROUTINE MAINTENANCE for information on cleaning the stove). If the
problem persists review the trouble-shooting section at the end of this manual.
PELLET FEED: The pellet feed system is designed to handle a wide range of pellet sizes. Different pellets
can feed at considerably different rates. If the stove will not stay alight at the minimum fuel feed setting,
those particular pellets may not be feeding fast enough. If this happens, adjust the damper rod (on the
side of the stove) in or out to achieve a proper burn.
PELLET SIZE: You may notice a difference in the burn if you change pellet fuel sizes. The bigger the
pellet, the slower it will feed and vice versa.
LONG BURN TIME: The stove may be safely operated on a continuous basis, but it is recommended that
it be turned down overnight or when the room is vacated for long periods of time. A 40 lb. bag of pellets
should last approximately 10 hours on high and 35 hours (or more) on low, depending on the type and
size of pellets you are burning.
AUTOMATlC SAFETY FEATURES
Power Outage
During a power outage, the stove will shut down safely. It will not automatically restart when the power is
restored unless the exhaust is still up to temperature. A small amount of smoke may leak from the top of
the window glass, the hopper and from the combustion air intake. This will not persist for more than 3 to 5
minutes and will not be a safety hazard.
To re-light the stove, follow the normal procedure for starting your stove.
NOTE: If you are installing this pellet stove in an area that is prone to frequent power outages, it is
recommended that there be a minimum of 3' (Feet) of vertical vent pipe included in the installation to
induce a natural draft in the event of a power failure.
Overheating
A high temperature switch will automatically shut down the stove if it overheats. The stove will need to be
manually re-lit. Allow 45 minutes before re-lighting.
TURNING OFF YOUR WHITFIELD PELLET STOVE:
Press the Auger On/Off Switch to the "OFF" position. This will turn the auger motor off and pellets will
stop feeding. Both blowers will continue to operate for a period of time (up to 45 minutes) until the
exhaust temperature cools sufficiently. The blowers will automatically turn off at that point.
LIGHTING STOVE WITH OPTIONAL FASTFIRE SELF-IGNITER
If you have purchased the optional FASTFIRE Self-igniter from your dealer, you will need to perform
the following start-up procedure:
1. Make sure the auger is primed (see Pre-Lighting Instructions above), then simply push the Start
button on the control board to activate the igniter.
2. Press the Auger On/Off Switch to the "ON" position.
3. While the pellets will ignite on any heat output setting' it is recommended that the Heat Output Knob be
set to position #3 or #4.
4. Pellets will start feeding into the grate and should begin to ignite within three to seven minutes. The
self igniter will automatically shut off after 15 minutes.
ROUTINE CLEANING
NOTE: STOVE WILL NEED TO BE SHUT OFF AND COOLED ENOUGH TO
HANDLE BEFORE ROUTINE CLEANING IS PERFORMED.
ALWAYS DISCONNECT POWER BEFORE
DOING ANY ROUTINE CLEANING.
The amount of fly ash bulid-up in your stove is directly proportional to the ash content of the fuel that you
are using (see PELLETS, page 6). After a period of time (a week, or so) inspect the heat exchanger
tubes, the burn grate, and the ash traps behind the fire brick. You will want to gauge your routine
maintenance accordingly.
THE FOLLOWING AREAS NEED TO BE INSPECTED DURING ROUTINE CLEANING:
· Burn Grate . Heat Exchanger Tubes
· Ash Pan
· Ash Traps and Baffles
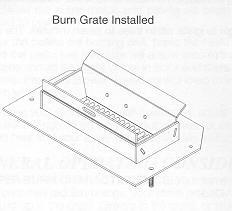
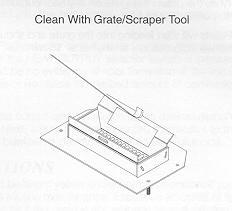
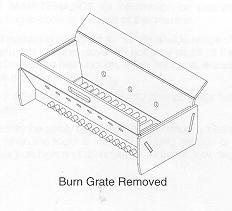
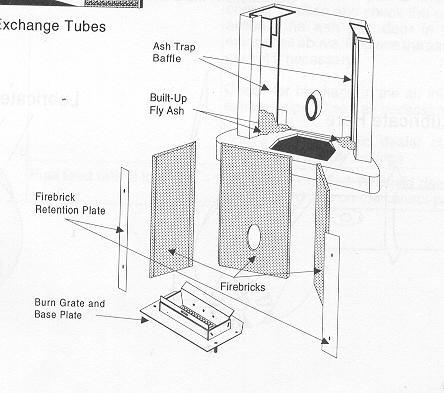
Burn Grate: The bum grate should be inspected periodically to assure that the air holes have not become clogged with ash or clinkers. The burn grate can easily be cleaned with the grate scraper/ash pan tool, or it can be removed for cleaning. It is very important to monitor the ash build up under the burn grate, as excessive build up may starve the fire of combustion air. When burning "Standard" grade pellets, it will be necessary to clean the ash pan more often than when burning "Premium" grade pellets.
 |
 |
 |
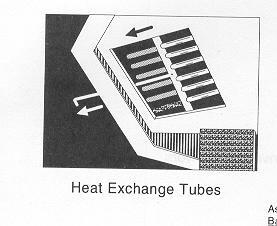
Heat Exchanger Tubes: located above the combustion chamber door is used for cleaning the
tubes. By pulling this rod in and out a few times, you will clean the fly ash off the heat exchanger
tubes. If your stove was recently turned off, the rod may still be hot. Handy Hint: you may want
to wrap a damp cloth around the rod when you clean the tubes. This will prevent fly ash from
being drawn into your house from the pulling action of the rod.
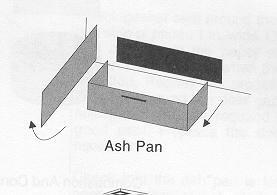
Ash Pan: The ash pan will have to be emptied whenever necessary. First, remove the ash pan trim
piece located below the door. Grasp the knob located on the ash pan door and swing the door
open. Then, using the ash pan/grate scraper tool, lift the grate out and sweep the top ash into the
pan, below. Then, remove the ash pan with the tool. Be sure to gently dump the ashes into a non-combustible container. When finished, slide the ash pan back into the stove and close the ash pan
door and replace the ash pan trim piece.
Cleaning of Ash Trap Baffles: Access to the ash trap baffles (behind the two side firebricks) is
obtained by loosening the screws that hold the "Brick Retention Plates" in place and lifting the
clips away from the stove. After the clips have been removed, remove each side brick first, then
the center firebrick. Thoroughly clean out areas where ash has collected behind the firebrick. The
amount of time between cleanings will be directly related to the ash content of the pellet fuel being
burned. Excessive ash build up in the baffle area behind the brick panels will restrict the exhaust
passages and cause less combustion air to enter the firebox and which can lead to poor
performance and a "dirty burn".
Handy Hint: After the first 10-20 bags of fuel, you may want to remove the firebrick and
determine the rate at which the fly ash is building build up within the stove. Contact your dealer
for more information should you have any questions regarding this procedure..
 |
 |
|
|
|
ROUTINE MAINTENANCE
The following areas need to be inspected as part of routine maintenance:
Door Rope Gasket: The condition of the rope gasket around the door and windows should be checked
periodically and replaced or repaired if necessary.
Exhaust Vent: Inspect frequently and clean when necessary. Fly ash will accumulate at all bends in the
exhaust system. Large amounts of fly ash will starve the fire for air.
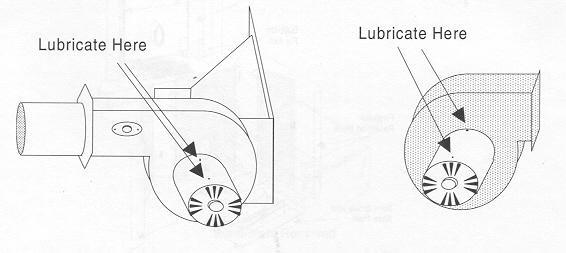
Motor Lubrication: The two blower motors require lubrication annually with not more than two drops of
high temperature turbine oil (available from your dealer) at the lubrication points shown below.
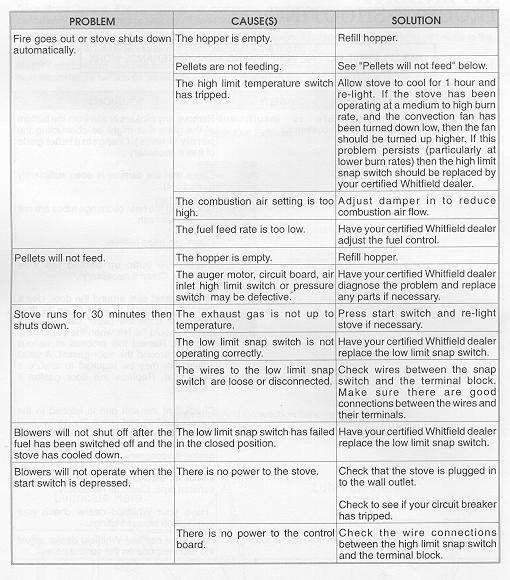
Trouble Shooting
| Page 1 | Page 2 | Page 3 |
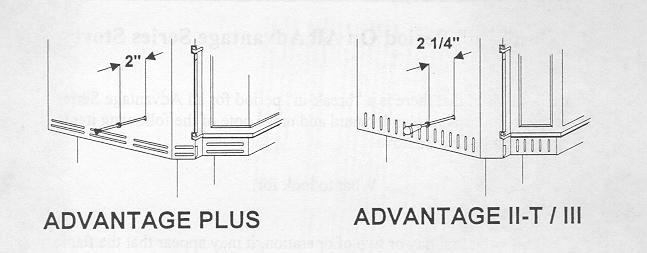
ADVANTAGE PLUS ADVANTAGE II-T / III
When your new stove is installed; the exhaust should hooked up, the stove
plugged in and the fire started. Check for proper operation at all heat output
settings (#1 - #5). Look for a brisk yellow flame with no black tips.
Any adjustments for combustion air should be made at the damper by varying
the spacing between the side of the stove and the inside of the damper set
collar. The factory setting on the damper, as noted above, should correspond
with the model you have.
If the fire goes out on the #1 setting, you will want to decrease the
combustion air flow. Loosen the set collar and push the damper in by 1/4"
intervals. Tighten the collar at its new position (2 1/2" - 2 3/4").
If the fuel is building up in the bum grate at the higher heat output settings,
you will want to increase the amount of available combustion air. Loosen the set
collar on the damper rod and pull the damper out. Do this 1/4" at a time. Tighten
the collar at its new position (1 3/4" - 2").
After making any adjustment to the damper set collar, pull the damper rod out
fully and re-check the dimension between the stove side panel and the inside if
the set collar.
Should you find that the fire is still not burning properly, contact your authorized
Whitfield Dealer for assistance.
Part No. 60020008
Technical Bulletin
PLEASE READ BEFORE LIGHTING STOVE!
"Break-in" Period On All Advantage Series Stoves
Please be advised that there is a "break-in'5 period for all Advantage Series Stoves. It is
important to understand and make note of the following items when you first light your
stove.
What to look for:
· During the first day or two of operation, it may appear that the flame
pattern is somewhat short and vigorous. This is due to the "break-in" period of the auger motor.
·
During this period, the auger motor will gradually speed up it's rotation cycle as the gear
box wears in. This will correspondingly increase the fuel feed rate. The flame pattern will
grow accordingly, and the damper rod may need to be pulled out slightly to compensate.
·
DO NOT ADJUST THE CONTROL BOARD'S INTERNAL SETTINGS AT THE
TIME OF INSTALLATION! All adjustments to compensate for burn characteristics
should be done with the damper on the left hand side of the stove by moving it in or out
slightly a quarter of an inch at a time. Please see your Owner's Manual or your Operation
& Maintenance Video for more information about damper adjustments.