and historical purposes, all rights reserved.
This page is copyright© by
This page may not be sold or distributed without
the expressed permission of the producer.
I have no connection with any camera company
This camera manual library is for reference
and historical purposes, all rights reserved.
This page is copyright© by ![]() ,
M. Butkus, NJ.
,
M. Butkus, NJ.
This page may not be sold or distributed without
the expressed permission of the producer.
I have no connection with any camera company
On-line camera manual library.
If you find this manual
useful,
how about a donation of $3 to:
M. Butkus, 29 Lake Ave.,
High Bridge, NJ 08829-1701
and send your
e-mail address
so I can thank you.
Most other places would charge
you $7.50 for a electronic copy
or $18.00 for a hard to read Xerox copy.
If you use Pay Pal, use the link below.
Use the above address for a check, M.O. or cash.
Back to main camera
manual page

Venmo is @mike-butkus-camera Ph 2083
This camera takes the rare Mamiya-Sekor CS Lenses
Mamiya NC1000 scan directly from manual
Mamiya NC1000s scan directly from manual
Mamiya NC1000s Bedienungsanleitung
Mamiya NC P adapter
This allows Pentax thread mount lens in stop down mode.
CLICK HERE TO CONTINUE TO PDF made from this HTML page

![]()
Mamiya Sekor NC1000s - different parts
FYI - This camera need two batteries to run.. no battery, no shutter.
The Mamiya NC 1000/1000s is an innovative 35mm
bayonet-mount automatic SLR camera which has been developed with Mamiya's
superior technology and long experience as a leading manufacturer of
professional medium-format cameras.
This new camera offers the ultimate in handling ease because of its compact
size and light weight. Moreover, the open-aperture metering system assures
that the large, brilliant viewfinder always remains bright, and the exposure
automation system is of the popular shutter-speed priority type, in which the
camera meter automatically selects the correct aperture in accordance with the
shutter speed selected by the user.
The NC 1000/1000s is designed to meet the needs of the amateur and
professional photographer alike. To further enhance its remarkable
capabilities, a wide range of accessories are available including an adaptor
which allows stop-down metering and diaphragm automation with the TL, DTL, SX
series lenses.
Every care has been taken to assure that your Mamiya camera will provide you
with years of trouble-free service. However, to avoid possible mishandling, be
sure to read this instruction
Contents
|
Nomenclature 1 Outline of Automatic Exposure (AK) operation .......3 Inserting Batteries ..........5 Battery Check and Exposure Meter Switch .......6 Loading Film ............7 Focusing ............11 Determining of Correct Exposure ............12 Holding the Camera Correctly ...............13 |
Unloading the Film ..............14 Using Flash .........................16 Interchanging Lenses ...............18 Advanced Technique Depth-of-Field ....... 20 Manual Exposure ......................21 Using Infrared Film ............23 Stopped-Down Metering .............24 Multiple-Exposures ...........25 Care of the Camera .............32 |
Nomenclature - Differences of NC 1000s
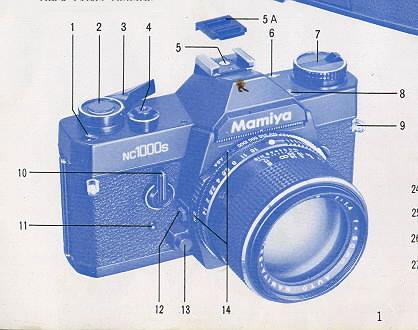 |
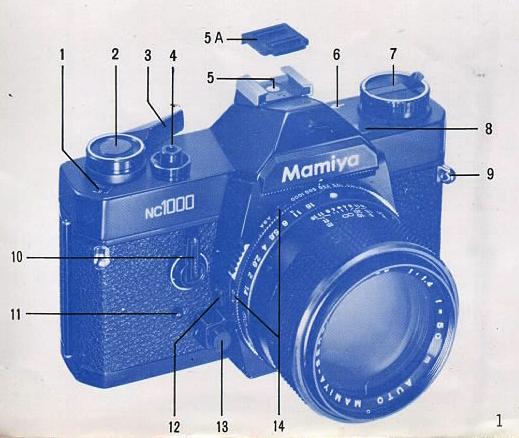
1. Exposure Counter 2. Meter OF F Button 3. Film Advance Lever 4. Shutter Release Button 5. Hot-Shoe with Safety Cover 6. Film Plane Reference Mark 7. Film Rewind Knob and Back Cover Release 8. Battery Check Lamp |
|
9. Neck Strap Eyelet 10. Self-Timer Lever 11. Self Timer Activating Button |
12 Lens Release Button 13. Depth of Field Preview Button 14. ASA/DIN Windows |
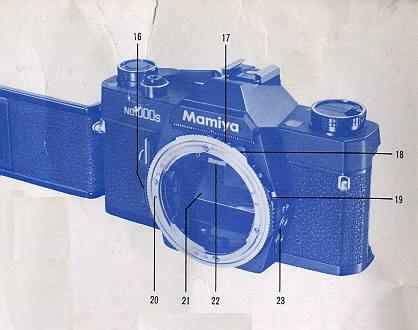 |
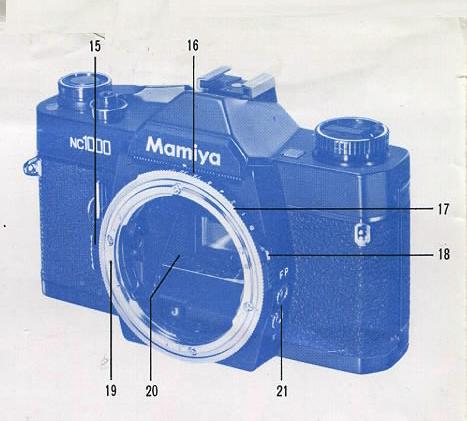
15. Film Memo Pocket 16. Shutter Speed Ring Flange 17. Shutter Speed Ring 18. Film Speed Ring Knob 19. Film Speed Ring Lock Button
|
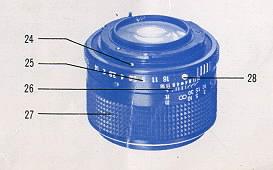 |
20. Alignment Dot for Lens Mounting (body) 21. Mirror 22. Focusing Screen Frame Latch 24. Alignment Dot for Lens Mounting (lens' 25. Aperture Ring 26. Depth-of-Field Scale and Central Index Mark (orange) |
27. Focusing Ring
28. AE Button
29. Battery Check Button
|
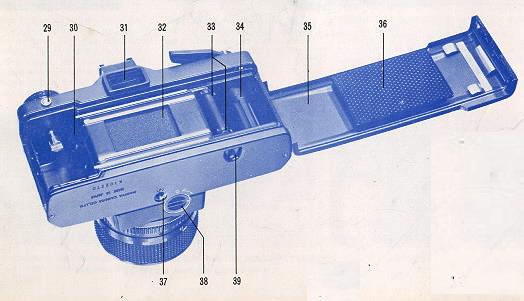
30. Film Chamber 31. Viewfinder Eyepiece 32. Focal Plane Shutter 33. Sprockets 34. Film Take up spool 35. Back Cover |
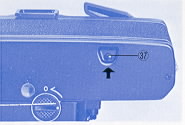
36. Film Pressure Plate 37. Tripod Socket 38. Battery Compartment Cover 39. Rewind Button |
End of NC 1000s differences
Nomenclature NC 1000
|
1. Exposure Counter 2. Meter OFF Button 3. Film Advance Lever 4. Shutter Release Button
|
5. Hot-Shoe with Safety Cover 6. Film Plane Reference Mark 7. Film Rewind Knob and Back Cover Release |
|
8. Battery Check Lamp 9. Neck Strap Eyelet 10. Self Timer Lever 11. Self-Timer Activating Button |
12. Lens Release Button 13. Depth-of-Field Preview Button 14. ASA/DIN Windows |
|
15. Shutter Speed Ring Flange 16. Shutter Speed Ring 17. Film Speed Ring 18. Film Speed Ring Lock Button |
19. Alignment Dot for Lens Mounting (body) 20. Mirror 21. Flash Sync Terminals (X and FP) |
22. Alignment Dot for Lens Mounting (lens)
23. Aperture Ring
24. Depth-of-Field Scale and Central Index Mark (orange)
25. Focusing Ring
26. AE Button
27. Battery Check Button
|
28. Film Chamber 29. Viewfinder Eyepiece 30. Focal Plane Shutter 31. Sprockets 32. Film Take-up Spool 33. Back Cover |
34. Slim Pressure Plate 35. Tripod Socket 36. Battery Compartment Cover 37. Rewind Button |
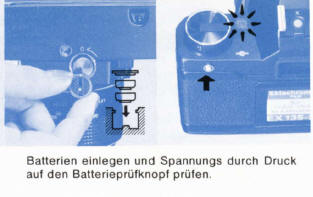
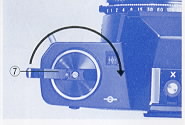
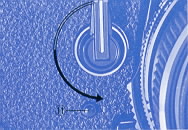
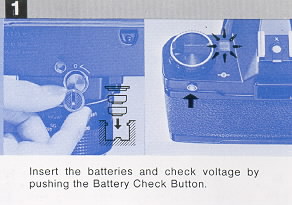
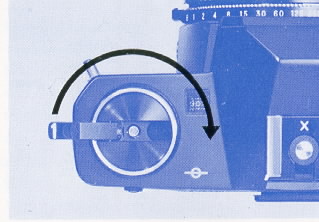
INSERTING BATTERIES - Batteries must be good for shutter to work.
 |
Remove the Battery Compartment Cover (36) by rotating it a quarter
turn counterclockwise with a fingertip or coin, Insert two 1.5V
silver-oxide batteries (Eveready S-76, Mallory MS--76 or equivalent)
into the Battery Compartment with the + (positive) side facing the
Battery Compartment Cover (it has a plus sign indicated as a reminder on
its underside). Perspiration, grease and dirt are harmful to the
batteries so do not handle them by your fingertips when inserting into
the battery compartment. Batteries should be wiped with a soft, dry
cloth or tissue before insertion. After inserting batteries, replace the
Battery Compartment Cover, aligning its white dot with the "O" (open)
symbol indicated on the camera, and lock cover into place by rotating it
a quarter-turn (90°) clockwise. 4. To assure consistent performance and the utmost accuracy, your Mamiya camera is equipped with an electronic shutter. However, when the batteries are exhausted, or there are no batteries in the Battery Compartment., the focal plane shutter will function only at B (bulb), and when the Shutter Speed Ring is set to any shutter speed other than B. a speed of approximately 1/1000 sec. will result. Of course, the metering system will not operate at this time. |
 |
Battery Check and exposure meter switch
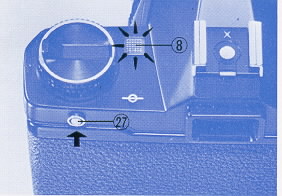 |
After inserting the batteries, check their voltage by pushing the
Battery Check Button (27). If the Battery Check Lamp (8) illuminates, it
indicates the batteries are in good condition. Battery condition should
also be checked when the camera has not been used for a long period of
time. When the Battery Check Lamp fails to light, remove the batteries
and wipe with a soft, dry cloth to assure good contact, Failure of the
Battery Check Lamp to light after wiping the batteries indicates they
must be replaced with fresh batteries. |
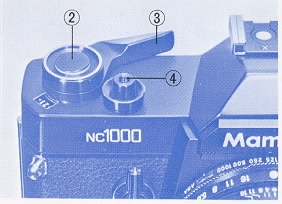 |
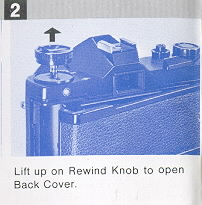
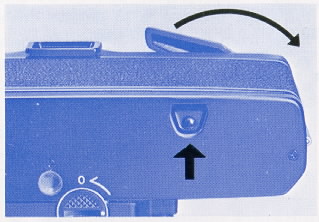
Loading Film
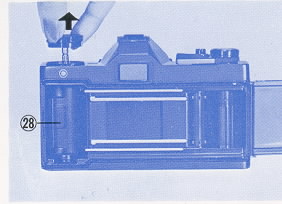 |
Avoid direct sunlight when loading and unloading film. Pull up on the
Film Rewind Knob (7) to open the Back Cover (33), and drop a 35mm film
cartridge into the film chamber (28), locking the cartridge into place
by pushing down on the Film Rewind Knob. If the Film Rewind Knob does
not return flush with the camera top, rotate it while gently pushing
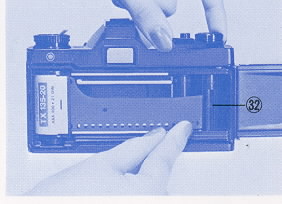
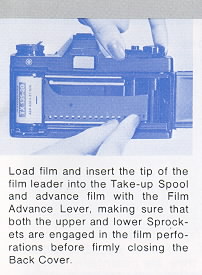
downward until it recesses flush. Insert the film leader into one of the slots in the Film Take-up
Spool (32). The arrow appearing on the Film Take-up Spool indicates the
direction in which it revolves.
Wind the film until both the upper and lower sprockets (31) are
engaged in the film perforations. If the Film Advance Lever stops
advancing, free it by depressing the Shutter Release Button (4). Before
securely closing the Back Cover, take up all the slack in the film by
gently rotating the Film Rewind Knob clockwise,
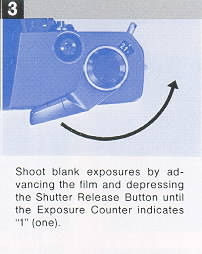
Move the Film Advance Lever as far as it will go and then depress the
Shutter Release Button. Repeat the above procedure until the Exposure
Counter indicates 1 (one). The camera is now loaded and ready to use.
|
 |
|
 |
|
 |
 |
Each time the film is advanced and the shutter wound, the Exposure
Counter advances one number, informing the user of the number of frames
the film has been advanced. When the Back Cover is opened, the Exposure
Counter automatically returns to "S" (start). |
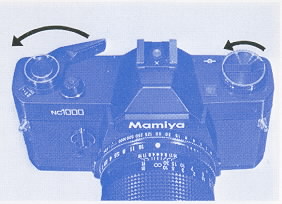
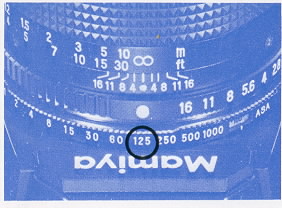
Setting the film Speed
|
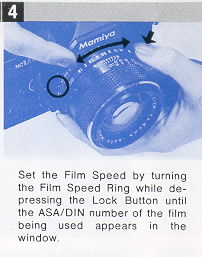
Before taking pictures, be sure to adjust the camera to the film
speed of the film being used. To do so turn the Shutter Speed Ring (16)
while depressing the Film Speed Ring Lock Button (18) until the correct
ASA or DIN number (as indicated on the film information sheet) appears
in the appropriate window (14). When setting the film speed, hold the
knurled portion of the Film Speed Ring (17) with one hand and depress
the Film Speed Ring Lock Button with the other hand. The correct values of the dots appearing between the ASA and DIN
numbers are indicated by the smaller numbers in the table below. When using the automatic exposure (AK) system of your camera, be sure to set the Aperture Ring (23) of the lens to the AE position. To do so, rotate the Aperture Ring until the orange AE Button (26) is aligned with the similarly colored Central Index Mark (24). When set to the AE position, the Aperture Ring will lock into place. |
 |
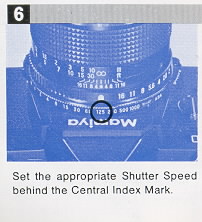
Setting the Shutter Speed
The numerals on the Shutter Speed Ring indicate fractions of a
second; thus, "500" represents 1/500 second. For an exposure time of
longer than 1 second, the Shutter Speed Ring is set to "B" (bulb). In
this position, the shutter will remain open for as long as the Shutter
Release Button is depressed. |
Caution: |
| Lighting Condition | Shutter Speed |
| Outdoors, Sunny | 1/250 or 1/125 sec. |
| Cloudy or in the shade | 1/125 or 1/60 sec. |
| Twilight or interiors | 1/30 sec. |
 |
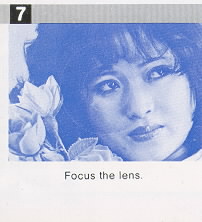
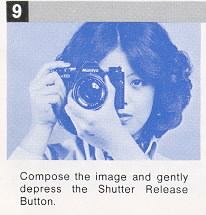
1. While looking through the viewfinder, adjust the Focusing Ring
until the most important part of the subject appears sharp. |
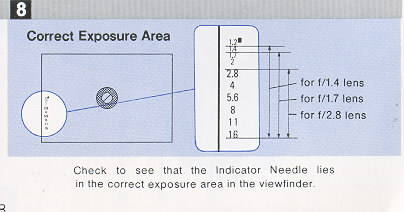
Determining of Correct Exposure
Pull the Film Advance Lever slightly away from the camera to its click-stop
position and look through the viewfinder to check that the Exposure Meter
Indicator Needle is located within the correct exposure area before releasing
the shutter.
· Correct Exposure Area
The correct exposure area is anywhere between the upper edge of the numeral
corresponding with the maximum aperture and the lower edge of the numeral of
the minimum aperture of the lens being used.
For example, when using an f/1.4 lens and the Indicator Needle points anywhere
between the upper edge of 1.4 and lower edge of 16 on the aperture scale in
the viewfinder, correct exposure will be obtained.
When using an f/1.7, f/2, or f/2.8 lens, the upper edge of the respective
numeral on the aperture scale in the viewfinder is the upper limit of the
correct exposure. When using an f/3.5 lens, the lower edge of 2.8 is the upper
limit of the correct exposure.
If the Indicator Needle moves beyond the upper limit, underexposure will
result, so adjust the Shutter Speed Ring to a slower shutter speed until the
Indicator Needle drops into the correct exposure area.
If the Indicator Needle lies below the lower limit, this indicates
overexposure, and the Shutter Speed Ring should be adjusted to a faster
shutter speed until the Indicator Needle enters into the correct exposure
area.
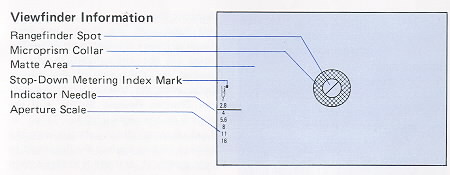
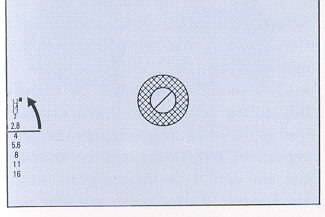
Aperture Scale:
The Aperture Scale is found on the left-hand side of the focusing screen area.
The Exposure Meter Indicator Needle moves up and down in this area, indicating
the aperture automatically selected by the camera when the Aperture Ring of
the lens is set to the AE position.
Stop-Down Metering Index:
This index is the small rectangular area found beside 1.2 on the Aperture
Scale. For manual stop-down metering, the Indicator Needle is aligned with
this index. Details appear later in this text.
Holding the Camera Correctly
 |
Support the camera in the palm of the left hand with the thumb and forefinger gripping the Focusing Ring. The palm of the right hand should fit against the right side of the camera body with the forefinger resting near the Shutter Release Button and the thumb on the camera back. Look through the viewfinder with the camera resting against the
forehead to help steady it and the left elbow held in against the body. |
Caution:
* During automatic exposure (AK) operation, be careful not to inadvertently
apply pressure to the Meter OFF Button while releasing the shutter, otherwise
incorrect exposure may result.
* When attaching the camera to a tripod that has a long attachment Drew.
adjust the Drew to less than 3/16 inch (4.5mm) to prevent damage to the
interior of the camera body.
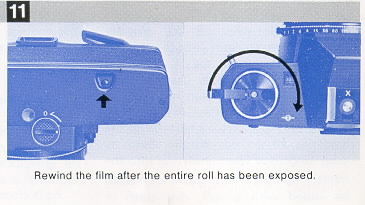
Unloading Film
 |
After exposing a roll of film, it must be rewound into its cartridge,
for if the Back Cover of the camera were to be opened without first
rewinding, anywhere from a few frames to the entire roll may be ruined. |
 |
Using the Self-Timer
 |
The Self-Timer provides a method of taking delayed action pictures,
allowing a photographer to get into his own photographs! |
 |
Caution:
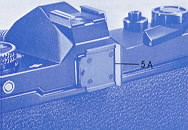
When using the self-timer in the automatic exposure (AK) mode, be sure to
attach the Hot Shoe Safety Cover (5A) (which also doubles as a viewfinder
cover) to the Viewfinder Eyepiece (29) to prevent extraneous light from
entering the eyepiece, possibly causing underexposure.
When using the self-timer, be sure the Film Advance Lever is at its click-stop
position, protruding slightly from the camera. If the lever is flush with the
camera top, the meter is turned off.
If the self-timer is started with the Film Advance Lever flush with the camera
top, the shutter will not release because pushing the Meter OFF Button not
only turns off the meter, but also locks the shutter release mechanism. In the
event that the self-timer is accidentally started with the Film Advance Lever
flush with the camera top, pull the lever out to its click-stop position and
then reset the self-timer; there will be no need to push the Self-timer
Activating Button again because the self-timer will start as soon as pressure
is released from the Self-Timer Lever.
Using Flash
 |
Your camera is provided with two flash Sync Terminals: FP for synchronization with FP class flash bulbs, and X for synchronization with electronic flash units. Compact electronic flash units designed for cordless operation may be attached to the Hot-Shoe (5) after its Safety Cover is removed. For a large flash unit used with a bracket, or for a compact electronic flash unit without provision for cordless operation, attach the flash synchronization cord to the appropriate Sync Terminal. Caution: |
The shaded areas of the Flash Synchronization Chart indicate the usable
shutter speeds with the various types of flash illumination. For example, when
using electronic flash, the Shutter Speed Ring should be set to 1/60 sec. or
slower (1/60 to 1 sec., B).
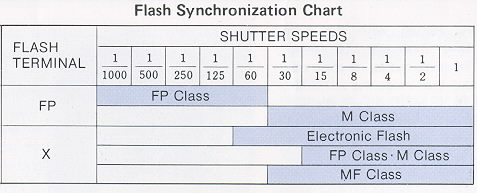
· Exposure for Flash Photograph
In flash photography, exposure is
determined by the guide number of the flashbulb or electronic flash unit.
The guide number represents a relationship between the power of the flash and
the speed of the film. Flashbulb guide numbers can be found on their package.
Guide numbers for electronic flash units are found in the manufacturers
specifications. Once you've found the correct shutter speed for your
type of flash, (see Flash Synchronization Chart), you can compute the correct
lens opening by this formula.
GUIDE NUMBER / CAMERA-TO-SUBJECT DISTANCE = APERTURE
If the flash you are using has a guide number of 56, for example, and if,
after focusing, you determine from the lens barrel Distance Scale that the
subject is 7 feet away, divide 56 by 7. The answer is 8, therefore the correct
aperture is f/8 (56 / 7 = 8 [f/8] ).
Not only is flash the most effective light source for indoor photography end
for shooting in dimly-lit places, but it's also an effective tool for
backlighting outdoor portraits and filling in shadows outdoors. Remember
that when flash is used as a supplemental light source, exposure must be based
on the light from the main light source (such as the sun). Remember,
also when shooting with electronic flash, the Shutter Speed Ring must be set
to 1/60 sec. or slower (1/60 - 1 sec., B).
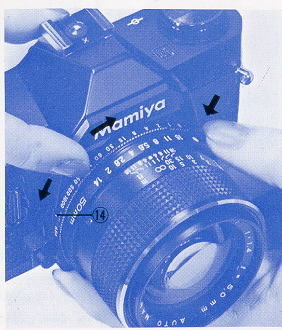
Interchangeable Lenses
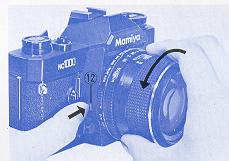 |
To remove the lens from your camera, push in on the Lens Release
Button (12), securely grip the lens by the lens barrel, give it a short
(approximately 45°) twist counterclockwise, and after the lens stops,
merely lift it straight out of the bayonet mount. |
 |
Outline of "AE" (Automatic Exposure) Operation
Mamiya NC P adapter instructions with warnings of specific lenses
The procedure appearing below in sketch form is designed for future use to serve as a quick review of the operation procedure which is explained in detail on the following pages. It is also designed for immediate reference by those already well acquainted with sophisticated 35mm SLR's.
 |
 |
 |
 |
 |
 |
 |
 |
 |
 |
 |
 |
ADVANCED TECHNIQUE In order to meet almost every photographic need, the Mamiya NC 1000S includes a variety of features. Mastery of these features will not only lead to better pictures, but will open up the doors to new photographic possibilities as well. |
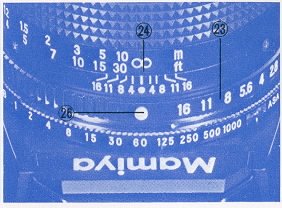
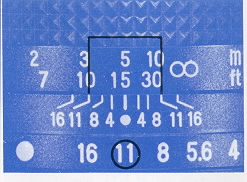
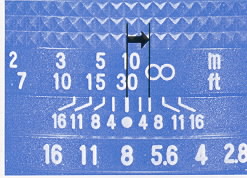
Depth of Field
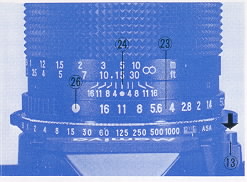 |
When the camera is focused on an object, an area in front of and
behind the object will also be in acceptably sharp focus. |
 |
To preview the depth-of-field push in on the AE Button (26) and rotate the
Aperture Ring (23) until the same F number indicated by the Exposure Meter
Indicator Needle is aligned with the Central Index Mark (24).
Next, push the Depth-of-Field Preview Button (13) as far as possible and the
diaphragm of the lens will stop down to the previously selected aperture,
making it possible to preview the depth-of-field. Releasing your finger from
the Depth-of-Field Preview Button will return the diaphragm to its maximum
aperture. After this is done, you can take a picture, However, it is better to
return the Aperture Ring to the AE position immediately after previewing the
depth-of-field to minimize the possibility of future error.
If the focusing screen is not sufficiently bright, because of a dark subject
or small aperture, to clearly distinguish the depth-of-field, you can
determine the approximate depth-of-field by referring to the Depth-of-Field
Scale (24) on the lens barrel.
For example, if the standard (50mm) lens is focused at 15 feet, one of the
marks representing f/11 appears at the 10 foot mark and the other at the 30
foot mark. This means that in a photograph focused at 15 feet with the
diaphragm set at f/11, everything between 10 and 30 feet will be in acceptably
sharp focus.
Manual Exposure
The automatic exposure system can be disengaged at any time by pushing the AE
Button to unlock the Aperture Ring and rotating it to the desired aperture.
Even when in the manual mode, the Exposure Meter Indicator Needle continues to
indicate correct exposure so that it may be used as a reference point to
assist the photographer who deliberately wishes to over or underexpose for
special effects. For example, when the Indicator Needle indicates f/8, the
photographer can overexpose two stops by manually setting the Aperture Ring to
f/4; similarly, he can underexpose two stops by setting the Aperture Ring to
f/16 instead of f/8.
Correct Exposure in Unusual Lighting
Your Mamiya camera
automatically computes correct exposure in most photographic situations.
However, in unusual circumstances such as when the background area is large
and much brighter or darker than the subject, it is best to make an exposure
adjustment to lighten or darken the principal area of interest.
 |
When the background is exceptionally bright, as when the subject is strongly back-lit, underexposure of the subject will normally occur and this will render the subject excessively dark. To prevent this from happening, tilt the camera so that the bright background or bright light source is not included in the viewfinder and then press the Shutter Release Button slightly (about 1mm) to lock the exposure in place. After the Indicator Needle locks, recompose the image in the viewfinder while maintaining pressure on the Shutter Release Button. Then, apply additional pressure to the Shutter Release Button to trip the shutter and take the picture. When you desire to have a brightly back-lit subject appear as a silhouette, do not make the exposure correction suggested above, but simply compose and shoot. · AE Correction for a Dark Background When the background is very dark in relation to the subject, as when photographing a stage performer standing in a spotlight against a dark curtain, overexposure will normally occur, washing out (overexposing) the subject. To correct for this type of situation, move very close to the subject, excluding the dark background from the viewfinder, and lack the exposure into place by slightly depressing the shutter release button, While maintaining pressure on the shutter release button to "hold" the correct exposure, back away from the subject, recompose, and shoot. If it is not possible to approach the subject, take an exposure measurement from a similarly lighted subject (such as one's own hand), lock the exposure, recompose, and shoot. |
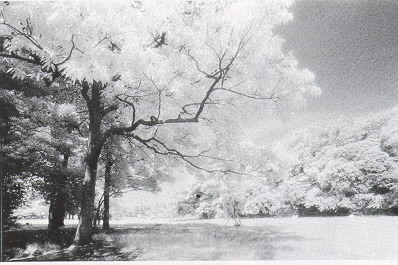
Using Infrared Film
 |
Just buy a digital IR camera ! When using
black and white infrared film it is necessary to make a focusing
adjustment in order to achieve accurate focus. This focusing adjustment
is particularly important when: a) using non-wide-angle lenses b) taking
close-ups c) shooting at wide apertures |
 |
Stop Down Metering
 |
When an Auto Mamiya-Sekor CS lens is attached to the camera,
stop-down metering is not possible. However, stop-down metering is used
on the following occasions: |
1. Focus on the
subject and, while pushing the Depth-of-Field Preview Button (13) as far as
possible rotate the Aperture Ring until the Indicator Needle comes to rest at
the Stop-Down Metering Index Mark (found beside 1.2 on the Aperture Scale).
Correct exposure is now set and the picture is ready to be taken. (When using
preset lenses, there is no need to manipulate the Depth-of-Field Preview
Button,)
2. If the Indicator Needle cannot be aligned with the Stop-Down Metering Index
Mark by rotating the Aperture Ring, change to another shutter speed. If the
Indicator Needle lies below the a faster shutter speed. Conversely, when the
Indicator Needle lies above the index, change to a slower shutter speed. It is
not necessary for the Indicator Needle to be perfectly centered in the
Stop-Down Metering Index Mark, for when the Indicator Needle enters any area
of the index, it indicates that the camera has been adjusted within the range
of correct exposure.
3. After adjusting for correct exposure, the usual practice is to remove one's
finger from the Depth-of-Field Preview Button before releasing the shutter so
that composition and focus can be rechecked at the maximum aperture. However,
it is perfectly acceptable to release the shutter while the Depth-of Field
Preview Button is still held.
Multiple-Exposures
 |
The NC 1000 camera is protected from accidental double exposures
under normal picture taking situations, however, you can make multiple
(double) exposures for special effects as follows. 1. Take your first
picture in the usual manner. |
 |
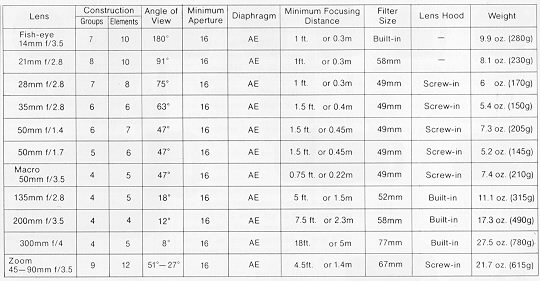
Mamiya-Sekor CS Lenses (these are the only lenses available for this camera
unless you use an adaptor which removes the AE mode)
Mamiya NC P adapter instructions
specifications of these lenses
Interchanging Focusing Screens - NC1000s only
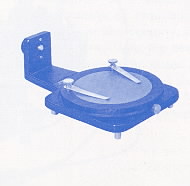
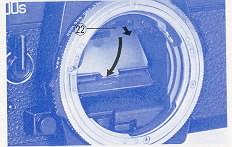 Five focusing screens (including the standard screen which comes with the camera) are available to satisfy the preferences or requirements of the photographer. |
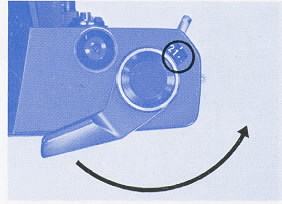
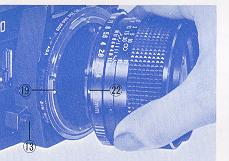
· Removing the Focusing Screen After removing the lens, gently pull the Focusing Screen Frame Latch (22) slightly forward and both the Focusing Screen Frame and screen will drop downward, making the screen easily accessible. |
Caution:
* When removing the screen grasp it by its central tab. Do not touch the
surface of the screen as fingerprints are difficult to remove.
* When interchanging screens handle them only by their edges.
* The focusing screens are susceptible to scratches; therefore, handle them
with extreme care.
* Be careful not to touch the mirror when interchanging screens.
· Replacing the Focusing Screen
To replace or insert a new screen, hold the screen by its central tab, glossy
side-down and matte-side-up, and gently insert it into the lowered Focusing
Screen Frame. Carefully raise the frame upward, pushing it shut until it locks
into place with a click.
* Do not try to insert the screen into the Focusing Screen Frame upside-down
(glossy-side-up) as it will not fit properly.
* If the screen is not correctly seated completely in the frame, it will not
be possible to lock the frame shut.
* Be sure the Focusing Screen Frame is securely locked in place before
attaching a lens to the camera.
Accessories
· Filters
A series of five high quality filters have been designed to maintain the high
performance of Mamiya-Sekor CS lenses. They come in 49, 52, and 58mm sizes,
and in the following types: SY48 (Y2), S056 (02), SL39 (UV), YG, SL-1 B
(Skylight).
 |
· Lens Hoods |
· Diopter
Correction Lenses
Many near and farsighted persons have difficulty looking through a camera
viewfinder while wearing glasses, but they can not focus accurately without
them. This common problem can be corrected by using a diopter correction lens
that mounts easily over the viewfinder eyepiece with the separately available
Adapter and Rubber Eyecup. Diopter correction lenses are available in
strengths of +3, +2, +1, - 1, - 2, and -3.
To attach a correction lens merely unscrew (counterclockwise) the diopter
correction lens retainer ring from the eyecup, insert the necessary correction
lens, and replace the retainer ring. Then slide the eyecup on the eyepiece of
the camera for easier focusing.
Before actually purchasing a Diopter Correction Lens at your Mamiya Dealer, be
sure to attach it to the camera and try viewing through it to assure correct
matching with your eyesight.
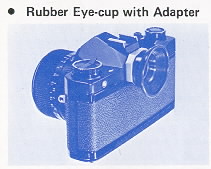 |
The Rubber Eyecup also helps to prevent unwanted light from entering the viewfinder from the back and sides while viewing. |
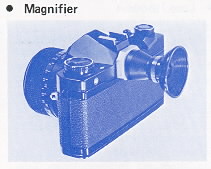 |
The
Magnifier is a useful aid for critical focusing as required in copy work,
close-up photography, and similar applications. Only the center portion of
the viewfinder image is visible through the Magnifier, and the size of the
image is doubled. The Magnifier provides a diopter adjustment of +5 to--5. |
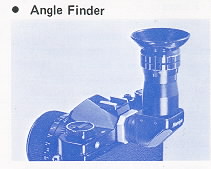 |
The Angle Finder is useful for low
angles and copy work. The Angle Finder has click stops every 90°, but
freely rotates a full 360° and has built in diopter corrections of--4 to
+4. Furthermore, the image seen through the Angle Finder is bright, unreversed, and laterally correct for ease of operation. |
 |
· Auto Extension Tube Set |
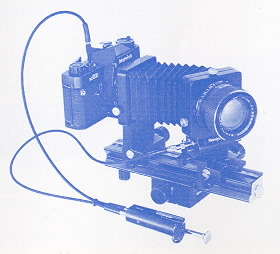 |
· Auto Bellows |
 |
· Slide Copier Used with the bellows unit, the slide copying attachment is mounted in front of the lens to allow the photographer to copy slides and film strips. It has a slide stage that moves in any direction to make it easy to crop mounted slides for better composition and a removable film tray to facilitate copying long rolls of 35mm film. |
 |
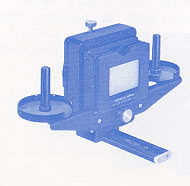
· Bellows Stand |
 |
· P-Mount Adapter for Mamiya TL/SX lenses |
<<<<
Additional information not in the manual:
I just wanted to point out that not all Mamiya M42
lenses are safe to use with the P adapter for the Auto-XTL. If you attempt to
use the SX type lenses with the Auto-XTL P adapter, the aperture sensing pin
will dig into the P adapter face since it is not perfectly flush with the
outer surface edge of the SX lense. Furthermore, since the entire moving
surface of the aperture ring of the SX lense comes to rest against the P
adapter face, it will lock down the aperture control of the lense and make it
impossible to turn, therefore preventing SX lens f-stop manipulation. Mamiya
M42 AUTO lenses seem to be safe choices as are M42 Yashica-Yashinon, M42
Meyer-Optik and M42 Zeiss MC Sonnar (S) lenses. Any aperture ring that rotates
at the extremity of a lens should be avoided. Of course the SX lens works
perfectly well with the "ZE" P adapter for Mamiya ZE series lenses which it
was designed for. Lenses with Auto and Manual switches like Zeiss MC Sonnar
work well with the Auto-XTL P adapter in conjunction with its Auto Aperture
pin. Lenses that have no Auto Aperture and only manual control of aperture
appear to work equally well like Meyer-Optik Orestor M42.
Robert A. Genna, Connecticut teacher and photographer, 10-23-04 >>>>>>
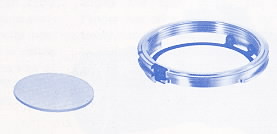
Focusing Screens - NC1000s only

Focusing Screens
Five interchangeable focusing screens are available to meet various
photographic needs.
No. 1 RangafinderSpot45°/Microprism (Supplied with camera)
The standard, and highly versatile screen which offers three-way focusing for
excellent focusing accuracy. A central split-image rangefinder spot has a
diagonal wedge (45° ) which makes precise focusing possible with either
horizontal or vertical lines. A microprism collar surrounds the rangefinder
spot, serving as a useful focusing aid with any subject. The remainder of the
screen is all matte and has a Fresnel lens for corner-to-corner brightness.
No. 2 Rangefinder Spot
All matte with Fresnel lens and central rangefinder spot. It helps to achieve
accurate focus even with wide-angle lenses which are usually more difficult to
focus because of their extreme depth-of-field. It is also suitable for general
purpose photography.
No. 3 Microprism
Entirely matte with a Fresnel lens and a central microprism spot. This is the
usual focusing screen for general purpose photography for those who find a
rangefinder spot distracting. The microprism assures rapid and accurate
focusing and the matte surface makes the entire screen suitable for focusing.
No. 4 Matte
All matte with Fresnel lens. Excellent for close-up photography, checking the
depth-of-field, and for use with lenses of relatively slow maximum aperture
(f/3.5 or smaller). Because focusing aids such as microprisms and rangefinders
become dark when used under conditions described above they may prove
distracting. The No. 4 focusing screen is designed to minimize this problem,
No. 5 Cross-Hair
Clear transparent screen with Fresnel lens and a cross-hair at the central
spot. This screen doesn't give you a proper meter reading. It is for use in
special purpose photography, as when working with the Auto Bellows or for
astrophotography. While focusing, the eye is moved to-and-fro (right-to-left),
and when the image no longer moves in relation to the cross hairs, optimum
focus has been achieved.
Care of the Camera
·
Cleaning:
Use a blower or camel hair brush to clean the entire film compartment before
loading film into the camera. Never use your breath to blow dust or dirt from
the compartment as the moisture can corrode the precision working parts.
To clean the lens surface, wipe VERY GENTLY in a circular motion with a
quality lens tissue. In severe cases ~ you can use a very small amount of p
lens cleaning solution, again wiping in p a circular motion. NEVER RUB THE
LENS TO REMOVE DIRT OR GRIT!
If the dirt will not come loose with a brush or blower, take the camera to a
factory approved service technician.
Never touch the lens with your fingers or any material other than a lens
tissue. Dirt on the reflex mirror will not affect your photograph.
· Storage:
Store your camera in its case with the lens set to infinity and protected by
its lens cap. Be sure to turn off them meter when storing the camera (this
will also give the added protection locking the Shutter Release Button), if
the camera will not be used for an extended period of time, remove the
batteries.
Never store the camera in areas where the temperature exceeds 100 degrees F or
goes below freezing (32 degrees F).
Protect the camera against moisture by using a desiccant. Never expose the
camera to direct sunlight for extended periods of time.
Avoid areas where prolonged exposure to salt water or briny air is possible.
Camera Type:
Ultra compact, shutter speed priority AE (Automatic Exposure) 35mm SLR with
manual override.
Film and Negative Size:
35mm film, 24mm x 36mm.
Standard Lenses:
Auto Mamiya-Sekor CS Multi-Coated 50mm f/1.4 (7 elements in 6 groups, AK,
automatic diaphragm, 47° angle of view, 49mm filter size).
Auto Mamiya-Sekor CS Multi-Coated 50mm f/1.7 (6 elements in 5 groups, AK, automatic diaphragm, 47° angle of view, 49mm filter size).
Lens Mount:
Mamiya Bayonet (three-flange, 49mm diameter) Mount.
Shutter:
Electronically controlled rubberized silk focal plane shutter with range of
1/1000 - 1 sec., B (bulb).
Self-Timer:
Variable time delay of approximately 4 - 9 sec.; has its own Activating Button
and can be by-passed.
Sync Terminals:
FP, X, and a Hot-Shoe for cordless flash operation.
Exposure Meter:
Ultra sensitive center-weighted CdS meter with exposure measurement range of
EV 2 - 18 (100 ASA, f/1.4 lens).
Coupling:
With Mamiya-Sekor CS lenses in AE mode: ASA, shutter speed, and lens maximum
aperture.
With Mamiya-Sekor CS lenses in manual mode: ASA, shutter speed, and lens
maximum aperture. Working aperture is directly read from viewfinder Aperture
Scale and manually set.
With preset lenses: ASA and shutter speed. Exposure measurement is by
zero-method stop-down metering.
Film Speed Range:
ASA, 25 - 3200; DIN 15 - 36.
Viewfinder:
Large, brilliant pentaprism SLR viewing. Exposure Meter Indicator Needle,
Aperture Scale, and Stop Down Metering Index Mark visible in viewfinder.
Magnification of 0.94X with 50mm lens at infinity. Three-way focusing: Central
rangefinder wedge at 45° angle surrounded by a microprism collar which is
located in a matte field, with finely-grooved Fresnel lens for even
illumination.
Mirror:
Quick-return mirror, coated for increased reflectance.
Film Advance Lever:
Single-action type with short 130° throw and stand-off angle of 15°,
double-exposure prevention, and with Meter OFF Button incorporated into lever
(Meter OFF Button also doubles as Shutter Release Button Lock).
Exposure Counter:
Additive type with automatic reset.
Power Source:
Two 1.5V silver oxide batteries (Eveready S-76, Ray0-Vac RS-76, Mallory MS-76
or equivalent) supply the power for the electronic shutter and exposure meter.
Dimensions and Weight:
| Body only | 5 11/32" x 3 17/64" x 1 31/32" (136 x 83 x 50mm) 18 oz. (510g) |
| With f/1. 4 lens | 5 11/32" x 3 17/64" x 3 1/ 2" (136 x 83 x 89mm) 25,3 oz. (715g) |
| With f/1.7 lens | 511/32" x 317/64" x 3 3/16" (136x83x81mm) 23.2 oz. (655g) |
NOTE: Because we are always striving to improve our products, specifications
are subject to change without notice