Sigma SA-300
Fourth section
| Back to
FIRST section |
Back to
SECOND section |
Back to
THIRD section |
Back to
FIFTH section |
![]() ,
,
SELECTING THE METERING MODE
This camera has three metering modes. To select the metering mode, while
pressing the Metering Mode Button turn the A-dial until the desired mode appears on the LCD panel.
 |
The camera measures the brightness of the scene by independently measuring
each segment and analyzing the correct exposure for the main subject under
any lighting situation.
|
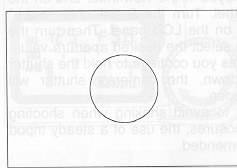 |
The camera will measure the brightness only inside of the circle as
shown in the viewfinder (approx. 9 mm in diameter).
|
 |
The camera will measure the average brightness of the scene.
|
Once you select the Metering Mode, the camera continuously holds that mode until you change the Metering Mode or set the mode dial to "* " mode.
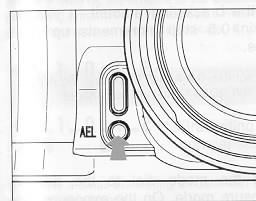
AE LOCK
The camera memorizes the exposure value when you press the AE Lock Button.
When the subject is very small or you wish to lock the exposure of a subject
off-center, AE lock is very useful. Use of this function with Partial Metering
Mode is recommended.
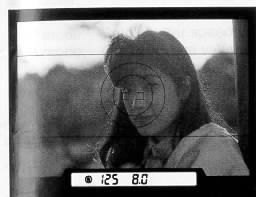 |
1. After you choose the metering mode, t press the shutter button "Half-way"
to turn on the exposure indicator.
2. Align the subject in the partial metering area. If the subject is small, move in closer or zoom is on the subject, so it fills the metering area. |
 |
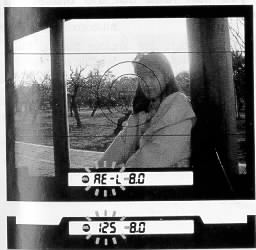
3. Press and hold the AE lock button The J viewfinder will alternately
indicate " AE-L " and shutter speed when the exposure is locked.
If you press and hold the shutter button "halfway-down" while the "AE -L" is indicated, the AE lock will continue even if you remove your finger from the AE lock button.
|
 |
4. Hold the AE lock button while you compose the picture. Then press the shutter button.
If you turn either the S-dial or A-dial while the exposure is locked, the combination of the shutter speed and aperture value will change to combinations which give the same exposure (except when the mode is set on M position). 5. After you take a picture, remove your finger from the AE lock button. The " HE-;" indication will disappear and the exposure will unlock. |
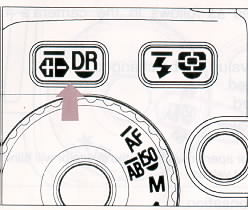
AUTO BRACKET
The camera will automatically take three consecutive pictures with different
exposure levels. If Proper exposure is difficult to determine, use this
function.
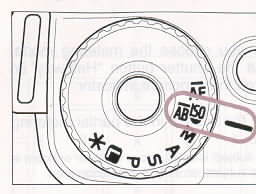 |
1. Set the mode dial to " AB-ME " position. |
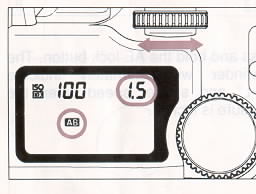 |
2. The LCD panel indicates 'Jim" and the L bracketing amount.
Turn the S-dial to set the bracketing amount. It can be set in 0.5 stop
increments up to 2 stops.
Do not turn the A-dial. If you turn the film speed setting will be changed. |
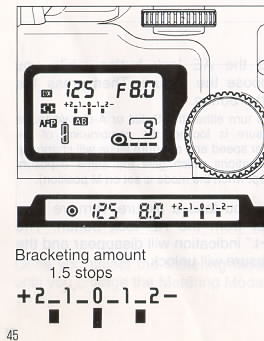 |
3. Turn the mode dial to the desired exposure mode. On the exposure
meter, you can read out the bracketing amount.
When you press the shutter button, the camera will take three Consecutive
pictures in the following sequence: |
4. Once set the Auto Bracketing is maintained until you set the
bracketing amount 0.0 or set the mode dial to the * position.
The exposure compensation will be applied as follows in the camera's
4 modes.
P mode: Both shutter speed and aperture value will be changed.
S mode: Only aperture value will be changed.
A mode: Only shutter speed will be
changed.
M mode: Only shutter speed will be changed.
If the bracketing amount is out of the range of the shutter or aperture
settings the indicator will blink and will show the limiting values. Pictures
will use these limit values.
You can use Auto Bracket with Exposure Compensation.
If you set the Exposure Compensation while you set the Auto Bracketing,
the bracketing amount will be shifted by the amount of the exposure compensation.
You can read the compensation and bracketing amount from the exposure meter.
If the combined compensation amount is more than 2 stops, the exposure
meter will indicate < or >
 |
Bracketing amount 1.0 stop with +1.0 stop compensation
Bracketing amount 2.0 stops with +1.5 stops compensation |
If you set a small bracketing amount with negative type films, it will
have almost no effect on the pictures' appearance.
If you use the built-in flash, the auto bracket is overridden. The camera
will take a single picture at the correct exposure.
You can combine the auto bracket with self-timer and remote control
modes.
The focusing distance and exposure value is memorized when the shutter
button is pressed. If the subject moves or the brightness changes during
the 3 exposures, some of the exposures may be mis-exposed or out of focus.
When the end of the film is reached before three consecutive pictures
are taken, please retake the all three pictures after reloading with the
new film.
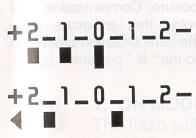
EXPOSURE COMPENSATION
If you want to intentionally overexpose or underexpose the subject,
use this function.
 |
While pressing the Exposure compensation Mode button, turn the S-dial to set the compensation value. It can be set at 0.5 stop increments from +2.0 stops and -2.0 stops. |
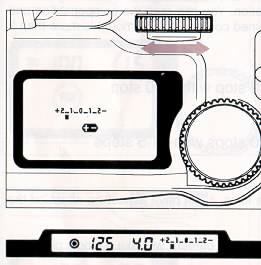 |
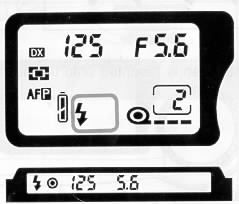
The LCD panel shows " + - " when you set the exposure compensation. The
compensation amount will be indicated on the exposure meter.
Once you set the Exposure Compensation, the camera continuously holds
that exposure compensation until you set the compensation amount to 0.0
or set the mode dial to the " * " position.
|
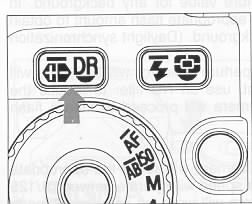
BUILT IN FLASH
When you set the mode dial on the P. S. A, or M mode, one of three flash
modes can be selected. To make your selection, press the flash mode button
and turn the S-dial while pressing the button until the desired mode is
displayed on the LCD panel.
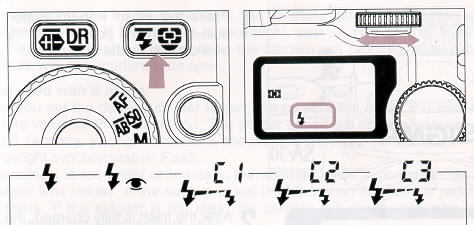 |
Do not use the built-in flash when the external flash is mounted onto the hot shoe.
 |
1. ON MODE The flash will fire normally. |
 |
2. RED-EYE REDUCTION FLASH ON mode with Red-Eye reduction flash. See page 29 for more details. |
|
3. WIRELESS FLASH MODE When you use the optional external flash SIGMA EF-430, wireless flash photography is possible. Please refer to the instruction book of EF-430 for more details. |
|
 |
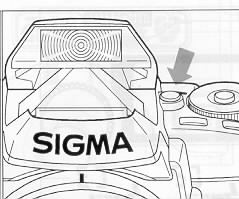 |
1. Press the Flash Pop-up Button. The I built-in flash will pop-up and
" |
 |
2. After the flash is fully charged, the flash indicator in the viewfinder
will change from blinking to steady.
3. Press the shutter button to take a picture. If the flash is not fully charged, (the flash indicator is blinking) the shutter can not be released. |
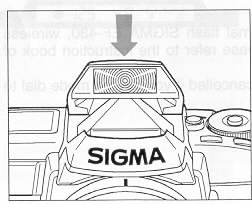 |
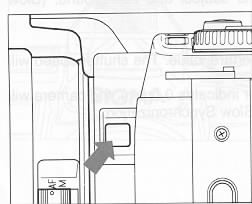
4. After you finish using the flash, close the flash head by pressing the
top part of the flash as shown in the illustration.
Excessive consecutive firing of the built-in flash may cause impairment to the flash component. Do not fire the flash more than 36 times continuously and, after a significant period of continuous firing, rest the flash at east 10 minutes to allow the component to cool. Also, when you use the flash continuously, the grip of the camera will become warm. This is normal and not a defect. |
When used with P mode
The camera will select the appropriate aperture value for any background.
In bright situations, the camera will calculate the appropriate flash amount
to obtain correct exposure for both the subject and background. (Daylight
synchronization Flash)
If the subject is too bright or too dark, the aperture indicator will
blink and will show limit values. If the subject is too bright, use an
ND filter to reduce the brightness. If the subject is too dark, the camera
will proceed to take a flash exposure with the aperture wide open.
When used with S mode
When you set the desired shutter speed, the camera will select the appropriate
aperture value for the background. The shutter speed will operate between
1/125 and 30 seconds. In bright situations, the camera will work the same
as P mode for Daylight synchronization Flash.
If the subject is too bright or too dark, the aperture value indicator
will blink and will show limit values. If the subject is too bright, use
an ND filter to reduce the brightness. If the subject is too dark, the
camera will proceed to take a flash exposure with the aperture wide open.
If you adjust the shutter speed until the aperture value indicator stop
blinking, you can get an appropriate exposure for both the subject and
background. (Slow Synchronization)
When used with A mode
When you set the desired aperture value, the camera will select the
appropriate shutter speed for the background. The shutter speed will operate
between 1/125 and 30 seconds. In bright situations, the camera will work
the same as P mode for Daylight synchronization Flash.
If the subject is too bright or too dark, the shutter speed indicator
will blink and will show limit values. If the subject is too bright, use
an ND filter to reduce the brightness. If the subject is too dark, set the aperture value to a
wider one. If you adjust the Aperture value until the shutter speed indicator stop
blinking, you can get an appropriate exposure for both the subject and background.
(Slow Synchronization)
When used with M mode
You can set the desired shutter speed and aperture value. The shutter
speed will operate between 1/125 and 30 seconds.
If you adjust exposure until the exposure meter indicates O (zero),
the camera will work as for Daylight synchronization Flash or Slow Synchronization.
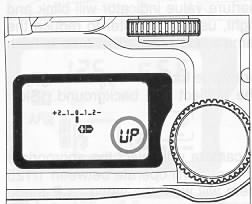
MIRROR-UP
If you wish to reduce the camera's mirror vibration. use the
mirror-up function.
 |
While pressing the Drive Mode Button, turn the A-dial until the " UP"
appears on the LCD panel.
When you press shutter button "Half-way", the shutter speed and aperture
value will be displayed and the exposure value memorized. As you press
the shutter button further, the mirror will move up.
To release the shutter, press the shutter button again. |
 |
The camera will cancel the mirror up mode if the shutter is not released within about 5 minutes of mirror up.
Once you set the Mirror Up Mode, the camera continuously holds that mode until you set the mode dial to the L position To reduce the vibration, you can use the remote controller to release the shutter See the '`Remote Controller" section for more details. |
PREVIEW BUTTON
 |
The aperture is always fully opened except at the time of taking the photograph, so that you can look through the viewfinder under conditions of maximum brightness. However, when the preview button is pressed, the aperture closes to the size used for taking the photograph so that you can check the depth of field of the subject in the finder. |
| Back to
FIRST section |
Back to
SECOND section |
Back to
THIRD section |
Back to
FIFTH section |
WEBMASTER:
![]()